DROPS Air
DROPS Air
65% Alpaca, 28% Polyamide, 7% Wool
from 4.80 £ /50g
Get the yarn to make this pattern from 48.00£.

The yarn cost is calculated from the pattern’s smallest size and the yarn’s cheapest product type. Looking for an even better price? You might find it on the DROPS Deals!

DROPS SS24

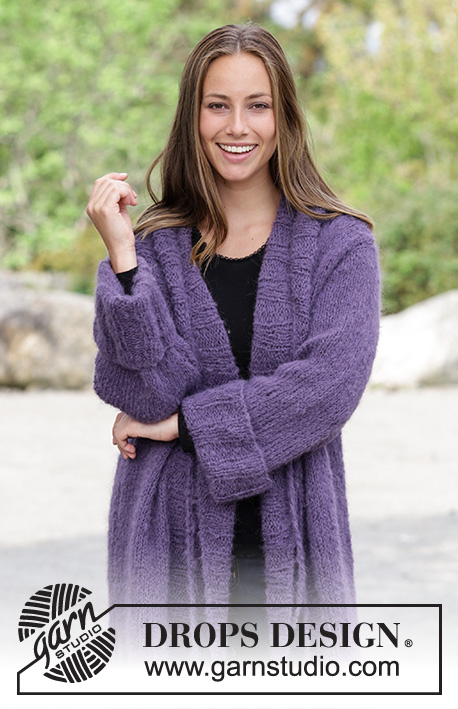
Elegant Comfort Jacket

Knitted jacket with moss stitch, cables, shawl collar and pockets. Sizes S - XXXL. The piece is worked in DROPS Air.

DROPS 180-33
DROPS Design: Pattern no ai-077
Yarn group C or A + A
-----------------------------------------------------------
Sizes: S - M - L - XL - XXL - XXXL
Materials:
DROPS AIR from Garnstudio (belongs to yarn group C)
500-550-600-650-700-800 g colour 02, wheat

The piece can also be knitted with yarn from:
"Alternative yarn (Yarn group C)" – see the link below.

DROPS CIRCULAR NEEDLE (40 and 80 cm) SIZE 5.5 MM – or the size needed to get 16 stitches and 20 rows stocking stitch on 10 cm in width and 10 cm in height.

DROPS CABLE NEEDLE – for cables.

DROPS MOTHER OF PEARL BUTTONS, Arched (white) NO 522: 5-5-5-5-6-6 pieces.
----------------------------------------------------------

-------------------------------------------------------

Alternative Yarn – See how to change yarns here
Yarn Groups A to F – Use the same pattern and change the yarn here
Yarn usage using an alternative yarn – Use our yarn converter here

-------------------------------------------------------

DROPS Air
DROPS Air
65% Alpaca, 28% Polyamide, 7% Wool
from 4.80 £ /50g
Get the yarn to make this pattern from 48.00£.

The yarn cost is calculated from the pattern’s smallest size and the yarn’s cheapest product type. Looking for an even better price? You might find it on the DROPS Deals!

Pattern instructions

NOTE: This pattern is written in British English. All measurements in charts are in cm. For conversion from cm to inches - click here. There are different terms for crocheting in British and American English. If this pattern includes crochet, click for "crochet terms" here. For this pattern in American English, please click here.
INFORMATION FOR THE PATTERN:

RIDGE/GARTER STITCH (worked back and forth):
1 ridge = Knit 2 rows.

MOSS STITCH:
ROW 1: * Knit 1, purl 1 *, work from *-*.
ROW 2: Knit over purl and purl over knit. Repeat row 2.

DECREASE TIP (for body):
Decrease alternately before and after the marker thread, i.e. only decrease 2 stitches in each side of the piece (= 4 stitches in total), first decrease before marker thread, second decrease after marker thread, and so on.
DECREASE AS FOLLOWS AFTER THE MARKER THREAD:
When the first stitch is knit: Slip 1 stitch as if to knit, knit 2 stitches together, pass the slipped stitch over the knitted together stitches (= 2 stitches decreased).
When the first stitch is purl: Purl 3 together (= 2 stitches decreased).
DECREASE AS FOLLOWS BEFORE THE MARKER THREAD:
When the last stitch is knit: Work until there are 3 stitches left before the marker thread, knit 3 together (= 2 stitches decreased).
When the last stitch is purl: Work until there are 3 stitches left before the marker thread, purl 3 together (= 2 stitches decreased).

PATTERN:
See diagram A.1. The diagram shows all the rows in the pattern seen from the right side.

BUTTONHOLE:
Decrease for buttonhole on right band. 1 BUTTONHOLE = knit 3rd and 4th stitch from the edge together and make 1 yarn over. On the next row knit the yarn over = hole.
Work buttonholes when the piece measures:
S: 36, 44, 52, 60 and 68 cm
M: 37, 45, 53, 61 and 69 cm
L: 38, 46, 54, 62 and 70 cm
XL: 39, 47, 55, 63 and 71 cm
XXL: 38, 45, 52, 59, 66 and 73 cm
XXXL: 39, 46, 53, 60, 67 and 74 cm
----------------------------------------------------------

JACKET:
The jacket is worked back and forth with circular needle from mid front up to the sleeves; from there, each section is finished separately and new stitches are cast on for the sleeves.

BODY:
Cast on 214-226-242-258-274-294 stitches (including 5 band stitches in each side of the piece) with circular needle size 5.5 mm and Air. Work 2 RIDGES – see description above, on the last row in the ridges, increase 8 stitches evenly on row = 222-234-250-266-282-302 stitches. Continue working as follows – from the right side: 5 stitches garter stitch (= band), A.1 (= 13 stitches), work 186-198-214-230-246-266 stitches MOSS STITCH – see description above, work A.1 over the next 13 stitches and finish with 5 stitches garter stitch (= band). Insert 1 marker thread in each side, 60-63-67-71-75-80 stitches (= front pieces) in from mid front (back piece = 102-108-116-124-132-142 stitches).
Continue the pattern upwards, remember BUTTONHOLE – see description above. REMEMBER THE KNITTING TENSION! When the piece measures 10 cm, decrease 2 stitches by each marker thread (= 4 stitches decreased) – READ DECREASE TIP! Decrease in this way every 3½-3½-3½-3½-4-4 cm a total of 14-14-15-15-14-14 times = 166-178-190-206-226-246 stitches. When the piece measures 61-62-63-64-65-66 cm place the first and last 46-49-52-56-61-66 stitches on a thread = 74-80-86-94-104-114 stitches left on needle. Each part is now finished separately.

BACK PIECE:
= 74-80-86-94-104-114 stitches. Continue the pattern as before, now cast on new stitches at the end of each row in each side for sleeves as follows: Cast on 8 stitches 4-4-4-3-3-3 times and 18-16-14-20-18-14 stitches 1 time, the increased stitches are worked in moss stitch = 174-176-178-182-188-190 stitches.
Continue the pattern as before, but the 5 outermost stitches in each side are worked in garter stitch.
When the piece measures 17-18-19-20-21-22 cm from where the first stitches were cast on for sleeves (the piece measures a total of 78-80-82-84-86-88 cm), cast off the middle 16-16-18-18-20-20 stitches for neck and each shoulder/sleeve is finished separately = 79-80-80-82-84-85 stitches left on shoulder/sleeve. On the next row from the neck cast off 1 stitch = 78-79-79-81-83-84 stitches.
Cast off when the piece measures 19-20-21-22-23-24 cm from where the first stitches were cast on for sleeve (the piece measures a total of 80-82-84-86-88-90 cm). Work the other shoulder/sleeve in the same way.

RIGHT FRONT PIECE:
Place the first 46-49-52-56-61-66 stitches back on the needle. Continue pattern as before, at the end of each row from the right side cast on new stitches for sleeve as for the back piece = 96-97-98-100-103-104 stitches. Continue pattern as before, but the outermost 5 stitches at the end of the sleeve is worked in garter stitch.
When the piece measures 80-82-84-86-88-90 cm cast off the first 78-79-79-81-83-84 stitches from the wrong side for shoulder/sleeve, work to end of row = 18-18-19-19-20-20 stitches left on the needle for shawl collar. Work short rows over these stitches, starting from the right side as follows:
Work 1 row over the first 12-12-13-13-14-14 stitches. turn and work back, work 1 row over all stitches, turn and work back. NOTE! There are cables in A.1, but because of the short rows there are more rows between the cable in the outermost part of the cable towards mid front. Continue in this way until the collar measures 8-8-9-9-10-10 cm at the shortest point. Decrease 4 stitches evenly over the stitches in A.1 = 14-14-15-15-16-16 stitches. Then cast off on the next row.

LEFT FRONT PIECE:
Work as for the right, but reversed. In other words, cast on new stitches at the end of each row from the wrong side. Cast off the first 78-79-79-81-83-84 stitches from the right side for shoulder/sleeve and work short rows over the neck edge, starting from the wrong side.

ASSEMBLY:
Sew the shoulder/sleeve seams. Sew the shawl collar together mid back (the seam should turn in when the collar is folded towards at the back). Sew the collar to the neckline in the back of the neck.
Sew the buttons onto the left band.

POCKETS:
Cast on 32-32-32-36-36-36 stitches with needle size 5.5 mm and Air. Work moss stitch until the piece measures 20 cm. Cast off with knit over purl and purl over knit. Work 1 more pocket in the same way. Sew the pockets onto the front pieces, approx. 16-18 cm from the bottom edge and 12-14 cm in from mid front.

Diagram

symbols = knit from the right side, purl from the wrong side
symbols = purl from the right side, knit from the wrong side
symbols = place 3 stitches on cable needle behind the piece, knit 3, knit 3 from the cable needle
symbols = place 3 stitches on cable needle in front of the piece, knit 3, knit 3 from the cable needle
diagram

Each of our patterns has specific tutorial videos to help you.

Do you have a question? See a list of frequently asked questions (FAQ)

Knitting tension is what determines the final measurements of your work, and is usually measured per 10 x 10 cm. It is provided like so: number of stitches in width x number of rows in height - eg: 19 stitches x 26 rows = 10 x 10 cm.

The knitting tension is very individual; some people knit/crochet loosely while others work tightly. You adjust the knitting tension with the needle size, which is why the suggested needle size is only meant as a guide! You need to adjust this (up or down) to ensure that YOUR knitting tension matches the knitting tension provided in the pattern. If you work with a different knitting tension than provided you will have a different yarn consumption, and your work will have different measurements than what the pattern suggests.

The knitting tension also determines which yarns can replace each other. As long as you achieve the same knitting tension you can replace one yarn with another.

See DROPS lesson: How to measure your tension/gauge

See DROPS video: How to make a gauge tension swatch

The required amount of yarn is provided in grams, eg: 450 g. To calculate how many balls you’ll need you first need to know how many grams are in 1 ball (25g, 50g or 100g). This information is available if you click on the individual yarn quality on our pages. Divide the amount required with the amount of each ball. For example, if each ball is 50g (the most common amount), the calculation will be as follows: 450 / 50 = 9 balls.

The important thing when changing from one yarn to another is that the knitting/crochet tension remains the same. This is so that the measurements of the finished piece will be the same as on the sketch provided. It is easier to achieve the same knitting tension using yarns from the same yarn group. It is also possible to work with multiple strands of a thinner yarn to achieve the knitting tension of a thicker one. Please try our yarn converter. We recommend you to always work a test swatch.

Please NOTE: when changing yarn the garment might have a different look and feel to the garment in the photo, due to individual properties and qualities of each yarn.

See DROPS lesson: Can I use a different yarn than the one mentioned in the pattern?

All our yarns are categorised into yarn groups (from A to F) according to thickness and knitting tension – group A contains the thinnest yarns and group F the thickest. This makes it easier for you to find alternative yarns to our patterns, should you wish to switch yarn. All yarns within the same group have a similar knitting tension and can easily replace each other. However, different yarn qualities have different structures and properties which will give the finished work a unique look and feel.

Click here for an overview of the yarns in each yarn group

At the top of all our patterns you’ll find a link to our yarn calculator, which is a helpful tool should you wish to use a different yarn than suggested. By filling in the yarn quality you wish to replace, the amount (in your size) and number of strands, the calculator will present good alternative yarns with the same knitting tension. Additionally it will tell you how much you’ll require in the new qualities and whether you’ll need to work with multiple strands. Most skeins are 50g (some are 25g or 100g).

If the pattern is worked with multiple colours, every colour will have to be calculated separately. Similarly, if the pattern is worked with several strands of different yarns (for example 1 strand Alpaca and 1 strand Kid-Silk) you will have to find alternatives for each, individually.

Click here to see our yarn calculator

Since different yarns have different qualities and textures we have chosen to keep the original yarn in our patterns. However, you can easily find options among our available qualities by using our yarn calculator, or simply pick a yarn from the same yarn group.

It is possible that some retailers still have discontinued yarns in stock, or that someone has a few skeins at home that they would like to find patterns for.

The yarn calculator will provide both alternative yarn as well as required amount in the new quality.

If you think it's hard to decide what size to make, it can be a good idea to measure a garment you own already and like the size of. Then you can pick the size by comparing those measures with the ones available in the pattern's size chart.

You'll find the size chart at the bottom of the pattern.

See DROPS lesson: How to read size chart

The needle size provided in the pattern serves only as a guide, the important thing is to follow the knitting tension. And since knitting tension is very individual, you will have to adjust the needle size to ensure that YOUR tension is the same as in the pattern – maybe you’ll have to adjust 1, or even 2 needle sizes, up or down to achieve the correct tension. For this, we recommend that you work test swatches.

Should you work with a different knitting tension than the one provided, the measurements of the finished garment might deviate from the measurement sketch.

See DROPS lesson: How to measure your tension/gauge

See DROPS video: How to make a tension/gauge swatch

Working a garment top-down provides more flexibility and room for personal adjustment. For example it is easier to try the garment on while working, as well as making adjustments to length of yoke and shoulder caps.

The instructions are carefully explaining every step, in the correct order. Diagrams are adjusted to the knitting direction and are worked as usual.

The diagram depicts all rows/rounds, and every stitch seen from the right side. It is read from bottom to top, from right to left. 1 square = 1 stitch.

When working back and forth, every other row is worked from the right side and every other row is worked from the wrong side. When working from the wrong side, the diagram will have to be worked reversed: from left to right, knit stitches are purled, purl stitches are knit etc.

When working in the round every round is worked from the right side and the diagram are worked from right to left on all rounds.

See DROPS lesson: How to read knitting diagrams

The diagram depicts all rows/rounds, and every stitch seen from the right side. It is worked from bottom to top, from right to left.

When working back and forth every other row is worked from the right side: from right to left and every other row is worked from the wrong side: from left to right.

When working in the round, every row in the diagram are worked from the right side, from right to left.

When working a circular diagram you start in the middle and work your way outwards, counter clockwise, row by row.

The rows usually start with a given number of chain stitches (equivalent to the height of the following stitch), this will either be depicted in the diagram or explained in the pattern.

See DROPS lesson: How to read crochet diagrams

Instructions for working several diagrams after each other on the same row/round, will often be written like so: “work A.1, A.2, A.3 a total of 0-0-2-3-4 times". This means you work A.1 once, then A.2 is worked once, and A.3 is repeated (in width) the number of times provided for your size – in this case like so: S = 0 times, M = 0 times, L=2 times, XL= 3 times and XXL = 4 times.

The diagrams are worked as usual: begin with the first row in A.1, then work the first row in A.2 etc.

See DROPS lesson: How to read knitting diagrams

See DROPS lesson: How to read crochet diagrams

The total width of the garment (from wrist-to-wrist) will be larger in the larger sizes, despite the actual sleeves being shorter. The larger sizes have longer sleeve caps and wider shoulders, so there will be a good fit in all sizes.

The measurement sketch/schematic drawing provides information regarding the full length of the garment. If it’s a jumper or a jacket the length is measured from the highest point on the shoulder closest to the neckline, and straight down to the bottom of the garment. It is NOT measured from the tip of shoulder. Similarly, the length of yoke is measured from the highest point on the shoulder and down to where yoke is split into body and sleeves.

On a jacket measures are never taken along bands, unless specifically stated. Always measure inside band stitches when measuring the length.

See DROPS lesson: How to read a schematic drawing

Diagrams are often repeated on the round or in height. 1 repeat is the diagram the way it appears in the pattern. If it says to work 5 repeats of A.1 in the round, then you work A.1 a total of 5 times after/next to each other in the round. If it says to work 2 repeats of A.1 vertically/in height you work the entire diagram once, then begin again at the start and work the entire diagram one more time.

Chain stitches are slightly narrower than other stitches and to avoid working the cast-on edge too tight, we simply chain more stitches to begin with. The stitch count will be adjusted on the following row to fit the pattern and measurement sketch.

The rib edge is more elastic and will contract slightly compared to, for example, stocking stitch. By increasing before the rib edge, you avoid a visible difference in width between the rib edge and the rest of the body.

It’s very easy to cast off too tightly, and by making yarn overs while casting off (and simultaneously casting these off) you avoid a too tight cast off edge.

See DROPS video: How to bind off with yarn overs (yo)

To achieve an even increase (or decrease) you can increase on, for example: every 3rd and 4th row alternately, like so: work 2 rows and increase on the 3rd row, work 3 rows and increase on the 4th. Repeat this until the increase is complete.

See DROPS lesson: Increase or decrease 1 st on every 3rd and 4th row alternately

Should you prefer to work in the round instead of back and forth, you may of course adjust the pattern. You’ll need to add steeks mid-front (usually 5 stitches), and follow the instructions. When you would normally turn and work from the wrong side, simply work across the steek and continue in the round. At the end you’ll cut the piece open, pick up stitches to work bands, and cover the cut edges.

See DROPS video: How to knit steeks and cut open

Should you prefer to work back and forth instead of in the round, you may of course adjust the pattern so you work the pieces separately and then assemble them at the end. Divide the stitches for the body in 2, add 1 edge stitch in each side (for sewing) and work the front and back pieces separately.

See DROPS lesson: Can I adapt a pattern for circular needles into straight needles?

Pattern repeats can vary slightly in the different sizes, in order to get the correct proportions. If you’re not working the exact same size as the garment in the photo, yours might deviate slightly. This has been carefully developed and adjusted so that the complete impression of the garment is the same in all sizes.

Make sure to follow instructions and diagrams for your size!

If you have found a pattern you like which is available in women’s size it’s not very difficult to convert it to men’s size. The biggest difference will be the length of sleeves and body. Start working on the women size that you think would fit across the chest. The additional length will be worked right before you cast off for the armhole/sleeve cap. If the pattern is worked top-down you can add the length right after the armhole or before the first decrease on sleeve.

Regarding additional yarn amount, this will depend on how much length you add, but it is better with a skein too many than too few.

All yarns will have excess fibres (from production) that might come off as lint or shedding. Brushed yarns (ie hairier yarns) have more of these loose, excess fibres, causing more shedding.

Shedding also depends on what is worn under or over the garment, and whether this pulls at the yarn fibres. It’s therefore not possible to guarantee that there will be no shedding

Below are some tips on how to get the best result when working with hairier yarns:

1. When the garment is finished (before you wash it) shake it vigorously so the looser hairs come off. NOTE: do NOT use a lint roller, brush or any method that pulls at the yarn.

2. Place the garment in a plastic bag and put it in your freezer - the temperature will cause the fibres to become less attached to each other, and excess fibres will come off easier.

3. Leave in the freezer for a few hours before taking it out and shaking it again.

4. Wash the garment according to the instructions on the yarn label.

Pilling is a natural process that happens to even the most exclusive of fibers. It's a natural sign of wear and tear that is hard to avoid, and that is most visible in high friction areas of your garment like a sweater's arms and cuffs.

You can make your garment look as new by removing the pilling, using a fabric comb or a pill/lint remover.

Still can't find the answer you need? Then scroll down and leave your question so one of our experts can try to help you. This will be done normally within 5 to 10 working days.
In the meantime, you can read the questions and answers that others have left to this pattern or join the DROPS Workshop on Facebook to get help from fellow knitters/crocheters!

You might also like...

Post a comment to pattern DROPS 180-33

We would love to hear what you have to say about this pattern!

If you want to leave a question, please make sure you select the correct category in the form below, to speed up the answering process. Required fields are marked *.

Comments / Questions (6)

country flag Aurélie wrote:

Bonjour, comment savoir combien il faut prendre de pelotes de laine? Je ne trouve pas s'il vous plait

31.10.2018 - 11:28

DROPS Design answered:

Bonjour Aurélie, vous trouvez le poids total pour chaque taille sous l'en-tête, soit par ex en taille S: 500 g DROPS Air / 50 g la pelote = 10 pelotes DROPS Air. Bon tricot!

31.10.2018 - 11:44

Зинаида wrote:

Спасибо за подробное описание. Жакет очень понравился.

13.09.2018 - 08:38

country flag TANGUY wrote:

Bonjour, Que signifie groupe de fils A + A : qu'il faut tricoter en double de la laine du groupe A ? Merci pour votre réponse, Corinne TANGUY POULLILIAN

19.03.2018 - 20:52

DROPS Design answered:

Bonjour Mme Tanguy Poullilian, tout à fait, vous pouvez par exemple pour ce modèle tricoter une laine du groupe C (= Air) ou bien la remplacer par 2 fils du groupe A (2 laines différentes du groupe A ou bien la même en double). Retrouvez tous nos groupes ici et plus d'infos sur les alternatives . Bon tricot!

20.03.2018 - 08:49

Perla E Reyes wrote:

Hay un error en las instrucciones de la trenza en español. Son trenzas de 3 puntos. En lugar de decir 3 puntos siempre en algunas partes dice 2 puntos lo cual es incorrecto.

11.01.2018 - 17:09

country flag Kirsten Asmussen wrote:

Denne jakke ville jeg gerne have til vinterkulden!

19.06.2017 - 20:17

country flag Света wrote:

Очень красивый жакет! как раз для осени!

09.06.2017 - 15:49