DROPS Flora
DROPS Flora
65% Wool, 35% Alpaca
from 2.40 £ /50g
Get the yarn to make this pattern from 21.60£.

The yarn cost is calculated from the pattern’s smallest size and the yarn’s cheapest product type. Looking for an even better price? You might find it on the DROPS Deals!

DROPS SS24

Perles du Nord

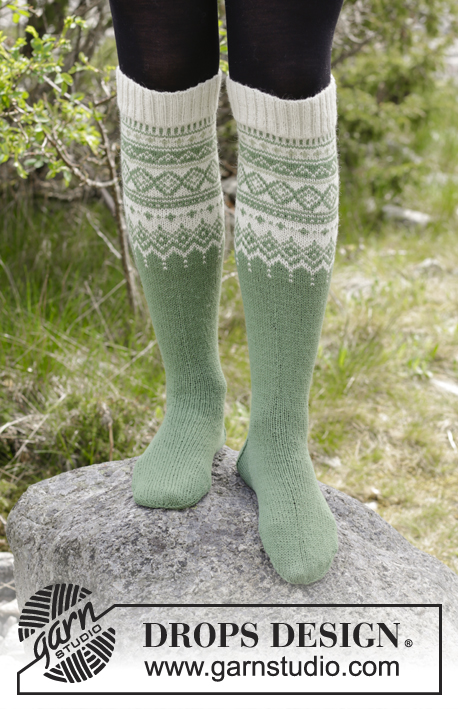
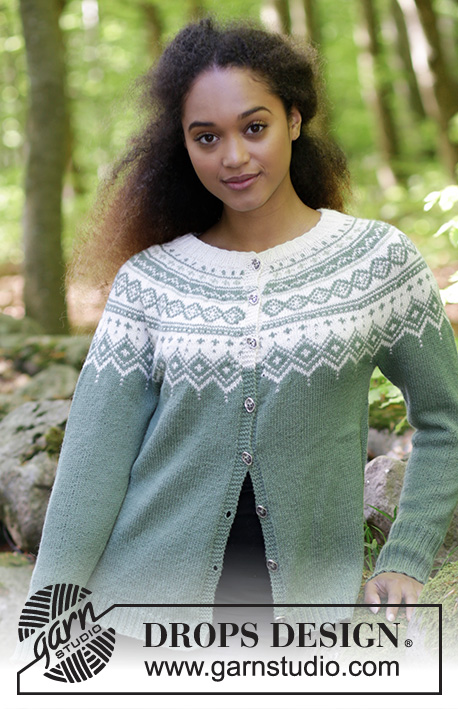
The set consists of: Knitted jumper with round yoke, multi-coloured Norwegian pattern and A-shape, worked top down. Sizes S - XXXL. Hat with multi-coloured Norwegian pattern. The set is worked in DROPS Flora.

DROPS 180-2
DROPS Design: Pattern no fl-008
Yarn group A
-----------------------------------------------------------

JUMPER:
Sizes: S - M - L - XL - XXL - XXXL
Materials:
DROPS FLORA from Garnstudio (belongs to yarn group A)
350-400-400-450-500-550 g colour 15, green
50-100-100-100-100-100 g colour 01, off white
50-50-50-50-50-50 g colour 16, pistachio

The piece can also be knitted with yarn from:
"Alternative yarn (Yarn group A)" – see the link below.

DROPS DOUBLE POINTED NEEDLES AND CIRCULAR NEEDLE (40 + 80 cm) SIZE 3 MM – or the size needed to get 24 stitches and 32 rows stocking stitch on 10 cm in width and 10 cm in height.

DROPS DOUBLE POINTED NEEDLES AND CIRCULAR NEEDLE (40 + 80 cm) SIZE 2.5 MM for rib – or the size needed to get 26 stitches and 34 rows stocking stitch on 10 cm in width and 10 cm in height.
-----------------------------------------------------------

HAT:
Sizes: S/M - L/XL
To fit head size: 54/56 - 58/60
Materials:
DROPS FLORA from Garnstudio (belongs to yarn group A)
50 g in both sizes in the following colours:
colour 01, off white
colour 15, green
colour 16, pistachio

The piece can also be knitted with yarn from:
"Alternative yarn (Yarn group A)" – see the link below.

DROPS DOUBLE POINTED NEEDLES AND CIRCULAR NEEDLE (40 cm) SIZE 3 MM – or the size needed to get 24 stitches and 32 rows stocking stitch on 10 cm in width and 10 cm in height.

DROPS CIRCULAR NEEDLE (40 cm) SIZE 2.5 MM for rib – or the size needed to get 26 stitches and 34 rows stocking stitch on 10 cm in width and 10 cm in height.

-------------------------------------------------------
Colour combinations shown are:
A) DROPS Flora 01, 14, 10.
B) DROPS Flora 01, 07, 08.
C) DROPS Flora 03, 04, 05.
-------------------------------------------------------

-------------------------------------------------------

Alternative Yarn – See how to change yarns here
Yarn Groups A to F – Use the same pattern and change the yarn here
Yarn usage using an alternative yarn – Use our yarn converter here

-------------------------------------------------------

DROPS Flora
DROPS Flora
65% Wool, 35% Alpaca
from 2.40 £ /50g
Get the yarn to make this pattern from 21.60£.

The yarn cost is calculated from the pattern’s smallest size and the yarn’s cheapest product type. Looking for an even better price? You might find it on the DROPS Deals!

Pattern instructions

NOTE: This pattern is written in British English. All measurements in charts are in cm. For conversion from cm to inches - click here. There are different terms for crocheting in British and American English. If this pattern includes crochet, click for "crochet terms" here. For this pattern in American English, please click here.
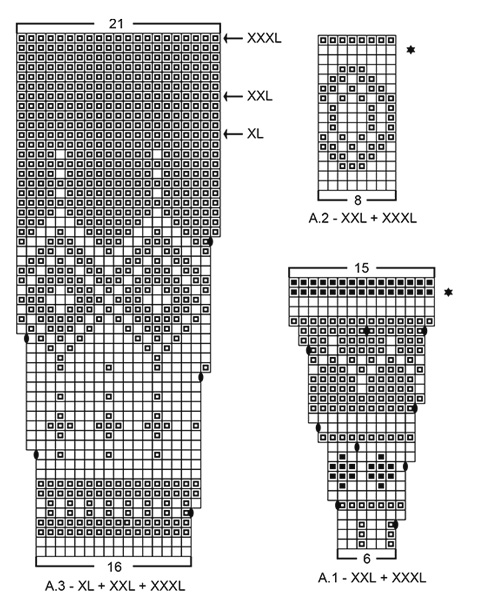
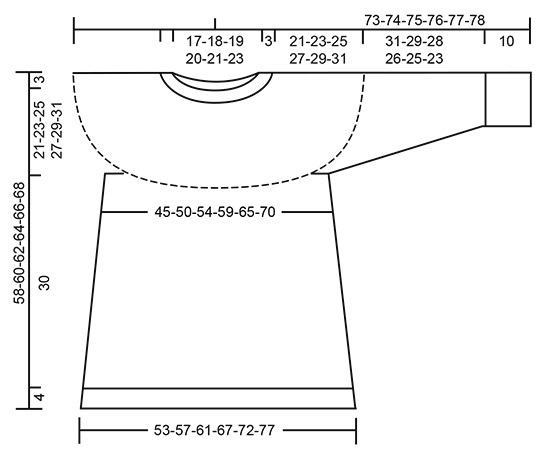
INFORMATION FOR THE PATTERN:

DECREASE/INCREASE TIP:
To work out how to decrease/increase evenly, count the total number of stitches on the needle (e.g. 120 stitches) and divide by the number of decreases/increases to be made (e.g. 18) = 6.6.
In this example, decrease by knitting alternately every 5th and 6th stitch and every 6th and 7th stitch together.
If you are increasing, do this after alternately every 6th and 7th stitch (increase 1 stitch by making 1 yarn over, on the next round, knit the yarn overs twisted and into the pattern so that there are no holes).

ELEVATION:
Insert 1 marker at the beginning of the round = mid back. Start from the right side with off white and knit until you have worked 8-8-9-10-10-11 stitches past the marker, turn, tighten the strand and purl 16-16-18-20-20-22 stitches. Turn, tighten the strand and knit 24-24-27-30-30-33 stitches, turn, tighten the strand and purl 32-32-36-40-40-44 stitches. Turn, tighten the strand and knit 40-40-45-50-50-55 stitches, turn, tighten the strand and purl 48-48-54-60-60-66 stitches. Turn, tighten the strand and knit 56-56-63-70-70-77 stitches, turn, tighten the strand and purl 64-64-72-80-80-88 stitches. Turn, tighten the strand and knit to mid back.

PATTERN:
Jumper: See diagrams A.1 to A.3. Choose diagram for your size.
Hat: See diagrams A.4 and A.5.
The diagrams show all the rows in the pattern seen from the right side. The whole of the pattern is worked in stocking stitch.

KNITTING TIP (for the multi-coloured pattern):
To prevent the knitting tension from becoming tighter when working pattern, it is important that the strands do not tighten at the back of the piece. You can increase the size of your needle when working pattern if you find you are working too tightly.

INCREASE TIP (for the sides of the body):
Start 2 stitches before the marker thread, make 1 yarn over, knit 4 (the marker thread sits in the middle of these 4 stitches), make 1 yarn over (= 2 stitches increased). On the next round knit the yarn overs twisted so that there are no holes.

DECREASE TIP-1 (for mid under the sleeve):
Work until there are 4 stitches left before the marker thread, knit 2 together, knit 4 (the marker thread sits in the middle of these 4 stitches), slip 1 stitch as if to knit, knit 1, pass the slipped stitch over the knitted stitch (= 2 stitches decreased).

DECREASE TIP-2 (for the hat):
Decrease after each marker thread as follows: Slip 1 stitch as if to knit, knit 1, pass the slipped stitch over the knitted stitch (= 1 stitch decreased).
----------------------------------------------------------

JUMPER:
The piece is worked in the round with circular needle, top down. The sleeve is worked in the round with short circular needle, top down. Change to double pointed needles when you have decreased enough stitches.  

NECKLINE:
Cast on 120-124-128-132-140-148 stitches with circular needle size 2.5 mm and off white. Knit 1 round. Then work rib (= knit 2 / purl 2). When the rib measures 3 cm, knit 1 round where you decrease 18-16-14-12-14-16 stitches evenly on round – read DECREASE/INCREASE TIP = 102-108-114-120-126-132 stitches. Continue to work the yoke as described below.

YOKE:
Change to circular needle size 3 mm. Knit 1 round. For a better fit you can now work a small ELEVATION in the back of the neck – see description above.
When the elevation is complete, work A.1 in the round (= 17-18-19-20-21-22 repeats of 6 stitches). Continue the pattern in this way and increase as shown in the diagram. Read KNITTING TIP and REMEMBER THE KNITTING TENSION!
On the round marked with a star in A.1 (i.e. the next to last round in A.1) there are 221-234-247-260-315-330 stitches on the needle, increase at the same time 11-22-33-36-21-22 stitches evenly on this round – read DECREASE/INCREASE TIP = 232-256-280-296-336-352 stitches.
When A.1 is complete, work A.2 in the round (= 29-32-35-37-42-44 repeats of 8 stitches). Continue the pattern in this way, but on the round marked with a star in A.2 (i.e. the next to last round in A.2) increase 8-16-24-24-16-16 stitches evenly on round = 240-272-304-320-352-368 stitches.
When A.2 is complete, work A.3 in the round (= 15-17-19-20-22-23 repeats of 16 stitches). Continue the pattern in this way and increase as shown in the diagram.
When the last round in A.3 remains (marked with an arrow in each size) there are 315-357-399-420-462-483 stitches on the needle, increase at the same time 11-11-1-12-0-5 stitches evenly on the round = 326-368-400-432-462-488 stitches.
The piece now measures approx. 24-26-28-30-32-34 cm from the cast-on edge, measured mid front. NOTE: If the piece measures less than this, continue working stocking stitch with green to the required length.
The next round is worked as follows: Knit 50-55-59-65-71-76 stitches (= ½ back piece), place the next 64-75-83-86-90-93 stitches on a thread for sleeve, cast on 10-10-12-12-14-16 new stitches on the needle (= in the side under the sleeve), knit 99-109-117-130-141-151 stitches (= front piece), place the next 64-75-83-86-90-93 stitches on a thread for sleeve, cast on 10-10-12-12-14-16 new stitches on the needle (= in the side under the sleeve) and knit the remaining 49-54-58-65-70-75 stitches (= ½ back piece). Cut the strand. Body and sleeves are finished separately. THE PIECE IS NOW MEASURED FROM HERE!

BODY:
= 218-238-258-284-310-334 stitches. Insert 1 marker thread in the middle of the 10-10-12-12-14-16 stitches cast on under the sleeve in each side. Start the round by one of the marker threads and work stocking stitch in the round with green. When the piece measures 2 cm from the division, increase 1 stitch on each side of both marker threads – read INCREASE TIP (= 4 stitches increased). Increase in this way every 10th round (approx. every 3 cm) until required length (if the knitting tension is correct in height, there should be approx. 9 increase rows in each side).
When the piece measures 30 cm from the division in all sizes, there are approx 254-274-294-320-346-370 stitches on the needle.
Knit 1 round where you increase 82-90-98-104-114-122 stitches evenly on round – read DECREASE/INCREASE TIP = 336-364-392-424-460-492 stitches.
Change to circular needle size 2.5 mm and work rib in the round (= knit 2 / purl 2) for 4 cm. Then cast off with knit over knit and purl over purl, but to prevent the cast-off edge being tight, you can make 1 yarn over on the needle after every 4th stitch AT THE SAME TIME as you cast off (the yarn overs are cast off as normal stitches). The jumper measures approx. 58-60-62-64-66-68 cm from the shoulder down.

SLEEVE:
Place the 64-75-83-86-90-93 stitches from the thread on one side of the piece on a short circular needle size 3 mm and in addition, knit up 1 stitch in each of the 10-10-12-12-14-16 stitches cast on under the sleeve = 74-85-95-98-104-109 stitches on the needle. Insert 1 marker thread in the middle of the 10-10-12-12-14-16 stitches under the sleeve. Start the round here and work stocking stitch in the round with green. When the sleeve measures 2 cm from the division, decrease 2 stitches mid under the sleeve – read DECREASE TIP. Decrease a total of 11-15-19-19-21-22 times in S: Every 9th round, in M: Every 6th round, in L and XL: Every 4th round, in XXL: Alternately every 3rd and 4th round and in XXXL: Every 3rd round = 52-55-57-60-62-65 stitches. When the sleeve measures 31-29-28-26-25-23 cm from the division (shorter measurements in the larger sizes due to longer yoke), knit 1 round where you increase 16-17-19-20-18-19 stitches evenly on round = 68-72-76-80-80-84 stitches. Change to double pointed needles size 2.5 mm and work rib in the round (= knit 2 / purl 2). When the rib measures 10 cm (or desired length) cast off with knit over knit and purl over purl, but to prevent the cast-off edge being tight, you can make 1 yarn over after every 4th stitch AT THE SAME TIME as you cast off (the yarn overs are cast off as normal stitches). The sleeve measures approx. 41-39-38-36-35-33 cm from the division. Work the second sleeve in the same way.
----------------------------------------------------------

HAT:
The piece is worked in the round with short circular needle, bottom up. Change to double pointed needles as the number of stitches decreases.
Cast on 128-136 stitches with circular needle size 2.5 mm and off white. Knit 1 round. Then work rib (= knit 2 / purl 2) for 4 cm. Change to short circular needle size 3 mm and knit 2 rounds – AT THE SAME TIME on the first round, increase 4-8 stitches evenly on round – read DECREASE/INCREASE TIP = 132-144 stitches. Work A.4 in the round (= 11-12 repeats of 12 stitches). On the last round in A.4 (marked with a star in the diagram), decrease 4-8 stitches evenly on round = 128-136 stitches. REMEMBER THE KNITTING TENSION! Now work A.5 in the round (= 16-17 repeats of 8 stitches). On the next to last round in A.5 (marked with a star in the diagram), decrease 8-4 stitches evenly on round = 120-132 stitches. The piece now measures approx. 16 cm in height. Continue working stocking stitch with green until the piece measures 20-23 cm. Insert 10-11 marker threads in the piece with 12 stitches between each marker thread. On the next round, decrease 1 stitch after each marker thread – read DECREASE TIP (= 10-11 stitches decreased). Decrease in this way every 2nd round a total of 8 times and then every round a total of 2 times = 20-22 stitches. On the next round knit all stitches together, 2 and 2 = 10-11 stitches. Cut the strand, pull it through the remaining stitches, tighten the strand and fasten well. The hat measures approx. 25-28 cm top down.

Diagram

symbols = off white
symbols = green
symbols = pistachio
symbols = between 2 stitches make 1 yarn over with background colour in pattern strip, on the next round knit the yarn overs twisted to prevent holes
symbols = increase round
symbols = decrease round
symbols = finish after this round
diagram
diagram
diagram
diagram

Each of our patterns has specific tutorial videos to help you.

Do you have a question? See a list of frequently asked questions (FAQ)

Knitting tension is what determines the final measurements of your work, and is usually measured per 10 x 10 cm. It is provided like so: number of stitches in width x number of rows in height - eg: 19 stitches x 26 rows = 10 x 10 cm.

The knitting tension is very individual; some people knit/crochet loosely while others work tightly. You adjust the knitting tension with the needle size, which is why the suggested needle size is only meant as a guide! You need to adjust this (up or down) to ensure that YOUR knitting tension matches the knitting tension provided in the pattern. If you work with a different knitting tension than provided you will have a different yarn consumption, and your work will have different measurements than what the pattern suggests.

The knitting tension also determines which yarns can replace each other. As long as you achieve the same knitting tension you can replace one yarn with another.

See DROPS lesson: How to measure your tension/gauge

See DROPS video: How to make a gauge tension swatch

The required amount of yarn is provided in grams, eg: 450 g. To calculate how many balls you’ll need you first need to know how many grams are in 1 ball (25g, 50g or 100g). This information is available if you click on the individual yarn quality on our pages. Divide the amount required with the amount of each ball. For example, if each ball is 50g (the most common amount), the calculation will be as follows: 450 / 50 = 9 balls.

The important thing when changing from one yarn to another is that the knitting/crochet tension remains the same. This is so that the measurements of the finished piece will be the same as on the sketch provided. It is easier to achieve the same knitting tension using yarns from the same yarn group. It is also possible to work with multiple strands of a thinner yarn to achieve the knitting tension of a thicker one. Please try our yarn converter. We recommend you to always work a test swatch.

Please NOTE: when changing yarn the garment might have a different look and feel to the garment in the photo, due to individual properties and qualities of each yarn.

See DROPS lesson: Can I use a different yarn than the one mentioned in the pattern?

All our yarns are categorised into yarn groups (from A to F) according to thickness and knitting tension – group A contains the thinnest yarns and group F the thickest. This makes it easier for you to find alternative yarns to our patterns, should you wish to switch yarn. All yarns within the same group have a similar knitting tension and can easily replace each other. However, different yarn qualities have different structures and properties which will give the finished work a unique look and feel.

Click here for an overview of the yarns in each yarn group

At the top of all our patterns you’ll find a link to our yarn calculator, which is a helpful tool should you wish to use a different yarn than suggested. By filling in the yarn quality you wish to replace, the amount (in your size) and number of strands, the calculator will present good alternative yarns with the same knitting tension. Additionally it will tell you how much you’ll require in the new qualities and whether you’ll need to work with multiple strands. Most skeins are 50g (some are 25g or 100g).

If the pattern is worked with multiple colours, every colour will have to be calculated separately. Similarly, if the pattern is worked with several strands of different yarns (for example 1 strand Alpaca and 1 strand Kid-Silk) you will have to find alternatives for each, individually.

Click here to see our yarn calculator

Since different yarns have different qualities and textures we have chosen to keep the original yarn in our patterns. However, you can easily find options among our available qualities by using our yarn calculator, or simply pick a yarn from the same yarn group.

It is possible that some retailers still have discontinued yarns in stock, or that someone has a few skeins at home that they would like to find patterns for.

The yarn calculator will provide both alternative yarn as well as required amount in the new quality.

If you think it's hard to decide what size to make, it can be a good idea to measure a garment you own already and like the size of. Then you can pick the size by comparing those measures with the ones available in the pattern's size chart.

You'll find the size chart at the bottom of the pattern.

See DROPS lesson: How to read size chart

The needle size provided in the pattern serves only as a guide, the important thing is to follow the knitting tension. And since knitting tension is very individual, you will have to adjust the needle size to ensure that YOUR tension is the same as in the pattern – maybe you’ll have to adjust 1, or even 2 needle sizes, up or down to achieve the correct tension. For this, we recommend that you work test swatches.

Should you work with a different knitting tension than the one provided, the measurements of the finished garment might deviate from the measurement sketch.

See DROPS lesson: How to measure your tension/gauge

See DROPS video: How to make a tension/gauge swatch

Working a garment top-down provides more flexibility and room for personal adjustment. For example it is easier to try the garment on while working, as well as making adjustments to length of yoke and shoulder caps.

The instructions are carefully explaining every step, in the correct order. Diagrams are adjusted to the knitting direction and are worked as usual.

The diagram depicts all rows/rounds, and every stitch seen from the right side. It is read from bottom to top, from right to left. 1 square = 1 stitch.

When working back and forth, every other row is worked from the right side and every other row is worked from the wrong side. When working from the wrong side, the diagram will have to be worked reversed: from left to right, knit stitches are purled, purl stitches are knit etc.

When working in the round every round is worked from the right side and the diagram are worked from right to left on all rounds.

See DROPS lesson: How to read knitting diagrams

The diagram depicts all rows/rounds, and every stitch seen from the right side. It is worked from bottom to top, from right to left.

When working back and forth every other row is worked from the right side: from right to left and every other row is worked from the wrong side: from left to right.

When working in the round, every row in the diagram are worked from the right side, from right to left.

When working a circular diagram you start in the middle and work your way outwards, counter clockwise, row by row.

The rows usually start with a given number of chain stitches (equivalent to the height of the following stitch), this will either be depicted in the diagram or explained in the pattern.

See DROPS lesson: How to read crochet diagrams

Instructions for working several diagrams after each other on the same row/round, will often be written like so: “work A.1, A.2, A.3 a total of 0-0-2-3-4 times". This means you work A.1 once, then A.2 is worked once, and A.3 is repeated (in width) the number of times provided for your size – in this case like so: S = 0 times, M = 0 times, L=2 times, XL= 3 times and XXL = 4 times.

The diagrams are worked as usual: begin with the first row in A.1, then work the first row in A.2 etc.

See DROPS lesson: How to read knitting diagrams

See DROPS lesson: How to read crochet diagrams

The total width of the garment (from wrist-to-wrist) will be larger in the larger sizes, despite the actual sleeves being shorter. The larger sizes have longer sleeve caps and wider shoulders, so there will be a good fit in all sizes.

The measurement sketch/schematic drawing provides information regarding the full length of the garment. If it’s a jumper or a jacket the length is measured from the highest point on the shoulder closest to the neckline, and straight down to the bottom of the garment. It is NOT measured from the tip of shoulder. Similarly, the length of yoke is measured from the highest point on the shoulder and down to where yoke is split into body and sleeves.

On a jacket measures are never taken along bands, unless specifically stated. Always measure inside band stitches when measuring the length.

See DROPS lesson: How to read a schematic drawing

Diagrams are often repeated on the round or in height. 1 repeat is the diagram the way it appears in the pattern. If it says to work 5 repeats of A.1 in the round, then you work A.1 a total of 5 times after/next to each other in the round. If it says to work 2 repeats of A.1 vertically/in height you work the entire diagram once, then begin again at the start and work the entire diagram one more time.

Chain stitches are slightly narrower than other stitches and to avoid working the cast-on edge too tight, we simply chain more stitches to begin with. The stitch count will be adjusted on the following row to fit the pattern and measurement sketch.

The rib edge is more elastic and will contract slightly compared to, for example, stocking stitch. By increasing before the rib edge, you avoid a visible difference in width between the rib edge and the rest of the body.

It’s very easy to cast off too tightly, and by making yarn overs while casting off (and simultaneously casting these off) you avoid a too tight cast off edge.

See DROPS video: How to bind off with yarn overs (yo)

To achieve an even increase (or decrease) you can increase on, for example: every 3rd and 4th row alternately, like so: work 2 rows and increase on the 3rd row, work 3 rows and increase on the 4th. Repeat this until the increase is complete.

See DROPS lesson: Increase or decrease 1 st on every 3rd and 4th row alternately

Should you prefer to work in the round instead of back and forth, you may of course adjust the pattern. You’ll need to add steeks mid-front (usually 5 stitches), and follow the instructions. When you would normally turn and work from the wrong side, simply work across the steek and continue in the round. At the end you’ll cut the piece open, pick up stitches to work bands, and cover the cut edges.

See DROPS video: How to knit steeks and cut open

Should you prefer to work back and forth instead of in the round, you may of course adjust the pattern so you work the pieces separately and then assemble them at the end. Divide the stitches for the body in 2, add 1 edge stitch in each side (for sewing) and work the front and back pieces separately.

See DROPS lesson: Can I adapt a pattern for circular needles into straight needles?

Pattern repeats can vary slightly in the different sizes, in order to get the correct proportions. If you’re not working the exact same size as the garment in the photo, yours might deviate slightly. This has been carefully developed and adjusted so that the complete impression of the garment is the same in all sizes.

Make sure to follow instructions and diagrams for your size!

If you have found a pattern you like which is available in women’s size it’s not very difficult to convert it to men’s size. The biggest difference will be the length of sleeves and body. Start working on the women size that you think would fit across the chest. The additional length will be worked right before you cast off for the armhole/sleeve cap. If the pattern is worked top-down you can add the length right after the armhole or before the first decrease on sleeve.

Regarding additional yarn amount, this will depend on how much length you add, but it is better with a skein too many than too few.

All yarns will have excess fibres (from production) that might come off as lint or shedding. Brushed yarns (ie hairier yarns) have more of these loose, excess fibres, causing more shedding.

Shedding also depends on what is worn under or over the garment, and whether this pulls at the yarn fibres. It’s therefore not possible to guarantee that there will be no shedding

Below are some tips on how to get the best result when working with hairier yarns:

1. When the garment is finished (before you wash it) shake it vigorously so the looser hairs come off. NOTE: do NOT use a lint roller, brush or any method that pulls at the yarn.

2. Place the garment in a plastic bag and put it in your freezer - the temperature will cause the fibres to become less attached to each other, and excess fibres will come off easier.

3. Leave in the freezer for a few hours before taking it out and shaking it again.

4. Wash the garment according to the instructions on the yarn label.

Pilling is a natural process that happens to even the most exclusive of fibers. It's a natural sign of wear and tear that is hard to avoid, and that is most visible in high friction areas of your garment like a sweater's arms and cuffs.

You can make your garment look as new by removing the pilling, using a fabric comb or a pill/lint remover.

Still can't find the answer you need? Then scroll down and leave your question so one of our experts can try to help you. This will be done normally within 5 to 10 working days.
In the meantime, you can read the questions and answers that others have left to this pattern or join the DROPS Workshop on Facebook to get help from fellow knitters/crocheters!

You might also like...

Perles du Nord

Danielle, Canada

Perles du Nord

Gillian Johnstone, Cyprus

Perles du Nord

Nikola, Czech Republic

Perles du Nord

Olga, Czech Republic

Post a comment to pattern DROPS 180-2

We would love to hear what you have to say about this pattern!

If you want to leave a question, please make sure you select the correct category in the form below, to speed up the answering process. Required fields are marked *.

Comments / Questions (106)

country flag Anna wrote:

W trzecim schemacie chyba jest bład, bo wzór nie wychodzi tak jak powinien, po schemacie pierwszych krzyzykow inna włoczką , co 18 ocxek dodane jest jedno, wiec nastepny schemat nie miesci sie regularnie jak na obrazku.

18.02.2020 - 11:03

country flag Bergljot R Evertsen wrote:

Finner ikke målene på denne genseren. Har bladd gjennom flere ganger. 😊

17.01.2020 - 12:46

DROPS Design answered:

Hei Bergliot. Målene til genseren finner du på målskissen helt nederst på oppskriften. God Fornøyelse!

27.01.2020 - 13:03

country flag Anita Späth wrote:

Når jeg vil printe Drops 180-2 ud får jeg kun hver anden side. Når jeg bestiller et KIT-180-2 hos RITO garn er der ingen opskrift med. Kan det være rigtigt. Jeg mener et KIT inde holder både garn og opskrift.

12.01.2020 - 15:44

DROPS Design answered:

Hej Anita, hvis du bruger "skriv ud" knappen her på selve opskriften, så får du alle sider med. Når du klikker på print, kan du selv vælge hvilke sider du vil have med. Hvis du ikke har mulighed for at skrive ud, så sig det til Rito, så sender de en opskrift med. God fornøjelse!

15.01.2020 - 15:33

country flag Lene Vester wrote:

Som så mange andre kommentarer forstår jeg ikke A3 For mig går det galt allerede i række 7 skla jeg srikke 4 natur 1 grøn 4 natur 1 grøn 4 natur 1 grøn 3 natur så der bliver 7 natur lige efter hinanden?? eller skal jeg slutte pinden af med 3 natur så det ender med 7 natur midtbagf?? Problemet er det samme i række 9 tænker hvis jeg får styr på de rækker kommer løsningen for mig også i række 12 som jeg heller ikke forstår

13.12.2019 - 22:42

DROPS Design answered:

Hej Lene, jo det stemmer, som du også kan se på billedet så er der kun en prik efter hver tredje "stjerne" i bærestykket. God fornøjelse!

17.12.2019 - 12:12

country flag Cristina Åhs wrote:

Stickar mönstret, men undrar överA3 och rad7 hur får jag mönstret att stämma slutar ju med 3batur Och börjar om med 4natur får ju då 7Natur i rad? Stickar stl. S

10.11.2019 - 19:08

DROPS Design answered:

Hej. Det är så mönstret ska vara, om du ser på bilden så ser du att det stämmer att det ska vara 7 natur i rad där. Lycka till!

12.11.2019 - 08:44

country flag Betty wrote:

Hei, har så lyst til å strikke denne, men kan en ikke snu oppskrifta og strikke fra bånn ? Har aldri strikket fra toppen og ned. Har strikket i over 60 år. Mvh Betty

04.11.2019 - 15:31

DROPS Design answered:

Hej Betty, det er meget enkelt at strikke ovenfra og ned og der er flere fordele. Se her:

How to knit a jumper top down from Garnstudio Drops design on Vimeo.

Vil du absolut ikke, så er det bare at starte nederste i opskriften ;)

05.11.2019 - 09:51

country flag Letizia wrote:

Sono ferma all'ottavo ferro del diagramma n. 3 e mi risulta una crocina in più di quante dovrebbero essere. Non capisco dove ho sbagliato. Come posso fare? Grazie mille!

21.07.2019 - 12:47

DROPS Design answered:

Buongiorno Letizia. Verifichi di avere il numero corretto di maglie. Se fino all’inizio del diagramma A3 le maglie sono corrette, potrebbe aver aumentato qualche maglia di troppo sulle righe del diagramma in cui sono previsti dei gettati. In quel caso è sufficiente disfare solo qualche riga. Buon lavoro!

21.07.2019 - 14:20

country flag Dea wrote:

Grazie per l'indicazione. Una cosa, potete chiarirmi questa frase "Inserire 1 segnapunti al centro delle 10-10-12-12-14-16 maglie sotto la manica. Iniziare qui il giro e lavorare a maglia rasata in tondo con verde. " ...il giro dove inizia? Sotto la manica dove c'è il segnapunti o dove inizio a riprendere la prima delle le 10 maglie? Grazie

11.04.2019 - 14:30

DROPS Design answered:

Buongiorno Dea. Inserisce il segnapunti al centro delle maglie avviate. Il giro inizio dalla maglia dopo il segnapunti. Il segnapunti servirà anche da riferimento per gli aumenti ai lati del davanti/dietro. Buon lavoro!

11.04.2019 - 14:42

country flag Dea wrote:

Buongiorno, sarebbe utile un video che mostri come fare la manica in questi tipi di maglioni. Grazie.

11.04.2019 - 11:28

DROPS Design answered:

Buongiorno Dea. Al momento un video non è disponibile. Può trovare un aiuto nella seguente lezione, oppure se ci spiega meglio la sua difficoltà possiamo provare ad aiutarla. Buon lavoro!

11.04.2019 - 11:59

country flag Hanne Pettersen wrote:

Hei Jeg sliter med å få mønsteret til å stemme i diagram A3, etter omgang 11, der det blir økt etter 18 masker hele omgangen. Da stemmer ikke omgang 13, med mønsteret i omgang 9...??

04.03.2019 - 14:02

DROPS Design answered:

Hei Hanne. Nå vet ikke jeg hvilket av A.3 diagrammene du strikker, men jeg antar det er XL-XXXL siden du nevner mønster på omgang 13. Du på slutten av hver rapport på 11 omgang. 13 omgang strikkes slik: 4 masker natur, 1 maske grønn, 4 natur, 1 grønn, 4 natur 1 grønn. Videre strikkes 7 natur (3 fra slutten av første rapport og 4 fra begynnelsen av 2 rapport) osv. 14 omgang: 1 grønn, 2 natur, 3 grønn 2 natur osv. God fornøyelse

04.03.2019 - 15:22