
Popular categories
Looking for a yarn?


|
|||||||||||||||||||
Dreamy Daffodil |
|||||||||||||||||||
 |
 |
||||||||||||||||||
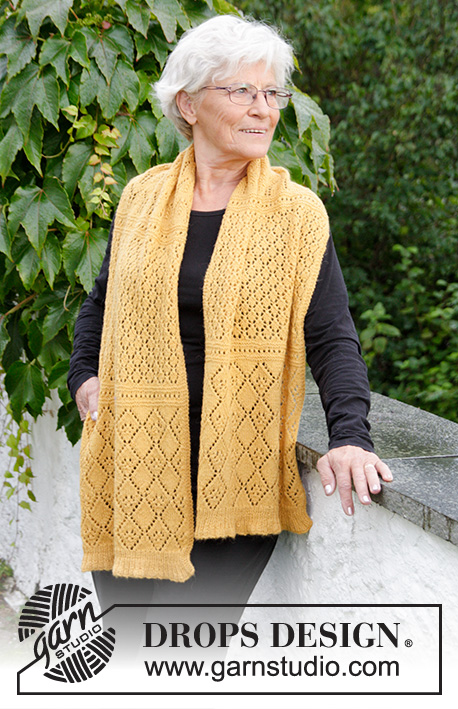
Knitted stole with lace pattern and rib. The piece is worked in DROPS Alpaca.
DROPS 180-14 |
|||||||||||||||||||
|
INFORMATION FOR THE PATTERN: RIDGE/GARTER STITCH (worked back and forth): 1 ridge = Knit 2 rows. PATTERN: See diagrams A.1 to A.4. The diagrams show all the rows in the pattern seen from the right side. ---------------------------------------------------------- STOLE: The piece is worked back and forth with circular needle in two equal parts, which are sewn together in the middle. Cast on 155 stitches with circular needle size 3 mm / US 2.5 and Alpaca. Purl 1 row from the wrong side. The next row is worked as follows from the right side: 3 edge stitches in GARTER STITCH – see description above, * knit 1, purl 3 *, repeat from *-* until there are 4 stitches left on the needle, finish with knit 1 and 3 edge stitches in garter stitch. Continue the rib in this way. When the piece measures 2 cm / 3/4'' decrease all the purl 3 (seen from the right side) to purl 2 = 118 stitches. When the piece measures 3 cm / 1'', decrease every other purl 2 to purl 1 (NOTE: decrease in the first and last purl sections = 19 stitches decreased) = 99 stitches. When the piece measures 4 cm / 1½'' decrease the remaining purl 2 to purl 1 (= 18 stitches decreased) = 81 stitches. When the rib measures 5 cm / 2'' – adjust so that the last row is worked from the wrong side, change to circular needle size 3.5 mm / US 4. The next row is worked as follows from the right side: 3 edge stitches in garter stitch, work PATTERN according to diagrams A.1a (= 7 stitches), A.1b (= 12 stitches) 5 times in width, A.1c (= 8 stitches), 3 edge stitches in garter stitch. Continue the pattern in this way until you have worked 4 complete repeats of A.1a to A.1c in height. REMEMBER THE GAUGE! The next row is worked from the right side as follows: Work 3 edge stitches in garter stitch, work A.2 until there are 5 stitches left on the needle, knit the next 2 stitches together (= 1 stitch decreased (this is done so that the pattern will fit the number of stitches)), work 3 edge stitches in garter stitch = 80 stitches. Continue the pattern until A.2 has been completed in height. Work 2 rows stockinette stitch with 3 edge stitches in garter stitch in each side, where you decrease 1 stitch at the end of the last row (this is done so that the pattern will fit the number of stitches) = 79 stitches. Now work pattern from the right side as follows: 3 edge stitches in garter stitch, A.3a (= 3 stitches), A.3b (= 6 stitches) 11 times in width, A.3c (= 4 stitches), 3 edge stitches in garter stitch. Repeat diagram A.3 in height until the piece measures 53 cm / 21'' – adjust so that you finish after a completed repeat in height. The next row is worked as follows from the right side: Work 3 edge stitches in garter stitch, work A.2 until there are 3 stitches left on the needle and decrease at the same time 1 stitch (this is done so that the pattern fits the number of stitches), 3 edge stitches in garter stitch = 78 stitches. Continue the pattern until A.2 has been completed in height. Work 2 rows stockinette stitch with 3 edge stitches in each side where you decrease 1 stitch at the end of the last row (this is done so that the pattern fits the number of stitches) = 77 stitches. Now work pattern as follows from the right side: 3 edge stitches in garter stitch, A.4 (= 10 stitches) 7 times in width, 1 stitch stockinette stitch, 3 edge stitches in garter stitch. Continue the pattern in this way until the you have worked 4 repeats in height. The next row is worked as follows from the right side: Work 3 edge stitches in garter stitch, work A.2 until there are 3 stitches left on the needle and at the same time increase 1 stitch on the first row (this is done so that the pattern fits the number of stitches), 3 edge stitches in garter stitch = 78 stitches. Continue the pattern until A.2 has been completed in height. Bind off. To prevent the bind-off edge being tight, you can use a larger needle or you can make a yarn over which is then bind off after every 4th stitch. The piece measures approx. 78 cm / 30 3/4''. Work a second part in the same way. Sew the two parts together inside the bind-off edge so that there are 4 ridges in the middle of the stole. Sew in each-and-every stitch and make sure the seam is not tight! |
|||||||||||||||||||
Diagram explanations |
|||||||||||||||||||
|
|||||||||||||||||||

|
|||||||||||||||||||
|
Have you made this or any other of our designs? Tag your pictures in social media with #dropsdesign so we can see them! Do you need help with this pattern?You'll find tutorial videos, a Comments/Questions area and more by visiting the pattern on garnstudio.com. © 1982-2024 DROPS Design A/S. We reserve all rights. This document, including all its sub-sections, has copyrights. Read more about what you can do with our patterns at the bottom of each pattern on our site. |
|||||||||||||||||||


With over 40 years in knitting and crochet design, DROPS Design offers one of the most extensive collections of free patterns on the internet - translated to 17 languages. As of today we count 304 catalogs and 11422 patterns - 11417 of which are translated into English (US/in).
We work hard to bring you the best knitting and crochet have to offer, inspiration and advice as well as great quality yarns at incredible prices! Would you like to use our patterns for other than personal use? You can read what you are allowed to do in the Copyright text at the bottom of all our patterns. Happy crafting!
Comments / Questions (15)
Hi there, I know this is a really silly question but I just have to ask it. I see the explanation for the empty box and the box with a line in it in the Diagram Explanations but for some reason it confuses me In the first section I did every 2nd row purl. Is that right So 2nd section A2 is it 1st -4th row knit (Garter st) and 5th row knit 6th row purl ie ss st Many thanks for your help.
14.10.2023 - 13:58DROPS Design answered:
Dear Valerie, since you start working on the right side, on every odd row, when an empty box is shown you will knit; on even rows you will purl when you work these empty boxes. On the other hand, you also start working A.2 on a row from the right side: the first row (with empty boxes) is knitted, the next row (with box with line) is also knitted, since you are working from the wrong side. In A.2 only the 6th and 8th rows are purled. Happy knitting!
16.10.2023 - 00:17Hi there I'm having difficulty sending my question. I apparently have used forbidden links. I haven't. So this is just a test to see if it goes through to you.
14.10.2023 - 13:55Hallo nochmal. Ich bin bei den Diagrammen angekommen. Die erste Reihe geschafft. Nun muss ich die Rückreihe nur linke Maschen, außer den Umschlag, den muss ich rechts abstricken. Habe ich das richtig verstanden? Ein sehr schöner Schal!!! Außerdem find ich es toll, dass die Fragen immer sehr schnell beantwortet werden, danke.
11.10.2019 - 16:28DROPS Design answered:
Liebe Monika, die Diagramme zeigen alle Reihen, dh die Hin- sowie die Rückreihen, dh bei A.1 a, b, c, stricken Sie alle Maschen von den Diagrammen links (siehe 1. Symbol = 1 Masche links in Rück-Reihen). Hier lesen Sie mehr über Diagramme. Viel Spaß beim stricken!
14.10.2019 - 08:55Hallo. Der Maschenanschlag ist ohne Randmaschen? Muss ich die noch dazurechnen oder wird einfach ohne Randmaschen gestrickt? LG Monika
11.10.2019 - 10:43DROPS Design answered:
Liebe Monika, schlagen Sie die 155 Maschen, dann stricken Sie eine Rück-Reihe links und bei der nächsten Hin-Reihe stricken Sie: 3 M krausrechts, Rippenmuseter und 3 M krausrechts, dh die 3 M krausrechts auf beiden Seiten stehen als Randmaschen, Sie brauchen keine extra Maschen anzuschlagen. Viel Spaß beim stricken!
11.10.2019 - 11:15Merci je viens de comprendre mon erreur la maille non tricote je l'a prenait par derrière et non devant au tout début pour cela que je n'arrivais pas ça me semblait dur, je ne l'a prenait pas dans le bon sens . Bonne journée à vous
12.02.2018 - 15:45Glisser 1 maille à l'endroit, tricoter 1 maille endroit, passer la maille glissée par-dessus la maille tricotée A ce passage sachant qu'il y a un jeté avant est ce que quand je glisse ma maille avant de tricoter la suivante je refait passer le fil devant ou je laisse le fil comme il est?
11.02.2018 - 19:45DROPS Design answered:
Bonjour Amandine, pour tricoter (1 jeté, glisser 1 m à l'end, 1 m end, passer la m glissée par-dessus la m tricotée) dans le diagramme, passez votre fil devant l'ouvrage (pour former le jeté), glissez la m suivante à l'end, tricotez 1 m end (le fil est toujours devant l'ouvrage, en tricotant la m end, il va passer par-dessus l'aiguille et ainsi former le jeté, puis passez la m glissée par-dessus la m tricotée, sur l'aiguille droite, vous avez 1 jeté, 1 m end (la m diminuée). Bon tricot!
12.02.2018 - 09:18Bonjour quand j'arrive au motif a1. A la deuxième ligne que je tricote donc en envers ? Je me retrouve avec 75 mailles et non 81 comme au départ . Comment je fais pour continuer ? Est ce normal ?
11.02.2018 - 19:23DROPS Design answered:
Bonjour Amandine, dans les diagrammes A.1a, A.1B et A.1c chaque diminution est compensée par 1 jeté, vous devez avoir toujours le même nombre de mailles dans chacun des diagrammes, soit 7 pour A.1a, 12 pour chaque A.1b et 8 pour A.1c, vous pouvez ajouter un marqueur entre chaque diagramme pour bien vérifier votre nombre de mailles et chaque répétition en largeur. Bon tricot!
12.02.2018 - 09:15D'accord merci . Et donc mon premier rang après avoir monter mes 155mailles sera un rang tout à l'envers ?
30.01.2018 - 17:40DROPS Design answered:
Bonjour Amandine, tout à fait, on commence par 1 rang envers sur l'envers puis on continue en côtes (1er rang des côtes = sur l'endroit), on diminue ensuite dans les côtes et on commence ensuite le point ajouré. Bon tricot!
31.01.2018 - 08:29Bonjour quand vous dîtes dans le premier paragraphe continuer en côte ainsi . Je reprends toujours comme au début un rang à l'envers puis le rang maille de bordure en mousse etc..? Ou bien je continue juste 3 mailles de bordure en mousse sur etc.. merci à vous
29.01.2018 - 23:21DROPS Design answered:
Bonjour Amandine, on continue en côtes comme le rang qui vient d'être tricoté, c'est-à-dire en côtes 1 m end,3 m env (= sur l'endroit, sur l'envers on va tricoter 1 m env, 3 m end autrement dit, sur l'envers, tricotez les mailles comme elles se présentent) avec 3 m point mousse de chaque côté. Bon tricot!
30.01.2018 - 09:20Bonjour Je ne comprends pas diminuer 1 maille envers dans toutes les sections 3 mailles envers. Pourriez vous mettre une vidéo svp merci d'avance ?
30.11.2017 - 21:43DROPS Design answered:
Bonjour Patricia, vous tricotez d'abord en côtes 1 m end, 3 m env (vu sur l'endroit). Pour diminuer 1 m env dans chacune des sections 3 m env, tricotez 1 rang ainsi: *1 m end, 2 m ens à l'env, 1 m env*, et répétez de *-* = il reste 2 m env dans chacune des sections 3 m env. Bon tricot!
01.12.2017 - 09:09