DROPS Andes
DROPS Andes
65% Wool, 35% Alpaca
from 6.60 $ /100g
Get the yarn to make this pattern from 132.00$.

The yarn cost is calculated from the pattern’s smallest size and the yarn’s cheapest product type. Looking for an even better price? You might find it on the DROPS Deals!

DROPS SS24

Gypsy Wagon

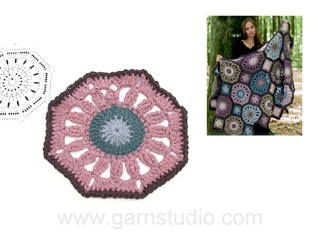
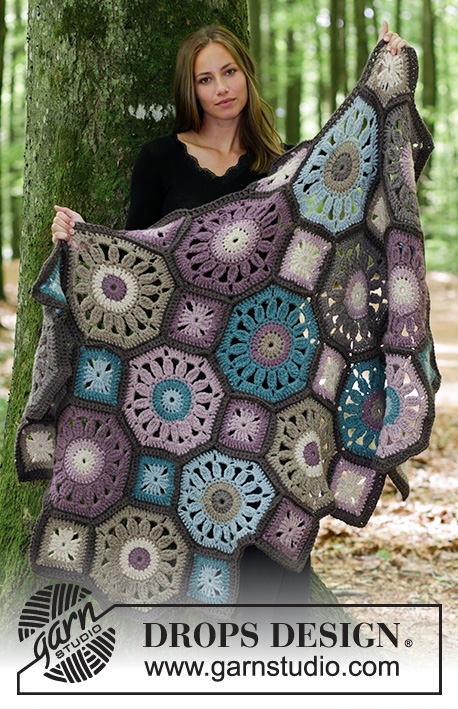
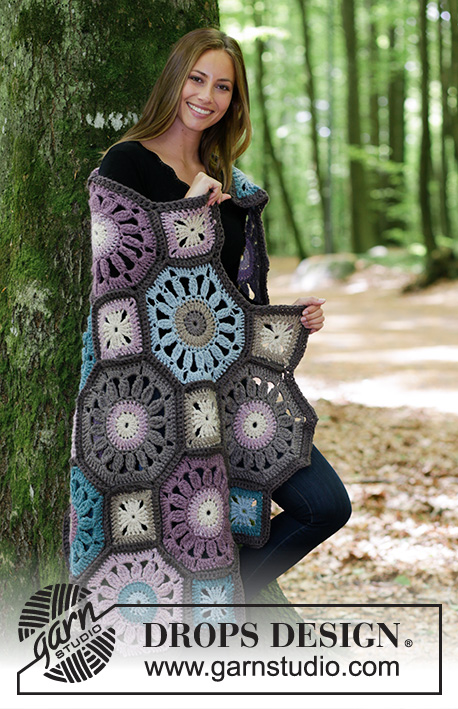
Crochet blanket with octagons and squares. The piece is crocheted in DROPS Andes.

DROPS 180-9
DROPS Design: Pattern no an-051
Yarn group E or C + C
-----------------------------------------------------------
Measurements: Width: approx. 100 cm / 39½''. Length: approx. 156 cm / 61 1/4''.
Materials:
DROPS ANDES from Garnstudio (belongs to yarn group E)
600 g color 5610, brown
200 g in following colors:
color 5310, light brown
color 0619, beige
color 4300, old pink
color 4276 misty rose
color 0206, light beige
color 7120, light gray green
color 7130, sea green

The piece can also be crocheted with yarn from:
"Alternative yarn (Yarn group E)" – see the link below.

DROPS CROCHET HOOK SIZE 9 MM / M/13 – or the size needed to get 8 double crochets on 10 cm / 4'' in width. 1 square measures 12 x 12 cm / 4¾''x4¾'', 1 octagon measures 28 cm / 11'' in diameter (measured from side to side).

-------------------------------------------------------

Alternative Yarn – See how to change yarns here
Yarn Groups A to F – Use the same pattern and change the yarn here
Yarn usage using an alternative yarn – Use our yarn converter here

-------------------------------------------------------

DROPS Andes
DROPS Andes
65% Wool, 35% Alpaca
from 6.60 $ /100g
Get the yarn to make this pattern from 132.00$.

The yarn cost is calculated from the pattern’s smallest size and the yarn’s cheapest product type. Looking for an even better price? You might find it on the DROPS Deals!

Pattern instructions

NOTE: This pattern is written in American English. All measurements in charts are in cm. For conversion from inches to cm - click here. There are different terms for crocheting in American and British English. If this pattern includes crochet, click for "crochet terms" here. For this pattern in British English, please click here.
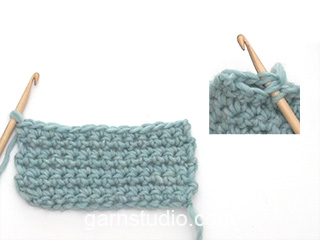
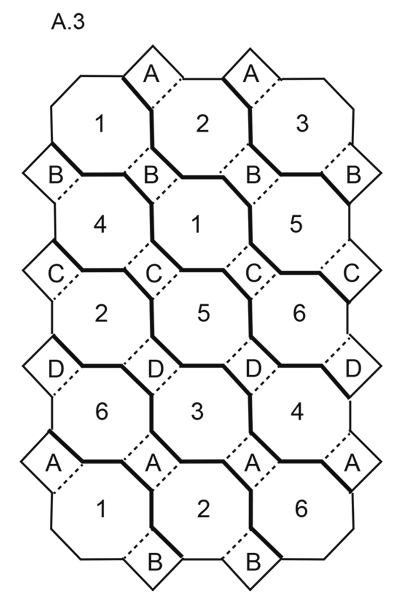
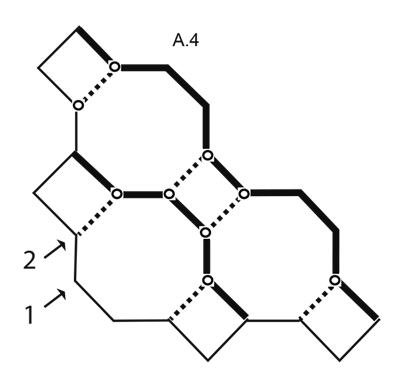
INFORMATION FOR THE PATTERN:

PATTERN:
See diagrams A.1 to A.4. Diagrams A.3 and A.4 show the assembly.

COLORS OCTAGON:
You will work a total of 15 octagons with the following color combinations:
OCTAGON-1 (3 items):
CAST ON + ROUND 1: light beige
ROUND 2: misty rose
ROUNDS 3-5: light brown
ROUND 6: brown

OCTAGON-2 (3 items):
CAST ON + ROUND 1: light beige
ROUND 2: misty rose
ROUNDS 3-5: old pink
ROUND 6: brown

OCTAGON-3 (2 items):
CAST ON + ROUND 1: light gray green
ROUND 2: sea green
ROUNDS 3-5: misty rose
ROUND 6: brown

OCTAGON-4 (2 ITEMS):
CAST ON + ROUND 1: Light brown
ROUND 2: beige
ROUNDS 3-5: light gray green
ROUND 6: brown

OCTAGON-5 (2 items):
CAST ON + ROUND 1: light brown
ROUND 2: old pink
ROUNDS 3-5: sea green
ROUND 6: brown

OCTAGON-6 (3 items):
CAST ON + ROUND 1: old pink
ROUND 2: light beige
ROUNDS 3-5: beige
ROUND 6: brown

COLORS SQUARE:
You will work a total of 20 squares with the following color combinations:
SQUARE-A (6 items)
CAST ON + ROUND 1: light gray green
ROUND 2: sea green
ROUND 3: brown

SQUARE-B (6 items):
CAST ON + ROUND 1: light beige
ROUND 2: light brown
ROUND 3: brown

SQUARE-C (4 items):
CAST ON + ROUND 1: light beige
ROUND 2: misty rose
ROUND 3: brown

SQUARE-D (4 items):
CAST ON + ROUND 1: misty rose
ROUND 2: old pink
ROUND 3: brown

COLOR CHANGE:
To get the neatest transition when changing colors, change the color when the last yarn over and pull through on the last stitch is to be worked, then pull the last yarn over with the new color through all the loops on the hook. Fasten the strands as you go.
----------------------------------------------------------

BLANKET:
The blanket consists of 15 octagons and 20 squares in varying color combinations. These crochet shapes are assembled at the end. Then an edge is worked around the whole blanket.

OCTAGON:
Work in the round according to diagram A.1 with hook size 9 mm / M/13. Read COLORS OCTAGON and COLOR CHANGE above. REMEMBER THE CROCHET GAUGE! One octagon measures 28 cm / 11'' in diameter measured from side to side.

SQUARE:
Work in the round according to diagram A.2 with hook size 9 mm / M/13. Read COLORS SQUARE and COLOR CHANGE above. REMEMBER THE CROCHET GAUGE! One square measures 12 x 12 cm / 4¾'' x 4¾''.

ASSEMBLY:
Lay the shapes out with the right shape number as shown in diagram A.3.
They are crocheted together with hook size 9 mm / M/13 and brown - see diagram A.4. They are worked together in diagonal stripes – see the thick line. Work 1 single crochet in the back loop of each single crochet through both layers. Then work the octagons/squares together as shown by the broken line. Work 1 slip stitch where 2 lots of double layers meet – see circle, 1 single crochet around the corner-space and 1 single crochet in the back loop of each of the 10 single crochets through both layers, 1 single crochet around the corner-space.

EDGE:
Work a finishing edge around the whole blanket with hook size 9 mm / M/13 and brown - see diagram A.4. Work 1 round with double crochets around the whole blanket by working 1 double crochet in each single crochet and around the chain-spaces, work as follows: Where there is an outward angle (see arrow-1), work 2 double crochets, 2 chain stitches and 2 double crochets around the chain-space. Where there is an inward angle (see arrow-2), work 1 double crochet around the chain-space of the first square/octagon and work 1 double crochet around the chain-space of the next square/octagon. The round starts with 3 chain stitches and finishes with 1 slip stitch in the 3rd chain stitch at the beginning of the round, then cut and fasten the strand.

Diagram

All measurements in charts are in cm.

symbols = slip stitch
symbols = chain stitch
symbols = single crochet in stitch
symbols = double crochet around the chain-space/chain-stitch ring
symbols = double crochet in stitch
symbols = treble crochet around the chain-stitch ring
symbols = 3 double treble crochets worked together as follows: Work 3 double treble crochets in the stitch – but wait with the last yarn over and pull through on all these double treble crochets, then pull the last yarn over through all 4 loops on the hook
symbols = 4 chain stitches, form them to a ring with 1 slip stitch in the first chain stitch – see point on circle, the round starts and finishes here
diagram
diagram
diagram
diagram
Do you have a question? See a list of frequently asked questions (FAQ)

Knitting tension is what determines the final measurements of your work, and is usually measured per 10 x 10 cm. It is provided like so: number of stitches in width x number of rows in height - eg: 19 stitches x 26 rows = 10 x 10 cm.

The knitting tension is very individual; some people knit/crochet loosely while others work tightly. You adjust the knitting tension with the needle size, which is why the suggested needle size only serve as a guide! You need to adjust this (up or down) to ensure that YOUR knitting tension matches the knitting tension provided in the pattern. If you work with a different knitting tension than provided you will have a different yarn consumption, and your work will have different measurements than what the pattern suggests.

The knitting tension also determines which yarns can replace each other. As long as you achieve the same knitting tension you can replace one yarn with another.

See DROPS lesson: How to measure your tension/gauge

See DROPS video: How to make a gauge tension swatch

The required amount of yarn is provided in grams, eg: 450 g. To calculate how many balls you’ll need you first need to know how many grams are in 1 ball (25g, 50g or 100g). This information is available if you click on the individual yarn quality on our pages. Divide the amount required with the amount of each ball. For example, if each ball is 50g (the most common amount), the calculation will be as follows: 450 / 50 = 9 balls.

The important thing when changing from one yarn to another is that the knitting/crochet tension remains the same. This is so that the measurements of the finished piece will be the same as on the sketch provided. It is easier to achieve the same knitting tension using yarns from the same yarn group. It is also possible to work with multiple strands of a thinner yarn to achieve the knitting tension of a thicker one. Please try our yarn converter. We recommend you to always work a test swatch.

Please NOTE: when changing yarn the garment might have a different look and feel to the garment in the photo, due to individual properties and qualities of each yarn.

See DROPS lesson: Can I use a different yarn than the one mentioned in the pattern?

All our yarns are categorised into yarn groups (from A to F) according to thickness and knitting tension – group A contains the thinnest yarns and group F the thickest. This makes it easier for you to find alternative yarns to our patterns, should you wish to switch yarn. All yarns within the same group have a similar knitting tension and can easily replace each other. However, different yarn qualities have different structures and properties which will give the finished work a unique look and feel.

Click here for an overview of the yarns in each yarn group

At the top of all our patterns you’ll find a link to our yarn converter, which is a helpful tool should you wish to use a different yarn than suggested. By filling in the yarn quality you wish to replace, the amount (in your size) and number of strands, the converter will present good alternative yarns with the same knitting tension. Additionally it will tell you how much you’ll require in the new qualities and whether you’ll need to work with multiple strands. Most skeins are 50g (some are 25g or 100g).

If the pattern is worked with multiple colours, every colour will have to be converted separately. Similarly, if the pattern is worked with several strands of different yarns (for example 1 strand Alpaca and 1 strand Kid-Silk) you will have to find alternatives for each, individually.

Click here to see our yarn converter

Since different yarns have different qualities and textures we have chosen to keep the original yarn in our patterns. However, you can easily find options among our available qualities by using our yarn converter, or simply pick a yarn from the same yarn group.

It is possible that some retailers still have discontinued yarns in stock, or that someone has a few skeins at home that they would like to find patterns for.

The yarn converter will provide both alternative yarn as well as required amount in the new quality.

If you think it's hard to decide what size to make, it can be a good idea to measure a garment you own already and like the size of. Then you can pick the size by comparing those measures with the ones available in the pattern's size chart.

You'll find the size chart at the bottom of the pattern.

See DROPS lesson: How to read size chart

The needle size provided in the pattern serves only as a guide, the important thing is to follow the knitting tension. And since knitting tension is very individual, you will have to adjust the needle size to ensure that YOUR tension is the same as in the pattern – maybe you’ll have to adjust 1, or even 2 needle sizes, up or down to achieve the correct tension. For this, we recommend that you work test swatches.

Should you work with a different knitting tension than the one provided, the measurements of the finished garment might deviate from the measurement sketch.

See DROPS lesson: How to measure your tension/gauge

See DROPS video: How to make a gauge tension swatch

Working a garment top-down provides more flexibility and room for personal adjustment. For example it is easier to try the garment on while working, as well as making adjustments to length of yoke and shoulder caps.

The instructions are carefully explaining every step, in the correct order. Diagrams are adjusted to the knitting direction and are worked as usual.

The diagram depicts all rows/rounds, and every stitch seen from the right side. It is read from bottom to top, from right to left. 1 square = 1 stitch.

When working back and forth, every other row is worked from the right side and every other row is worked from the wrong side. When working from the wrong side, the diagram will have to be worked reversed: from left to right, knit stitches are purled, purl stitches are knit etc.

When working in the round every round is worked from the right side and the diagram are worked from right to left on all rounds.

See DROPS lesson: How to read knitting diagrams

The diagram depicts all rows/rounds, and every stitch seen from the right side. It is worked from bottom to top, from right to left.

When working back and forth every other row is worked from the right side: from right to left and every other row is worked from the wrong side: from left to right.

When working in the round, every row in the diagram are worked from the right side, from right to left.

When working a circular diagram you start in the middle and work your way outwards, counter clockwise, row by row.

The rows usually start with a given number of chain stitches (equivalent to the height of the following stitch), this will either be depicted in the diagram or explained in the pattern.

See DROPS lesson: How to read crochet diagrams

Instructions for working several diagrams after each other on the same row/round, will often be written like so: “work A.1, A.2, A.3 a total of 0-0-2-3-4 times". This means you work A.1 once, then A.2 is worked once, and A.3 is repeated (in width) the number of times provided for your size – in this case like so: S = 0 times, M = 0 times, L=2 times, XL= 3 times and XXL = 4 times.

The diagrams are worked as usual: begin with the first row in A.1, then work the first row in A.2 etc.

See DROPS lesson: How to read knitting diagrams

See DROPS lesson: How to read crochet diagrams

The total width of the garment (from wrist-to-wrist) will be larger in the larger sizes, despite the actual sleeves being shorter. The larger sizes have longer sleeve caps and wider shoulders, so there will be a good fit in all sizes.

The measurement sketch/schematic drawing provides information regarding the full length of the garment. If it’s a jumper or a jacket the length is measured from the highest point on the shoulder (usually closest to the neckline), and straight down to the bottom of the garment. It is NOT measured from the tip of shoulder. Similarly, the length of yoke is measured from the highest point on the shoulder and down to where yoke is split into body and sleeves.

See DROPS lesson: How to read a schematic drawing

Diagrams are often repeated on the round or in height. 1 repeat is the diagram the way it appears in the pattern. If it says to work 5 repeats of A.1 in the round, then you work A.1 a total of 5 times after/next to each other in the round. If it says to work 2 repeats of A.1 vertically/in height you work the entire diagram once, then begin again at the start and work the entire diagram one more time.

Chain stitches are slightly narrower than other stitches and to avoid working the cast-on edge too tight, we simply chain more stitches to begin with. The stitch count will be adjusted on the following row to fit the pattern and measurement sketch.

The rib edge is more elastic and will contract slightly compared to, for example, stocking stitch. By increasing before the rib edge, you avoid a visible difference in width between the rib edge and the rest of the body.

It’s very easy to cast off too tightly, and by making yarn overs while casting off (and simultaneously casting these off) you avoid a too tight cast off edge.

See DROPS video: How to bind off with yarn overs (yo)

To achieve an even increase (or decrease) you can increase on, for example: every 3rd and 4th row alternately, like so: work 2 rows and increase on the 3rd row, work 3 rows and increase on the 4th. Repeat this until the increase is complete.

See DROPS lesson: Increase or decrease 1 st on every 3rd and 4th row alternately

Should you prefer to work in the round instead of back and forth, you may of course adjust the pattern. You’ll need to add steeks mid-front (usually 5 stitches), and follow the instructions. When you would normally turn and work from the wrong side, simply work across the steek and continue in the round. At the end you’ll cut the piece open, pick up stitches to work bands, and cover the cut edges.

See DROPS video: How to knit steeks and cut open

Should you prefer to work back and forth instead of in the round, you may of course adjust the pattern so you work the pieces separately and then assemble them at the end. Divide the stitches for the body in 2, add 1 edge stitch in each side (for sewing) and work the front and back pieces separately.

See DROPS lesson: Can I adapt a pattern for circular needles into straight needles?

Pattern repeats can vary slightly in the different sizes, in order to get the correct proportions. If you’re not working the exact same size as the garment in the photo, yours might deviate slightly. This has been carefully developed and adjusted so that the complete impression of the garment is the same in all sizes.

Make sure to follow instructions and diagrams for your size!

If you have found a pattern you like which is available in women’s size it’s not very difficult to convert it to men’s size. The biggest difference will be the length of sleeves and body. Start working on the women size that you think would fit across the chest. The additional length will be worked right before you cast off for the armhole/sleeve cap. If the pattern is worked top-down you can add the length right after the armhole or before the first decrease on sleeve.

Regarding additional yarn amount, this will depend on how much length you add, but it is better with a skein too many than too few.

All yarns will have excess fibres (from production) that might come off as lint or shedding. Brushed yarns (ie hairier yarns) have more of these loose, excess fibres, causing more shedding.

Shedding also depends on what is worn under or over the garment, and whether this pulls at the yarn fibres. It’s therefore not possible to guarantee that there will be no shedding

Below are some tips on how to get the best result when working with hairier yarns:

1. When the garment is finished (before you wash it) shake it vigorously so the looser hairs come off. NOTE: do NOT use a lint roller, brush or any method that pulls at the yarn.

2. Place the garment in a plastic bag and put it in your freezer - the temperature will cause the fibres to become less attached to each other, and excess fibres will come off easier.

3. Leave in the freezer for a few hours before taking it out and shaking it again.

4. Wash the garment according to the instructions on the yarn label.

Pilling is a natural process that happens to even the most exclusive of fibers. It's a natural sign of wear and tear that is hard to avoid, and that is most visible in high friction areas of your garment like a sweater's arms and cuffs.

You can make your garment look as new by removing the pilling, using a fabric comb or a pill/lint remover.

Still can't find the answer you need? Then scroll down and leave your question so one of our experts can try to help you. This will be done normally within 5 to 10 working days.
In the meantime, you can read the questions and answers that others have left to this pattern or join the DROPS Workshop on Facebook to get help from fellow knitters/crocheters!

You might also like...

Post a comment to pattern DROPS 180-9

We would love to hear what you have to say about this pattern!

If you want to leave a question, please make sure you select the correct category in the form below, to speed up the answering process. Required fields are marked *.

Comments / Questions (15)

country flag Nathalie Leclerc wrote:

Bonjour, à l’assemblage, je ne comprends ou débute le travail lorsqu’on dit crocheter 1 maille coulée au niveau où les 2 épaisseurs se rejoignent – voir cercle, 1 maille serrée autour de l’arceau du coin et 1 maille serrée dans le brin arrière de chacune des 10 mailles serrées en piquant dans les 2 épaisseurs, 1 maille serrée autour de l’arceau du coin.

28.04.2023 - 02:42

DROPS Design answered:

Cf réponse ci-dessous en espérant qu'elle vous sera utile.

28.04.2023 - 10:27

country flag Nathalie Leclerc wrote:

Bonjour, au niveau assemblage, je ne comprends pas le plan A.4. Ou le travail débute et termine lorsqu’on dit: Crocheter 1 maille coulée au niveau où les 2 épaisseurs se rejoignent – voir cercle, 1 maille serrée autour de l’arceau du coin et 1 maille serrée dans le brin arrière de chacune des 10 mailles serrées en piquant dans les 2 épaisseurs, 1 maille serrée autour de l’arceau du coin. De plus, il y a 3 épaisseurs en référence à “voir cercle”. Merci

28.04.2023 - 00:15

DROPS Design answered:

Bonjour Mme Leclerc, suivez d'abord les traits en gras pour assembler les motifs entre eux, par ex de bas en haut, vous assemblez 1 carré avec un hexagone, puis un côté de l'hexagone du bas avec l'hexagone du haut etc..; à ce niveau, suivez uniquement les traits en gras. Quand ces lignes diagonales sont faites, crochetez les motifs entre eux en suivant les lignes en pointillés: par ex, tout en bas, assemblez le carré avec l'hexagone en terminant par 1 maille coulée = cercle = transition entre le carré et les 2 hexagones. Bon assemblage!

28.04.2023 - 10:26

country flag Ida-Eline Engh wrote:

Hei! Jeg har bestilt garn etter oppskriften for teppet Gipsy Wagon men fargene ser ikke ut til å stemme med bildet. Jeg har nå to nyanser rosa, to nyanser blå og fire nyanser brunt / beige, mens på bildet er det to rosa, to blå, to brun / beige og to kaki / grønt...

14.01.2021 - 00:23

DROPS Design answered:

Hei Ida-Eline. Sjekk fargenr. du har på garnnøstene om det stemmer med det som står i oppskriften. Ut ifra det du skriver på hva du har fått, syns jeg det stemmer. Jeg kan ikke se noen kaki/grønn farge på teppet. Dette kan ha noe med fargeinnstillingene på de enkelte skjermene. mvh DROPS design

15.01.2021 - 13:11

country flag Sharon wrote:

Many thX for another lovely Pattern. I made mine :30cm and 13.5cm (blocked sizes) and used I only used 90g of light beige and >500g dark brown. I used the 6th brown for extra border ( BP HDC ) I recommend using 3410 amethyst instead of the old pink if you want a more uplifting colourway with slightly more contrast, the photo shows more contrast between colours than is actual, so changing the pink would remedy this as well. I hope you consider putting amethyst on your color list as an option .

28.02.2020 - 11:16

DROPS Design answered:

Dear Sharon, thanks for your suggestion - you are welcome to send us your link for our #dropsfan gallery - Read more here. Happy crocheting!

28.02.2020 - 14:23

country flag Sharon wrote:

For the octagon, I made first two rows with 7mm hooks and the rest with an 8mm. I dont understand that in the video the stitches are a lot looser crocheted than mine even though a 9mm is apparently used. like the dutch commentator, I also had to make the square with a 6mm hook to get 12cm, and also would have ended up with a much smaller octagon had I used the same size hook . Andes is a lovely yarn and I have Lots left for a cushion or two. There isnt as much constrast as the photo though

23.02.2020 - 23:40

DROPS Design answered:

Dear Sharon, everyone has its own tension, some crochet tight some other loose, you should try to check out which crochet hook size you would require to get the tension and maybe try to tighten your stitches in height if necessary - a href="https://www.garnstudio.com/faq.php?show=patterns&cid=19#question1">Read more here about tension. Happy crocheting!

24.02.2020 - 10:04

country flag Katie Garlic wrote:

Drops, Thank you for your answer. I saw cast on at the beginning of COLOURS OCTAGON: I read the whole pattern and saw it was crochet. Sorry aboutthat. I should have read the whole pattern.

05.07.2019 - 14:58

country flag Katie Garlic wrote:

Hi. Pattern says crochet. Why are the directions in knitting terms? Am I missing something?

03.07.2019 - 22:20

DROPS Design answered:

Hi Katie, please check your pattern once more as both our versions (in Brittish English and in US English as well) are correct and instructions are for crocheting. Happy crafting!

04.07.2019 - 00:22

country flag Suzie Korte wrote:

This is absolutely stunning

25.08.2018 - 23:10

country flag Dorothy J Baker wrote:

Absolutely Beautiful

25.08.2018 - 06:18

country flag Sofia Broborg wrote:

Hej! Går allt garn åt i alla färger till modell nr 180-9 eller är garnåtgången uträknad exakt? Funderar på om ev rest räcker till t ex ytterligare en rad...

23.10.2017 - 12:00

DROPS Design answered:

Hei Sofia. Vi har desverre ikke det nøyaktige garnforbruket som er tilbake, men du kan jo fint veie kvadratene (etter hver fargebytte) underveis når du hekler. Om du da ikke er ferdig med alle iflg oppskriften. Bare husk å nok til montering og kanten. God Fornøyelse!

23.10.2017 - 13:58