DROPS Muskat
DROPS Muskat
100% Cotton
from 1.85 £ /50g
Get the yarn to make this pattern from 7.40£.

The yarn cost is calculated from the pattern’s smallest size and the yarn’s cheapest product type. Looking for an even better price? You might find it on the DROPS Deals!

DROPS SS24

Mazo

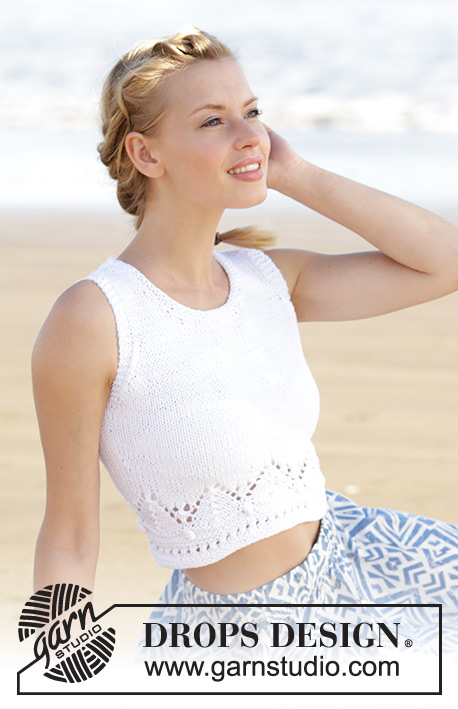
Top with V-neck, textured pattern and vents in the sides, worked bottom up in DROPS Muskat. Size: S - XXXL.

DROPS 178-66
DROPS design: Pattern r-709
Yarn group B
----------------------------------------------------------
Size: S - M - L - XL - XXL - XXXL
Materials:
DROPS MUSKAT from Garnstudio (belongs to yarn group B)
200-200-200-250-250-300 g colour 06, pink

DROPS CIRCULAR NEEDLE (60 cm) SIZE 4 mm – or size needed to get 21 stitches and 28 rows in stocking stitch = width 10 cm and 10 cm vertically.
----------------------------------------------------------

-------------------------------------------------------

Alternative Yarn – See how to change yarns here
Yarn Groups A to F – Use the same pattern and change the yarn here
Yarn usage using an alternative yarn – Use our yarn converter here

-------------------------------------------------------

DROPS Muskat
DROPS Muskat
100% Cotton
from 1.85 £ /50g
Get the yarn to make this pattern from 7.40£.

The yarn cost is calculated from the pattern’s smallest size and the yarn’s cheapest product type. Looking for an even better price? You might find it on the DROPS Deals!

Pattern instructions

NOTE: This pattern is written in British English. All measurements in charts are in cm. For conversion from cm to inches - click here. There are different terms for crocheting in British and American English. If this pattern includes crochet, click for "crochet terms" here. For this pattern in American English, please click here.
GARTER STITCH (back and forth):
Knit all rows. 1 ridge = knit 2 rows.

PATTERN:
See diagrams A.1 to A.4. Diagrams show all rows in pattern seen from the right side. Choose diagram for your size.

INCREASE TIP:
Increase 1 stitch by making a yarn over. On next row knit yarn over twisted to avoid hole. NOTE: Work the new stitches gradually in the pattern A.2.

DECREASE TIP:
Decrease 1 stitch inside 3 edge stitches in garter stitch. All decreases are done from the right side.
Decrease as follows after 3 edge stitches in garter stitch: Slip 1 stitch knitwise, knit 1, pass slipped stitch over stitch worked
Decrease as follows before 3 edge stitches in garter stitch: Begin 2 stitches before the 3 edge stitches in garter stitch and knit 2 together.
----------------------------------------------------------

TOP:
Worked back and forth in 2 parts and sewn together when finished.

BACK PIECE:
Cast on 81-89-97-107-119-133 stitches with Muskat on circular needle size 4 mm. Purl 1 row from wrong side. Work rib as follows (1st row = right side): Work 3 stitches in GARTER STITCH - see explanation above, knit 1 stitch, repeat A.1 (= 2 stitches) until 3 stitches remain on row, work 3 stitches in garter stitch. Continue pattern back and forth like this until A.1 has been worked vertically. Then work A.2 (= 2 stitches) over A.1. REMEMBER THE KNITTING TENSION! When piece measures 5 cm, cast on 1 new stitch at the end of the next 2 rows (marks where vents end) = 83-91-99-109-121-135 stitches.

Work pattern as follows: 1 edge stitch in garter stitch, knit 1, A.2 until 1 stitch remains, 1 edge stitch in garter stitch. When piece measures 7 cm, increase 1 stitch inside 1 edge stitches in garter stitch in each side - READ INCREASE TIP!
Repeat increase when piece measures 10 cm = 87-95-103-113-125-139 stitches. When piece measures 19-20-21-22-23-24 cm, work from arrow in A.3 over the middle 7 stitches on row - adjust so that this row marked with arrow is worked from wrong side. On first row from right side after A.3 work over the first 44-48-52-57-63-70 stitches on row and slip the remaining 44-48-52-57-63-70 stitches on 1 stitch holder.

RIGHT SIDE AT THE BACK:
= 44-48-52-57-63-70 stitches. READ ALL OF THE FOLLOWING SECTION - decrease for neck and armhole at the same time as follows:
Work pattern A.2 as before with 3 edge stitches in garter stitch towards neck and 1 edge stitch in garter stitch towards the side.
NECK:
On first row from right side begin decrease for neck. Decrease 1 stitch inside the 3 edge stitches in garter stitch - READ DECREASE TIP. Decrease like this every other row (i.e. on every row from right side) 16-18-20-22-24-26 times in total.
ARMHOLE:
When piece measures 21-22-23-24-25-26 cm, work in garter stitch over the outermost 10-10-12-11-11-14 stitches towards the side (including 1 edge stitch in garter stitch). When 4 rows have been worked (= 2 ridges) over these stitches, cast off the first 7-7-9-8-8-11 stitches at beginning of row for armhole. Work the next 3 stitches in garter stitch (= edge towards armhole). Decrease 1 stitch inside the 3 edge stitches in garter stitch towards the armhole. Decrease like this every other row (i.e. on every row from right side) 10-12-12-14-18-20 times in total.

After all cast offs and decreases for armhole and neck, 11-11-11-13-13-13 stitches remain on row for strap. Continue the pattern as before with 3 edge stitches in garter stitch in each side. Work strap as shown in A.4 - choose diagram for size. When piece measures 39-41-43-45-47-49 cm, cast off all stitches.

LEFT SIDE AT THE BACK:
Slip the 44-48-52-57-63-70 stitches from stitch holder in the other side back on circular needle size 4 mm and work the same way as right side at the back but reversed – NOTE: When casting off for armhole in the side, cast off at beginning of row from wrong side (instead of beginning of row from right side). The remaining decreases for armhole and neck are done from right side.

FRONT PIECE:
Cast on and work as back piece.

ASSEMBLY:
Sew the two straps together with grafting/kitchener stitches to avoid a chunky seam. Sew side seam inside 1 edge stitch in garter stitch in each side from armhole and down to vent. Repeat in the other side. Fasten off.

Diagram

symbols = knit from the right side, purl from the wrong side
symbols = purl from the right side, knit from the wrong side
symbols = knit 1 in front and back loop of same stitch (= 1 stitch increased)
symbols = begin on this row - adjust to begin from wrong side
diagram
diagram

Each of our patterns has specific tutorial videos to help you.

Do you have a question? See a list of frequently asked questions (FAQ)

Knitting tension is what determines the final measurements of your work, and is usually measured per 10 x 10 cm. It is provided like so: number of stitches in width x number of rows in height - eg: 19 stitches x 26 rows = 10 x 10 cm.

The knitting tension is very individual; some people knit/crochet loosely while others work tightly. You adjust the knitting tension with the needle size, which is why the suggested needle size is only meant as a guide! You need to adjust this (up or down) to ensure that YOUR knitting tension matches the knitting tension provided in the pattern. If you work with a different knitting tension than provided you will have a different yarn consumption, and your work will have different measurements than what the pattern suggests.

The knitting tension also determines which yarns can replace each other. As long as you achieve the same knitting tension you can replace one yarn with another.

See DROPS lesson: How to measure your tension/gauge

See DROPS video: How to make a gauge tension swatch

The required amount of yarn is provided in grams, eg: 450 g. To calculate how many balls you’ll need you first need to know how many grams are in 1 ball (25g, 50g or 100g). This information is available if you click on the individual yarn quality on our pages. Divide the amount required with the amount of each ball. For example, if each ball is 50g (the most common amount), the calculation will be as follows: 450 / 50 = 9 balls.

The important thing when changing from one yarn to another is that the knitting/crochet tension remains the same. This is so that the measurements of the finished piece will be the same as on the sketch provided. It is easier to achieve the same knitting tension using yarns from the same yarn group. It is also possible to work with multiple strands of a thinner yarn to achieve the knitting tension of a thicker one. Please try our yarn converter. We recommend you to always work a test swatch.

Please NOTE: when changing yarn the garment might have a different look and feel to the garment in the photo, due to individual properties and qualities of each yarn.

See DROPS lesson: Can I use a different yarn than the one mentioned in the pattern?

All our yarns are categorised into yarn groups (from A to F) according to thickness and knitting tension – group A contains the thinnest yarns and group F the thickest. This makes it easier for you to find alternative yarns to our patterns, should you wish to switch yarn. All yarns within the same group have a similar knitting tension and can easily replace each other. However, different yarn qualities have different structures and properties which will give the finished work a unique look and feel.

Click here for an overview of the yarns in each yarn group

At the top of all our patterns you’ll find a link to our yarn calculator, which is a helpful tool should you wish to use a different yarn than suggested. By filling in the yarn quality you wish to replace, the amount (in your size) and number of strands, the calculator will present good alternative yarns with the same knitting tension. Additionally it will tell you how much you’ll require in the new qualities and whether you’ll need to work with multiple strands. Most skeins are 50g (some are 25g or 100g).

If the pattern is worked with multiple colours, every colour will have to be calculated separately. Similarly, if the pattern is worked with several strands of different yarns (for example 1 strand Alpaca and 1 strand Kid-Silk) you will have to find alternatives for each, individually.

Click here to see our yarn calculator

Since different yarns have different qualities and textures we have chosen to keep the original yarn in our patterns. However, you can easily find options among our available qualities by using our yarn calculator, or simply pick a yarn from the same yarn group.

It is possible that some retailers still have discontinued yarns in stock, or that someone has a few skeins at home that they would like to find patterns for.

The yarn calculator will provide both alternative yarn as well as required amount in the new quality.

If you think it's hard to decide what size to make, it can be a good idea to measure a garment you own already and like the size of. Then you can pick the size by comparing those measures with the ones available in the pattern's size chart.

You'll find the size chart at the bottom of the pattern.

See DROPS lesson: How to read size chart

The needle size provided in the pattern serves only as a guide, the important thing is to follow the knitting tension. And since knitting tension is very individual, you will have to adjust the needle size to ensure that YOUR tension is the same as in the pattern – maybe you’ll have to adjust 1, or even 2 needle sizes, up or down to achieve the correct tension. For this, we recommend that you work test swatches.

Should you work with a different knitting tension than the one provided, the measurements of the finished garment might deviate from the measurement sketch.

See DROPS lesson: How to measure your tension/gauge

See DROPS video: How to make a tension/gauge swatch

Working a garment top-down provides more flexibility and room for personal adjustment. For example it is easier to try the garment on while working, as well as making adjustments to length of yoke and shoulder caps.

The instructions are carefully explaining every step, in the correct order. Diagrams are adjusted to the knitting direction and are worked as usual.

The diagram depicts all rows/rounds, and every stitch seen from the right side. It is read from bottom to top, from right to left. 1 square = 1 stitch.

When working back and forth, every other row is worked from the right side and every other row is worked from the wrong side. When working from the wrong side, the diagram will have to be worked reversed: from left to right, knit stitches are purled, purl stitches are knit etc.

When working in the round every round is worked from the right side and the diagram are worked from right to left on all rounds.

See DROPS lesson: How to read knitting diagrams

The diagram depicts all rows/rounds, and every stitch seen from the right side. It is worked from bottom to top, from right to left.

When working back and forth every other row is worked from the right side: from right to left and every other row is worked from the wrong side: from left to right.

When working in the round, every row in the diagram are worked from the right side, from right to left.

When working a circular diagram you start in the middle and work your way outwards, counter clockwise, row by row.

The rows usually start with a given number of chain stitches (equivalent to the height of the following stitch), this will either be depicted in the diagram or explained in the pattern.

See DROPS lesson: How to read crochet diagrams

Instructions for working several diagrams after each other on the same row/round, will often be written like so: “work A.1, A.2, A.3 a total of 0-0-2-3-4 times". This means you work A.1 once, then A.2 is worked once, and A.3 is repeated (in width) the number of times provided for your size – in this case like so: S = 0 times, M = 0 times, L=2 times, XL= 3 times and XXL = 4 times.

The diagrams are worked as usual: begin with the first row in A.1, then work the first row in A.2 etc.

See DROPS lesson: How to read knitting diagrams

See DROPS lesson: How to read crochet diagrams

The total width of the garment (from wrist-to-wrist) will be larger in the larger sizes, despite the actual sleeves being shorter. The larger sizes have longer sleeve caps and wider shoulders, so there will be a good fit in all sizes.

The measurement sketch/schematic drawing provides information regarding the full length of the garment. If it’s a jumper or a jacket the length is measured from the highest point on the shoulder closest to the neckline, and straight down to the bottom of the garment. It is NOT measured from the tip of shoulder. Similarly, the length of yoke is measured from the highest point on the shoulder and down to where yoke is split into body and sleeves.

On a jacket measures are never taken along bands, unless specifically stated. Always measure inside band stitches when measuring the length.

See DROPS lesson: How to read a schematic drawing

Diagrams are often repeated on the round or in height. 1 repeat is the diagram the way it appears in the pattern. If it says to work 5 repeats of A.1 in the round, then you work A.1 a total of 5 times after/next to each other in the round. If it says to work 2 repeats of A.1 vertically/in height you work the entire diagram once, then begin again at the start and work the entire diagram one more time.

Chain stitches are slightly narrower than other stitches and to avoid working the cast-on edge too tight, we simply chain more stitches to begin with. The stitch count will be adjusted on the following row to fit the pattern and measurement sketch.

The rib edge is more elastic and will contract slightly compared to, for example, stocking stitch. By increasing before the rib edge, you avoid a visible difference in width between the rib edge and the rest of the body.

It’s very easy to cast off too tightly, and by making yarn overs while casting off (and simultaneously casting these off) you avoid a too tight cast off edge.

See DROPS video: How to bind off with yarn overs (yo)

To achieve an even increase (or decrease) you can increase on, for example: every 3rd and 4th row alternately, like so: work 2 rows and increase on the 3rd row, work 3 rows and increase on the 4th. Repeat this until the increase is complete.

See DROPS lesson: Increase or decrease 1 st on every 3rd and 4th row alternately

Should you prefer to work in the round instead of back and forth, you may of course adjust the pattern. You’ll need to add steeks mid-front (usually 5 stitches), and follow the instructions. When you would normally turn and work from the wrong side, simply work across the steek and continue in the round. At the end you’ll cut the piece open, pick up stitches to work bands, and cover the cut edges.

See DROPS video: How to knit steeks and cut open

Should you prefer to work back and forth instead of in the round, you may of course adjust the pattern so you work the pieces separately and then assemble them at the end. Divide the stitches for the body in 2, add 1 edge stitch in each side (for sewing) and work the front and back pieces separately.

See DROPS lesson: Can I adapt a pattern for circular needles into straight needles?

Pattern repeats can vary slightly in the different sizes, in order to get the correct proportions. If you’re not working the exact same size as the garment in the photo, yours might deviate slightly. This has been carefully developed and adjusted so that the complete impression of the garment is the same in all sizes.

Make sure to follow instructions and diagrams for your size!

If you have found a pattern you like which is available in women’s size it’s not very difficult to convert it to men’s size. The biggest difference will be the length of sleeves and body. Start working on the women size that you think would fit across the chest. The additional length will be worked right before you cast off for the armhole/sleeve cap. If the pattern is worked top-down you can add the length right after the armhole or before the first decrease on sleeve.

Regarding additional yarn amount, this will depend on how much length you add, but it is better with a skein too many than too few.

All yarns will have excess fibres (from production) that might come off as lint or shedding. Brushed yarns (ie hairier yarns) have more of these loose, excess fibres, causing more shedding.

Shedding also depends on what is worn under or over the garment, and whether this pulls at the yarn fibres. It’s therefore not possible to guarantee that there will be no shedding

Below are some tips on how to get the best result when working with hairier yarns:

1. When the garment is finished (before you wash it) shake it vigorously so the looser hairs come off. NOTE: do NOT use a lint roller, brush or any method that pulls at the yarn.

2. Place the garment in a plastic bag and put it in your freezer - the temperature will cause the fibres to become less attached to each other, and excess fibres will come off easier.

3. Leave in the freezer for a few hours before taking it out and shaking it again.

4. Wash the garment according to the instructions on the yarn label.

Pilling is a natural process that happens to even the most exclusive of fibers. It's a natural sign of wear and tear that is hard to avoid, and that is most visible in high friction areas of your garment like a sweater's arms and cuffs.

You can make your garment look as new by removing the pilling, using a fabric comb or a pill/lint remover.

Still can't find the answer you need? Then scroll down and leave your question so one of our experts can try to help you. This will be done normally within 5 to 10 working days.
In the meantime, you can read the questions and answers that others have left to this pattern or join the DROPS Workshop on Facebook to get help from fellow knitters/crocheters!

You might also like...

Mazo

Gabi, Germany

Mazo

Jenny, Finland

Post a comment to pattern DROPS 178-66

We would love to hear what you have to say about this pattern!

If you want to leave a question, please make sure you select the correct category in the form below, to speed up the answering process. Required fields are marked *.

Comments / Questions (46)

country flag Alysha Magtuto wrote:

Hello! When we get to the row of A.2 where we cast on 1 stitch at the end of the row, do we start the following row by knitting the stitch that was just casted on?

01.08.2020 - 11:27

DROPS Design answered:

Dear Mrs Magtuto, after you have cast on 1 st at the end of first of 2 rows, knit the new st (= edge stitch in garter stitch) then after you have cast on 1 st at the end of 2nd row, work: 1 edge st in garter st, K1, A.2 until 1 st remain, 1 edge st in garter st. Happy knitting!

03.08.2020 - 07:42

country flag Winki wrote:

Zeigt das Muster die Maschen wie sie auf der Vorderseite erscheinen? Bei A3 ist die Reihe mit dem Pfeil aber eine Hinreihe!

27.07.2020 - 17:06

DROPS Design answered:

Liebe Winki, ja, es sind alle Reihen eingezeichnet und A.1 und A.2 beginnen mit einer Hin-Reihe. Bei A.3 soll allerdings tatsächlich mit einer Rück-Reihe begonnen werden (Reihe mit Pfeil), damit sich der V-Ausschnitt, den Sie mit A.3 einleiten, optisch absetzt. Gutes Gelingen!

28.07.2020 - 11:21

country flag Liesel Thompson wrote:

Please clarify for me? For A2 pattern is the 2nd row Which will be worked from the wrong side be a row of purl stitch or knit stitch please?

17.07.2020 - 16:12

DROPS Design answered:

Hi Liesel, Row 2 in A.2 is purled, as it is from the wrong side. Happy knitting!

20.07.2020 - 07:32

country flag Liesel Thompson wrote:

Please explain how there are 48 stitches on the left and right back when the total stitches are 95? After 20cm working on 95 stitches are we meant to increase 1 somewhere?

15.07.2020 - 22:26

DROPS Design answered:

Dear Mrs Thompson, you increase one stitch in A.3 (next to last row = 3rd symbol from diagram text) so that there are 96 sts on needle. Happy knitting!

16.07.2020 - 09:59

country flag Johanne Villars Jørgensen wrote:

Hej. Det er sådan et flot mønster. Jeg ønsker at strikke toppen så den bliver lidt længere, er der da et stykke af opskriften jeg kan gentage til den får den ønskede længde? De bedste hilsner fra Johanne.

07.07.2020 - 23:09

DROPS Design answered:

Hei Johanne. Du kan strikke / fortsette med dette mønstret mellom første og siste økning: Strikk mønster slik: 1 kantmaske rille, 1 rett, A.2 til det gjenstår 1 maske, 1 kantmaske i rille, til du har strikket de ekstra cm du ønsker. Husk å nok garn. God Fornøyelse!

13.07.2020 - 08:50

country flag India Saleem wrote:

Please can you clarify - is the first row purl 2nd row - is knit 4 then A1 (1P,1K) Knit last 3 stiches pattern is confusing - thanks India

19.06.2020 - 15:42

DROPS Design answered:

Dear Mrs Saleem, do you mean at the very beg? you first purl 1 row, then next row will be worked from RS with A.1 = Purl 1, K1. Continue then in rib like this as shown in A.1: K over K and P over P. but work 3 sts in garter stitch on each side and knit 1 before working A.1 (so that pattern starts and ends with K1 from RS). Happy knitting!

19.06.2020 - 16:15

country flag Jyoti Patel wrote:

I would like to reduce to an XS, how many stitches should i start with? First line is pearl, could you explain the next line for the ribbed and how to follow the box diagram pattern as i am unable to do so. Thank you. Help would be much appreciated.

13.06.2020 - 19:24

DROPS Design answered:

Dear Mrs Patel, we are unfortunately not able to adapt every pattern to every single request, please contact your yarn store for any further individual assistance. Read more here about diagrams and work A.1 in rib P1/K1 (seen from RS) - Happy knitting!

15.06.2020 - 08:53

country flag Teresa wrote:

Ora mi è chiaro! Grazie!

05.04.2020 - 15:45

country flag Teresa wrote:

Sono arrivata alle diminuzioni per scollo e scalfo: dal disegno sembra che inizino contemporaneamente, è esatto? I 22cm (taglia M) coincidono per me con il primo ferro dritto per le diminuzioni dello scollo. Grazie

05.04.2020 - 00:55

DROPS Design answered:

Buongiorno Teresa. Per la taglia M, a 22 cm divide il lavoro al centro. Le diminuzioni per lo scollo iniziano al primo ferro sul diritto del lavoro. Per lo scalfo, lavora a legaccio le 10 m sul lato dello scalfo per 4 ferri, poi intreccia 7 m per lo scalfo e prosegue con le diminuzioni come indicato nel testo. Buon lavoro!

05.04.2020 - 08:30

country flag Catherine Sybille Gervais wrote:

Bonjour, Je tricote la taille large et je n’ai pas assez de 200 gr de drops muskat pour la tricoter au complet. Pourtant ma swatch indique que j’ai parfaitement la bonne tension. N’y a t il pas assez de laine dans le 200gr pour tricoter une swatch et le patron? Merci

19.03.2020 - 03:38