DROPS Safran
DROPS Safran
100% Cotton
from 1.55 € /50g
Get the yarn to make this pattern from 1.55€.

The yarn cost is calculated from the pattern’s smallest size and the yarn’s cheapest product type. Looking for an even better price? You might find it on the DROPS Deals!

DROPS SS24

So Charming Socks

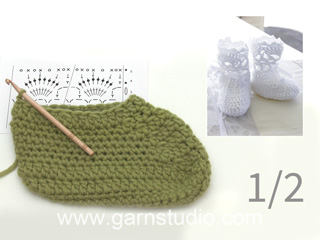
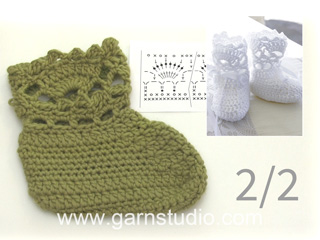
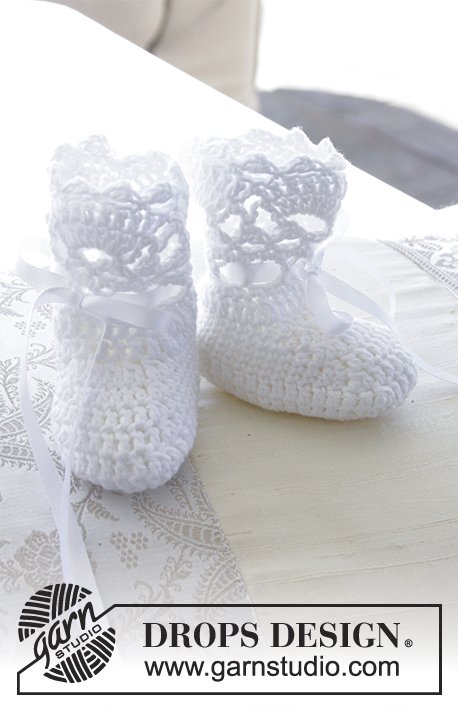
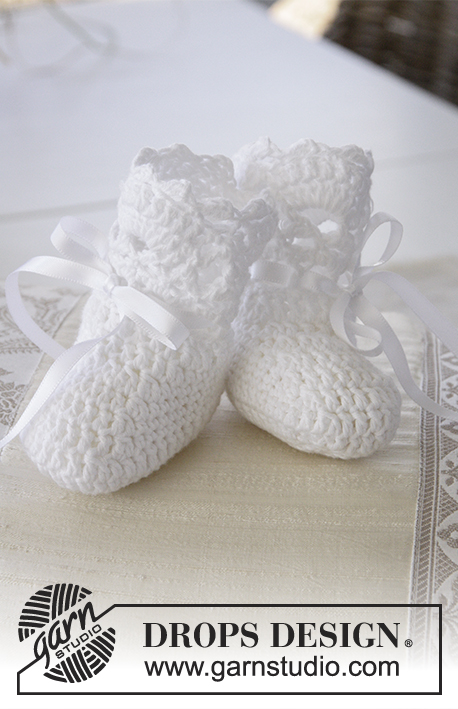
Crocheted baby slippers with fan edge for Christening or other special occasions in DROPS Safran. Sizes 15 - 23.

DROPS Baby 29-4
DROPS Design: Pattern no e-076-by
Yarn group A
-----------------------------------------------------------
Sizes: 15/17 - 18/19 - 20/21 - 22/23
For foot length: 10-11-12-13 cm
Materials:
DROPS SAFRAN from Garnstudio (belongs to yarn group A)
50 g for all sizes in colour 17, white

DROPS CROCHET HOOK SIZE 3 MM – or the size needed to get 24 double crochets/treble crochets on 10 cm in width.
ACCESSORIES: Approx.1 metre silk ribbon (approx. 5 mm wide).
----------------------------------------------------------

-------------------------------------------------------

Alternative Yarn – See how to change yarns here
Yarn Groups A to F – Use the same pattern and change the yarn here
Yarn usage using an alternative yarn – Use our yarn converter here

-------------------------------------------------------

DROPS Safran
DROPS Safran
100% Cotton
from 1.55 € /50g
Get the yarn to make this pattern from 1.55€.

The yarn cost is calculated from the pattern’s smallest size and the yarn’s cheapest product type. Looking for an even better price? You might find it on the DROPS Deals!

Pattern instructions

CROCHET INFO:
At the beginning of each round/row of double crochets, replace the first double crochet with 1 chain stitch. When working in the round, finish the round with 1 slip stitch in the chain stitch from the beginning of the round. When working back and forth, finish the row with 1 double crochet in the 3rd chain stitch from the beginning of row of treble crochets.
At the beginning of each round/row of treble crochets, replace the first treble crochet with 3 chain stitches. When working in the round, finish the round with 1 slip stitch in the 3rd chain stitch from the beginning of the round. When working back and forth, finish the row with 1 treble crochet in the chain stitch from the beginning of the row of double crochets.

INCREASE TIP:
Increase 1 double crochet/treble crochet by working 2 double crochets/treble crochets in the same stitch.

DECREASE TIP:
Work 1 double crochet/treble crochet, but wait with the last yarn over and pull through (= 2 loops on the hook), then work the next double crochet/treble crochet, but when making the last pull through, pull the strand through all the loops on the hook - 1 double crochet/treble crochet decreased.

CROCHET TIP:
On the round after the treble crochets at the front of the slipper have been worked together 2 and 2, work a little tighter at the front of the slipper, i.e. the strand is tightened a little between each treble crochet worked. This is done to prevent the mid piece at the front of the slipper being loose.

PATTERN:
See diagrams A.1.
----------------------------------------------------------

SLIPPER:
READ CROCHET INFO and start with the sole – NOTE: Work in each stitch (not between stitches). REMEMBER THE CROCHET TENSION!
Work 19-21-23-25 chain stitches (including 1 chain stitch to turn) with hook size 3 mm and Safran. 
The first row is worked as follows: 1 double crochet in the 2nd chain stitch from the hook, 1 double crochet in each of the next 17-19-21-23 chain stitches = 18-20-22-24 double crochets, turn the piece. Continue by working 1 double crochet in each double crochet from the previous row AT THE SAME TIME as you increase 2 double crochets at the beginning and end of the first row by working 3 double crochets in the first and last double crochet on the row = 22-24-26-28 double crochets.
Work double crochets back and forth until there is 1 row left before the piece measures 3-4-4-5 cm. Now decrease 2 double crochets in each side – READ DECREASE TIP = 18-20-22-24 double crochets on the row – NOTE: At the end of the row start decreasing when there are 4 double crochets left, then work the last 4 double crochets together 2 and 2. The piece measures approx. 3-4-4 (5) cm. Cut and fasten the strand, the sole is now finished.
Continue by working treble crochets around the sole as follows:
ROUND 1: Start mid back (= middle of the one short side) - Work 1 slip stitch in the first stitch, 3 chain stitches (= 1 treble crochet), work 1-2-2-3 treble crochets to the corner, 2 treble crochets in the corner, 1 treble crochet in each of the 18-20-22-24 double crochets along the side, 2 treble crochets in the corner, 4-6-6-8 treble crochets along the short side (= the toe), 2 treble crochets in the corner, 18-20-22-24 treble crochets along the side, 2 treble crochets in the corner and 2-3-3-4 treble crochets along the short side mid back, finish with 1 slip stitch in the 3rd chain stitch at the beginning of the round = 52-60-64-72 treble crochets.
NEXT ROUND IN SIZE 22/23 (this round is not worked in the other sizes): Work 1 round with 1 treble crochet in each treble crochet = 72 treble crochets.
NEXT ROUND IS WORKED AS FOLLOWS IN ALL SIZES:
Work 1 treble crochet in each treble crochet, but decrease 1 treble crochet in each of the 2 corners at the front of the toe – READ DECREASE TIP = 50-58-62-70 treble crochets.
CONTINUE BY WORKING AS FOLLOWS FROM MID BACK (work 1 stitch in each stitch from the previous round):
ROUND 1: 19-22-24-27 double crochets, 1 half treble crochet, work 2 treble crochets together – READ DECREASE TIP, 6-8-8-10 treble crochets, work 2 treble crochets together, 1 half treble crochet and 19-22-24-27 double crochets = 48-56-60-68 stitches.
ROUND 2: 18-21-23-26 double crochets, 1 half treble crochet, work 2 treble crochets together, 6-8-8-10 treble crochets, work 2 treble crochets together, 1 half treble crochet and 18-21-23-26 double crochets = 46-54-58-66 stitches.
ROUND 3: 17-20-22-25 double crochets, 1 half treble crochet, work 2 treble crochets together, 6-8-8-10 treble crochets, work 2 treble crochets together, 1 half treble crochet and 17-20-22-25 double crochets = 44-52-56-64 stitches.
ROUND 4 IN SIZE 22/23 (this round is not worked in the other sizes): 24 double crochets, 1 half treble crochet, work 2 treble crochets together, 10 treble crochets, work 2 treble crochets together, 1 half treble crochet and 24 double crochets = 62 stitches.
THE NEXT ROUND IS WORKED AS FOLLOWS IN ALL SIZES:
16-19-21-23 double crochets, 1 half treble crochet, work the next 10-12-12-14 treble crochets together 2 and 2, 1 half treble crochet and 16-19-21-23 double crochets = 39-46-50-55 stitches.
THE NEXT ROUND IS WORKED AS FOLLOWS IN ALL SIZES:
READ CROCHET TIP and work 14-17-19-21 double crochets, 1 half treble crochet, work 2 treble crochets together, 5-6-6-7 treble crochets, work 2 treble crochets together, 1 half treble crochet and 14-17-19-21 double crochets = 37-44-48-53 stitches.
THE NEXT ROUND IS WORKED AS FOLLOWS IN SIZE 22/23 (this round is not worked in the other sizes): 20 double crochets, 1 half treble crochet, work 2 treble crochets together, 7 treble crochets, work 2 treble crochets together, 1 half treble crochet and 20 double crochets = 51 stitches.
ALL SIZES:
= 37-44-48-51 stitches. Work 1-1-2-2 rounds with 1 treble crochet in each treble crochet AT THE SAME TIME as the number of stitches is adjusted to 30-36-36-36 treble crochets on the 1st round – READ INCREASE TIP/ DECREASE TIP – NOTE: If you wish the slipper to be bigger or smaller in the opening, the number of stitches can be adjusted to the desired measurements, but because of the pattern, the number of stitches needs to be divisible by 6.

FAN PATTERN:
ROUND 1: Work 1 double crochet in each treble crochet = 30-36-36-36 double crochets.
ROUND 2 (= row of holes for the silk ribbon): * 1 half treble crochet in the first/next double crochet, 2 chain stitches, skip 2 double crochets *, repeat from *-* the rest of the round = 10-12-12-12 half treble crochets with 2 chain stitches between each.
ROUND 3: Work 1 double crochet in each treble crochet and 3 double crochets around each chain-space, but in Size 15/17 only work 2 double crochets around the chain-space a total of 3 times on the round and in Sizes 18/19 + 20/21 + 22/23 work 4 double crochets around the chain-space a total of 1 time on the round) = 37-49-49-49 double crochets (the number of stitches is divisible by 12 + 1).
Continue by working the fan pattern in the round as follows: work A.1A over the first stitch, then work 3-4-4-4 repeats of A.1B. When A.1 has been completed, cut and fasten the strand.
Work another slipper in the same way.

SILK RIBBON:
Cut the silk ribbon into two equal lengths. Start mid front on the one slipper and thread the ribbon up and down through the row of holes. Tie a bow mid front. Do the same on the other slipper.

Diagram

symbols = this round is described in the text
symbols = the round starts with 1 chain stitch and finishes with 1 slip stitch in the chain stitch
symbols = double crochet in stitch
symbols = double crochet in the top of picot
symbols = double crochet around the chain-space
symbols = chain stitch
symbols = 1 picot: 3 chain stitches, 1 treble crochet in the first chain stitch worked
symbols = treble crochet around the chain-space
symbols = treble crochet in stitch from previous round
symbols = the round starts with 3 chain stitches and finishes with 1 slip stitch in the 3rd chain stitch from the beginning of the round
symbols = double crochet worked in this treble crochet
diagram

Each of our patterns has specific tutorial videos to help you.

Do you have a question? See a list of frequently asked questions (FAQ)

Knitting tension is what determines the final measurements of your work, and is usually measured per 10 x 10 cm. It is provided like so: number of stitches in width x number of rows in height - eg: 19 stitches x 26 rows = 10 x 10 cm.

The knitting tension is very individual; some people knit/crochet loosely while others work tightly. You adjust the knitting tension with the needle size, which is why the suggested needle size is only meant as a guide! You need to adjust this (up or down) to ensure that YOUR knitting tension matches the knitting tension provided in the pattern. If you work with a different knitting tension than provided you will have a different yarn consumption, and your work will have different measurements than what the pattern suggests.

The knitting tension also determines which yarns can replace each other. As long as you achieve the same knitting tension you can replace one yarn with another.

See DROPS lesson: How to measure your tension/gauge

See DROPS video: How to make a gauge tension swatch

The required amount of yarn is provided in grams, eg: 450 g. To calculate how many balls you’ll need you first need to know how many grams are in 1 ball (25g, 50g or 100g). This information is available if you click on the individual yarn quality on our pages. Divide the amount required with the amount of each ball. For example, if each ball is 50g (the most common amount), the calculation will be as follows: 450 / 50 = 9 balls.

The important thing when changing from one yarn to another is that the knitting/crochet tension remains the same. This is so that the measurements of the finished piece will be the same as on the sketch provided. It is easier to achieve the same knitting tension using yarns from the same yarn group. It is also possible to work with multiple strands of a thinner yarn to achieve the knitting tension of a thicker one. Please try our yarn converter. We recommend you to always work a test swatch.

Please NOTE: when changing yarn the garment might have a different look and feel to the garment in the photo, due to individual properties and qualities of each yarn.

See DROPS lesson: Can I use a different yarn than the one mentioned in the pattern?

All our yarns are categorised into yarn groups (from A to F) according to thickness and knitting tension – group A contains the thinnest yarns and group F the thickest. This makes it easier for you to find alternative yarns to our patterns, should you wish to switch yarn. All yarns within the same group have a similar knitting tension and can easily replace each other. However, different yarn qualities have different structures and properties which will give the finished work a unique look and feel.

Click here for an overview of the yarns in each yarn group

At the top of all our patterns you’ll find a link to our yarn calculator, which is a helpful tool should you wish to use a different yarn than suggested. By filling in the yarn quality you wish to replace, the amount (in your size) and number of strands, the calculator will present good alternative yarns with the same knitting tension. Additionally it will tell you how much you’ll require in the new qualities and whether you’ll need to work with multiple strands. Most skeins are 50g (some are 25g or 100g).

If the pattern is worked with multiple colours, every colour will have to be calculated separately. Similarly, if the pattern is worked with several strands of different yarns (for example 1 strand Alpaca and 1 strand Kid-Silk) you will have to find alternatives for each, individually.

Click here to see our yarn calculator

Since different yarns have different qualities and textures we have chosen to keep the original yarn in our patterns. However, you can easily find options among our available qualities by using our yarn calculator, or simply pick a yarn from the same yarn group.

It is possible that some retailers still have discontinued yarns in stock, or that someone has a few skeins at home that they would like to find patterns for.

The yarn calculator will provide both alternative yarn as well as required amount in the new quality.

If you think it's hard to decide what size to make, it can be a good idea to measure a garment you own already and like the size of. Then you can pick the size by comparing those measures with the ones available in the pattern's size chart.

You'll find the size chart at the bottom of the pattern.

See DROPS lesson: How to read size chart

The needle size provided in the pattern serves only as a guide, the important thing is to follow the knitting tension. And since knitting tension is very individual, you will have to adjust the needle size to ensure that YOUR tension is the same as in the pattern – maybe you’ll have to adjust 1, or even 2 needle sizes, up or down to achieve the correct tension. For this, we recommend that you work test swatches.

Should you work with a different knitting tension than the one provided, the measurements of the finished garment might deviate from the measurement sketch.

See DROPS lesson: How to measure your tension/gauge

See DROPS video: How to make a tension/gauge swatch

Working a garment top-down provides more flexibility and room for personal adjustment. For example it is easier to try the garment on while working, as well as making adjustments to length of yoke and shoulder caps.

The instructions are carefully explaining every step, in the correct order. Diagrams are adjusted to the knitting direction and are worked as usual.

The diagram depicts all rows/rounds, and every stitch seen from the right side. It is read from bottom to top, from right to left. 1 square = 1 stitch.

When working back and forth, every other row is worked from the right side and every other row is worked from the wrong side. When working from the wrong side, the diagram will have to be worked reversed: from left to right, knit stitches are purled, purl stitches are knit etc.

When working in the round every round is worked from the right side and the diagram are worked from right to left on all rounds.

See DROPS lesson: How to read knitting diagrams

The diagram depicts all rows/rounds, and every stitch seen from the right side. It is worked from bottom to top, from right to left.

When working back and forth every other row is worked from the right side: from right to left and every other row is worked from the wrong side: from left to right.

When working in the round, every row in the diagram are worked from the right side, from right to left.

When working a circular diagram you start in the middle and work your way outwards, counter clockwise, row by row.

The rows usually start with a given number of chain stitches (equivalent to the height of the following stitch), this will either be depicted in the diagram or explained in the pattern.

See DROPS lesson: How to read crochet diagrams

Instructions for working several diagrams after each other on the same row/round, will often be written like so: “work A.1, A.2, A.3 a total of 0-0-2-3-4 times". This means you work A.1 once, then A.2 is worked once, and A.3 is repeated (in width) the number of times provided for your size – in this case like so: S = 0 times, M = 0 times, L=2 times, XL= 3 times and XXL = 4 times.

The diagrams are worked as usual: begin with the first row in A.1, then work the first row in A.2 etc.

See DROPS lesson: How to read knitting diagrams

See DROPS lesson: How to read crochet diagrams

The total width of the garment (from wrist-to-wrist) will be larger in the larger sizes, despite the actual sleeves being shorter. The larger sizes have longer sleeve caps and wider shoulders, so there will be a good fit in all sizes.

The measurement sketch/schematic drawing provides information regarding the full length of the garment. If it’s a jumper or a jacket the length is measured from the highest point on the shoulder closest to the neckline, and straight down to the bottom of the garment. It is NOT measured from the tip of shoulder. Similarly, the length of yoke is measured from the highest point on the shoulder and down to where yoke is split into body and sleeves.

On a jacket measures are never taken along bands, unless specifically stated. Always measure inside band stitches when measuring the length.

See DROPS lesson: How to read a schematic drawing

Diagrams are often repeated on the round or in height. 1 repeat is the diagram the way it appears in the pattern. If it says to work 5 repeats of A.1 in the round, then you work A.1 a total of 5 times after/next to each other in the round. If it says to work 2 repeats of A.1 vertically/in height you work the entire diagram once, then begin again at the start and work the entire diagram one more time.

Chain stitches are slightly narrower than other stitches and to avoid working the cast-on edge too tight, we simply chain more stitches to begin with. The stitch count will be adjusted on the following row to fit the pattern and measurement sketch.

The rib edge is more elastic and will contract slightly compared to, for example, stocking stitch. By increasing before the rib edge, you avoid a visible difference in width between the rib edge and the rest of the body.

It’s very easy to cast off too tightly, and by making yarn overs while casting off (and simultaneously casting these off) you avoid a too tight cast off edge.

See DROPS video: How to bind off with yarn overs (yo)

To achieve an even increase (or decrease) you can increase on, for example: every 3rd and 4th row alternately, like so: work 2 rows and increase on the 3rd row, work 3 rows and increase on the 4th. Repeat this until the increase is complete.

See DROPS lesson: Increase or decrease 1 st on every 3rd and 4th row alternately

Should you prefer to work in the round instead of back and forth, you may of course adjust the pattern. You’ll need to add steeks mid-front (usually 5 stitches), and follow the instructions. When you would normally turn and work from the wrong side, simply work across the steek and continue in the round. At the end you’ll cut the piece open, pick up stitches to work bands, and cover the cut edges.

See DROPS video: How to knit steeks and cut open

Should you prefer to work back and forth instead of in the round, you may of course adjust the pattern so you work the pieces separately and then assemble them at the end. Divide the stitches for the body in 2, add 1 edge stitch in each side (for sewing) and work the front and back pieces separately.

See DROPS lesson: Can I adapt a pattern for circular needles into straight needles?

Pattern repeats can vary slightly in the different sizes, in order to get the correct proportions. If you’re not working the exact same size as the garment in the photo, yours might deviate slightly. This has been carefully developed and adjusted so that the complete impression of the garment is the same in all sizes.

Make sure to follow instructions and diagrams for your size!

If you have found a pattern you like which is available in women’s size it’s not very difficult to convert it to men’s size. The biggest difference will be the length of sleeves and body. Start working on the women size that you think would fit across the chest. The additional length will be worked right before you cast off for the armhole/sleeve cap. If the pattern is worked top-down you can add the length right after the armhole or before the first decrease on sleeve.

Regarding additional yarn amount, this will depend on how much length you add, but it is better with a skein too many than too few.

All yarns will have excess fibres (from production) that might come off as lint or shedding. Brushed yarns (ie hairier yarns) have more of these loose, excess fibres, causing more shedding.

Shedding also depends on what is worn under or over the garment, and whether this pulls at the yarn fibres. It’s therefore not possible to guarantee that there will be no shedding

Below are some tips on how to get the best result when working with hairier yarns:

1. When the garment is finished (before you wash it) shake it vigorously so the looser hairs come off. NOTE: do NOT use a lint roller, brush or any method that pulls at the yarn.

2. Place the garment in a plastic bag and put it in your freezer - the temperature will cause the fibres to become less attached to each other, and excess fibres will come off easier.

3. Leave in the freezer for a few hours before taking it out and shaking it again.

4. Wash the garment according to the instructions on the yarn label.

Pilling is a natural process that happens to even the most exclusive of fibers. It's a natural sign of wear and tear that is hard to avoid, and that is most visible in high friction areas of your garment like a sweater's arms and cuffs.

You can make your garment look as new by removing the pilling, using a fabric comb or a pill/lint remover.

Still can't find the answer you need? Then scroll down and leave your question so one of our experts can try to help you. This will be done normally within 5 to 10 working days.
In the meantime, you can read the questions and answers that others have left to this pattern or join the DROPS Workshop on Facebook to get help from fellow knitters/crocheters!

You might also like...

Post a comment to pattern DROPS Baby 29-4

We would love to hear what you have to say about this pattern!

If you want to leave a question, please make sure you select the correct category in the form below, to speed up the answering process. Required fields are marked *.

Comments / Questions (15)

country flag Mette Nielsen wrote:

Kære Drops design Jeg kommenterer her da jeg ikke ved hvordan jeg ellers får fat på jer. Jeg skriver fordi der er en butik på Etsy, der sælger drops mønstre i butikkens eget navn og kalder designsne for deres egne. Hvordan melder vi dette til Drops, så de kan tage deres rettigheder tilbage og lukke butikken?! Mange tak

16.02.2021 - 16:09

DROPS Design answered:

Hej Mette, tak for info, vi skal se på det :)

18.02.2021 - 09:44

country flag Faith wrote:

Thanks for creating this blog. Your crochet sockets are beautiful and the colors are attractive. I would love you to make a video of it. So I can learn how to make mine as well. I await your urgent reply and thanks once more for creating this blog.

22.05.2020 - 13:54

country flag Margret wrote:

Guten Tag Nicht nur für dieses Modell möchte ich mich herzlich bedanken.Auch die Tatsache, dass man die Anleitungen ausdrucken kann, ohne bei einer Firma seine Daten hinterlassen zu müssen, finde ich super ! Weiter so! MfG Margret

14.11.2019 - 09:07

country flag Irene wrote:

En la vuelta 2 del patrón de abanicos, es decir, la hilera de agujeros para el listón de seda, ¿se hacen puntos medio altos o puntos altos? En el texto dice que puntos medios altos, pero en la vuelta siguiente se dice que se trabajen puntos bajos en los puntos altos de la vuelta anterior... Gracias!

26.08.2019 - 22:00

DROPS Design answered:

Hola Irene. Enviaré tu pregunta al departamento de diseño. Pero puedes trabajar puntos altos o medio altos para la vuelta para pasar la cinta, ya que esto solo afecta a la anchura de los agujeros, pero no al diseño del modelo.

08.09.2019 - 14:05

country flag Erika Reinhold wrote:

DIE NÄCHSTE RUNDE IN ALLEN GRÖSSEN: 16-19-21-23 feste Maschen, = 39-46-50-55 Maschen.DIE NÄCHSTE RUNDE IN ALLEN GRÖSSEN: 14-17-19-21 feste Maschen häkeln, 37-44-48-53 Maschen. wie bitte soll das gehen? entweder ich reduziere die Seiten oder die Mitte. hier ist die Seite von 19 auf 17 und die mitte von 8 auf 6 maschen reduziert

07.08.2019 - 18:21

DROPS Design answered:

Liebe Frau Reinhold, es wird in der Mitte durch die 2 Stb zs abgenommen - aber gleichzeitig häkeln Sie weniger fM und mhr Stb um das richtige Form zu behalten. Viel Spaß beim häkeln!

08.08.2019 - 09:39

country flag Erika Reinhold wrote:

Könnte man es möglich machen eine Übersetzungsfunktion für die Fragen und Kommentare einzubauen? Dann könnte man sehen, ob die Frage schon einmal gestellt und beantwortet wurde.

06.08.2019 - 12:23

DROPS Design answered:

Liebe Frau Reinhold, die Fragen/Antwort und Kommentare können Sie auch mit einer Online-Übersetzer übersetzen. Gerne können Sie immer Ihre Frage hier stellen, oder auch sich direk an Ihrem DROPS Store wenden. Viel Spaß beim häkeln!

07.08.2019 - 11:53

country flag Simard wrote:

Dans le patron vous dite de faire une maille serré dans le haut du picot c est où exactement

07.06.2019 - 21:47

DROPS Design answered:

Bonjour Mme Simard, au rang précédent vous avez crocheté 3 ml, 1 bride dans la 1ère des 3 ml pour former un picot, au rang suivant, vous crochetez la maille serrée dans la pointe de ce picot. Bon crochet!

20.06.2019 - 09:06

country flag Patricia CASTAGNOTTO wrote:

Bonjour, pourrais je avoir une video pour ces très jolis chaussons ? Merci

03.04.2019 - 22:18

DROPS Design answered:

Bonjour Mme Castagnotto, nous n'avons pas de vidéo pour ce modèle, toutefois, lisez attentivement les indications pour la taille souhaitée et suivez bien le diagramme (comment lire un diagramme au crochet). Pour toute question complémentaire, n'hésitez pas à utiliser cette rubrique ou bien contactez le magasin où vous avez acheté votre laine pour toute assistance individuelle. Bon crochet!

04.04.2019 - 09:38

country flag Susanne Bylund wrote:

Ingen som vill svara...behöver hjälp för att kunna fortsätta... Mvh/Susanne Bylund

06.02.2019 - 14:18

country flag Susanne Bylund wrote:

Ska man börja med bara 1 maska på A1 o sen enbart upprepa A2 3 ggr? Mvh/Susanne Bylund

05.02.2019 - 13:47

DROPS Design answered:

Hej, jo du ska virka A.1A över den första maskan en gång och sedan upprepar du A.1B 3 gånger.

06.02.2019 - 17:30