DROPS Paris
DROPS Paris
100% Cotton
from 1.10 £ /50g
Get the yarn to make this pattern from 7.70£.

The yarn cost is calculated from the pattern’s smallest size and the yarn’s cheapest product type. Looking for an even better price? You might find it on the DROPS Deals!

DROPS SS24

Summer Foam

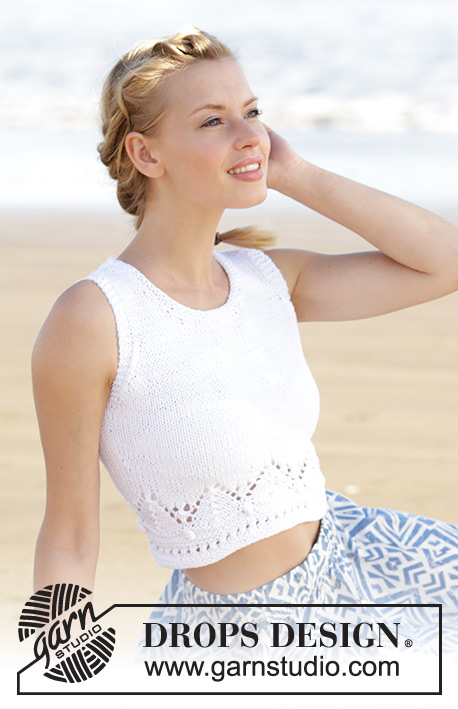
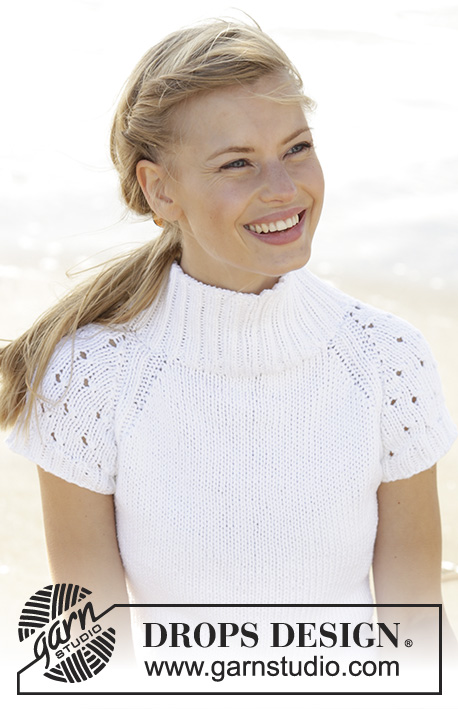
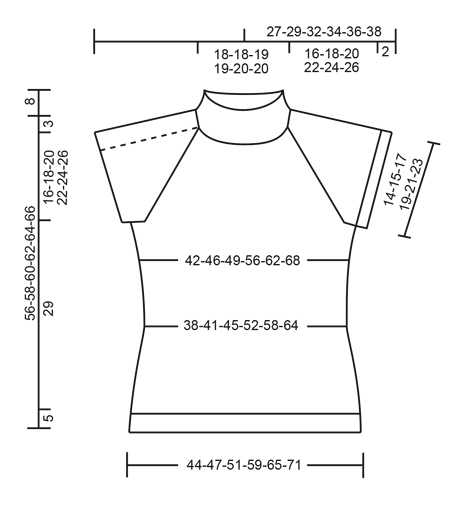
Fitted top with high neck, raglan and lace pattern on the sleeves, worked top down in DROPS Paris. Sizes S - XXXL.

DROPS 178-46
DROPS Design: Pattern no w-643
Yarn group C or A + A
-----------------------------------------------------------
Sizes: S - M - L - XL - XXL - XXXL
Materials:
DROPS PARIS from Garnstudio (belongs to yarn group C)
350-400-450-500-550-600 g colour 16, white

DROPS CIRCULAR NEEDLE (40 + 60 or 80 cm) SIZE 5 MM – or the size needed to get 17 stitches and 22 rows stocking stitch on 10 cm in width and 10 cm in height.
DROPS CIRCULAR NEEDLE (40 + 60 or 80 cm) SIZE 4 MM for the rib – or the size needed to get 19 stitches and 25 rows stocking stitch on 10 cm in width and 10 cm in height.
----------------------------------------------------------

-------------------------------------------------------

Alternative Yarn – See how to change yarns here
Yarn Groups A to F – Use the same pattern and change the yarn here
Yarn usage using an alternative yarn – Use our yarn converter here

-------------------------------------------------------

DROPS Paris
DROPS Paris
100% Cotton
from 1.10 £ /50g
Get the yarn to make this pattern from 7.70£.

The yarn cost is calculated from the pattern’s smallest size and the yarn’s cheapest product type. Looking for an even better price? You might find it on the DROPS Deals!

Pattern instructions

NOTE: This pattern is written in British English. All measurements in charts are in cm. For conversion from cm to inches - click here. There are different terms for crocheting in British and American English. If this pattern includes crochet, click for "crochet terms" here. For this pattern in American English, please click here.
RIDGE/GARTER STITCH (worked in the round):
1 ridge = 2 rounds. Knit 1 round and purl 1 round.

ELEVATION:
Start from the right side and work rib until you have worked 7-7-11-11-11-11 stitches past the marker, turn, tighten the strand and work 14-14-22-22-22-22 stitches rib back again. Turn, tighten the strand and work 22-22-30-30-30-30 stitches rib, turn, tighten the strand and work 30-30-38-38-38-38 stitches rib back again. Turn, tighten the strand and work 38-38-46-46-46-46 stitches rib, turn, tighten the strand and work 46-46-54-54-54-54 stitches rib back again. Turn and work rib towards mid back.

PATTERN:
See diagrams A.1 to A.3. The diagrams show all the rows in the pattern seen from the right side. A.2 is shown in size S – A.2 is worked in the same way in the other sizes, i.e. the holes continue outwards in the same way, but make sure you do not make a hole close into the raglan line. 1 repeat with holes in width and height is shown in A.2A.

DECREASE/INCREASE TIP (evenly spaced):
To work out how to decrease/increase evenly, count the total number of stitches on the needle (e.g. 112 stitches) and divide by the number of decreases/increases to be made (e.g. 32) = 3.5. In this example, you work alternately approx. every 2nd and 3rd stitch together and every 3rd and 4th stitch together (if you are increasing make 1 yarn over after alternately approx. every 3rd and 4th stitch).

RAGLAN:
Increase to raglan on each side of A.1 in each transition between body and sleeves. Increase 1 stitch by making 1 yarn over, on the next round, knit the yarn overs twisted to prevent holes. The increased stitches are worked in stocking stitch on the body and in A.2 on the sleeves. NOTE: Increases are different on body and sleeves as explained in the text.

DECREASE TIP (for the sides of the body):
Decrease 1 stitch on each side of the 6-6-10-10-10-10 rib stitches in each side.
Decrease as follows before the 6-6-10-10-10-10 rib stitches: Knit 2 together (= 1 stitch decreased).
Decrease as follows after the 6-6-10-10-10-10 rib stitches: Slip 1 stitch as if to knit, knit 1, pass the slipped stitch over the knitted stitch (= 1 stitch decreased).

INCREASE TIP (for the sides of the body):
Increase 1 stitch on each side of the 6-6-10-10-10-10 rib stitches in each side. Increase 1 stitch by making 1 yarn over, on the next round knit the yarn overs twisted to prevent holes.
----------------------------------------------------------

TOP:
The piece is worked in the round with circular needle and worked top down.

NECK:
Cast on 112-112-120-120-128-128 stitches on short circular needle size 4 mm and Paris. Knit 1 round. Insert 1 marker at the beginning of the round = mid back. The next round is worked as follows: * Knit 1, purl 2, knit 1 *, repeat from *-* the whole round. Continue with rib in this way for 8 cm.
For a better fit you can now work an ELEVATION in the back of the neck – see description above. After the elevation knit 1 round where you decrease 32-32-36-36-40-40 stitches evenly spaced along the round – READ DECREASE/INCREASE TIP = 80-80-84-84-88-88 stitches. Change to short circular needle size 5 mm and work the next round as follows: 12-12-13-13-14-14 stitches stocking stitch (= ½ the back piece), A.1 (= 6 stitches in the raglan line), A.2 (= 4 stitches on the sleeve), A.1 (= 6 stitches in the raglan line), 24-24-26-26-28-28 stitches stocking stitch (= front piece), A.1 (= 6 stitches in the raglan line), A.2 (= 4 stitches on the sleeve), A.1 (= 6 stitches in the raglan line) and 12-12-13-13-14-14 stitches stocking stitch (= ½ the back piece).
READ THE WHOLE OF THE NEXT SECTION BEFORE CONTINUING!
Continue with stocking stitch on the front and back pieces, A.1 in each transition between body and sleeves and A.2 on each sleeve (see the description of A.2 under PATTERN). REMEMBER THE KNITTING TENSION!
AT THE SAME TIME on the first round start the increases to RAGLAN – see description above.
The increases are different on the front/back pieces and the sleeves - NOTE: In size L start the increases for the sleeves on the first round, but for the front and back pieces, work 2 rounds before starting the increases:
FRONT AND BACK PIECE: Increase every round a total of 0-2-0-5-9-14 times, then every 2nd round a total of 18-19-21-22-22-22 times.
SLEEVES: Increase every 2nd round a total of 12-14-16-20-26-29 times and then every 4th round a total of 3-3-3-2-0-0 times.
After all the increases to raglan, there are 212-232-244-280-316-348 stitches on the needle and the piece measures approx. 16-18-20-22-24-26 cm (measured mid front after the rib in the neck).
The next round is worked as follows: Work the first 33-36-37-43-48-53 stitches as before (= ½ the back piece), place the next 40-44-48-54-62-68 stitches on 1 thread (= left sleeve), cast on 6-6-10-10-10-10 new stitches on the needle (= in the side mid under sleeve), work the next 66-72-74-86-96-106 stitches as before (= front piece), place the next 40-44-48-54-62-68 stitches on 1 thread (= right sleeve), cast on 6-6-10-10-10-10 new stitches on the needle (= in the side under the sleeve) and work the remaining 33-36-37-43-48-53 stitches as before (= ½ the back piece).

BODY:
= 144-156-168-192-212-232 stitches. Insert 1 marker in the side – THE PIECE IS NOW MEASURED FROM HERE!
Work stocking stitch in the round, but over the 6-6-10-10-10-10 stitches in each side work 2 RIDGES – see description above. When2 ridges have been worked in each side work rib over these 6-6-10-10-10-10 stitches in each side as follows: S + M: Work A.1 (= 6 stitches), L + XL + XXL + XXXL: Work A.3 (= 10 stitches) – the other stitches are continued in stocking stitch.
When the piece measures 2 cm from the marker decrease 1 stitch on each side of the rib section in each side – READ DECREASE TIP (= 4 stitches decreased). Decrease in this way every 6th round a total of 4 times in each side = 128-140-152-176-196-216 stitches.
When the piece measures 17 cm from the marker increase 1 stitch on each side of the rib section in each side – READ INCREASE TIP (= 4 stitches increased). Increase in this way every 6th-6th-6th-5th-5th-5th round a total of 5-5-5-6-6-6 times in each side = 148-160-172-200-220-240 stitches. When the piece measures 29 cm from the marker, knit 1 round where you increase 36-36-36-40-44-48 stitches evenly along the round – READ DECREASE/INCREASE TIP = 184-196-208-240-264-288 stitches. Change to circular needle size 4 mm and work rib in the round (= knit 2 / purl 2). When the rib measures 5 cm (or desired length) change back to circular needle size 5 mm before casting off with knit over knit and purl over purl.

SLEEVE EDGE:
Place the 40-44-48-54-62-68 stitches from the one thread in one side of the piece on double pointed needles size 4 mm, in addition, knit up 1 stitch in each of the 6-6-10-10-10-10 stitches mid under the sleeve = 46-50-58-64-72-78 stitches on the needles. Knit 1 round where you increase 10-10-10-12-12-14 stitches evenly along the round = 56-60-68-76-84-92 stitches. Continue by working rib (= knit 2 / purl 2). When the sleeve edge measures 2 cm, LOOSELY cast off with knit over knit and purl over purl. Work sleeve edge around the other armhole in the same way.

Diagram

symbols = knit from the right side, purl from the wrong side
symbols = purl from the right side, knit from the wrong side
symbols = between 2 stitches make 1 yarn over
symbols = slip 1 stitch as if to knit, knit 1, pass the slipped stitch over the knitted stitch
diagram
diagram
diagram

Each of our patterns has specific tutorial videos to help you.

Do you have a question? See a list of frequently asked questions (FAQ)

Knitting tension is what determines the final measurements of your work, and is usually measured per 10 x 10 cm. It is provided like so: number of stitches in width x number of rows in height - eg: 19 stitches x 26 rows = 10 x 10 cm.

The knitting tension is very individual; some people knit/crochet loosely while others work tightly. You adjust the knitting tension with the needle size, which is why the suggested needle size is only meant as a guide! You need to adjust this (up or down) to ensure that YOUR knitting tension matches the knitting tension provided in the pattern. If you work with a different knitting tension than provided you will have a different yarn consumption, and your work will have different measurements than what the pattern suggests.

The knitting tension also determines which yarns can replace each other. As long as you achieve the same knitting tension you can replace one yarn with another.

See DROPS lesson: How to measure your tension/gauge

See DROPS video: How to make a gauge tension swatch

The required amount of yarn is provided in grams, eg: 450 g. To calculate how many balls you’ll need you first need to know how many grams are in 1 ball (25g, 50g or 100g). This information is available if you click on the individual yarn quality on our pages. Divide the amount required with the amount of each ball. For example, if each ball is 50g (the most common amount), the calculation will be as follows: 450 / 50 = 9 balls.

The important thing when changing from one yarn to another is that the knitting/crochet tension remains the same. This is so that the measurements of the finished piece will be the same as on the sketch provided. It is easier to achieve the same knitting tension using yarns from the same yarn group. It is also possible to work with multiple strands of a thinner yarn to achieve the knitting tension of a thicker one. Please try our yarn converter. We recommend you to always work a test swatch.

Please NOTE: when changing yarn the garment might have a different look and feel to the garment in the photo, due to individual properties and qualities of each yarn.

See DROPS lesson: Can I use a different yarn than the one mentioned in the pattern?

All our yarns are categorised into yarn groups (from A to F) according to thickness and knitting tension – group A contains the thinnest yarns and group F the thickest. This makes it easier for you to find alternative yarns to our patterns, should you wish to switch yarn. All yarns within the same group have a similar knitting tension and can easily replace each other. However, different yarn qualities have different structures and properties which will give the finished work a unique look and feel.

Click here for an overview of the yarns in each yarn group

At the top of all our patterns you’ll find a link to our yarn calculator, which is a helpful tool should you wish to use a different yarn than suggested. By filling in the yarn quality you wish to replace, the amount (in your size) and number of strands, the calculator will present good alternative yarns with the same knitting tension. Additionally it will tell you how much you’ll require in the new qualities and whether you’ll need to work with multiple strands. Most skeins are 50g (some are 25g or 100g).

If the pattern is worked with multiple colours, every colour will have to be calculated separately. Similarly, if the pattern is worked with several strands of different yarns (for example 1 strand Alpaca and 1 strand Kid-Silk) you will have to find alternatives for each, individually.

Click here to see our yarn calculator

Since different yarns have different qualities and textures we have chosen to keep the original yarn in our patterns. However, you can easily find options among our available qualities by using our yarn calculator, or simply pick a yarn from the same yarn group.

It is possible that some retailers still have discontinued yarns in stock, or that someone has a few skeins at home that they would like to find patterns for.

The yarn calculator will provide both alternative yarn as well as required amount in the new quality.

If you think it's hard to decide what size to make, it can be a good idea to measure a garment you own already and like the size of. Then you can pick the size by comparing those measures with the ones available in the pattern's size chart.

You'll find the size chart at the bottom of the pattern.

See DROPS lesson: How to read size chart

The needle size provided in the pattern serves only as a guide, the important thing is to follow the knitting tension. And since knitting tension is very individual, you will have to adjust the needle size to ensure that YOUR tension is the same as in the pattern – maybe you’ll have to adjust 1, or even 2 needle sizes, up or down to achieve the correct tension. For this, we recommend that you work test swatches.

Should you work with a different knitting tension than the one provided, the measurements of the finished garment might deviate from the measurement sketch.

See DROPS lesson: How to measure your tension/gauge

See DROPS video: How to make a tension/gauge swatch

Working a garment top-down provides more flexibility and room for personal adjustment. For example it is easier to try the garment on while working, as well as making adjustments to length of yoke and shoulder caps.

The instructions are carefully explaining every step, in the correct order. Diagrams are adjusted to the knitting direction and are worked as usual.

The diagram depicts all rows/rounds, and every stitch seen from the right side. It is read from bottom to top, from right to left. 1 square = 1 stitch.

When working back and forth, every other row is worked from the right side and every other row is worked from the wrong side. When working from the wrong side, the diagram will have to be worked reversed: from left to right, knit stitches are purled, purl stitches are knit etc.

When working in the round every round is worked from the right side and the diagram are worked from right to left on all rounds.

See DROPS lesson: How to read knitting diagrams

The diagram depicts all rows/rounds, and every stitch seen from the right side. It is worked from bottom to top, from right to left.

When working back and forth every other row is worked from the right side: from right to left and every other row is worked from the wrong side: from left to right.

When working in the round, every row in the diagram are worked from the right side, from right to left.

When working a circular diagram you start in the middle and work your way outwards, counter clockwise, row by row.

The rows usually start with a given number of chain stitches (equivalent to the height of the following stitch), this will either be depicted in the diagram or explained in the pattern.

See DROPS lesson: How to read crochet diagrams

Instructions for working several diagrams after each other on the same row/round, will often be written like so: “work A.1, A.2, A.3 a total of 0-0-2-3-4 times". This means you work A.1 once, then A.2 is worked once, and A.3 is repeated (in width) the number of times provided for your size – in this case like so: S = 0 times, M = 0 times, L=2 times, XL= 3 times and XXL = 4 times.

The diagrams are worked as usual: begin with the first row in A.1, then work the first row in A.2 etc.

See DROPS lesson: How to read knitting diagrams

See DROPS lesson: How to read crochet diagrams

The total width of the garment (from wrist-to-wrist) will be larger in the larger sizes, despite the actual sleeves being shorter. The larger sizes have longer sleeve caps and wider shoulders, so there will be a good fit in all sizes.

The measurement sketch/schematic drawing provides information regarding the full length of the garment. If it’s a jumper or a jacket the length is measured from the highest point on the shoulder closest to the neckline, and straight down to the bottom of the garment. It is NOT measured from the tip of shoulder. Similarly, the length of yoke is measured from the highest point on the shoulder and down to where yoke is split into body and sleeves.

On a jacket measures are never taken along bands, unless specifically stated. Always measure inside band stitches when measuring the length.

See DROPS lesson: How to read a schematic drawing

Diagrams are often repeated on the round or in height. 1 repeat is the diagram the way it appears in the pattern. If it says to work 5 repeats of A.1 in the round, then you work A.1 a total of 5 times after/next to each other in the round. If it says to work 2 repeats of A.1 vertically/in height you work the entire diagram once, then begin again at the start and work the entire diagram one more time.

Chain stitches are slightly narrower than other stitches and to avoid working the cast-on edge too tight, we simply chain more stitches to begin with. The stitch count will be adjusted on the following row to fit the pattern and measurement sketch.

The rib edge is more elastic and will contract slightly compared to, for example, stocking stitch. By increasing before the rib edge, you avoid a visible difference in width between the rib edge and the rest of the body.

It’s very easy to cast off too tightly, and by making yarn overs while casting off (and simultaneously casting these off) you avoid a too tight cast off edge.

See DROPS video: How to bind off with yarn overs (yo)

To achieve an even increase (or decrease) you can increase on, for example: every 3rd and 4th row alternately, like so: work 2 rows and increase on the 3rd row, work 3 rows and increase on the 4th. Repeat this until the increase is complete.

See DROPS lesson: Increase or decrease 1 st on every 3rd and 4th row alternately

Should you prefer to work in the round instead of back and forth, you may of course adjust the pattern. You’ll need to add steeks mid-front (usually 5 stitches), and follow the instructions. When you would normally turn and work from the wrong side, simply work across the steek and continue in the round. At the end you’ll cut the piece open, pick up stitches to work bands, and cover the cut edges.

See DROPS video: How to knit steeks and cut open

Should you prefer to work back and forth instead of in the round, you may of course adjust the pattern so you work the pieces separately and then assemble them at the end. Divide the stitches for the body in 2, add 1 edge stitch in each side (for sewing) and work the front and back pieces separately.

See DROPS lesson: Can I adapt a pattern for circular needles into straight needles?

Pattern repeats can vary slightly in the different sizes, in order to get the correct proportions. If you’re not working the exact same size as the garment in the photo, yours might deviate slightly. This has been carefully developed and adjusted so that the complete impression of the garment is the same in all sizes.

Make sure to follow instructions and diagrams for your size!

If you have found a pattern you like which is available in women’s size it’s not very difficult to convert it to men’s size. The biggest difference will be the length of sleeves and body. Start working on the women size that you think would fit across the chest. The additional length will be worked right before you cast off for the armhole/sleeve cap. If the pattern is worked top-down you can add the length right after the armhole or before the first decrease on sleeve.

Regarding additional yarn amount, this will depend on how much length you add, but it is better with a skein too many than too few.

All yarns will have excess fibres (from production) that might come off as lint or shedding. Brushed yarns (ie hairier yarns) have more of these loose, excess fibres, causing more shedding.

Shedding also depends on what is worn under or over the garment, and whether this pulls at the yarn fibres. It’s therefore not possible to guarantee that there will be no shedding

Below are some tips on how to get the best result when working with hairier yarns:

1. When the garment is finished (before you wash it) shake it vigorously so the looser hairs come off. NOTE: do NOT use a lint roller, brush or any method that pulls at the yarn.

2. Place the garment in a plastic bag and put it in your freezer - the temperature will cause the fibres to become less attached to each other, and excess fibres will come off easier.

3. Leave in the freezer for a few hours before taking it out and shaking it again.

4. Wash the garment according to the instructions on the yarn label.

Pilling is a natural process that happens to even the most exclusive of fibers. It's a natural sign of wear and tear that is hard to avoid, and that is most visible in high friction areas of your garment like a sweater's arms and cuffs.

You can make your garment look as new by removing the pilling, using a fabric comb or a pill/lint remover.

Still can't find the answer you need? Then scroll down and leave your question so one of our experts can try to help you. This will be done normally within 5 to 10 working days.
In the meantime, you can read the questions and answers that others have left to this pattern or join the DROPS Workshop on Facebook to get help from fellow knitters/crocheters!

You might also like...

Post a comment to pattern DROPS 178-46

We would love to hear what you have to say about this pattern!

If you want to leave a question, please make sure you select the correct category in the form below, to speed up the answering process. Required fields are marked *.

Comments / Questions (42)

country flag Leentje wrote:

Ik brei maat xl en moet meerderen op de mouwen en voor en rugpand . ik moet in totaal eindigen met 280 steken. dat wil dus zeggen 20 steken = 5keer elke naald en 88 st = elke 2e naald 22keer. maar dan op de mouwen moet ik 20keer= elke 2e naald (4 steken per nld) en nog eens 8 steken=2keer elke 4e nld. mijn vraag is dus waar moet ik meerderen in voor en rug ?En voor de mouwen wand in het telpatroon zitten ook 30 meerderingen .wat met A2A ?daar word niets van vermeld. alvast bedankt leentje

24.03.2024 - 16:19

country flag Leentje wrote:

Ik brei maat xl en moet meerderen op de mouwen en voor en rugpand . ik moet in totaal eindigen met 280 steken. dat wil dus zeggen 20 steken = 5keer elke naald en 88 st = elke 2e naald 22keer. maar dan op de mouwen moet ik 20keer= elke 2e naald (4 steken per nld) en nog eens 8 steken=2keer elke 4e nld. mijn vraag is dus waar moet ik meerderen in voor en rug ?En voor de mouwen wand in het telpatroon zitten ook 30 meerderingen alvast bedankt leentje

23.03.2024 - 17:25

DROPS Design answered:

Dag Leentje,

In het telpatroon zijn geen meerderingen getekend, de meerderingen staan allemaal in de beschrijving (wel is er in het telpatroon rekening mee gehouden dat er meerderingen zijn gemaakt). Je begint de raglan met 84 steken. VOOR- EN ACHTERPAND: Meerder iedere naald in totaal 5 keer, dan iedere 2e naald in totaal 22 keer (108 st gemeerderd). MOUWEN: Meerder iedere 2e naald in totaal 20 keer en dan iedere 4e naald in totaal 2 keer (88 st gemeerderd). In totaal kom je dan op 84 + 108 + 88 = 280 steken. Het kan handig zijn om even op ruitjespapier uit te schrijven wanneer je moet meerderen voor iedere naald die je breit.

24.03.2024 - 20:08

country flag Leentje wrote:

Ik brei maat xl en moet meerderen op de mouwen en voor en rugpand . ik moet in totaal eindigen met 280 steken. dat wil dus zeggen 20 steken = 5keer elke naald en 88 st = elke 2e naald 22keer. maar dan op de mouwen moet ik 20keer= elke 2e naald (4 steken per nld) en nog eens 8 steken=2keer elke 4e nld. mijn vraag is dus waar moet ik meerderen voor de mouwen wand in het telpatroon zitten ook 30 meerderingen alvast bedankt leentje

22.03.2024 - 21:32

country flag Leentje wrote:

Ik ben bezig met maat xl.vanaf de text : LEES HET VOLGENDE STUK VOLLEDIG DOOR VOORDAT U VERDER GAAT ! Alvast bedankt

15.03.2024 - 00:01

country flag Leentje wrote:

Hallo, Kan iemand me helpen ik snap niets van de uitleg voor de meerderingen voor de raglan en de mouwen .alvast bedankt

12.03.2024 - 21:49

DROPS Design answered:

Dag Leentje,

Kan je aangeven welke maat je aan het breien bent en wat je precies niet begrijpt? Er staat per maat (reeks getallen) aangegeven hoe vaak je moet meerderen. Soms moet je eerst een aantal keren op iedere naald meerderen en dan een aantal keren op iedere 4e naald. Daarnaast kunnen de meerderingen op de panden anders verdeeld zijn dan op de mouwen. Het kan soms helpen om dit even uit te schrijven op ruitjespapier.

14.03.2024 - 22:14

country flag Mia wrote:

Hallo! Betreff Rumpfteil: Habe nun 160 Maschen.Soll nun 36 Masch gleichmäßig verteilt zunehmen. 160 : 36 =4,44444. Habe probiert nach jeder 4.M zuzunehmen,dadurch sind zu viele Maschen auf der Nadel,dann habe ich es mit nach jeder 4. und 5. Masche probiert, paßt auch nicht,dann nach jeder 3. und 4.Masche geht nicht auf,nach jeder 5.Masche fehlen 5 Maschen,damit es dann insgesamt 196 Maschen sein sollen. Nach welcher Masche soll ich zunehmen? VG Mia

07.02.2022 - 17:54

DROPS Design answered:

Liebe Mia, Sie sollen abwechlslungsweise nach ca jeder 5. und nach jeder 4. Masche zunehmen, hier lesen Sie mehr. Viel Spaß beim stricken!

08.02.2022 - 08:41

country flag Mia wrote:

Hallo ! Betreff: Rumpfteil: "Bei einer Länge von 17 cm ab dem Markierer je 1 Masche beidseitig Rippenmusters an beiden Seiten zunehmen " - Ist der seitliche Markierer von "Bei einer Länge von 2 cm ab dem Markierer je 1 Masche beidseitig des Rippenmusters an beiden Seiten abnehmen " gemeint? Danke

06.02.2022 - 11:20

DROPS Design answered:

Liebe Mia, davor haben beidseitig Rippenmuster an beiden Seiten abgenommen, jetzt wird es beidseiting Rippenmuster an beiden Seiten zugenommen - so wird das Top tailiert. Viel Spaß beim stricken!

07.02.2022 - 10:20

country flag Mia wrote:

Hi ! Ich habe jetzt für Größe M nach allen Raglanzunahmen 232 Maschen auf der Nadel,meine Arbeit mißt aber nur 16cm statt 18cm. Soll ich die nächsten 2cm über alle Maschen rechts stricken,sodaß ich auf auf das Maß von 18cm komme oder soll ich gleich weiter verfahren mit "Die nächste Runde wie folgt stricken: Die ersten 33-36-37-43-48-53 Maschen wie zuvor stricken (= ½ Rückenteil) ....?

02.02.2022 - 17:10

DROPS Design answered:

Liebe Mia, wenn Sie genau in der Mitte vorne messen, und trotzdem 2 cm fehlen, ist sicher Ihre Maschenprobe in der Höhe nicht richtig, dann stricken Sie diese 2 cm weiter genauso wie zuvor, aber nun ohne Zunahmen. Viel Spaß beim stricken!

03.02.2022 - 08:32

country flag Mia wrote:

Hallo Drops Team ! Habe nun alle Raglan Zunahmen ( 19x 4M ) und für den Ärmelzunahemn ( 14x 4m + 3x in jeder 4.Rd = 12M ) gearbeitet. Nun sind 224 M insgesamt auf der Nadel. Ich schreibe mir jede gestrickte Runde auf und zähle immer wieder und es werden keine 232 M in der Größe M? Woran kann das liegen? Vielen lieben Dnak für die Hilfe!

28.01.2022 - 15:47

Mia answered:

Habe den Fehler gefunden.Gür Größe M : \"VORDER- UND RÜCKENTEIL: In jeder Runde insgesamt 2 x zunehmen,...\r\nDanke euch trotzdem für die bisherige Hilfe.

30.01.2022 - 12:03

country flag Mia wrote:

Hi ! Muss die Erhöhung unbedingt gestrickt werden? VG Mia

26.01.2022 - 11:42

DROPS Design answered:

Liebe Mia, dank der Erhöhung wird der Halsausschnitt höher beim Rücken als beim Vorderteil, wenn Sie aber keine Erhöhung stricken, dann sind Halsausschnitt am Rücken- und Vorderteil gleich. Viel Spaß beim stricken!

26.01.2022 - 13:26