DROPS Paris
DROPS Paris
100% Cotton
from 1.10 £ /50g
Get the yarn to make this pattern from 23.10£.

The yarn cost is calculated from the pattern’s smallest size and the yarn’s cheapest product type. Looking for an even better price? You might find it on the DROPS Deals!

DROPS SS24

Radiant

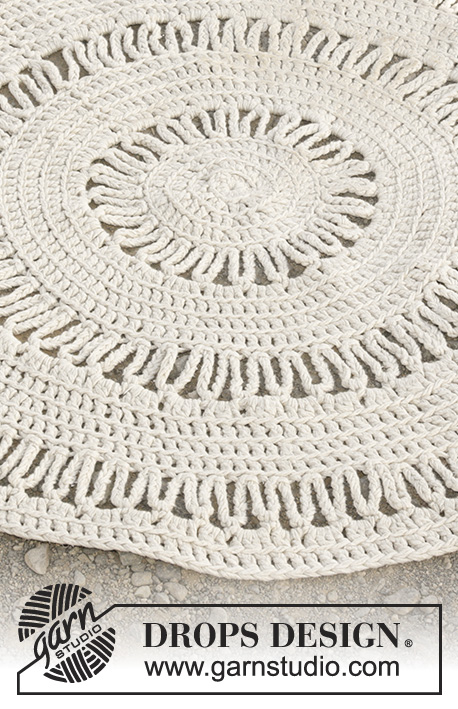
Circular floor rug with treble crochet and lace pattern, worked with 3 strands DROPS Paris.

DROPS 178-37
DROPS Design: Pattern no w-630
Yarn group C + C + C
----------------------------------------------------------
Measurements: Diameter: approx. 92 cm.
Materials:
DROPS PARIS from Garnstudio
1050 g colour 17, off white

DROPS CROCHET HOOK SIZE 8 MM – or the size needed to get 8 treble crochets and 5 rows with 3 strands on 10 cm in width and 10 cm in height.
----------------------------------------------------------

-------------------------------------------------------

Alternative Yarn – See how to change yarns here
Yarn Groups A to F – Use the same pattern and change the yarn here
Yarn usage using an alternative yarn – Use our yarn converter here

-------------------------------------------------------

DROPS Paris
DROPS Paris
100% Cotton
from 1.10 £ /50g
Get the yarn to make this pattern from 23.10£.

The yarn cost is calculated from the pattern’s smallest size and the yarn’s cheapest product type. Looking for an even better price? You might find it on the DROPS Deals!

Pattern instructions

NOTE: This pattern is written in British English. All measurements in charts are in cm. For conversion from cm to inches - click here. There are different terms for crocheting in British and American English. If this pattern includes crochet, click for "crochet terms" here. For this pattern in American English, please click here.
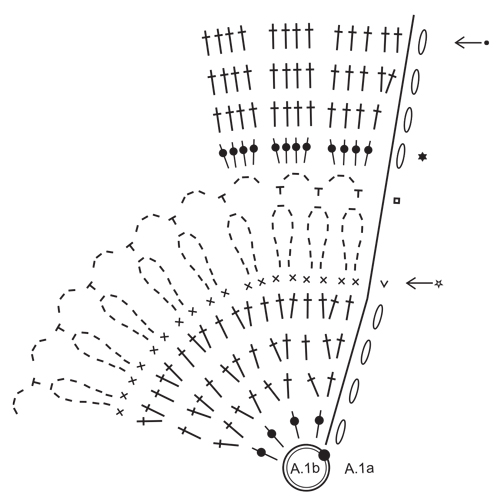
PATTERN:
See diagrams A.1 to A.3.

INCREASE TIP:
Increase in 1 treble crochet by working 2 treble crochets in one treble crochet.

CROCHET TIP:
All stitches which are worked in a stitch, are worked in the back loop of the stitch.
----------------------------------------------------------

FLOOR RUG:
The floor rug is worked in the round – READ CROCHET TIP!

Start with 3 strands Paris with hook size 8 mm and work pattern according to diagram A.1 - start with A.1a which shows how the round starts and ends, then work A.1b 3 times. From the 7th round the diagram is worked 9 times on the round and on the last round increase 3 treble crochets evenly along the round – READ INCREASE TIP = 120 treble crochets on the round. REMEMBER THE CROCHET TENSION! When the whole of diagrams A.1a and A.1b have been completed in height the piece measures approx. 44 cm in diameter.

Continue working from the 2nd round in diagram A.2b a total of 12 times on the round (A.2a shows how the round starts and ends). When the whole of diagrams A.2a and A.2b have been completed in height there are 192 treble crochets on the round and the piece measures 76 cm in diameter.

Continue working from the 2nd round in diagram A.3b a total of 48 times on the round (A.3a shows how the round starts and ends). When the whole of diagrams A.3a and A.3b have been completed in height there are 240 treble crochets on the round and the piece measures 92 cm in diameter. Cut and fasten the strand.

Diagram

symbols = Work 4 chain stitches and form them to a ring with 1 slip stitch in the first chain stitch
symbols = 1 treble crochet around the chain-stitch ring/ chain-space
symbols = 1 treble crochet worked in the back loop of stitch
symbols = The round begins with 3 chain stitches and ends with 1 slip stitch in the 3rd chain stitch at the beginning of the round
symbols = Work 2 treble crochets together as follows: Work 1 treble crochet around the chain-space, but wait with the last pull through (= 2 loop on the hook), work 1 more treble crochet, but when you are working the last pull through, pull the strand through all the loops on the hook
symbols = 1 slip stitch worked in the back loop of stitch
symbols = 1 chain stitch
symbols = 1 double crochet around the chain-space
symbols = The round begins with 1 chain stitch and ends with 1 slip stitch in the first chain stitch at the beginning of the round, then work 1 slip stitch in each of the first 6 chain stitches on the round
symbols = The round begins with 1 chain stitch and ends with 1 slip stitch in the first chain stitch at the beginning of the round
symbols = On this round, you increase 3 treble crochets evenly along the round – see explanation in the text
symbols = When this round is worked it is important that each of the chain-spaces (= the 11 chain stitches) measures 11 cm in length! If you do not have the right crochet tension, you must either add or take away chain stitches
symbols = From this round (= 7th round) you work the diagram 9 times on the round.
diagram
diagram
diagram
Do you have a question? See a list of frequently asked questions (FAQ)

Knitting tension is what determines the final measurements of your work, and is usually measured per 10 x 10 cm. It is provided like so: number of stitches in width x number of rows in height - eg: 19 stitches x 26 rows = 10 x 10 cm.

The knitting tension is very individual; some people knit/crochet loosely while others work tightly. You adjust the knitting tension with the needle size, which is why the suggested needle size is only meant as a guide! You need to adjust this (up or down) to ensure that YOUR knitting tension matches the knitting tension provided in the pattern. If you work with a different knitting tension than provided you will have a different yarn consumption, and your work will have different measurements than what the pattern suggests.

The knitting tension also determines which yarns can replace each other. As long as you achieve the same knitting tension you can replace one yarn with another.

See DROPS lesson: How to measure your tension/gauge

See DROPS video: How to make a gauge tension swatch

The required amount of yarn is provided in grams, eg: 450 g. To calculate how many balls you’ll need you first need to know how many grams are in 1 ball (25g, 50g or 100g). This information is available if you click on the individual yarn quality on our pages. Divide the amount required with the amount of each ball. For example, if each ball is 50g (the most common amount), the calculation will be as follows: 450 / 50 = 9 balls.

The important thing when changing from one yarn to another is that the knitting/crochet tension remains the same. This is so that the measurements of the finished piece will be the same as on the sketch provided. It is easier to achieve the same knitting tension using yarns from the same yarn group. It is also possible to work with multiple strands of a thinner yarn to achieve the knitting tension of a thicker one. Please try our yarn converter. We recommend you to always work a test swatch.

Please NOTE: when changing yarn the garment might have a different look and feel to the garment in the photo, due to individual properties and qualities of each yarn.

See DROPS lesson: Can I use a different yarn than the one mentioned in the pattern?

All our yarns are categorised into yarn groups (from A to F) according to thickness and knitting tension – group A contains the thinnest yarns and group F the thickest. This makes it easier for you to find alternative yarns to our patterns, should you wish to switch yarn. All yarns within the same group have a similar knitting tension and can easily replace each other. However, different yarn qualities have different structures and properties which will give the finished work a unique look and feel.

Click here for an overview of the yarns in each yarn group

At the top of all our patterns you’ll find a link to our yarn calculator, which is a helpful tool should you wish to use a different yarn than suggested. By filling in the yarn quality you wish to replace, the amount (in your size) and number of strands, the calculator will present good alternative yarns with the same knitting tension. Additionally it will tell you how much you’ll require in the new qualities and whether you’ll need to work with multiple strands. Most skeins are 50g (some are 25g or 100g).

If the pattern is worked with multiple colours, every colour will have to be calculated separately. Similarly, if the pattern is worked with several strands of different yarns (for example 1 strand Alpaca and 1 strand Kid-Silk) you will have to find alternatives for each, individually.

Click here to see our yarn calculator

Since different yarns have different qualities and textures we have chosen to keep the original yarn in our patterns. However, you can easily find options among our available qualities by using our yarn calculator, or simply pick a yarn from the same yarn group.

It is possible that some retailers still have discontinued yarns in stock, or that someone has a few skeins at home that they would like to find patterns for.

The yarn calculator will provide both alternative yarn as well as required amount in the new quality.

If you think it's hard to decide what size to make, it can be a good idea to measure a garment you own already and like the size of. Then you can pick the size by comparing those measures with the ones available in the pattern's size chart.

You'll find the size chart at the bottom of the pattern.

See DROPS lesson: How to read size chart

The needle size provided in the pattern serves only as a guide, the important thing is to follow the knitting tension. And since knitting tension is very individual, you will have to adjust the needle size to ensure that YOUR tension is the same as in the pattern – maybe you’ll have to adjust 1, or even 2 needle sizes, up or down to achieve the correct tension. For this, we recommend that you work test swatches.

Should you work with a different knitting tension than the one provided, the measurements of the finished garment might deviate from the measurement sketch.

See DROPS lesson: How to measure your tension/gauge

See DROPS video: How to make a tension/gauge swatch

Working a garment top-down provides more flexibility and room for personal adjustment. For example it is easier to try the garment on while working, as well as making adjustments to length of yoke and shoulder caps.

The instructions are carefully explaining every step, in the correct order. Diagrams are adjusted to the knitting direction and are worked as usual.

The diagram depicts all rows/rounds, and every stitch seen from the right side. It is read from bottom to top, from right to left. 1 square = 1 stitch.

When working back and forth, every other row is worked from the right side and every other row is worked from the wrong side. When working from the wrong side, the diagram will have to be worked reversed: from left to right, knit stitches are purled, purl stitches are knit etc.

When working in the round every round is worked from the right side and the diagram are worked from right to left on all rounds.

See DROPS lesson: How to read knitting diagrams

The diagram depicts all rows/rounds, and every stitch seen from the right side. It is worked from bottom to top, from right to left.

When working back and forth every other row is worked from the right side: from right to left and every other row is worked from the wrong side: from left to right.

When working in the round, every row in the diagram are worked from the right side, from right to left.

When working a circular diagram you start in the middle and work your way outwards, counter clockwise, row by row.

The rows usually start with a given number of chain stitches (equivalent to the height of the following stitch), this will either be depicted in the diagram or explained in the pattern.

See DROPS lesson: How to read crochet diagrams

Instructions for working several diagrams after each other on the same row/round, will often be written like so: “work A.1, A.2, A.3 a total of 0-0-2-3-4 times". This means you work A.1 once, then A.2 is worked once, and A.3 is repeated (in width) the number of times provided for your size – in this case like so: S = 0 times, M = 0 times, L=2 times, XL= 3 times and XXL = 4 times.

The diagrams are worked as usual: begin with the first row in A.1, then work the first row in A.2 etc.

See DROPS lesson: How to read knitting diagrams

See DROPS lesson: How to read crochet diagrams

The total width of the garment (from wrist-to-wrist) will be larger in the larger sizes, despite the actual sleeves being shorter. The larger sizes have longer sleeve caps and wider shoulders, so there will be a good fit in all sizes.

The measurement sketch/schematic drawing provides information regarding the full length of the garment. If it’s a jumper or a jacket the length is measured from the highest point on the shoulder closest to the neckline, and straight down to the bottom of the garment. It is NOT measured from the tip of shoulder. Similarly, the length of yoke is measured from the highest point on the shoulder and down to where yoke is split into body and sleeves.

On a jacket measures are never taken along bands, unless specifically stated. Always measure inside band stitches when measuring the length.

See DROPS lesson: How to read a schematic drawing

Diagrams are often repeated on the round or in height. 1 repeat is the diagram the way it appears in the pattern. If it says to work 5 repeats of A.1 in the round, then you work A.1 a total of 5 times after/next to each other in the round. If it says to work 2 repeats of A.1 vertically/in height you work the entire diagram once, then begin again at the start and work the entire diagram one more time.

Chain stitches are slightly narrower than other stitches and to avoid working the cast-on edge too tight, we simply chain more stitches to begin with. The stitch count will be adjusted on the following row to fit the pattern and measurement sketch.

The rib edge is more elastic and will contract slightly compared to, for example, stocking stitch. By increasing before the rib edge, you avoid a visible difference in width between the rib edge and the rest of the body.

It’s very easy to cast off too tightly, and by making yarn overs while casting off (and simultaneously casting these off) you avoid a too tight cast off edge.

See DROPS video: How to bind off with yarn overs (yo)

To achieve an even increase (or decrease) you can increase on, for example: every 3rd and 4th row alternately, like so: work 2 rows and increase on the 3rd row, work 3 rows and increase on the 4th. Repeat this until the increase is complete.

See DROPS lesson: Increase or decrease 1 st on every 3rd and 4th row alternately

Should you prefer to work in the round instead of back and forth, you may of course adjust the pattern. You’ll need to add steeks mid-front (usually 5 stitches), and follow the instructions. When you would normally turn and work from the wrong side, simply work across the steek and continue in the round. At the end you’ll cut the piece open, pick up stitches to work bands, and cover the cut edges.

See DROPS video: How to knit steeks and cut open

Should you prefer to work back and forth instead of in the round, you may of course adjust the pattern so you work the pieces separately and then assemble them at the end. Divide the stitches for the body in 2, add 1 edge stitch in each side (for sewing) and work the front and back pieces separately.

See DROPS lesson: Can I adapt a pattern for circular needles into straight needles?

Pattern repeats can vary slightly in the different sizes, in order to get the correct proportions. If you’re not working the exact same size as the garment in the photo, yours might deviate slightly. This has been carefully developed and adjusted so that the complete impression of the garment is the same in all sizes.

Make sure to follow instructions and diagrams for your size!

If you have found a pattern you like which is available in women’s size it’s not very difficult to convert it to men’s size. The biggest difference will be the length of sleeves and body. Start working on the women size that you think would fit across the chest. The additional length will be worked right before you cast off for the armhole/sleeve cap. If the pattern is worked top-down you can add the length right after the armhole or before the first decrease on sleeve.

Regarding additional yarn amount, this will depend on how much length you add, but it is better with a skein too many than too few.

All yarns will have excess fibres (from production) that might come off as lint or shedding. Brushed yarns (ie hairier yarns) have more of these loose, excess fibres, causing more shedding.

Shedding also depends on what is worn under or over the garment, and whether this pulls at the yarn fibres. It’s therefore not possible to guarantee that there will be no shedding

Below are some tips on how to get the best result when working with hairier yarns:

1. When the garment is finished (before you wash it) shake it vigorously so the looser hairs come off. NOTE: do NOT use a lint roller, brush or any method that pulls at the yarn.

2. Place the garment in a plastic bag and put it in your freezer - the temperature will cause the fibres to become less attached to each other, and excess fibres will come off easier.

3. Leave in the freezer for a few hours before taking it out and shaking it again.

4. Wash the garment according to the instructions on the yarn label.

Pilling is a natural process that happens to even the most exclusive of fibers. It's a natural sign of wear and tear that is hard to avoid, and that is most visible in high friction areas of your garment like a sweater's arms and cuffs.

You can make your garment look as new by removing the pilling, using a fabric comb or a pill/lint remover.

Still can't find the answer you need? Then scroll down and leave your question so one of our experts can try to help you. This will be done normally within 5 to 10 working days.
In the meantime, you can read the questions and answers that others have left to this pattern or join the DROPS Workshop on Facebook to get help from fellow knitters/crocheters!

You might also like...

Post a comment to pattern DROPS 178-37

We would love to hear what you have to say about this pattern!

If you want to leave a question, please make sure you select the correct category in the form below, to speed up the answering process. Required fields are marked *.

Comments / Questions (14)

country flag Ania wrote:

Żeby powiększyć dywanik do większych rozmiarów należy powtórzyć schemat 1b czy 2b na szerokość?

14.03.2024 - 10:44

DROPS Design answered:

Witaj Aniu, należy powtarzać schemat A.2b , aby powiększyć dywanik. Pozdrawiamy!

14.03.2024 - 11:16

country flag Ania wrote:

Czy schemat to połowa całości??? Ile jest słupków wyjściowych, na początku schematu? 8?czy 9? czy 10?

12.03.2024 - 20:15

DROPS Design answered:

Witaj Aniu, na początku, zgodnie z opisem przerabiasz schemat A.1b 3 razy, więc na samym początku masz 12 słupków. Jak czytać schematy w robótce na drutach znajdziesz TUTAJ. Pozdrawiamy!

13.03.2024 - 08:35

country flag Trine wrote:

Hei! Kan jeg bytte til et tykkere garn i denne oppskriften? I såfall hvilket?

03.07.2023 - 10:02

DROPS Design answered:

Hei Trine. Dette gulvteppet hekles med 3 tråder DROPS Paris, vi har ikke et lignende garn som vil gi denne tykkelsen. Hverken i ull eller bomull. mvh DROPS Design

03.07.2023 - 11:51

country flag Karolína Šiklová wrote:

Včera jsem začala, jsem u 7.řady. Vypadá krásně. Děkuji.

23.02.2022 - 09:18

country flag Agnieszka Wysmułek wrote:

Ile motków włóczki potrzeba na taki dywanik?

30.01.2021 - 01:55

DROPS Design answered:

Witaj Agnieszko, będziesz potrzebować 21 motków włóczki DROPS Paris. Miłej pracy!

30.01.2021 - 17:29

country flag Elena wrote:

Buonasera... e complimenti per questo modello davvero bellissimo. Vorrei sapere se cambia molto farlo con 2 capi anziché 3...non ho abbastanza cotone. Grazie

17.07.2020 - 16:28

DROPS Design answered:

Buongiorno Elena. Lavorando con 2 soli capi otterrà un tappeto di misure più piccole rispetto a quelle indicate. Buon lavoro!

17.07.2020 - 19:35

country flag Hannie Hutten wrote:

Hoe begin je met de toer na de tour met lussen van 11 lossen. Hecht je dan een nieuwe draad aan?

06.05.2020 - 15:50

DROPS Design answered:

Dag Hannie,

Ja, je hecht inderdaad opnieuw de draad aan in een van de lossenboogjes.

07.05.2020 - 10:02

country flag Marianne Petersen wrote:

Jeg undre mig over at jeg kan tælle 24 af de lange buer i 5.omgang på billedet og når jeg følger diagrammet bliver der 54der er en fejl et sted kan bare ikke finde den

30.10.2019 - 18:39

country flag Maria wrote:

Hej! När man har virkat luftmaskringen, börjar man med den ovala ringen (1 stolpe virkad i bakre maskbågen) eller med "1 stolpe om luftmaskringen"? Måste man inte börja med 3 luftmaskor för att komma upp i höjden, så som det står beskrivet från andra varvet? Om jag förstår det rätt ska jag vara 12 stolpar om luftmasringen, men i så fall förstår jag inte den ovala ringens funktion till höger om det långa strecket..? Tack på förhand för svar!

18.02.2019 - 10:37

DROPS Design answered:

Hei Maria. Her hadde 2 av symbolene i symbolforklaringen byttet plass. Den ovale ringen er: Omgangen begynner med 3 luftmasker og avsluttes med 1 kjedemaske i 3.luftmaske på starten av omgangen. Og korset er : 1 stav heklet i bakre ledd av maske. Dette har vi nå rettet opp. Takk for beskjed, og god fornøyelse

21.02.2019 - 09:02

country flag Marie wrote:

Hei! Tegnsettingen i diagrammene MÅ være feil her. F.eks. i diagram A.2b er det på rad nr fire et tegn (den som er helt svart og oval) som i følge oppskriften tilsier: " = Omgangen begynner med 3 luftmasker og avsluttes med 1 kjedemaske i 3.luftmaske på starten av omgangen". Dette forteller meg kun hvordan jeg skal starte og avslutte omgangen, ikke hvordan selve omgangen skal hekles? Hva skal jeg egentlig gjøre her?

09.05.2018 - 13:39