
Popular categories
Looking for a yarn?


100% Cotton
from 1.85 £ /50g

Order DROPS Muskat from Wool Warehouse Direct Ltd

|
DROPS Muskat uni colour 100% Cotton |
1.85 £ /50g |
Order |
Clicking the ORDER button will redirect you to Wool Warehouse Direct Ltd website
Order DROPS Needles & Hooks
Clicking the ORDER button will redirect you to Wool Warehouse Direct Ltd website
The yarn cost is calculated from the pattern’s smallest size and the yarn’s cheapest product type. Looking for an even better price? You might find it on the DROPS Deals!

Summer Swing
Top with lace pattern and raglan, worked bottom up in DROPS Muskat. Size: S - XXXL.
DROPS design: Pattern r-711
Yarn group B
----------------------------------------------------------
Size: S - M - L - XL - XXL - XXXL
Materials:
DROPS MUSKAT from Garnstudio (belongs to yarn group B)
400-400-450-500-550-600 g colour 18, white
DROPS CIRCULAR NEEDLE (80 and 60 cm) SIZE 4 mm – or size needed to get 21 stitches and 28 rows in stocking stitch = width 10 cm and 10 cm vertically.
DROPS DOUBLE POINTED NEEDLES AND CIRCULAR NEEDLE (40 cm) SIZE 3.5 mm for sleeve and neck edge – or size needed to get 22 stitches and 30 rows in stocking stitch = width 10 cm and 10 cm vertically.
----------------------------------------------------------
-------------------------------------------------------
Alternative Yarn – See how to change yarns here
Yarn Groups A to F – Use the same pattern and change the yarn here
Yarn usage using an alternative yarn – Use our yarn converter here
-------------------------------------------------------
100% Cotton
from 1.85 £ /50g
Order DROPS Muskat from Wool Warehouse Direct Ltd
|
|
DROPS Muskat uni colour 100% Cotton 1.85 £ /50g Order |
Clicking the ORDER button will redirect you to Wool Warehouse Direct Ltd website
Order DROPS Needles & Hooks
Clicking the ORDER button will redirect you to Wool Warehouse Direct Ltd website
The yarn cost is calculated from the pattern’s smallest size and the yarn’s cheapest product type. Looking for an even better price? You might find it on the DROPS Deals!
- English (UK/cm)
- Česky
- Dansk
- Deutsch
- Eesti keel
- English (US/in)
- Español
- Français
- Íslenska
- Italiano
- Magyar
- Nederlands
- Norsk
- Polski
- Português
- Suomi
- Svenska
- English (UK/cm), Bulgaria
- English (UK/cm), Croatia
- English (UK/cm), Greece
- English (UK/cm), Latvia
- English (UK/cm), Lithuania
- English (UK/cm), Romania
- English (UK/cm), Slovenia
- Česky, Slovakia
Pattern instructions
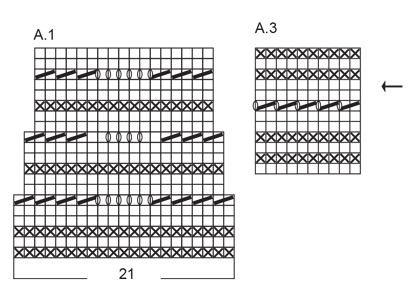
1 ridge= knit 1 round and purl 1 round.
PATTERN:
See diagrams A.1 to A.3.
DECREASE TIP:
To calculate how to decrease evenly, use the total number of stitches on row (e.g. 272 stitches) and divide stitches by number of decreases to be done (e.g. 34) = 8. I.e. in this example knit approx. every 7th and 8th stitch together.
RAGLAN:
Decrease as follows: Begin 3 stitches before marker thread: Knit 2 together, knit 2 (marker thread is between these stitches), slip 1 stitch knitwise, knit 1, pass slipped stitch over stitch worked (= 8 stitches decreased on round).
----------------------------------------------------------
TOP:
Worked in the round on circular needle. Work sleeve edges in the round on double pointed needles.
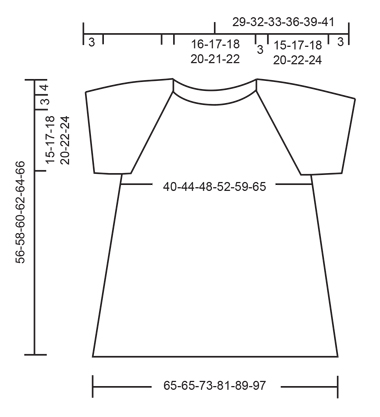
Cast on 336-336-378-420-462-504 stitches on circular needle size 4 mm with Muskat. Work A.1 (= 21 stitches) 16-16-18-20-22-24 times in total on round. When entire A.1 has been worked vertically, 272-272-306-340-374-408 stitches remain on needle. Knit 1 round while decreasing 34 stitches evenly - READ DECREASE TIP (evenly) = 238-238-272-306-340-374 stitches. REMEMBER THE KNITTING TENSION Then work A.2 (= 34 stitches) 7-7-8-9-10-11 times. Continue this pattern and decrease as shown in diagrams. When entire A.2 has been worked vertically, 182-182-208-234-260-286 stitches remain on needle. Knit 1 row from right side while adjusting number of stitches to 168-184-200-220-248-272 (i.e. in size M increase 2 stitches. In size S, L, XL, XXL and XXXL decrease 14-8-14-12-14 stitches evenly). Continue in stocking stitch. When piece measures 34-34-35-35-35-35 cm, work next round as follows: Work the first 38-42-45-50-56-61 stitches (= ½ back piece), cast off the next 8-8-10-10-12-14 stitches for armhole, work the next 76-84-90-100-112-122 stitches (= front piece), cast off the next 8-8-10-10-12-14 stitches, work the remaining 38-42-45-50-56-61 stitches (= ½ back piece). Put piece aside and work the sleeve edges.
SLEEVE EDGES:
Work sleeve edges in the round on double pointed needles.
Cast on 68-76-84-88-92-98 stitches on double pointed needles size 3.5 mm with Muskat. Work A.3 in the round. When A.3 has been vertically, work next round as follows: Cast off the first 8-8-10-10-12-14 stitches (= under sleeves), knit the remaining stitches and decrease 1-0-0-0-0-1 stitch evenly = 59-68-74-78-80-83 stitches. Put piece aside and work another sleeve edge the same way.
YOKE:
Slip sleeve edges on to same circular needle as body where armholes were cast off = 270-304-328-356-384-410 stitches. Insert 1 marker thread in all transitions between sleeves and body piece (= 4 marker threads). Continue in stocking stitch, AT THE SAME TIME on 1st round, begin to decrease for RAGLAN – see explanation above! Decrease like this every other round 21-23-25-28-30-33 times in total = 102-120-128-132-144-146 stitches. Switch to circular needle size 3.5 mm and work A.3. On round marked with arrow in diagram decrease 2-14-18-16-24-20 stitches evenly = 100-106-110-116-120-126 stitches. Cast off when A.3 has been worked one time vertically.
ASSEMBLY:
Sew together holes under the sleeves. Fasten off.
This pattern has been corrected. Click here to see the correction/s.
Under YOKE: Work after chart A.3, not A.4
Pattern and diagram A.2 has been updated.
Chart A.2 (row 41 updated).
Diagram

|
= knit |

|
= purl |

|
= 1 yarn over between 2 stitches |

|
= slip 1 stitch knitwise, knit 1, pass slipped stitch over |

|
= knit 2 together |

|
= slip 1 stitch knitwise, knit 2 together, pass slipped stitch over |

What can you do with our patterns? You can share DROPS patterns online, using the pattern original picture, materials, name and number. But you are NOT ALLOWED to reproduce the complete pattern digitally in any way. Yarn stores are welcome to use the DROPS pattern database to promote the sale of our assortment. You can print out our patterns, make as many copies as you’d like. The only thing we ask is that you don't make any changes / additions to the original printed document. And that the patterns according to the DROPS philosophy are given out to the consumers for free. Editorials that wish to publish our patterns in printed books or magazines can contact us for more information. The sale of garments based on DROPS patterns is permitted as long as they are sold as single items or per order. Further commercial use of the patterns is not permitted. It has to be clearly stated that the garment is made based on a design from DROPS DESIGN. The use of clothing labels of which DROPS DESIGN forms part is conditioned by the inclusion of the following text: “A DROPS DESIGN made by …..”. The use of DROPS photos for marketing purposes/sales is only permitted in connection with the use/sale of DROPS products. The photos may not be cut or edited and the logo should be clearly visible.
We reserve the right to withdraw the permission for use of our patterns at any time, notwithstanding the reason.
Each of our patterns has specific tutorial videos to help you.


These step-by-step tutorials might also help you:


Why is the knitting/crochet tension so important?
Knitting tension is what determines the final measurements of your work, and is usually measured per 10 x 10 cm. It is provided like so: number of stitches in width x number of rows in height - eg: 19 stitches x 26 rows = 10 x 10 cm.
The knitting tension is very individual; some people knit/crochet loosely while others work tightly. You adjust the knitting tension with the needle size, which is why the suggested needle size is only meant as a guide! You need to adjust this (up or down) to ensure that YOUR knitting tension matches the knitting tension provided in the pattern. If you work with a different knitting tension than provided you will have a different yarn consumption, and your work will have different measurements than what the pattern suggests.
The knitting tension also determines which yarns can replace each other. As long as you achieve the same knitting tension you can replace one yarn with another.
See DROPS lesson: How to measure your tension/gauge
See DROPS video: How to make a gauge tension swatch
How do I know how many balls of yarn I need?
The required amount of yarn is provided in grams, eg: 450 g. To calculate how many balls you’ll need you first need to know how many grams are in 1 ball (25g, 50g or 100g). This information is available if you click on the individual yarn quality on our pages. Divide the amount required with the amount of each ball. For example, if each ball is 50g (the most common amount), the calculation will be as follows: 450 / 50 = 9 balls.
Can I use a different yarn than what the pattern suggests?
The important thing when changing from one yarn to another is that the knitting/crochet tension remains the same. This is so that the measurements of the finished piece will be the same as on the sketch provided. It is easier to achieve the same knitting tension using yarns from the same yarn group. It is also possible to work with multiple strands of a thinner yarn to achieve the knitting tension of a thicker one. Please try our yarn converter. We recommend you to always work a test swatch.
Please NOTE: when changing yarn the garment might have a different look and feel to the garment in the photo, due to individual properties and qualities of each yarn.
See DROPS lesson: Can I use a different yarn than the one mentioned in the pattern?
What are the yarn groups?
All our yarns are categorised into yarn groups (from A to F) according to thickness and knitting tension – group A contains the thinnest yarns and group F the thickest. This makes it easier for you to find alternative yarns to our patterns, should you wish to switch yarn. All yarns within the same group have a similar knitting tension and can easily replace each other. However, different yarn qualities have different structures and properties which will give the finished work a unique look and feel.
How do I use the yarn calculator?
At the top of all our patterns you’ll find a link to our yarn calculator, which is a helpful tool should you wish to use a different yarn than suggested. By filling in the yarn quality you wish to replace, the amount (in your size) and number of strands, the calculator will present good alternative yarns with the same knitting tension. Additionally it will tell you how much you’ll require in the new qualities and whether you’ll need to work with multiple strands. Most skeins are 50g (some are 25g or 100g).
If the pattern is worked with multiple colours, every colour will have to be calculated separately. Similarly, if the pattern is worked with several strands of different yarns (for example 1 strand Alpaca and 1 strand Kid-Silk) you will have to find alternatives for each, individually.
Why do you show discontinued yarns in the patterns?
Since different yarns have different qualities and textures we have chosen to keep the original yarn in our patterns. However, you can easily find options among our available qualities by using our yarn calculator, or simply pick a yarn from the same yarn group.
It is possible that some retailers still have discontinued yarns in stock, or that someone has a few skeins at home that they would like to find patterns for.
The yarn calculator will provide both alternative yarn as well as required amount in the new quality.
What size should I knit?
If you think it's hard to decide what size to make, it can be a good idea to measure a garment you own already and like the size of. Then you can pick the size by comparing those measures with the ones available in the pattern's size chart.
You'll find the size chart at the bottom of the pattern.
See DROPS lesson: How to read size chart
Why do I get the wrong knitting tension with the suggested needle size?
The needle size provided in the pattern serves only as a guide, the important thing is to follow the knitting tension. And since knitting tension is very individual, you will have to adjust the needle size to ensure that YOUR tension is the same as in the pattern – maybe you’ll have to adjust 1, or even 2 needle sizes, up or down to achieve the correct tension. For this, we recommend that you work test swatches.
Should you work with a different knitting tension than the one provided, the measurements of the finished garment might deviate from the measurement sketch.
See DROPS lesson: How to measure your tension/gauge
See DROPS video: How to make a tension/gauge swatch
Why is the pattern worked top-down?
Working a garment top-down provides more flexibility and room for personal adjustment. For example it is easier to try the garment on while working, as well as making adjustments to length of yoke and shoulder caps.
The instructions are carefully explaining every step, in the correct order. Diagrams are adjusted to the knitting direction and are worked as usual.
How do I work according to a knitting diagram?
The diagram depicts all rows/rounds, and every stitch seen from the right side. It is read from bottom to top, from right to left. 1 square = 1 stitch.
When working back and forth, every other row is worked from the right side and every other row is worked from the wrong side. When working from the wrong side, the diagram will have to be worked reversed: from left to right, knit stitches are purled, purl stitches are knit etc.
When working in the round every round is worked from the right side and the diagram are worked from right to left on all rounds.
See DROPS lesson: How to read knitting diagrams
How do I work according to a crochet diagram?
The diagram depicts all rows/rounds, and every stitch seen from the right side. It is worked from bottom to top, from right to left.
When working back and forth every other row is worked from the right side: from right to left and every other row is worked from the wrong side: from left to right.
When working in the round, every row in the diagram are worked from the right side, from right to left.
When working a circular diagram you start in the middle and work your way outwards, counter clockwise, row by row.
The rows usually start with a given number of chain stitches (equivalent to the height of the following stitch), this will either be depicted in the diagram or explained in the pattern.
See DROPS lesson: How to read crochet diagrams
How do I work several diagrams simultaneously on the same row/round?
Instructions for working several diagrams after each other on the same row/round, will often be written like so: “work A.1, A.2, A.3 a total of 0-0-2-3-4 times". This means you work A.1 once, then A.2 is worked once, and A.3 is repeated (in width) the number of times provided for your size – in this case like so: S = 0 times, M = 0 times, L=2 times, XL= 3 times and XXL = 4 times.
The diagrams are worked as usual: begin with the first row in A.1, then work the first row in A.2 etc.
See DROPS lesson: How to read knitting diagrams
See DROPS lesson: How to read crochet diagrams
Why are the sleeves shorter in larger sizes?
The total width of the garment (from wrist-to-wrist) will be larger in the larger sizes, despite the actual sleeves being shorter. The larger sizes have longer sleeve caps and wider shoulders, so there will be a good fit in all sizes.
Where on the garment is the length measured?
The measurement sketch/schematic drawing provides information regarding the full length of the garment. If it’s a jumper or a jacket the length is measured from the highest point on the shoulder closest to the neckline, and straight down to the bottom of the garment. It is NOT measured from the tip of shoulder. Similarly, the length of yoke is measured from the highest point on the shoulder and down to where yoke is split into body and sleeves.
On a jacket measures are never taken along bands, unless specifically stated. Always measure inside band stitches when measuring the length.
See DROPS lesson: How to read a schematic drawing
What is a repeat?
Diagrams are often repeated on the round or in height. 1 repeat is the diagram the way it appears in the pattern. If it says to work 5 repeats of A.1 in the round, then you work A.1 a total of 5 times after/next to each other in the round. If it says to work 2 repeats of A.1 vertically/in height you work the entire diagram once, then begin again at the start and work the entire diagram one more time.
Why does the piece start with more chain stitches than it’s worked with?
Chain stitches are slightly narrower than other stitches and to avoid working the cast-on edge too tight, we simply chain more stitches to begin with. The stitch count will be adjusted on the following row to fit the pattern and measurement sketch.
Why increase before the rib edge when the piece is worked top-down?
The rib edge is more elastic and will contract slightly compared to, for example, stocking stitch. By increasing before the rib edge, you avoid a visible difference in width between the rib edge and the rest of the body.
Why increase in the cast-off edge?
It’s very easy to cast off too tightly, and by making yarn overs while casting off (and simultaneously casting these off) you avoid a too tight cast off edge.
See DROPS video: How to bind off with yarn overs (yo)
How do I increase/decrease on every 3rd and 4th row/round alternately?
To achieve an even increase (or decrease) you can increase on, for example: every 3rd and 4th row alternately, like so: work 2 rows and increase on the 3rd row, work 3 rows and increase on the 4th. Repeat this until the increase is complete.
See DROPS lesson: Increase or decrease 1 st on every 3rd and 4th row alternately
How can I work a jacket in the round instead of back and forth?
Should you prefer to work in the round instead of back and forth, you may of course adjust the pattern. You’ll need to add steeks mid-front (usually 5 stitches), and follow the instructions. When you would normally turn and work from the wrong side, simply work across the steek and continue in the round. At the end you’ll cut the piece open, pick up stitches to work bands, and cover the cut edges.
See DROPS video: How to knit steeks and cut open
Can I work a jumper back and forth instead of in the round?
Should you prefer to work back and forth instead of in the round, you may of course adjust the pattern so you work the pieces separately and then assemble them at the end. Divide the stitches for the body in 2, add 1 edge stitch in each side (for sewing) and work the front and back pieces separately.
See DROPS lesson: Can I adapt a pattern for circular needles into straight needles?
Why is the pattern slightly different than what I see in the photo?
Pattern repeats can vary slightly in the different sizes, in order to get the correct proportions. If you’re not working the exact same size as the garment in the photo, yours might deviate slightly. This has been carefully developed and adjusted so that the complete impression of the garment is the same in all sizes.
Make sure to follow instructions and diagrams for your size!
How do I make a women’s size garment into a men’s size one?
If you have found a pattern you like which is available in women’s size it’s not very difficult to convert it to men’s size. The biggest difference will be the length of sleeves and body. Start working on the women size that you think would fit across the chest. The additional length will be worked right before you cast off for the armhole/sleeve cap. If the pattern is worked top-down you can add the length right after the armhole or before the first decrease on sleeve.
Regarding additional yarn amount, this will depend on how much length you add, but it is better with a skein too many than too few.
How do I prevent a hairy garment from shedding?
All yarns will have excess fibres (from production) that might come off as lint or shedding. Brushed yarns (ie hairier yarns) have more of these loose, excess fibres, causing more shedding.
Shedding also depends on what is worn under or over the garment, and whether this pulls at the yarn fibres. It’s therefore not possible to guarantee that there will be no shedding
Below are some tips on how to get the best result when working with hairier yarns:
1. When the garment is finished (before you wash it) shake it vigorously so the looser hairs come off. NOTE: do NOT use a lint roller, brush or any method that pulls at the yarn.
2. Place the garment in a plastic bag and put it in your freezer - the temperature will cause the fibres to become less attached to each other, and excess fibres will come off easier.
3. Leave in the freezer for a few hours before taking it out and shaking it again.
4. Wash the garment according to the instructions on the yarn label.
Why does my garment pill?
Pilling is a natural process that happens to even the most exclusive of fibers. It's a natural sign of wear and tear that is hard to avoid, and that is most visible in high friction areas of your garment like a sweater's arms and cuffs.
You can make your garment look as new by removing the pilling, using a fabric comb or a pill/lint remover.
In the meantime, you can read the questions and answers that others have left to this pattern or join the DROPS Workshop on Facebook to get help from fellow knitters/crocheters!
You might also like...


|
|||||||||||||||||||
Summer Swing |
|||||||||||||||||||
|
|
|||||||||||||||||||
Top with lace pattern and raglan, worked bottom up in DROPS Muskat. Size: S - XXXL.
DROPS 178-32 |
|||||||||||||||||||
|
GARTER STITCH (worked in the round): 1 ridge= knit 1 round and purl 1 round. PATTERN: See diagrams A.1 to A.3. DECREASE TIP: To calculate how to decrease evenly, use the total number of stitches on row (e.g. 272 stitches) and divide stitches by number of decreases to be done (e.g. 34) = 8. I.e. in this example knit approx. every 7th and 8th stitch together. RAGLAN: Decrease as follows: Begin 3 stitches before marker thread: Knit 2 together, knit 2 (marker thread is between these stitches), slip 1 stitch knitwise, knit 1, pass slipped stitch over stitch worked (= 8 stitches decreased on round). ---------------------------------------------------------- TOP: Worked in the round on circular needle. Work sleeve edges in the round on double pointed needles. Cast on 336-336-378-420-462-504 stitches on circular needle size 4 mm with Muskat. Work A.1 (= 21 stitches) 16-16-18-20-22-24 times in total on round. When entire A.1 has been worked vertically, 272-272-306-340-374-408 stitches remain on needle. Knit 1 round while decreasing 34 stitches evenly - READ DECREASE TIP (evenly) = 238-238-272-306-340-374 stitches. REMEMBER THE KNITTING TENSION Then work A.2 (= 34 stitches) 7-7-8-9-10-11 times. Continue this pattern and decrease as shown in diagrams. When entire A.2 has been worked vertically, 182-182-208-234-260-286 stitches remain on needle. Knit 1 row from right side while adjusting number of stitches to 168-184-200-220-248-272 (i.e. in size M increase 2 stitches. In size S, L, XL, XXL and XXXL decrease 14-8-14-12-14 stitches evenly). Continue in stocking stitch. When piece measures 34-34-35-35-35-35 cm, work next round as follows: Work the first 38-42-45-50-56-61 stitches (= ½ back piece), cast off the next 8-8-10-10-12-14 stitches for armhole, work the next 76-84-90-100-112-122 stitches (= front piece), cast off the next 8-8-10-10-12-14 stitches, work the remaining 38-42-45-50-56-61 stitches (= ½ back piece). Put piece aside and work the sleeve edges. SLEEVE EDGES: Work sleeve edges in the round on double pointed needles. Cast on 68-76-84-88-92-98 stitches on double pointed needles size 3.5 mm with Muskat. Work A.3 in the round. When A.3 has been vertically, work next round as follows: Cast off the first 8-8-10-10-12-14 stitches (= under sleeves), knit the remaining stitches and decrease 1-0-0-0-0-1 stitch evenly = 59-68-74-78-80-83 stitches. Put piece aside and work another sleeve edge the same way. YOKE: Slip sleeve edges on to same circular needle as body where armholes were cast off = 270-304-328-356-384-410 stitches. Insert 1 marker thread in all transitions between sleeves and body piece (= 4 marker threads). Continue in stocking stitch, AT THE SAME TIME on 1st round, begin to decrease for RAGLAN – see explanation above! Decrease like this every other round 21-23-25-28-30-33 times in total = 102-120-128-132-144-146 stitches. Switch to circular needle size 3.5 mm and work A.3. On round marked with arrow in diagram decrease 2-14-18-16-24-20 stitches evenly = 100-106-110-116-120-126 stitches. Cast off when A.3 has been worked one time vertically. ASSEMBLY: Sew together holes under the sleeves. Fasten off. |
|||||||||||||||||||
Diagram explanations |
|||||||||||||||||||
|
|||||||||||||||||||
|
|
|||||||||||||||||||
|
|
|||||||||||||||||||
|
|
|||||||||||||||||||
|
Have you made this or any other of our designs? Tag your pictures in social media with #dropsdesign so we can see them! Do you need help with this pattern?You'll find tutorial videos, a Comments/Questions area and more by visiting the pattern on garnstudio.com. © 1982-2024 DROPS Design A/S. We reserve all rights. This document, including all its sub-sections, has copyrights. Read more about what you can do with our patterns at the bottom of each pattern on our site. |
|||||||||||||||||||


With over 40 years in knitting and crochet design, DROPS Design offers one of the most extensive collections of free patterns on the internet - translated to 17 languages. As of today we count 304 catalogues and 11422 patterns - 11422 of which are translated into English (UK/cm).
We work hard to bring you the best knitting and crochet have to offer, inspiration and advice as well as great quality yarns at incredible prices! Would you like to use our patterns for other than personal use? You can read what you are allowed to do in the Copyright text at the bottom of all our patterns. Happy crafting!
Comments / Questions (53)
Forgive me, reading wrong size. Thanks for your hardwork in creating this pattern.
12.04.2024 - 17:41On the size L at the shaping of the yoke, we have 90 sts each side, front and back total stitches 180. On the sleeves 74sts times 2 total stitches 148. Altogether ready for raglan 328 stitches. Raglan decrease for 25 times total of 50 stitches. Calculation:- 90-50=40x2=80 stitches for front and back. 78-50=28x2=56 stitches for either sleeves. 80+56=136 stitches to start A3 pattern. The pattern requests to have a total of 4 sts per sleeve to many, that would mean another 4 rows before A3 is done?
12.04.2024 - 17:07DROPS Design answered:
Dear Lynn, you decrease on each side of each marker thread for the raglan. In total, you decrease 8 times on each round. 8 stitches x 25 times = 200 stitches. 328-200 = 128 stitches. For the sleeves, you had 74 sts on each sleeve (not 78), minus 50 = 24. 24*2 = 48. 80+48 = 128 stitches. Happy knitting!
14.04.2024 - 22:40J’ai commencé à faire le modèle no 178-32 et lorsque j’ai terminé le A1 j’avais beaucoup plus de maille au lieu de moins de maille alors que j’ai fait à la lettre
22.03.2024 - 21:04DROPS Design answered:
Bonjour Mme Tremblay, notez bien que A.1 comporte des diminutions: vous allez diminuer 2 mailles au 6ème tour et 2 mailles au 12ème tour, autrement dit vous allez diminuer 4 mailles dans chaque A.1. Pensez à bien mettre un marqueur entre chaque A.1 pour bien vérifier votre n nombre de mailles à chaque fois et ainsi être certaine de bien conserver le bon nombre de mailles. Bon tricot!
02.04.2024 - 08:06Co to znaczy przersbiac schemat A3 w okrazeniu oznaczonym w schemacie strzalka.Przerabiamy tylko do strzalki czy jak
13.03.2024 - 08:28DROPS Design answered:
Witaj Małgosiu, 'W okrążeniu oznaczonym w schemacie A.3 strzałką, równomiernie zamknąć....'. Tzn. że w 9-tym okrążeniu schematu A.3, czyli w okrążeniu oczkami prawymi, musisz równomiernie zamknąć X oczek. Jak równomiernie zamykać oczka znajdziesz TUTAJ. Pozdrawiamy!
13.03.2024 - 09:23After working A.1 should there be a PURL row? The pictures seem to show one. I'd also like to know the answer to Claudia's question please.
16.07.2023 - 15:13DROPS Design answered:
Dear Mo, yes, you'd need to purl the next round after A.1 and at the same time decrease. The arrow is explained in the pattern instructions and is used for the yoke: On round marked with arrow in diagram decrease 2-14-18-16-24-20 stitches evenly. Happy knitting!
17.07.2023 - 11:33What does the arrow mean on the right of Chart A3, beside Row 9?
15.07.2023 - 21:38DROPS Design answered:
Dear Claudia, the arrow is explained in the pattern instructions and is used for the yoke: On round marked with arrow in diagram decrease 2-14-18-16-24-20 stitches evenly. Happy knitting!
17.07.2023 - 11:34Non ho eseguito il campione, ma ho usato il filo e i ferri indicati nel modello
22.04.2022 - 08:49DROPS Design answered:
Buonasera Maria Elena, la tensione del campione è soggettiva, per cui se il suo campione dovesse essere diverso da quello indicato, anche la quantità di filato cambierebbe. Buon lavoro!
24.04.2022 - 16:34Is A.4 gelijk aan A.3?
18.04.2022 - 22:16DROPS Design answered:
Dag Annette,
Ja, dit mot inderdaad A.3 zijn. Het staat verkeerd in de tekst. Ik zal het doorgeven aan de ontwerpafdeling ter controle.
20.04.2022 - 11:01Ho lavorato la taglia L ma segnato che sono necessari gr. 500 di filato anziché gr. 450
18.04.2022 - 18:59DROPS Design answered:
Buonasera Maria Elena, il suo campione corrispondeva a quello indicato? Buon lavoro!
19.04.2022 - 21:26Bonjour Pouvez vous me dire ce que veux dire "l'étoile ".......*......dans le graphique (A 2) Il y en a deux ...une a la 15 e ligne et l'autre 36 e ligne MERCI pour vos explications
26.02.2022 - 07:58DROPS Design answered:
Bonjour Marine, je ne vois pas détoile dans A.2, mais au début du 15ème et du 51ème tour vous devez commencer le diagramme 1 maille avant, autrement dit tricotez le tour précédent jusqu'à ce qu'il reste 1 maille, et commencez le diagramme A.2 ainsi. Si j'ai mal compris votre question, pouvez-vous essayer de la reformuler différemment? Merci pour votre compréhension.
28.02.2022 - 09:13