
Popular categories
Looking for a yarn?


|
|||||||||||||||||||
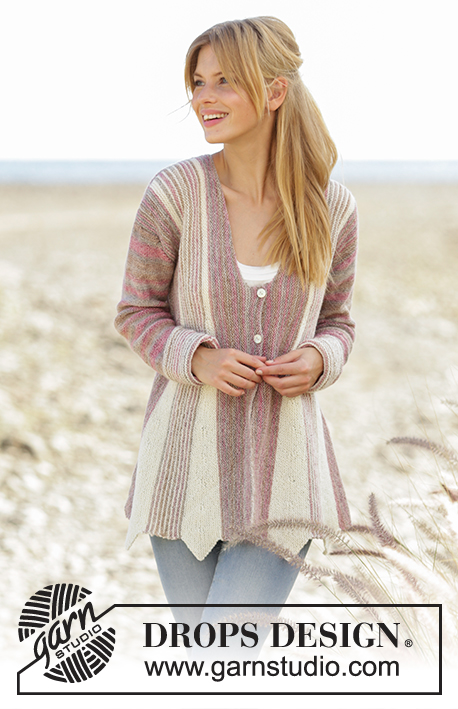
Spring Forest |
|||||||||||||||||||
 |
 |
||||||||||||||||||
Jumper with wave pattern and raglan, worked bottom up with 2 strands DROPS Delight. Sizes: S - XXXL.
DROPS 178-27 |
|||||||||||||||||||
|
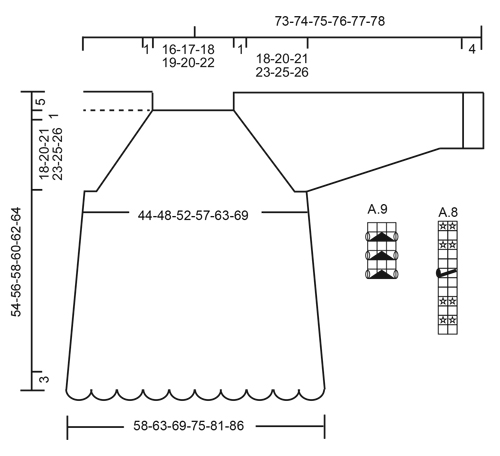
RIDGE/GARTER STITCH (worked back and forth): 1 ridge = knit 2 rows. CHANGING THE STRAND TIP: So that the transitions between colours in Delight are as neat as possible when changing balls, it is important to find a ball which starts with the colour the previous ball ended with. PATTERN: See diagrams A.1 to A.9. The diagrams show all the rows in the pattern seen from the right side. INCREASE TIP (for mid under the sleeve): Start 2 stitches before the marker thread, make 1 yarn over, knit 4 (the marker thread sits in the middle of these 4 stitches), make 1 yarn over. On the next round knit the yarn overs twisted to prevent holes. DECREASE TIP: Decrease 1 stitch by knitting 2 stitches together. To work out how to decrease evenly, count the total number of stitches on the needle (e.g. 88 stitches) and divide the number of stitches by the number of decreases to be made (e.g. 5) = 17.6. In this example you work approx. every 17th and 18th stitch together. RAGLAN: Decrease to raglan in each transition between body and sleeves. NOTE: In sizes S, M and XXL decreases are different on the body and sleeves as described in the text. Decrease as follows after A.9: Slip 1 stitch as if to knit, knit 1, pass the slipped stitch over (= 1 stitch decreased). Decrease as follows before A.9: Start 2 stitches before A.9 and knit 2 stitches together (= 1 stitch decreased). ---------------------------------------------------------- JUMPER: The piece is worked in the round with circular needle, from the bottom up. The sleeves are worked with double pointed needles. BODY: Cast on 270-297-324-351-378-405 stitches with circular needle size 5.5 mm with 1 strand in each colour (= 2 strands). Work A.1 (= 27 stitches) 10-11-12-13-14-15 times in width. When the whole of A.1 has been completed in height there are 230-253-276-299-322-345 stitches on the round. Work A.2 (= 23 stitches) over each repeat of A.1. Continue in this way until A.2 has been completed 3-3-3-3-3-4 times in height – READ CHANGING THE STRAND TIP! REMEMBER THE KNITTING TENSION! Work A.3 (= 23 stitches) 1 time in height. When the whole of A.3 has been completed in height there are 210-231-252-273-294-315 stitches on the round. Work A.4 (= 21 stitches) 2 times in height in all sizes. Work A.5 (= 21 stitches) 1 time in height. When the whole of A.5 has been completed in height there are 190-209-228-247-266-285 stitches on the round. Work A.6 (= 19 stitches) 3 times in height in all sizes. Then work A.7 (= 19 stitches). When A.7 has been completed in height there are 150-165-180-195-210-225 stitches on the round. Knit 1 round where you decrease 10-11-14-13-8-5 stitches evenly along the round = 140-154-166-182-202-220 stitches. Then work the next round as follows: Knit 32-35-38-42-47-52 stitches and insert 1 marker thread in the last stitch knitted, cast off 6 stitches for the armhole, knit 64-71-77-85-95-104 stitches and insert 1 marker thread in the first and last stitch knitted, cast off 6 stitches for the armhole, knit 32-36-39-43-48-52 stitches and insert 1 marker thread in the first stitch knitted. Put aside and work sleeves. SLEEVES: Cast on 32-34-36-40-42-46 stitches with double pointed needles size 4.5 mm with 1 strand in each colour (= 2 strands). Work pattern in the round according to diagram A.8. When A.8 has been completed 1 time in height change to double pointed needles size 5.5 mm. Insert 1 marker thread at the beginning of the round and allow the marker thread to follow the work upwards. Work stocking stitch in the round. When the piece measures 10-12-7-5-5-10 cm increase 2 stitches mid under the sleeve – READ INCREASE TIP. Increase in this way every 7th-5th-5th-5th-4th-4th round a total of 10-12-14-14-14-14 times = 52-58-64-68-70-74 stitches. When the piece measures 46-44-44-42-41-40 cm (shorter measurements in larger sizes due to wider neck and longer yoke) cast off 6 stitches mid under the sleeve (i.e. cast off 3 stitches on each side of the marker thread) = 46-52-58-62-64-68 stitches. Lay the piece to one side and work the other sleeve in the same way. YOKE: Place the sleeves on the same circular needle as the body where you have cast off stitches for the armholes (do this without working the stitches) = 220-246-270-294-318-344 stitches on the needle. There are now 4 marker thread in the piece (1 marker thread in each transition between body and sleeves). Continue by working stocking stitch and A.9 in each transition between body and sleeves (the stitches with marker threads are the middle stitches in A.9). AT THE SAME TIME on the first round start the decreases to RAGLAN – see the description above. NOTE: Decreases vary in the different sizes. SIZES S, M AND XXL: The decreases are different on body and sleeves. FRONT AND BACK PIECES: Decrease 1 stitch every 2nd round (= 4 stitches decreased on the round) a total of 18-20-25 times. SLEEVES: Decrease 1 stitch every 4th round a total of 2-2-1 times and every 2nd round (= 4 stitches decreased on the round) a total of 13-16-23 times. Change to short circular needle size 5.5 mm when the number of stitches has been sufficiently reduced. SIZES L, XL AND XXXL: Decrease 1 stitch on each side of each A.9 (= 8 stitches decreased on the round). Decrease in this way every 2nd round a total of 21-23-26 times. Change to short circular needle size 5.5 mm when the number of stitches has been sufficiently reduced. ALL SIZES: When all the decreases have been completed there are 88-94-102-110-122-136 stitches on the round. Work 1 round where you decrease 5-8-12-16-24-34 stitches evenly along the round – READ DECREASE TIP = 83-86-90-94-98-102 stitches. Change to short circular needle size 4.5 mm. Work 2 RIDGES – see description above and cast off. Make sure the cast-off edge is not tight! ASSEMBLY: Sew the openings under the sleeves. |
|||||||||||||||||||
Diagram explanations |
|||||||||||||||||||
|
|||||||||||||||||||
|
|||||||||||||||||||

|
|||||||||||||||||||
|
Have you made this or any other of our designs? Tag your pictures in social media with #dropsdesign so we can see them! Do you need help with this pattern?You'll find tutorial videos, a Comments/Questions area and more by visiting the pattern on garnstudio.com. © 1982-2024 DROPS Design A/S. We reserve all rights. This document, including all its sub-sections, has copyrights. Read more about what you can do with our patterns at the bottom of each pattern on our site. |
|||||||||||||||||||


With over 40 years in knitting and crochet design, DROPS Design offers one of the most extensive collections of free patterns on the internet - translated to 17 languages. As of today we count 304 catalogues and 11422 patterns - 11422 of which are translated into English (UK/cm).
We work hard to bring you the best knitting and crochet have to offer, inspiration and advice as well as great quality yarns at incredible prices! Would you like to use our patterns for other than personal use? You can read what you are allowed to do in the Copyright text at the bottom of all our patterns. Happy crafting!
Comments / Questions (45)
Die 270 M Anschlag sind für die kleinste Größe. Ich benötige die Größte. Wenn ich die Maschenprobe für das Wellenmuster zugrunde lege, dann ergibt sich folgendes, bei den angegeben Maßen, in meinem Fall 86 cm = 172 cm Umfang: 20 M = 10 cm, 20 x 17,2 = 344 Maschen und nicht wie in der Anleitung angegeben 405 Maschen. Was ist jetzt richtig?
11.12.2017 - 20:23DROPS Design answered:
Liebe Karin, genau diese Maschenanzahl (also 345 M) haben Sie nach A.1. Schlagen Sie 405 M in der letzten Größe, dann stricken Sie die 5 Runden M.1, dann haben Sie 345 M (4 M werden in der 3. Reihe A.1 in jedem Rapport abgenommen). Viel Spaß beim stricken!
12.12.2017 - 07:58Kann es sein, dass die Maschenprobe nicht zu diesem Modell gehört? Nach der angegeben Maschenprobe, ohne dass Muster zu berücksichtigen, müsste man bei der größten Größe 275 Maschen anschlagen. Oder habe ich irgendwo einen Denkfehler?
10.12.2017 - 02:33DROPS Design answered:
Liebe Karin, es werden 270 M angeschlagen, dann A.1 gestrickt. Nach A.1 bleiben 230 M und mit 20 M im Wellenmuster = 10 cm, haben Sie dann 115 cm Umfang, dh wie in der Skizze. Viel Spaß beim stricken!
11.12.2017 - 09:43Alle som klager på at denne er for kort har rett. Her må det strikkes flere A6 for å få rette lengden. Dere ber om tilbakemeldinger men når dere får det så gidder dere ikke ta det til etterretning. Skjerp dere. Når så mange gir tilbakemelding på at lengden ikke stemmer så kan ikke det være en tilfeldighet. Mvh. Tone Sundland
21.11.2017 - 12:34Kommer der en rettelse til denne opskrift. Jeg har her 10 dage stadig ikke hørt noget fra jer....
23.10.2017 - 11:40Følger man opskrift bliver længde op til ærmegab 23 cm. Iflg stregtegning skal længden være 37 cm op til ærmegab så der er en STOR fejl i opskriften. Bittert at have brugt penge på en ubrugelig opskrift og penge på garn også......
12.10.2017 - 10:52Der mangler noget i opskriften. Blusen er alt alt for kort. Ikke i orden at I ikke får mønstret rettet til når det er nævnt flere gange i kommentarfeltet.
11.10.2017 - 22:21Je n'ai jamais tricoté avec des aiguilles circulaires j'appréhende de me lancer.. comment faire pour tricoter vos modèles avec des aiguilles droites merci
14.08.2017 - 14:07DROPS Design answered:
Bonjour Nadine . Ici vous trouvez comment adapter un modèle sur aiguille circulaire pour des aiguilles droites. Bon tricot!
17.08.2017 - 22:18Strickanleitung fehlerhaft!
31.07.2017 - 18:38DROPS Design answered:
Liebe Andrea, können Sie bitte mehr sagen? Was für Fehler, Größe, usw damit wir prüfen können. Danke im voraus!
01.08.2017 - 12:32Helen Singleton wrote:
Hi Drops, I am really beginning to hate your website!!! Every time I visit you have ANOTHER beautiful pattern that is available in larger sizes and I really don't think that I will live long enough to knit them all. I should just stop visiting you but I am addicted and always wanting to see what further delights you have to knit. Thank you so much for putting the pleasure back into knitting things for myself again. Regards Helen
30.06.2017 - 22:22Bonjour, je suis en train de tricoter spring forest en taille S et j'ai un souci avec la taille finale : en ajoutant tous les rangs A1, A2...., j'arrive au nombre de 69 rangs jusqu'à l'emmanchure. Si je prends l'échantillon 20 m x 24 rangs = 10 cms, soit pour 72 rangs (3X24) cela fait 30 cms, or, le schéma indique 51 cms (54-3), il manque donc 21 cms ??? Y aurait -il une erreur par exemple en A2 qu'il faudrait tricoter non pas 3X mais 9X voire 10X ??? Merci de votre réponse ! Pascale
08.05.2017 - 15:07DROPS Design answered:
Bonjour Mme Fouanon, les 54 cm sont la hauteur totale - le 3 cm du bas - les 18 cm d'emmanchure + 1 + 5 cm pour les manches = 27 cm de hauteur jusqu'aux emmanchures. Bon tricot!
08.05.2017 - 16:10