
Popular categories
Looking for a yarn?


|
|
Rays of Spring |
|
 |
 |
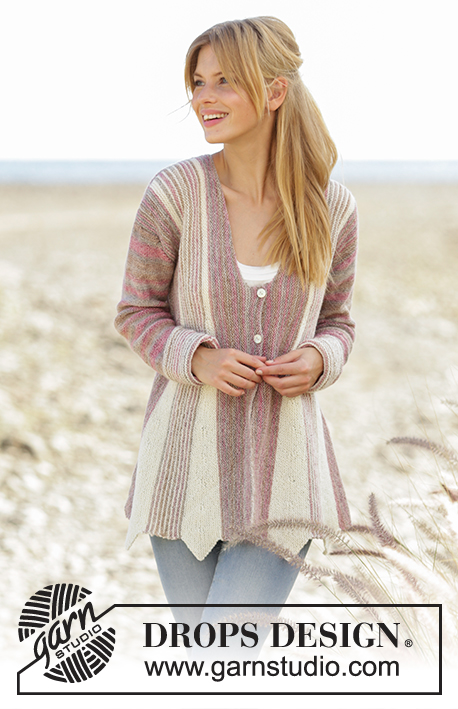
Knitted jacket in Garter stitch with short rows and stripes in DROPS Fabel. Sizes S - XXXL.
DROPS 178-26 |
|
|
KNITTING TIP: Garter stitch is quite elastic and the garment will stretch when worn, both in width and length, and will be larger than the measurements show. Possibly choose a size smaller than you usually use. RIDGE/GARTER STITCH (is worked back and forth): 1 ridge = Work 2 rows knit. MEASURING TIP: Measure from the cast-on edge. Measure under the armhole, where the piece is narrowest. SHORT ROWS: The short rows are always worked with off white and in ridges. 1 repeat of short rows is 1 ridge across all the stitches in the piece, 9 ridges with short rows, 1 ridge over all the stitches, 9 ridges with short rows and 1 ridge over all the stitches. Insert 1 marker thread in the 86th stitch from the right side. Change to off white, continue to work short rows as follows (row 1 = from the right side): ROW 1: Knit all the stitches = 143-148-152-157-161-166 stitches. ROW 2: Knit all the stitches. ROW 3: Knit 86 stitches. ROW 4: Turn and work back by knitting 85 stitches, knit 2 stitches in the last stitch. ROW 5: Knit 77 stitches. ROW 6: Turn and work back by knitting 76 stitches, knit 2 stitches in the last stitch. Continue with short rows and garter stitch, turn 10 stitches earlier on each row from the right side and increase 1 stitch at the end of each row from the wrong side. Continue in this way until you have knitted 14 stitches before turning, turn and knit 2 stitches in the last stitch. There are now 9 ridges with short rows. Work 2 rows across all the stitches on the needle. Continue to work as follows – from the right side: ROW 1: Knit 2 together (= 1 stitch on the needle), knit 13. ROW 2: Turn and knit back. ROW 3: Knit 2 together (= 1 stitch on the needle), knit 22. ROW 4: Turn and knit back. ROW 5: Knit 2 together (= 1 stitch on the needle), knit 31. ROW 6: Turn and knit back. Continue with short rows and garter stitch, turn 10 stitches closer to the stitch with the marker thread each time you turn and knit 2 together at the beginning of each row on the right side. Continue in this way until you have worked 86 stitches before turning, turn and work to end of row. Knit 1 row from the right side and knit 1 row from the wrong side = 143-148-152-157-161-166 stitches on the needle. In the left side of the piece/on the shoulder of the jacket: 1 repeat with short rows = 3 ridges in off white. STRIPES: * Work 1 ridge (= 2 rows) with rose mist, work 1 ridge (= 2 rows) with off white *, repeat from *-*. The stripes are worked between repeats with short rows on back and front piecses. The sides and front bands are worked in rose mist. STRIPES SLEEVE: * Work 1 ridge (= 2 rows) with off white, 1 ridge (= 2 rows) with rose mist *, repeat from *-* for 8 cm. The rest of the sleeve is worked in stocking stitch with the wrong side out with rose mist (= purl from right side and knit from wrong side). ---------------------------------------------------------- BACK PIECE: The piece is worked back and forth on the circular needle. Work in GARTER STITCH = knit all rows. Cast on and work from the left-hand side, see the arrows in the sketch for the direction of work. READ KNITTING TIP! Loosely cast on 102-104-106-109-111-113 stitches with circular needle size 3.5 mm and rose mist. Work 5-11-13-15-19-21 rows (row 1 = from the wrong side). REMEMBER THE KNITTING TENSION! At the end of the next row (= from the right side) cast on 3 new stitches for the armhole. Continue to cast on 3 new stitches at the end of every 6th row: 0-0-1-2-4-5 times = 105-107-112-118-126-131 stitches. At the end of the next row from the right side cast on 38-41-40-39-35-35 new stitches = 143-148-152-157-161-166 stitches. Continue to work garter stitch across all stitches until the piece measures 9-10-11-12-14-16 cm (adjust so that the next row is worked from the right side). Continue to work 1 repeat with SHORT ROWS – see description above – with off white. Continue working with STRIPES - see description above, across all stitches until the piece measures 17-19-21-23-26-28 cm – READ MEASURING TIP. Now cast off 5 stitches at the beginning of the next row from the wrong side for the neck = 138-143-147-152-156-161 stitches. Continue working garter stitch across all stitches until the piece measures 20-22-24-26-30-32 cm (adjust so that the next row is worked from the right side). Work 1 repeat with short rows with off white. Continue with stripes and garter stitch until the piece measures 25-27-29-31-36-38 cm. Now cast on 5 stitches at the end of the next row from the right side = 143-148-152-157-161-166 stitches. Continue back and forth across all the stitches until the piece measures 32-35-38-41-47-49 cm (adjust so that the next row is worked from the right side). Work 1 repeat with short rows with off white. Finish the piece in garter stitch and rose mist. Work until the piece measures approx. 40-43-45-47-52-54 cm. Now cast off 38-41-40-39-35-35 stitches at the beginning of the next row from the wrong side for the armhole = 105-107-112-118-126-131 stitches. On the next row from the wrong side cast off 3 stitches at the beginning of the row. Continue to cast off at the beginning of every 6th row: 3 stitches 0-0-1-2-4-5 times = 102-104-106-109-111-113 stitches. Work back and forth until the piece measures 42-46-50-54-62-66 cm. Loosely cast off. RIGHT FRONT PIECE: Cast on and work from the side towards mid front. See the arrows in the sketch for the direction to work in. Loosely cast on 102-104-106-109-111-113 stitches with circular needle size 3.5 mm and rose mist. Continue to work and increase for the armhole as for the back piece = 143-148-152-157-161-166 stitches. When the piece measures 6-7-8-9-12-14 cm (adjust so that the next row is worked from the right side) work 1 repeat with short rows with off white. Continue to work in garter stitch and stripes across all stitches. When the piece measures 13-15-17-17-19-21 cm – READ MEASURING TIP - (adjust so that the next row is worked from the right side) work 1 repeat with short rows with off white. Continue to work garter stitch with rose mist. Work until the piece measures 3-3-3-5-6-6 cm after the last short row (the piece now measures a total of approx. 17-19-21-23-26-28 cm). Now cast off for the neck at the beginning of every row from the wrong side: 9-9-11-9-11-8 stitches 1 time, 5 stitches 7 times and 2 stitches 1-1-1-2-2-4 times = 97-102-104-109-111-115 stitches. Work 5 rows back and forth across all the stitches with rose mist. Now cast off for buttonholes, work as follows from the right side: Work 56-61-63-68-70-74 stitches, * knit 2 together, make 1 yarn over, work 16 stitches *, repeat from *-* in total 2 times, knit 2 together, make 1 yarn over, work the last 3 stitches = 3 buttonholes. Work 5 rows back and forth across all the stitches with rose mist. Loosely cast off. LEFT FRONT PIECE: Cast on and work from mid front towards the side. Loosely cast on 97-102-104-109-111-115 stitches with circular needle size 3.5 mm and rose mist. Work 11 rows (row 1 = from right side) back and forth across all stitches. Then continue to increase for the neck at the end of every row from the right side: 2 stitches 1-1-1-2-2-4 times, 5 stitches 7 times and 9-9-11-9-11-8 stitches 1 time = 143-148-152-157-161-166 stitches. Continue back and forth across all stitches until the piece measures approx. 10-10-10-12-13-14 cm (adjust so that the next row is worked from the right side). Work 1 repeat with short rows and off white. Continue working in garter stitch and stripes back and forth across all stitches until the piece measures approx. 17-18-19-20-20-21 cm (adjust so that the next row is worked from the right side). Work 1 repeat with short rows with off white. Continue to work garter stitch with rose mist. AT THE SAME TIME when the piece measures 4-4-3-2-2-2 cm after the last short row cast off the first 38-41-40-39-35-35 stitches from the wrong side for the armhole. On the next row from the wrong side cast off 3 stitches at the beginning of the row. Continue to cast off at the beginning of every 6th row: 3 stitches 0-0-1-2-4-5 times = 102-104-106-109-111-113 stitches. Continue back and forth across all stitches until the piece measures 6-7-8-9-12-14 cm after the last short row. Loosely cast off. SLEEVE: The sleeve is worked back and forth on the circular needle. Loosely cast on 48-50-52-54-56-58 stitches (including 1 edge stitch in each side) with circular needle size 3.5 mm and rose mist. Work in GARTER STITCH and STRIPES SLEEVE – see description above. When the piece measures 5-5-5-5-5-8 cm increase 1 stitch in each side. Continue the increases every 3-2½-2-1½-1½-1 cm in total 12-14-16-19-20-22 times = 72-78-84-92-96-102 stitches. AT THE SAME TIME when the piece measures 8 cm continue working with rose mist and stocking stitch with the wrong side out. When the piece measures 41-41-40-40-38-37 cm cast off 3 stitches in each side for the sleeve cap. NOTE! Shorter measurements in the larger sizes due to a longer sleeve cap and broader shoulder measurements. Continue to cast off for the sleeve cap at the beginning of each row in the side as follows: 2 stitches 2-2-2-2-1-0 times and 1 stitch 10-12-14-15-24-28 times. Then cast off 2 stitches in each side until the piece measures 47-48-48-49-49-50 cm. Now cast off 3 stitches in each side 1 time. Cast off the remaining stitches, when the piece measures approx. 48-49-49-50-50-51 cm. ASSEMBLY: Sew the shoulder seams. Sew in the sleeves. Sew the sleeve and side seams in one go inside the 1 edge stitch. Sew the buttons on the left front piece. |
|

|
|
|
Have you made this or any other of our designs? Tag your pictures in social media with #dropsdesign so we can see them! Do you need help with this pattern?You'll find tutorial videos, a Comments/Questions area and more by visiting the pattern on garnstudio.com. © 1982-2024 DROPS Design A/S. We reserve all rights. This document, including all its sub-sections, has copyrights. Read more about what you can do with our patterns at the bottom of each pattern on our site. |
|


With over 40 years in knitting and crochet design, DROPS Design offers one of the most extensive collections of free patterns on the internet - translated to 17 languages. As of today we count 304 catalogues and 11422 patterns - 11422 of which are translated into English (UK/cm).
We work hard to bring you the best knitting and crochet have to offer, inspiration and advice as well as great quality yarns at incredible prices! Would you like to use our patterns for other than personal use? You can read what you are allowed to do in the Copyright text at the bottom of all our patterns. Happy crafting!
Comments / Questions (52)
Mido 1,63cm, cuantos ovillos necesito de cada colorexactamente?
13.02.2018 - 12:12DROPS Design answered:
Hola Victoria. Cuando calculamos el material necesario hay que tener en cuenta la talla que vas a realizar. Tienes todas las medidas en el diagrama bajo el patrón. Si tienes duda para elegir entre dos tallas siempre elige la talla más grande.
17.02.2018 - 17:09Mido ,63cm cuantos ovillos necesito de cada colorexactamente?
13.02.2018 - 12:11DROPS Design answered:
Ver la respuesta arriba
17.02.2018 - 17:09Mooi patroon maar soms lastig te volgen, denk door vertaling. Bij Rechtervoorpand, vierde zin staat Ga verder tot brei ??? en meerder voor het armsgat als op het achterpand... Moet ik bij mijn vraagtekens ook 11 naalden breien?
15.01.2018 - 19:48DROPS Design answered:
Hallo Eliza, Oeps, dat was inderdaad een vertaalfoutje, ga verder tot brei is nu veranderd naar gaverder met breien. De meerderingen maak je net als dat je dat gedaan hebt op het achterpand.
17.01.2018 - 11:32Witam, Robię tył, mam 104 oczka (rozmiar M) 11 rzędów, dodałam 3 oczka na podkrój rękawów. Następnie czytam: ,,Dalej nabierać 3 oczka na końcu rzędu co 6 rzędów: 0 razy = 107 oczek. ... Powinnam przerobić 6 rzędów bez dodawania oczek czy też od razu dodać co następuje później: Na końcu następnego rzędu na prawej stronie robótki, nabrać 41 oczek =148 oczek. Dalej przerabiać aż dł. robótki wynosi 10 cm Z góry dziękuję i pozdrawiam :)
17.12.2017 - 19:03DROPS Design answered:
Witam, należy od razu przejść do sekcji: "Na końcu następnego rzędu na prawej stronie robótki, nabrać 41 oczek =148 oczek". Pozdrawiamy
18.12.2017 - 09:53Ich habe diese Jacke in Fabel, wooden rose und natur gestrickt. Das Muster habe ich meiner Größe angepasst, d.h. etwas länger gestrickt und die Spitzen unten nicht ganz so lang, den Halsauschnitt vorne spitz zulaufend. Das ist wieder eine Jacke geworden, die nicht jeder hat! Super! Die stricke ich auf jeden Fall nochmal in anderen Farben!
22.08.2017 - 16:51Ryg. Måletipset nævnes første gang ved den første rapport. Vil det sige, at man ved det første stykke af ryggen skal måle fra den første opslåningskant og ikke fra hvor arbejdet er smallest?
01.07.2017 - 09:52DROPS Design answered:
Hej, ja du skal måle fra opslåningskanten, og når du begynder på vendepindene skal du måle i den korteste side. God fornøjelse!
05.07.2017 - 08:49Entschuldigung. In meiner zweiten Frage sollte es "3 Krausrippen" heißen. Das hatten wir ja geklärt. ;o)
24.06.2017 - 18:47Danke für die Antwort. Doch mir ist noch nicht klar, wo die 6 Krausrippen am Schluß der verkürzten Reihen laut Beschreibung gestrickt werden sollen. In der Anleitung steht an der linken Seite/an der Schulter - doch das ist beim Rückenteil an der Anschlagseite. Da bin ich doch schon vorbei? Bitte helft mir! Ich verstehe es nicht.
24.06.2017 - 18:45DROPS Design answered:
Liebe Angela, beim Rückreihen beginnen die Reihen unten (= am untere Kante der Jacke): Reihe 1 + 2 sind über alle Maschen gestrickt (= 1 Krausrippe oben gegen Hals), dann stricken Sie verkürzte Reihe (= 9 Krausrippen im verkürzten Reihen, und 2 Reihen über alle Maschen. Dann noch verkürzten Reihen (= 9 Krausrippen) und endlich noch 2 Reihen über alle Maschen. Viel Spaß beim stricken!
26.06.2017 - 09:07Mich irritiert der letzte Satz im Abschnitt "Verkürzte Reihen" wo es heißt : "An der linken Seite der Arbeit/an der Schulter der Jacke: 1 Rapport mit verkürzten Reihen=3 Krausrippen (=2 Reihen kraus rechts) in Natur." Wo soll ich denn diese Krausrippen stricken? An der Schulter bin ich doch schon vorbei? Oder soll ich am linken Rand neue Maschen aufnehmen? Davon steht da aber nichts. Und sind nicht 3 Krausrippen = 6 Reihen kraus rechts, da 1 Krausrippe = 2 Reihen kraus rechts sind?
22.06.2017 - 20:27DROPS Design answered:
Liebe Angela, 3 Krausrippen sind 6 Reihe rechts (Korrektion wird gemacht) - ein Rapport mit verkürzten Reihen besteht aus: 1 Krausrippe über alle Maschen, 9 Krausrippen mit verkürzten Reihen, 1 Krausrippe über alle Maschen, 9 Krausrippen mit verkürzten Reihen und 1 Krausrippe über alle Maschen. Viel Spaß beim stricken!
23.06.2017 - 08:19In Ihrer Anleitung wird für die Maschenprobe in glatt rechts angeben: 23 Reihen und 30 Reihen ergeben 10 x 10 cm??? Unklar Maschenanzahl Vorderteil, meine Maschenprobe 30 M + 34 R = 10 x 10 cm, aus Ihrer Skizze geht aber nicht eindeutig hervor, wie viele cm es nun genau sind, da zwei Zahlen dort stehen, einmal 37 und dann die Zahlen für die 6 Größen. Könnten Sie mir bitte angeben, wie viele cm für den Anschlag nötig sind? Vielen Dank für Ihre Hilfe.
03.06.2017 - 12:19DROPS Design answered:
Liebe Yoruba, die verkürzten Reihen werden in alle Größe über 37 cm in der Breite gestrickt. Je nach der Größe wird der Anschlag eine unterschiedliche Breite haben. Z.B in der 1. Größe ist die Jacke 62 cm lang: 18 cm Armloch, 37 cm verkürzten Reihen und 7 cm dazwischen (62-18-37). Viel Spaß beim stricken!
06.06.2017 - 08:35