DROPS Belle
DROPS Belle
53% Cotton, 33% Viscose, 14% Linen
from 2.00 £ /50g
Get the yarn to make this pattern from 14.00£.

The yarn cost is calculated from the pattern’s smallest size and the yarn’s cheapest product type. Looking for an even better price? You might find it on the DROPS Deals!

DROPS SS24

A Wistful Dream

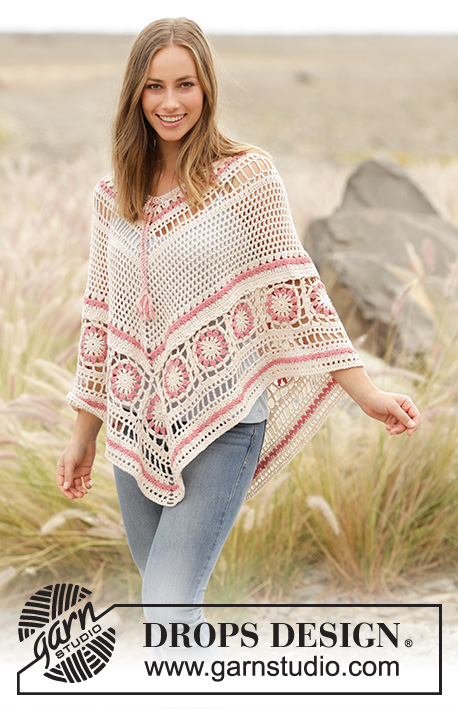
Poncho with lace pattern and crochet squares, worked top down in DROPS Belle. Sizes S - XXXL.

DROPS 176-16
DROPS Design: Pattern no vs-036
Yarn group B
----------------------------------------------------------
Sizes: S/M - L/XL - XXL/XXXL
Materials:
DROPS BELLE from Garnstudio (belongs to yarn group B)
350-450-550 g colour 03, light beige
150-200-250 g colour 11, old pink

DROPS CROCHET HOOK SIZE 4 MM – or the size needed to get 18 treble crochets and 9 rows on 10 cm in width and 10 cm in height.
----------------------------------------------------------

-------------------------------------------------------

Alternative Yarn – See how to change yarns here
Yarn Groups A to F – Use the same pattern and change the yarn here
Yarn usage using an alternative yarn – Use our yarn converter here

-------------------------------------------------------

DROPS Belle
DROPS Belle
53% Cotton, 33% Viscose, 14% Linen
from 2.00 £ /50g
Get the yarn to make this pattern from 14.00£.

The yarn cost is calculated from the pattern’s smallest size and the yarn’s cheapest product type. Looking for an even better price? You might find it on the DROPS Deals!

Pattern instructions

NOTE: This pattern is written in British English. All measurements in charts are in cm. For conversion from cm to inches - click here. There are different terms for crocheting in British and American English. If this pattern includes crochet, click for "crochet terms" here. For this pattern in American English, please click here.
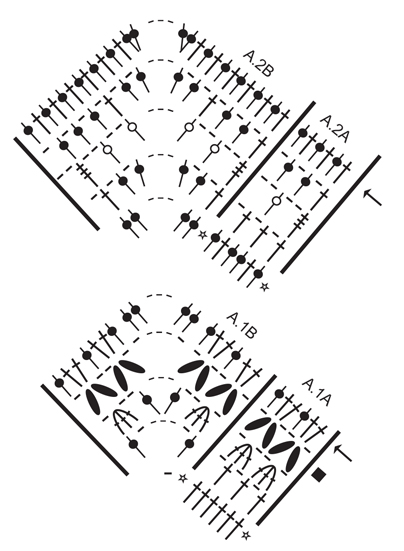
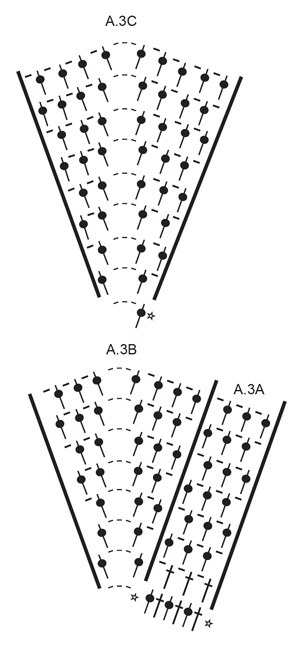
PATTERN:
See diagrams A.1 to A.6.

CROCHET INFO-1:
The first treble crochet from the beginning of the round is replaced by 3 chain stitches and the round finishes with 1 slip stitch in the 3rd chain stitch at the start of the round.

CROCHET INFO-2 (diagram):
Each round starts with 3 chain stitches and finishes with 1 slip stitch in the 3rd chain stitch at the start of the round.

COLOURS:
The whole poncho is worked with light beige apart from the 3 rounds marked with a black square in the diagrams, these rounds are worked with old pink.
The square is worked with light beige apart from the 4th round (= the round with together-worked treble crochets), this round is worked with old pink.

INCREASE TIP-1:
Increase 1 treble crochet by working 2 treble crochets in/around the same stitch.

INCREASE TIP-2:
Increase 1 treble crochet + 1 chain stitch by working 1 treble crochet, 1 chain stitch, 1 treble crochet and 1 chain stitch around the same chain stitch.
----------------------------------------------------------

PONCHO:
The poncho is worked in the round and top down in 3 sections which are worked together as you go. Start with the first section, then work the squares separately as section 2. Increase mid front and mid back as shown in the diagram and otherwise increase evenly along the sides.

FIRST SECTION:
The round starts on the left shoulder.
Work 146-178-206 chain stitches with hook size 4 mm and light beige and form them to a ring with 1 slip stitch in the first chain stitch. Work 3 chain stitches – READ CROCHET INFO-1, then work 1 treble crochet in each of the next 5-3-5 chain stitches, * skip 1 chain stitch, work 1 treble crochet in each of the next 4 chain stitches *, repeat from *-* 5-7-8 more times (= 30-36-42 treble crochets), 1 chain stitch (= chain space in front), work 1 treble crochet in each of the next 4-4-4 chain stitches, * skip 1 chain stitch, work 1 treble crochet in each of the next 4 chain stitches *, repeat from *-* 13-16-19 more times (= 60-72-84 treble crochets along the side), 1 chain stitch (= chain space in the middle in the back), work 1 treble crochet in each of the next 6-4-6 chain stitches, * skip 1 chain stitch, work 1 treble crochet in each of the next 4 chain stitches *, repeat from *-* 5-7-8 more times (= 30-36-42 treble crochets along half the side) = in total 120-144-168 treble crochets and 2 chain stitches on the round.
REMEMBER THE CROCHET TENSION!

Then work according to the diagram – READ COLOURS and CROCHET INFO-2. Increase every treble crochet round marked with an arrow – READ INCREASE TIP-1!

A.1 is worked as follows:
Work rounds 1-3 as follows: Work A.1A in total 5-6-7 times, A.1B over the chain space, A.1A in total 10-12-14 times, A.1B over the chain space in the middle, finish with A.1A in total 5-6-7 times.
Then work the last round and increase 23-23-23 treble crochets evenly in each of the sides between the chain space in the middle mid front and the chain space in the middle mid back.
When A.1 is finished in height there are 100-112-124 treble crochets between the chain-space mid front and mid back (= in total 200-224-248 treble crochets and 2 chain-spaces on the round).

A.2 is worked as follows:
Work rounds 1-3 as follows: Work A.2A in total 8-9-10 times, A.2B, A.2A in total 16-18-20 times, A.2B, finish with A.2A in total 8-9-10 times.
Then work the last round and increase 9-9-9 treble crochets evenly in each of the sides between the chain space in the middle in front and the chain space in the middle mid back.
When A.2 is finished in height there are 132-144-156 treble crochets between the chain-space mid front and mid back (= in total 264-288-312 treble crochets and 2 chain-spaces on the round).

A.3A and A.3B are worked as follows:
Work A.3A in total 11-12-13 times, A.3B over chain space in the middle, A.3A in total 22-24-26 times, A.3B over chain space in the middle, finish with A.3A in total 11-12-13 times.
When A.3B is finished in height there are 73-79-85 treble crochets with 1 chain stitch, between the chain-space mid front and mid back (= in total 146-158-170 treble crochets with 1 chain stitch and 2 chain-spaces on the round).

A.3A and A.3C are worked as follows:
When A.3A is worked, repeat only the last 2 rounds upwards. Work A.3A in total 12-13-14 times, A.3C, A.3A in total 24-26-28 times, A.3C, finish with A.3A in total 12-13-14 times. Continue up to and including rounds 4-6-8 in A.3C. There are now 77-85-93 treble crochets with 1 chain stitch, between the chain-space mid front and mid back (= in total 154-170-186 treble crochets with 1 chain stitch and 2 chain-spaces on the round). Cut the strand, start next round as shown in A.4A, i.e. not in the middle chain space, but before this one.

A.4 is worked as follows:
On the 1st round you will increase 1-2-0 treble crochet/s (with 1 chain stitch) evenly on each of the sides between the middle chain space mid front and the middle chain space mid back - READ INCREASE TIP-2 and work as follows: Work * A4.A, A.4B in total 25-28-30 times *, repeat from *-* 1 more time. Then work rounds 2-4.
Then work round 5 and decrease 2-0-0/increase 0-0-8 treble crochets evenly in each of the sides between the chain space in the mid front and the chain space in the mid back.
When A.4 is finished in height there are 160-180-200 treble crochets between the chain-space mid front and mid back (= in total 320-360-400 treble crochets and 2 chain-spaces on the round). Cut and fasten the strand. Lay the piece to one side and work the second section.

SECOND SECTION:
Work in total 18-20-22 similar squares. One square measures 11 cm in width x 11 cm in height. NOTE! It is important that you keep to these measurements so that the squares fit the measurements on the last round of the first section.

SQUARE:
Work 4 chain stitches with hook size 4 mm and light beige and form them to a ring with one slip stitch in the first chain stitch - Remember COLOURS. Continue in the round according to A.5 until the square is finished. Cut and fasten the strand. Work 17-19-21 more squares in the same way.

ASSEMBLY OF SQUARES:
Lay 10-11-12 squares together in a line (the square at each end = mid front and mid back of the poncho).
Lay 2 and 2 squares on top of each other, wrong side to wrong side and work them together through both layers as follows: 1 double crochet in the middle chain stitch in the corner, 2 chain stitches, 1 double crochet around the same chain-space, 1 chain stitch, * 1 double crochet around the next chain-space, 2 chain stitches, 1 double crochet around the same chain-space, 1 chain stitch *, repeat from *-* in total 3 times, work 1 double crochet around the next space (= the corner), 2 chain stitches, finish with 1 double crochet in the middle chain stitch in the corner.
Lay the other 8-9-10 squares together in a line and work together in the same way.
Lay the 2 lines together to make a tip in each side (i.e. mid front and mid back – see the sketch) and work together in the same way as before.

ASSEMBLY OF FIRST AND SECOND SECTIONS:
Lay the first section = 160-180-200 treble crochets, together wityh second section (i.e. the side with the shortest circumference of squares). Work them together through both layers (adjust so that there is 20 treble crochets over each side of each square of 5 chain-spaces) as follows: Work * 1 double crochet in the next treble crochet and around the chain-space on the square, skip 3 treble crochets *, repeat from *-* the complete round, around the 2 chain spaces in the middle work in addition 3 chain stitches over the middle chain spaces (= mid front and mid back). Cut and fasten the strand.

THIRD SECTION:
Continue working in the round on the second section, i.e. the side with the longest circumference of squares, there are 10-11-12 square sides on each side of mid front and mid back (= in total 20-22-24 sides).
Start in one corner. Remember CROCHET INFO-2. Work 4 treble crochets around each of the 5 chain-spaces on each square until the next corner, work 3 chain stitches (= chain space in the middle), work 4 treble crochets around each of the 5 chain-spaces on each square until the next corner, finish with 3 chain stitches (= chain space in the middle). There are now 200-220-240 treble crochets between the chain-space mid front and mid back (= in total 400-440-480 treble crochets and 2 chain-spaces on the round).

A.6 is worked as follows:
Work * A.6A in total 33-37-40 times, A.3B over the chain space in the middle *, repeat from *-* 1 more time. When A.6 is finished in height there are 215-239-257 treble crochets between the chain-space mid front and mid back (= in total 430-478-514 treble crochets and 2 chain-spaces on the round). Cut and fasten the strand.

TIE STRING:
Cut 2 strands light beige and 2 strands old pink of 4 meters in length. Twist them together until they resist, fold the string double and it will continue to twist. Tie a knot in each end, approx. 5 cm from the end. Thread the string up and down, starting mid front, through the holes in round 3 from the neck.

This pattern has been corrected.

Updated online: 21.02.2017
There has been made a small edit in pattern text about diagram A.2B.
Updated online: 13.07.2017
FIRST SECTION:
The round starts on the left shoulder.
Work 146-178-206 chain stitches with hook size 4 mm and light beige and form them to a ring with 1 slip stitch in the first chain stitch. Work 3 chain stitches – READ CROCHET INFO-1,

Diagram

symbols = chain stitch
symbols = double crochet in stitch
symbols = double crochet around chain stitch/chain-space
symbols = treble crochet in stitch
symbols = treble crochet around chain stitch/chain-space
symbols = work 1 treble crochet in/around each of the next 2 stitches, but wait the last yarn over and pull through on both of these treble crochets, work 1 treble crochet in/around the next stitch and pull the last yarn over through all 4 loops on the hook
symbols = work 2 treble crochets around the chain-space, but wait with the last yarn over and pull through on both these treble crochets, work 1 treble crochet around the same chain-space and pull the last yarn over through all 4 loops on the hook
symbols = work 1 treble crochet around the chain-space/in the stitch, but wait with the last yarn over and pull through, work 1 treble crochet around the same chain-space/in the stitch and pull the last yarn over through all 3 loops on the hook
symbols = double treble crochet around the chain stitch
symbols = triple treble crochet in stitch
symbols = triple treble crochet around chain stitch/chain-space
symbols = 4 chain stitches, form them in to a ring with 1 slip stitch in the first chain stitch – see point on circle, the round starts and finishes here
symbols = slip stitch
symbols = increase round/decrease round
symbols = the round is described in the text and is already worked - start on the next round
symbols = shows the last round of the previous diagram - start on the next round
symbols = round worked with old pink
diagram
diagram
diagram
diagram
diagram
Do you have a question? See a list of frequently asked questions (FAQ)

Knitting tension is what determines the final measurements of your work, and is usually measured per 10 x 10 cm. It is provided like so: number of stitches in width x number of rows in height - eg: 19 stitches x 26 rows = 10 x 10 cm.

The knitting tension is very individual; some people knit/crochet loosely while others work tightly. You adjust the knitting tension with the needle size, which is why the suggested needle size is only meant as a guide! You need to adjust this (up or down) to ensure that YOUR knitting tension matches the knitting tension provided in the pattern. If you work with a different knitting tension than provided you will have a different yarn consumption, and your work will have different measurements than what the pattern suggests.

The knitting tension also determines which yarns can replace each other. As long as you achieve the same knitting tension you can replace one yarn with another.

See DROPS lesson: How to measure your tension/gauge

See DROPS video: How to make a gauge tension swatch

The required amount of yarn is provided in grams, eg: 450 g. To calculate how many balls you’ll need you first need to know how many grams are in 1 ball (25g, 50g or 100g). This information is available if you click on the individual yarn quality on our pages. Divide the amount required with the amount of each ball. For example, if each ball is 50g (the most common amount), the calculation will be as follows: 450 / 50 = 9 balls.

The important thing when changing from one yarn to another is that the knitting/crochet tension remains the same. This is so that the measurements of the finished piece will be the same as on the sketch provided. It is easier to achieve the same knitting tension using yarns from the same yarn group. It is also possible to work with multiple strands of a thinner yarn to achieve the knitting tension of a thicker one. Please try our yarn converter. We recommend you to always work a test swatch.

Please NOTE: when changing yarn the garment might have a different look and feel to the garment in the photo, due to individual properties and qualities of each yarn.

See DROPS lesson: Can I use a different yarn than the one mentioned in the pattern?

All our yarns are categorised into yarn groups (from A to F) according to thickness and knitting tension – group A contains the thinnest yarns and group F the thickest. This makes it easier for you to find alternative yarns to our patterns, should you wish to switch yarn. All yarns within the same group have a similar knitting tension and can easily replace each other. However, different yarn qualities have different structures and properties which will give the finished work a unique look and feel.

Click here for an overview of the yarns in each yarn group

At the top of all our patterns you’ll find a link to our yarn calculator, which is a helpful tool should you wish to use a different yarn than suggested. By filling in the yarn quality you wish to replace, the amount (in your size) and number of strands, the calculator will present good alternative yarns with the same knitting tension. Additionally it will tell you how much you’ll require in the new qualities and whether you’ll need to work with multiple strands. Most skeins are 50g (some are 25g or 100g).

If the pattern is worked with multiple colours, every colour will have to be calculated separately. Similarly, if the pattern is worked with several strands of different yarns (for example 1 strand Alpaca and 1 strand Kid-Silk) you will have to find alternatives for each, individually.

Click here to see our yarn calculator

Since different yarns have different qualities and textures we have chosen to keep the original yarn in our patterns. However, you can easily find options among our available qualities by using our yarn calculator, or simply pick a yarn from the same yarn group.

It is possible that some retailers still have discontinued yarns in stock, or that someone has a few skeins at home that they would like to find patterns for.

The yarn calculator will provide both alternative yarn as well as required amount in the new quality.

If you think it's hard to decide what size to make, it can be a good idea to measure a garment you own already and like the size of. Then you can pick the size by comparing those measures with the ones available in the pattern's size chart.

You'll find the size chart at the bottom of the pattern.

See DROPS lesson: How to read size chart

The needle size provided in the pattern serves only as a guide, the important thing is to follow the knitting tension. And since knitting tension is very individual, you will have to adjust the needle size to ensure that YOUR tension is the same as in the pattern – maybe you’ll have to adjust 1, or even 2 needle sizes, up or down to achieve the correct tension. For this, we recommend that you work test swatches.

Should you work with a different knitting tension than the one provided, the measurements of the finished garment might deviate from the measurement sketch.

See DROPS lesson: How to measure your tension/gauge

See DROPS video: How to make a tension/gauge swatch

Working a garment top-down provides more flexibility and room for personal adjustment. For example it is easier to try the garment on while working, as well as making adjustments to length of yoke and shoulder caps.

The instructions are carefully explaining every step, in the correct order. Diagrams are adjusted to the knitting direction and are worked as usual.

The diagram depicts all rows/rounds, and every stitch seen from the right side. It is read from bottom to top, from right to left. 1 square = 1 stitch.

When working back and forth, every other row is worked from the right side and every other row is worked from the wrong side. When working from the wrong side, the diagram will have to be worked reversed: from left to right, knit stitches are purled, purl stitches are knit etc.

When working in the round every round is worked from the right side and the diagram are worked from right to left on all rounds.

See DROPS lesson: How to read knitting diagrams

The diagram depicts all rows/rounds, and every stitch seen from the right side. It is worked from bottom to top, from right to left.

When working back and forth every other row is worked from the right side: from right to left and every other row is worked from the wrong side: from left to right.

When working in the round, every row in the diagram are worked from the right side, from right to left.

When working a circular diagram you start in the middle and work your way outwards, counter clockwise, row by row.

The rows usually start with a given number of chain stitches (equivalent to the height of the following stitch), this will either be depicted in the diagram or explained in the pattern.

See DROPS lesson: How to read crochet diagrams

Instructions for working several diagrams after each other on the same row/round, will often be written like so: “work A.1, A.2, A.3 a total of 0-0-2-3-4 times". This means you work A.1 once, then A.2 is worked once, and A.3 is repeated (in width) the number of times provided for your size – in this case like so: S = 0 times, M = 0 times, L=2 times, XL= 3 times and XXL = 4 times.

The diagrams are worked as usual: begin with the first row in A.1, then work the first row in A.2 etc.

See DROPS lesson: How to read knitting diagrams

See DROPS lesson: How to read crochet diagrams

The total width of the garment (from wrist-to-wrist) will be larger in the larger sizes, despite the actual sleeves being shorter. The larger sizes have longer sleeve caps and wider shoulders, so there will be a good fit in all sizes.

The measurement sketch/schematic drawing provides information regarding the full length of the garment. If it’s a jumper or a jacket the length is measured from the highest point on the shoulder closest to the neckline, and straight down to the bottom of the garment. It is NOT measured from the tip of shoulder. Similarly, the length of yoke is measured from the highest point on the shoulder and down to where yoke is split into body and sleeves.

On a jacket measures are never taken along bands, unless specifically stated. Always measure inside band stitches when measuring the length.

See DROPS lesson: How to read a schematic drawing

Diagrams are often repeated on the round or in height. 1 repeat is the diagram the way it appears in the pattern. If it says to work 5 repeats of A.1 in the round, then you work A.1 a total of 5 times after/next to each other in the round. If it says to work 2 repeats of A.1 vertically/in height you work the entire diagram once, then begin again at the start and work the entire diagram one more time.

Chain stitches are slightly narrower than other stitches and to avoid working the cast-on edge too tight, we simply chain more stitches to begin with. The stitch count will be adjusted on the following row to fit the pattern and measurement sketch.

The rib edge is more elastic and will contract slightly compared to, for example, stocking stitch. By increasing before the rib edge, you avoid a visible difference in width between the rib edge and the rest of the body.

It’s very easy to cast off too tightly, and by making yarn overs while casting off (and simultaneously casting these off) you avoid a too tight cast off edge.

See DROPS video: How to bind off with yarn overs (yo)

To achieve an even increase (or decrease) you can increase on, for example: every 3rd and 4th row alternately, like so: work 2 rows and increase on the 3rd row, work 3 rows and increase on the 4th. Repeat this until the increase is complete.

See DROPS lesson: Increase or decrease 1 st on every 3rd and 4th row alternately

Should you prefer to work in the round instead of back and forth, you may of course adjust the pattern. You’ll need to add steeks mid-front (usually 5 stitches), and follow the instructions. When you would normally turn and work from the wrong side, simply work across the steek and continue in the round. At the end you’ll cut the piece open, pick up stitches to work bands, and cover the cut edges.

See DROPS video: How to knit steeks and cut open

Should you prefer to work back and forth instead of in the round, you may of course adjust the pattern so you work the pieces separately and then assemble them at the end. Divide the stitches for the body in 2, add 1 edge stitch in each side (for sewing) and work the front and back pieces separately.

See DROPS lesson: Can I adapt a pattern for circular needles into straight needles?

Pattern repeats can vary slightly in the different sizes, in order to get the correct proportions. If you’re not working the exact same size as the garment in the photo, yours might deviate slightly. This has been carefully developed and adjusted so that the complete impression of the garment is the same in all sizes.

Make sure to follow instructions and diagrams for your size!

If you have found a pattern you like which is available in women’s size it’s not very difficult to convert it to men’s size. The biggest difference will be the length of sleeves and body. Start working on the women size that you think would fit across the chest. The additional length will be worked right before you cast off for the armhole/sleeve cap. If the pattern is worked top-down you can add the length right after the armhole or before the first decrease on sleeve.

Regarding additional yarn amount, this will depend on how much length you add, but it is better with a skein too many than too few.

All yarns will have excess fibres (from production) that might come off as lint or shedding. Brushed yarns (ie hairier yarns) have more of these loose, excess fibres, causing more shedding.

Shedding also depends on what is worn under or over the garment, and whether this pulls at the yarn fibres. It’s therefore not possible to guarantee that there will be no shedding

Below are some tips on how to get the best result when working with hairier yarns:

1. When the garment is finished (before you wash it) shake it vigorously so the looser hairs come off. NOTE: do NOT use a lint roller, brush or any method that pulls at the yarn.

2. Place the garment in a plastic bag and put it in your freezer - the temperature will cause the fibres to become less attached to each other, and excess fibres will come off easier.

3. Leave in the freezer for a few hours before taking it out and shaking it again.

4. Wash the garment according to the instructions on the yarn label.

Pilling is a natural process that happens to even the most exclusive of fibers. It's a natural sign of wear and tear that is hard to avoid, and that is most visible in high friction areas of your garment like a sweater's arms and cuffs.

You can make your garment look as new by removing the pilling, using a fabric comb or a pill/lint remover.

Still can't find the answer you need? Then scroll down and leave your question so one of our experts can try to help you. This will be done normally within 5 to 10 working days.
In the meantime, you can read the questions and answers that others have left to this pattern or join the DROPS Workshop on Facebook to get help from fellow knitters/crocheters!

You might also like...

Post a comment to pattern DROPS 176-16

We would love to hear what you have to say about this pattern!

If you want to leave a question, please make sure you select the correct category in the form below, to speed up the answering process. Required fields are marked *.

Comments / Questions (37)

country flag G.Hekman wrote:

Ook ik heb het zelfde probleem met de steken. Ik lees dat er een correctie is geweest voor dit patroon, maar dat kan ik niet vinden.Ik wil graag weten met hoeveel lossen ik moet beginnen.

03.05.2017 - 10:10

DROPS Design answered:

Bedankt voor het geduld, ik heb het even uitgezocht. Er is inderdaad een correctie geweest, alleen dit betrof een correctie op het telpatroon. Het aantal steken is (nog) niet aangepast. Het aantal op te zetten lossen heb ik een paar keer nagerekend en ik kom inderdaad uit op 146 voor maat S/M. Van de grotere maten zijn het aantal op te zetten lossen wel goed aangegeven. Dit heb ik doorgegeven aan de maker van het patroon, echter hier op heb ik nog geen bevestiging op gekregen. Zodra dit bekend is laat ik het weten.

12.05.2017 - 19:33

Ann Willems wrote:

As already requested by other crocheters, but not yet answered properly: the initial chain counts 172 stitches but we have to crochet 120 DC's, add 2 chains and skip 26 chain stitches, so I've worked on 146 chain stitches ... what about the remaining 26 chain stitches ???

30.04.2017 - 20:17

DROPS Design answered:

Dear Ann, number of sts will be checked again. Thank you in advance for your patience.

30.05.2017 - 09:01

Dolores wrote:

Will this pattern be updated or is it my understanding that's the problem? Thanks.

22.04.2017 - 16:28

DROPS Design answered:

Dear Dolores, the only change made in this pattern affected onnly the charts and the symbol's explanation. If you let us know what is the problem in more details, we will try to help more. And remember, you can always turn to the place you bought your DROPS yarns from for more hands on help. Happy crocheting!

24.04.2017 - 11:30

Dolores wrote:

I'm a bit confused. I've counted all the spaces left on the chain and the stitches. It adds up to 146 or there about. I erased the tally. Can you verify that 172 chain stitches are the correct number? Can you explain this to me? Many, many thanks. Dolores

02.04.2017 - 16:24

DROPS Design answered:

Dear Dolores, number of sts will be checked again. Thank you in advance for your patience.

03.04.2017 - 11:13

country flag Michele wrote:

Why does the pattern call for 172 chains while the first round has 122 stitches? (120 DC and 2 chains?)

27.03.2017 - 18:18

DROPS Design answered:

Dear Michelle, thank you for your question. The difference between the umber of chain stitches of the beginning and the stitch count of the first row is the result of skipped stitches (as in "* skip 1 chain stitch, work 1 treble crochet in each of the next 4 chain stitches"). Happy crocheting!

28.03.2017 - 01:04

country flag Iris wrote:

DROPS Design~ Was a correction made to this pattern, Wistful Dreams? I really want to make this, but I do not have time for a pattern that has problems. I wanted to make this for a gift. Thanks

09.03.2017 - 17:22

DROPS Design answered:

Hi Iris. Yes, a small correction has been made on 2/21 (see CORRECTIONS). The pattern should now be alright now. Have fun .

16.03.2017 - 13:52

Denise Nef wrote:

Ich habe das selbe festgestellt mit Franzi. Für S/M sollten es 146 LM sein.Nach der Einteilung steht 30 STB plus 23 Zunahme auf beiden Seiten ergibt für mich 106 LM nicht 100. Ich denke evtl. ist da beim ganzen Muster etwas schief gelaufen. Danke

03.03.2017 - 03:15

country flag Franzi wrote:

Leider komme ich schon am Anfang nicht weiter. Wenn ich 172 LM anschlage und dann die Stäbchen häkel so wie es in der Anleitung steht, komme ich aber nicht bis zum Schluss der 172 LM. Was passiert mit den restlichen LM?

02.03.2017 - 21:16

DROPS Design answered:

Liebe Franzi, Danke für den Hinweis, Anleitung wird noch mal geprüft.

03.03.2017 - 08:43

country flag Annie wrote:

Varför ska man börja första varvet vid vänster axel och inte mitt bak?

11.02.2017 - 14:06

DROPS Design answered:

Hej Annie. Det ved jeg faktisk ikke, saadan har designeren besluttet at det skal göre - der har sikkert vaeret en idé om at det bliver bedst paa den maade.

13.02.2017 - 13:52

country flag Joana Martins wrote:

Ansiosa por que cheguem as instruções.... modelito escolhido para o próximo Verão 😉

23.01.2017 - 15:15