DROPS Brushed Alpaca Silk
77% Alpaca, 23% Silk
from 2.90 £ /25g
Get the yarn to make this pattern from 14.50£.

The yarn cost is calculated from the pattern’s smallest size and the yarn’s cheapest product type. Looking for an even better price? You might find it on the DROPS Deals!

DROPS SS24

Emmelie

Knitted jumper in English rib with round yoke and 3/4 sleeves in DROPS Brushed Alpaca Silk. Size: S - XXXL

DROPS 176-32
DROPS design: Pattern as-066
Yarn group C or A + A
----------------------------------------------------------
Size: S - M - L - XL - XXL - XXXL
Materials:
DROPS BRUSHED ALPACA SILK from Garnstudio (belongs to yarn group C)
125-125-150-150-175-200 g colour 12, powder pink

DROPS CIRCULAR NEEDLE (40 and 80 cm) SIZE 6 mm – or size needed to get 15 stitches and 19 rows in stocking stitch = width 10 cm and 10 cm vertically (12 stitches English rib = 10 cm in width).

DROPS CIRCULAR NEEDLE (40 cm) SIZE 5 mm for rib – or size needed to get 17 stitches and 22 rows in stocking stitch = width 10 cm and 10 cm vertically.
----------------------------------------------------------

-------------------------------------------------------

Alternative Yarn – See how to change yarns here
Yarn Groups A to F – Use the same pattern and change the yarn here
Yarn usage using an alternative yarn – Use our yarn converter here

-------------------------------------------------------

DROPS Brushed Alpaca Silk
77% Alpaca, 23% Silk
from 2.90 £ /25g
Get the yarn to make this pattern from 14.50£.

The yarn cost is calculated from the pattern’s smallest size and the yarn’s cheapest product type. Looking for an even better price? You might find it on the DROPS Deals!

Pattern instructions

NOTE: This pattern is written in British English. All measurements in charts are in cm. For conversion from cm to inches - click here. There are different terms for crocheting in British and American English. If this pattern includes crochet, click for "crochet terms" here. For this pattern in American English, please click here.
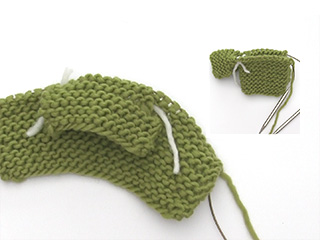
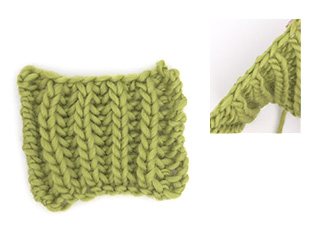
ENGLISH RIB ON BODY (worked in the round on circular needle)
ROUND 1:
* 1 yarn over, slip 1 stitch as if to purl, knit 1 *, repeat from *-*.
ROUND 2:
* Purl together yarn over and slipped stitch, 1 yarn over, slip 1 stitch as if to purl *, repeat from *-*.
ROUND 3:
* 1 yarn over, slip 1 stitch as if to purl, knit together yarn over and slipped stitch *, repeat from *-*.
Repeat rounds 2 and 3.

ENGLISH RIB FOR SLEEVES (worked back and forth on needle):
ROW 1 (= right side):
1 edge stitch, * knit 1, 1 yarn over, slip 1 stitch as if to purl *, repeat from *-* until 1 stitch remains, finish with 1 edge stitch.
ROW 2:
1 edge stitch, * knit yarn over and slipped stitch together, 1 yarn over, slip 1 stitch as if to purl *, repeat from *-* until 1 stitch remains, finish with 1 edge stitch. Repeat 2nd row upwards.

COUNTING ENGLISH RIB STITCHES:
When counting the stitches, the yarn overs are not counted as stitches.

DECREASE TIP (applies to body):
Decrease 2 stitches on each side of every marker thread (= 8 stitches on every decrease round):

1ST DECREASE:
Begin 9 stitches before marker thread, pass next yarn over over stitch (so that it is behind this stitch), slip this stitch knitwise, knit the next 2 stitches together, pass slipped stitch over stitches worked together.
Continue with English rib until 7 stitches have been worked passed marker thread, knit the next 3 stitches together. Repeat at the other marker thread.

2ND DECREASE:
Begin 7 stitches before marker thread, pass next yarn over over stitch (so that it is behind this stitch), slip this stitch knitwise, knit the next 2 stitches together, pass slipped stitch over stitches worked together. Continue with English rib until 5 stitches have been worked passed marker thread, knit the next 3 stitches together. Repeat at the other marker thread.

3RD DECREASE:
Begin 5 stitches before marker thread, pass next yarn over over stitch (so that it is behind this stitch), slip this stitch knitwise, knit the next 2 stitches together, pass slipped stitch over stitches worked together. Continue with English rib until 3 stitches have been worked passed marker thread, knit the next 3 stitches together. Repeat at the other marker thread.

INCREASE TIP (applies to sleeves):
Increase 1 stitch inside 1 edge stitch in each side of piece. Increase 1 stitch by making 1 yarn over, on next row work yarn over twisted. NOTE: Work the increased stitches in English rib.

GARTER STITCH (back and forth):
1 ridge = knit 2 rows.
----------------------------------------------------------

JUMPER:
Worked in the round on circular needle, bottom up. Work sleeve back and forth on circular needle. Slip sleeves on to same circular needle as body and work yoke in the round on circular needle.

BODY:
Worked in the round on circular needle size 6 mm with Brushed Alpaca Silk. Cast on 180-192-210-228-246-270 stitches. Work first round as follows: * Purl 2 together, knit 1 *, repeat from *-* the entire round = 120-128-140-152-164-180 stitches. 
Insert 2 marker threads in each side of piece as follows: Insert 1 marker thread at beginning of round, insert 1 marker thread after 60-64-70-76-82-90 stitches. Move the marker threads upwards when working. Now work ENGLISH PATTERN FOR BODY - see explanation above. REMEMBER THE KNITTING TENSION 
When piece measures 10 cm, decrease 4 stitches in each side of piece on 2nd round in English rib - read DECREASE TIP for 1st DECREASE (= 8 decreased stitches in total on round). Repeat decrease when piece measures 20 and 30 cm – READ DECREASE TIP for 2nd and 3rd DECREASE = 96-104-116-128-140-156 stitches. Continue until piece measures approx. 34-34-35-35-35-35 cm, adjust to finish after 3rd round in English rib. On next round (= 2nd round in pattern), cast off 3-3-3-4-4-4 stitches on each side of each marker thread for armholes (yarn overs are not counted as stitches - Read ENGLISH RIB STITCH above) = 42-46-52-56-62-70 stitches on front/back piece. Put piece aside and work the sleeves.

SLEEVE:
Work piece back and forth on circular needle size 6 mm. Cast on 44-47-50-50-50-53 stitches (including 1 edge stitch in each side). Work in stocking stitch for 8 cm, then work as follows from wrong side: 1 edge stitch in GARTER STITCH – see explanation above, * knit 1, purl 2 together, *, repeat from *-* until 1 stitch remains, work 1 edge stitch in garter stitch = 30-32-34-34-34-36 stitches. Then work English rib with 1 edge stitch in each side - Read ENGLISH RIB FOR SLEEVES. When piece measures 12-12-11-8-8-8 cm, increase 1 stitch on each side – read INCREASE TIP. Increase every 13-13-6-4-4-4 cm 2-2-3-4-4-4 times in total = 34-36-40-42-42-44 stitches. When piece measures 29-28-27-26-24-23 cm, cast off 4-4-4-5-5-5 stitches at beginning of the next 2 rows, start cast off on a right side row = 26-28-32-32-32-34 stitches, cut the yarn. Work another sleeve the same way.

YOKE:
Worked in the round on circular needle size 6 mm. Slip sleeves on to same circular needle as body where armholes were cast off = 136-148-168-176-188-208 stitches. Then work English rib in the round. When yoke measures 15-17-18-20-22-24 cm from where body and sleeves where put together, switch to circular needle size 5 mm, and work 1 round rib (= knit 1/purl 1, work yarn overs together with the slipped stitches). On next round decrease as follows: * Knit 2 twisted together (work in back loop of stitch), purl 2 together *, repeat from *-* the entire round = 68-74-84-88-94-104 stitches. Continue with rib until yoke measures 18-20-21-23-25-27 cm, then cast off all stitches with knit over knit and purl over purl. 

ASSEMBLY:
Sew the sleeve seams inside 1 edge stitch. Sew the opening under the sleeves.

Diagram

diagram measurements

Each of our patterns has specific tutorial videos to help you.

Do you have a question? See a list of frequently asked questions (FAQ)

Knitting tension is what determines the final measurements of your work, and is usually measured per 10 x 10 cm. It is provided like so: number of stitches in width x number of rows in height - eg: 19 stitches x 26 rows = 10 x 10 cm.

The knitting tension is very individual; some people knit/crochet loosely while others work tightly. You adjust the knitting tension with the needle size, which is why the suggested needle size is only meant as a guide! You need to adjust this (up or down) to ensure that YOUR knitting tension matches the knitting tension provided in the pattern. If you work with a different knitting tension than provided you will have a different yarn consumption, and your work will have different measurements than what the pattern suggests.

The knitting tension also determines which yarns can replace each other. As long as you achieve the same knitting tension you can replace one yarn with another.

See DROPS lesson: How to measure your tension/gauge

See DROPS video: How to make a gauge tension swatch

The required amount of yarn is provided in grams, eg: 450 g. To calculate how many balls you’ll need you first need to know how many grams are in 1 ball (25g, 50g or 100g). This information is available if you click on the individual yarn quality on our pages. Divide the amount required with the amount of each ball. For example, if each ball is 50g (the most common amount), the calculation will be as follows: 450 / 50 = 9 balls.

The important thing when changing from one yarn to another is that the knitting/crochet tension remains the same. This is so that the measurements of the finished piece will be the same as on the sketch provided. It is easier to achieve the same knitting tension using yarns from the same yarn group. It is also possible to work with multiple strands of a thinner yarn to achieve the knitting tension of a thicker one. Please try our yarn converter. We recommend you to always work a test swatch.

Please NOTE: when changing yarn the garment might have a different look and feel to the garment in the photo, due to individual properties and qualities of each yarn.

See DROPS lesson: Can I use a different yarn than the one mentioned in the pattern?

All our yarns are categorised into yarn groups (from A to F) according to thickness and knitting tension – group A contains the thinnest yarns and group F the thickest. This makes it easier for you to find alternative yarns to our patterns, should you wish to switch yarn. All yarns within the same group have a similar knitting tension and can easily replace each other. However, different yarn qualities have different structures and properties which will give the finished work a unique look and feel.

Click here for an overview of the yarns in each yarn group

At the top of all our patterns you’ll find a link to our yarn calculator, which is a helpful tool should you wish to use a different yarn than suggested. By filling in the yarn quality you wish to replace, the amount (in your size) and number of strands, the calculator will present good alternative yarns with the same knitting tension. Additionally it will tell you how much you’ll require in the new qualities and whether you’ll need to work with multiple strands. Most skeins are 50g (some are 25g or 100g).

If the pattern is worked with multiple colours, every colour will have to be calculated separately. Similarly, if the pattern is worked with several strands of different yarns (for example 1 strand Alpaca and 1 strand Kid-Silk) you will have to find alternatives for each, individually.

Click here to see our yarn calculator

Since different yarns have different qualities and textures we have chosen to keep the original yarn in our patterns. However, you can easily find options among our available qualities by using our yarn calculator, or simply pick a yarn from the same yarn group.

It is possible that some retailers still have discontinued yarns in stock, or that someone has a few skeins at home that they would like to find patterns for.

The yarn calculator will provide both alternative yarn as well as required amount in the new quality.

If you think it's hard to decide what size to make, it can be a good idea to measure a garment you own already and like the size of. Then you can pick the size by comparing those measures with the ones available in the pattern's size chart.

You'll find the size chart at the bottom of the pattern.

See DROPS lesson: How to read size chart

The needle size provided in the pattern serves only as a guide, the important thing is to follow the knitting tension. And since knitting tension is very individual, you will have to adjust the needle size to ensure that YOUR tension is the same as in the pattern – maybe you’ll have to adjust 1, or even 2 needle sizes, up or down to achieve the correct tension. For this, we recommend that you work test swatches.

Should you work with a different knitting tension than the one provided, the measurements of the finished garment might deviate from the measurement sketch.

See DROPS lesson: How to measure your tension/gauge

See DROPS video: How to make a tension/gauge swatch

Working a garment top-down provides more flexibility and room for personal adjustment. For example it is easier to try the garment on while working, as well as making adjustments to length of yoke and shoulder caps.

The instructions are carefully explaining every step, in the correct order. Diagrams are adjusted to the knitting direction and are worked as usual.

The diagram depicts all rows/rounds, and every stitch seen from the right side. It is read from bottom to top, from right to left. 1 square = 1 stitch.

When working back and forth, every other row is worked from the right side and every other row is worked from the wrong side. When working from the wrong side, the diagram will have to be worked reversed: from left to right, knit stitches are purled, purl stitches are knit etc.

When working in the round every round is worked from the right side and the diagram are worked from right to left on all rounds.

See DROPS lesson: How to read knitting diagrams

The diagram depicts all rows/rounds, and every stitch seen from the right side. It is worked from bottom to top, from right to left.

When working back and forth every other row is worked from the right side: from right to left and every other row is worked from the wrong side: from left to right.

When working in the round, every row in the diagram are worked from the right side, from right to left.

When working a circular diagram you start in the middle and work your way outwards, counter clockwise, row by row.

The rows usually start with a given number of chain stitches (equivalent to the height of the following stitch), this will either be depicted in the diagram or explained in the pattern.

See DROPS lesson: How to read crochet diagrams

Instructions for working several diagrams after each other on the same row/round, will often be written like so: “work A.1, A.2, A.3 a total of 0-0-2-3-4 times". This means you work A.1 once, then A.2 is worked once, and A.3 is repeated (in width) the number of times provided for your size – in this case like so: S = 0 times, M = 0 times, L=2 times, XL= 3 times and XXL = 4 times.

The diagrams are worked as usual: begin with the first row in A.1, then work the first row in A.2 etc.

See DROPS lesson: How to read knitting diagrams

See DROPS lesson: How to read crochet diagrams

The total width of the garment (from wrist-to-wrist) will be larger in the larger sizes, despite the actual sleeves being shorter. The larger sizes have longer sleeve caps and wider shoulders, so there will be a good fit in all sizes.

The measurement sketch/schematic drawing provides information regarding the full length of the garment. If it’s a jumper or a jacket the length is measured from the highest point on the shoulder closest to the neckline, and straight down to the bottom of the garment. It is NOT measured from the tip of shoulder. Similarly, the length of yoke is measured from the highest point on the shoulder and down to where yoke is split into body and sleeves.

On a jacket measures are never taken along bands, unless specifically stated. Always measure inside band stitches when measuring the length.

See DROPS lesson: How to read a schematic drawing

Diagrams are often repeated on the round or in height. 1 repeat is the diagram the way it appears in the pattern. If it says to work 5 repeats of A.1 in the round, then you work A.1 a total of 5 times after/next to each other in the round. If it says to work 2 repeats of A.1 vertically/in height you work the entire diagram once, then begin again at the start and work the entire diagram one more time.

Chain stitches are slightly narrower than other stitches and to avoid working the cast-on edge too tight, we simply chain more stitches to begin with. The stitch count will be adjusted on the following row to fit the pattern and measurement sketch.

The rib edge is more elastic and will contract slightly compared to, for example, stocking stitch. By increasing before the rib edge, you avoid a visible difference in width between the rib edge and the rest of the body.

It’s very easy to cast off too tightly, and by making yarn overs while casting off (and simultaneously casting these off) you avoid a too tight cast off edge.

See DROPS video: How to bind off with yarn overs (yo)

To achieve an even increase (or decrease) you can increase on, for example: every 3rd and 4th row alternately, like so: work 2 rows and increase on the 3rd row, work 3 rows and increase on the 4th. Repeat this until the increase is complete.

See DROPS lesson: Increase or decrease 1 st on every 3rd and 4th row alternately

Should you prefer to work in the round instead of back and forth, you may of course adjust the pattern. You’ll need to add steeks mid-front (usually 5 stitches), and follow the instructions. When you would normally turn and work from the wrong side, simply work across the steek and continue in the round. At the end you’ll cut the piece open, pick up stitches to work bands, and cover the cut edges.

See DROPS video: How to knit steeks and cut open

Should you prefer to work back and forth instead of in the round, you may of course adjust the pattern so you work the pieces separately and then assemble them at the end. Divide the stitches for the body in 2, add 1 edge stitch in each side (for sewing) and work the front and back pieces separately.

See DROPS lesson: Can I adapt a pattern for circular needles into straight needles?

Pattern repeats can vary slightly in the different sizes, in order to get the correct proportions. If you’re not working the exact same size as the garment in the photo, yours might deviate slightly. This has been carefully developed and adjusted so that the complete impression of the garment is the same in all sizes.

Make sure to follow instructions and diagrams for your size!

If you have found a pattern you like which is available in women’s size it’s not very difficult to convert it to men’s size. The biggest difference will be the length of sleeves and body. Start working on the women size that you think would fit across the chest. The additional length will be worked right before you cast off for the armhole/sleeve cap. If the pattern is worked top-down you can add the length right after the armhole or before the first decrease on sleeve.

Regarding additional yarn amount, this will depend on how much length you add, but it is better with a skein too many than too few.

All yarns will have excess fibres (from production) that might come off as lint or shedding. Brushed yarns (ie hairier yarns) have more of these loose, excess fibres, causing more shedding.

Shedding also depends on what is worn under or over the garment, and whether this pulls at the yarn fibres. It’s therefore not possible to guarantee that there will be no shedding

Below are some tips on how to get the best result when working with hairier yarns:

1. When the garment is finished (before you wash it) shake it vigorously so the looser hairs come off. NOTE: do NOT use a lint roller, brush or any method that pulls at the yarn.

2. Place the garment in a plastic bag and put it in your freezer - the temperature will cause the fibres to become less attached to each other, and excess fibres will come off easier.

3. Leave in the freezer for a few hours before taking it out and shaking it again.

4. Wash the garment according to the instructions on the yarn label.

Pilling is a natural process that happens to even the most exclusive of fibers. It's a natural sign of wear and tear that is hard to avoid, and that is most visible in high friction areas of your garment like a sweater's arms and cuffs.

You can make your garment look as new by removing the pilling, using a fabric comb or a pill/lint remover.

Still can't find the answer you need? Then scroll down and leave your question so one of our experts can try to help you. This will be done normally within 5 to 10 working days.
In the meantime, you can read the questions and answers that others have left to this pattern or join the DROPS Workshop on Facebook to get help from fellow knitters/crocheters!

You might also like...

Post a comment to pattern DROPS 176-32

We would love to hear what you have to say about this pattern!

If you want to leave a question, please make sure you select the correct category in the form below, to speed up the answering process. Required fields are marked *.

Comments / Questions (21)

country flag Hbn Caroline wrote:

Bonjour, J’aime bien ce modèle et je souhaiterais le tricoter plus épais. Pensez vous qu’il soit possible de doubler le fil et d’obtenir quelque chose de similaire avec ce modèle ?

22.10.2018 - 12:26

DROPS Design answered:

Bonjour Mme Hbn, il vous faudrait au préalable faire un échantillon pour vérifier les mesures en largeur et en hauteur. N'hésitez pas à demander conseil à votre magasin, même par mail ou téléphone, on saura vous conseiller. Bon tricot!

22.10.2018 - 14:21

country flag Nina Rose wrote:

Jeg har et spørsmål til øking på ermene i de tre største størrelsene: Det står at vi skal strikke 8 cm glattstrikk. Og så gå over på halvpatent. Videre står det at vi skal øke når arbeidet måler 8 cm. Det er jo før/der vi begynner med halvpatent. Betyr det at vi skal øke med en gang vi begynner å strikke halvpatent?

09.04.2018 - 00:25

DROPS Design answered:

Hei Nina, Ja, i de tre største størrelsene begynner du å øke på første rad med patentstrikk. God fornøyelse!

09.04.2018 - 08:04

country flag Monica wrote:

Buongiorno vorrei sapere se l'ultima parte dello sprone va lavorata tutta a coste 1/1 con il diritto ritorto oppure se, dopo il primo ferro con i cali, si procede a coste 1/1 con il diritto normale? Grazie saluti

25.01.2018 - 07:05

DROPS Design answered:

Buongiorno Monica. Le coste sono con il diritto normale. Buon lavoro!

25.01.2018 - 09:05

country flag Cathyrn A Matjazic wrote:

Why are there not measurements for the finished sweater? I've noticed this in a lot of your patterns. I have a 55" bust and don't know if this will fit me.

25.01.2018 - 03:47

DROPS Design answered:

Dear Mrs Matjazic, you will find at the bottom of the pattern a measurement chart with all measurements in cm, taken flat from side to side. Compare these to a similar garment you have and like the shape to find out the matching size. Read more about sizing and convert into inches here. Happy knitting!

25.01.2018 - 08:33

ANNICK LE BOEDEC wrote:

Sur ce n° 176-32 vous indiquez de tricoter les manches ainsi 28 cm puis rabattre 4 m j'ai l'impression que les manches seront un peu courtes ?? merci de votre réponse

09.01.2018 - 09:23

DROPS Design answered:

Bonjour Mme Le Boedec, à ces 28 cm de la manche il faut ajouter les 20 cm de l'empiècement, on aura ainsi en taille M 48 cm de manche à partir de l'encolure. Bon tricot!

09.01.2018 - 09:47

country flag Monica wrote:

Buongiorno vorrei sapere se è possibile lavorare in tondo anche le maniche e poi unirle al corpo per lavorare lo sprone. Grazie

04.01.2018 - 06:51

DROPS Design answered:

Buongiorno Monica. Sì può lavorare le maniche in tondo, seguendo le indicazione della costa inglese in tondo e non quella avanti e indietro. Buon lavoro!

04.01.2018 - 08:54

country flag Eve wrote:

Contente d'avoir fini. Extrêmement léger et doux, confortable. Cependant, comme il n'y avait pas de dimensions pour l'échantillon en côte anglaise, et que je la tricote plus lâche que le jersey, il est un peu plus large que prévu. Peut-être serait-il utile d'avoir un échantillon en côte anglaise, comme c'est la maille principale du pull?

13.08.2017 - 15:03

country flag Gillard Eve wrote:

Bonjour je ne comprends pas très bien les diminutions dans ce modèle. Je ne suis pas sûre de ce qu'il faut faire avec le jeté: est-ce qu'on le fait passer sur l'autre aiguille par-dessus la maille sans le tricoter? Après le marqueur, quand il faut tricoter 3 mailles ensembles, est-ce que c'est toutes les 3 ensembles, ou comme avant le marqueur? Et est-ce qu'il y a une vidéo qui le montre? Merci

24.03.2017 - 14:39

DROPS Design answered:

Bonjour Mme Gillard, passez le jeté par-dessus la m (sur l'aiguille de gauche) pour qu'il ne reste que la maille et plus le jeté, tricotez les 2 m suivantes ens à l'end, et passez la m glissée par-dessus les 2 m tricotées ensemble, puis tricotez 7 m après le marqueur et tricotez les 3 m suivantes ens à l'end. Bon tricot!

24.03.2017 - 17:06

country flag Anne Mette wrote:

Bliver denne opskrift ikke lagt op på et tidspunkt? Den er så fin :-)

01.02.2017 - 11:38

country flag Maria wrote:

Kevyt, ilmava ja rento - ihana!

29.12.2016 - 01:18