DROPS Safran
DROPS Safran
100% Cotton
from 2.05 $ /50g
Get the yarn to make this pattern from 16.40$.

The yarn cost is calculated from the pattern’s smallest size and the yarn’s cheapest product type. Looking for an even better price? You might find it on the DROPS Deals!

DROPS SS24

Lizzy

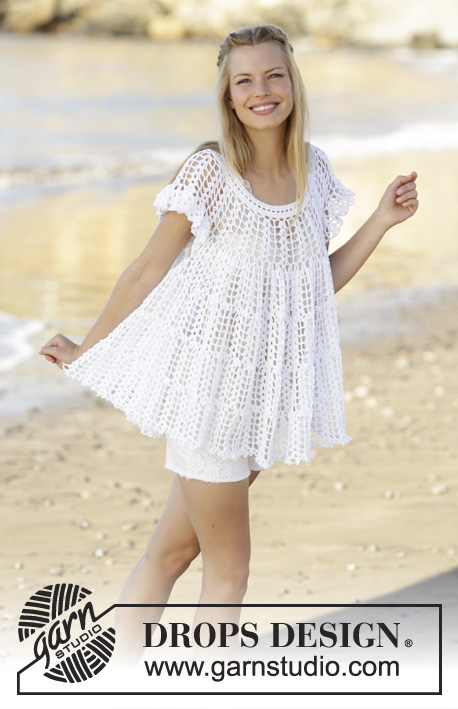
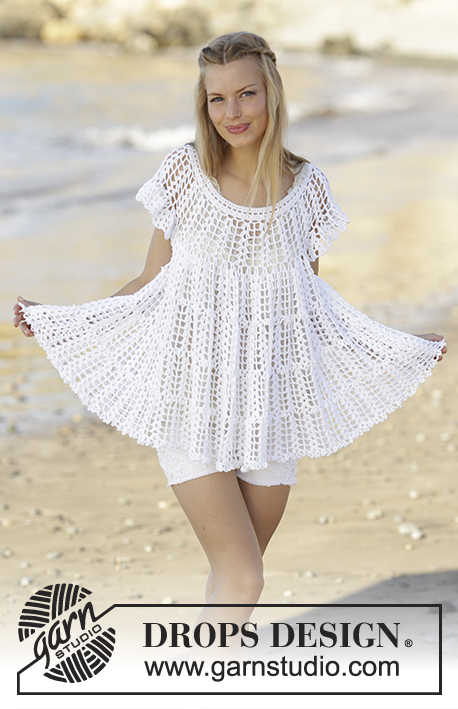
Tunic with fan pattern, flounce and A-shape, crochet top down in DROPS Safran. Size S-XXXL.

DROPS 176-2
DROPS design: Pattern e-264
Yarn group A
----------------------------------------------------------
Size: S - M - L - XL - XXL - XXXL
NOTE! Choose your normal size. The chest measurement is wide,

but the garment drapes nicely.
Materials:
DROPS SAFRAN from Garnstudio (belongs to yarn group A)
400-450-550-600-650-700 g color 17, white

DROPS HOOK size 3.5 mm/E/4 - or size needed to get 22 treble crochet x 8 rows = 10 cm / 4" in width and 10 cm / 4" vertically. 1 repetition A.2b should measure approx. 4.5 cm / 1¾" in width.

-------------------------------------------------------

Alternative Yarn – See how to change yarns here
Yarn Groups A to F – Use the same pattern and change the yarn here
Yarn usage using an alternative yarn – Use our yarn converter here

-------------------------------------------------------

DROPS Safran
DROPS Safran
100% Cotton
from 2.05 $ /50g
Get the yarn to make this pattern from 16.40$.

The yarn cost is calculated from the pattern’s smallest size and the yarn’s cheapest product type. Looking for an even better price? You might find it on the DROPS Deals!

Pattern instructions

NOTE: This pattern is written in American English. All measurements in charts are in cm. For conversion from inches to cm - click here. There are different terms for crocheting in American and British English. If this pattern includes crochet, click for "crochet terms" here. For this pattern in British English, please click here.
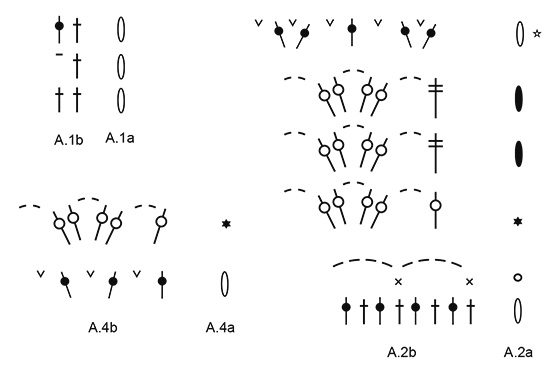
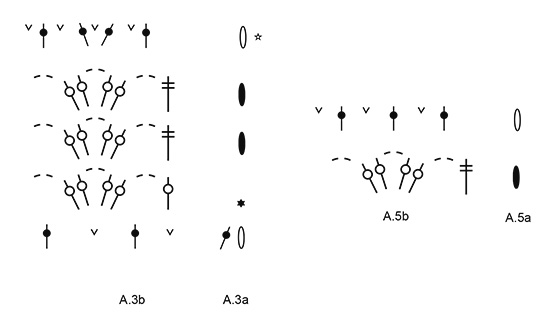
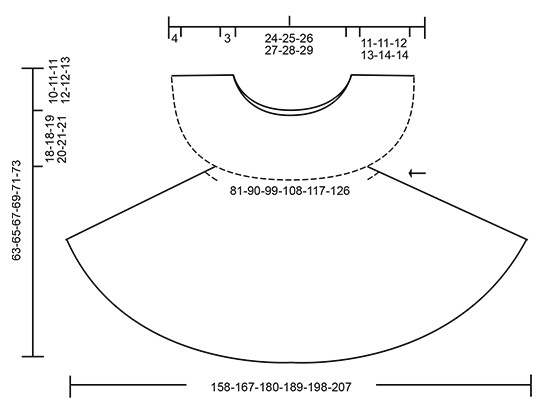
CROCHET INFO:
At beginning of every round with double crochet replace first double crochet with 3 chain stitches. Finish round with 1 slip stitch in 3rd chain stitch at beginning of round.

PATTERN:
See diagrams A.1 to A.5. (Diagrams A.1a, A.2a, A.3a, A.4a and A.5a show how round begins and ends).

INCREASE TIP 1 (evenly spaced):
To calculate how to increase evenly, use the total number of stitches on round (e.g. 180 stitches) and divide stitches by number of increases to be done (e.g. 74) = 2.4. I.e. in this example increase alternately in approx. every 2nd and 3rd stitch.

INCREASE TIP 2:
Increase 1 double crochet by working 2 double crochet in same stitch.

INCREASE TIP 3:
Increase an extra chain space by working (1 double crochet and 5 chain stitches) around a chain space.
----------------------------------------------------------

TUNIC:
Worked in the round, top down. Round begins mid back. NOTE!
Choose your normal size. The chest measurement is wide, but the
garment drapes nicely.

Begin on hook size 3.5 mm/E/4 and Safran, work 180-192-202-211-221-233 chain stitches and form a ring with 1 slip stitch in 1st chain stitch. Work 3 chain stitches (= 1 double crochet) - READ CROCHET INFO, * skip 1 chain stitch, work 1 double crochet in each of the next 5 chain stitches *, repeat from *-* 28-30-32-33-35-37 more times, skip 1 chain stitch, work 1 double crochet in each of the remaining 4-4-2-5-3-3 chain stitches = 150-160-168-176-184-194 double crochet.

Work from 2nd round in diagrams as follows:
Work A.1a (shows how round begins and ends), work A.1b the entire round. On 3rd round work 1 double crochet in every double crochet and 1 double crochet around every chain stitch and increase in addition 74-96-104-128-136-142 double crochet evenly – READ INCREASE TIP 1 (evenly spaced) and INCREASE TIP 2 = 224-256-272-304-320-336 double crochet.

Work from 2nd round in diagrams as follows: Work A.2a (shows how round begins and ends), work A.2b (= 28-32-34-38-40-42 repetitions). When 5th round has been worked vertically, repeat this round 3-3-4-5-6-6 more times (= 6-6-7-8-9-9 rounds in total with fans). Then work 6th round and increase 4-0-6-2-8-14 chain spaces evenly - READ INCREASE TIP 3 = 144-160-176-192-208-224 chain spaces. REMEMBER THE CROCHET GAUGE! Piece measures approx. 14-14-15-16-17-17 cm / 5½"-5½"-6"-6¼"-6¾"-6¾" from first chain stitch row worked.

Work from 2nd round in diagrams as follows: Work A.3a (shows how round begins and ends), work A.3b (= 72-80-88-96-104-112 repetitions). When 4th round has been worked vertically, the yoke is done. Piece measures approx. 18-18-19-20-21-21 cm / 7"-7"-7½"-8"-8¼"-8¼" from neck edge and down (and approx. 28-29-30-32-33-34 cm / 11"-11½"-11¾"-12½"-13"-13½" from shoulder). Insert a marker thread in piece, NOW MEASURE PIECE FROM HERE.
Work 4th round in A.3b one more time as follows: Work over the first 9-10-11-12-13-14 repetitions (= half back piece), skip 18-20-22-24-26-28 repetitions (= sleeve), work over the next 18-20-22-24-26-28 repetitions (= front piece), skip 18-20-22-24-26-28 repetitions (= sleeve), work over the remaining 9-10-11-12-13-14 repetitions (= half back piece) = 36-40-44-48-52-56 repetitions for body. Repeat 4th round in A.3a and A.3b 2 more times (= 6 round in total with fans). Then work 5th round and increase 0-2-4-0-2-4 chain spaces evenly = 144-162-180-192-210-228 chain spaces. Piece measures approx. 8 cm / 3⅛".

Work from 2nd round in diagrams as follows: Work A.4a (shows how round begins and ends), work A.4b (= 48-54-60-64-70-76 repetitions). On next round continue from 3rd round in A.3a and A.3b. When 4th round has been worked vertically, repeat this round 3 more times (= 6 rounds in total with fans). Then work as explained below and increase in addition 3-0-6-1-1-4 chain spaces evenly: * Work last round in A.3b 1 time in width, work last round in A.5b 1 time in width *, repeat from *-* = 171-189-216-225-246-270 chain spaces. Piece measures approx. 18 cm / 7".

Work from 2nd round in diagrams as follows: Work A.4a (shows how round begins and ends), work A.4b (= 57-63-72-75-82-90 repetitions). On next round continue from 3rd round in A.3a and A.3b. When 4th round has been worked vertically, repeat this round 3 more times (= 6 rounds in total with fans). Work next round in the different sizes as follows:


Size S, M, L and XL:
Work as explained below and increase in addition 20-12-0-2 chain spaces evenly: Work A.3a, * work last round in A.3b 1 time in width, work last round in A.5b 2 times in width *, repeat from *-* the entire round = 210-222-240-252 chain spaces.

Size XXL and XXXL:
Work A.5a, then work last round in A.5b the entire round and increase in addition 18-6 chain spaces evenly = 264-276 chain spaces.

Piece measures approx. 28 cm / 11". Then work in all sizes from last round in diagrams as follows: Work A.4a (shows how round begins and ends), work A.4b (= 70-74-80-84-88-92 repetitions). On next round continue from 3rd round in A.3a and A.3b. When 4th round has been worked vertically, repeat this round vertically until piece measures approx. 33-34-35-35-36-37 cm / 13"-13½"-13¾"-13¾"-14¼"-14½". Work the last round in diagram. Tunic measures approx. 63-65-67-69-71-73 cm / 24¾"-25½"-26⅜"-27⅛"-28"-28¾" from shoulder. Fasten off.

This pattern has been corrected.

Updated online: 09.03.2017
The garments measurement at the chest has been added to the schematic : Choose your normal size. The chest measurement is wide, but the garment drapes nicely.
Updated online: 25.08.2017
Diagrams A.2a, A.3a, A.3b and A.5a have been updated.

Diagram

All measurements in charts are in cm.

symbols = 1 chain stitch
symbols = 5 chain stitches
symbols = 1 single crochet in stitch
symbols = 1 double crochet in stitch
symbols = 1 double crochet around chain space
symbols = 1 treble crochet around chain space
symbols = 1 treble crochet in stitch
symbols = Replace first double crochet on round with 3 chain stitches. Finish round with 1 slip stitch in 3rd chain stitch at beginning of round.
symbols = Replace first treble crochet on round with 4 chain stitches. Finish round with 1 slip stitch in 4th chain stitch at beginning of round.
symbols = Replace first single crochet on round with 1 chain stitch. Finish round with 1 slip stitch in 1st chain stitch at beginning of round.
symbols = Begin round by working slip stitches until first chain space, then replace first treble crochet with 4 chain stitches. Finish round with 1 slip stitch in 4th chain stitch at beginning of round.
symbols = on this round increase chain spaces evenly - see explanation in pattern
symbols = Choose your normal size. The chest measurement is wide, but
the garment drapes nicely.
diagram
diagram
diagram
Do you have a question? See a list of frequently asked questions (FAQ)

Knitting tension is what determines the final measurements of your work, and is usually measured per 10 x 10 cm. It is provided like so: number of stitches in width x number of rows in height - eg: 19 stitches x 26 rows = 10 x 10 cm.

The knitting tension is very individual; some people knit/crochet loosely while others work tightly. You adjust the knitting tension with the needle size, which is why the suggested needle size only serve as a guide! You need to adjust this (up or down) to ensure that YOUR knitting tension matches the knitting tension provided in the pattern. If you work with a different knitting tension than provided you will have a different yarn consumption, and your work will have different measurements than what the pattern suggests.

The knitting tension also determines which yarns can replace each other. As long as you achieve the same knitting tension you can replace one yarn with another.

See DROPS lesson: How to measure your tension/gauge

See DROPS video: How to make a gauge tension swatch

The required amount of yarn is provided in grams, eg: 450 g. To calculate how many balls you’ll need you first need to know how many grams are in 1 ball (25g, 50g or 100g). This information is available if you click on the individual yarn quality on our pages. Divide the amount required with the amount of each ball. For example, if each ball is 50g (the most common amount), the calculation will be as follows: 450 / 50 = 9 balls.

The important thing when changing from one yarn to another is that the knitting/crochet tension remains the same. This is so that the measurements of the finished piece will be the same as on the sketch provided. It is easier to achieve the same knitting tension using yarns from the same yarn group. It is also possible to work with multiple strands of a thinner yarn to achieve the knitting tension of a thicker one. Please try our yarn converter. We recommend you to always work a test swatch.

Please NOTE: when changing yarn the garment might have a different look and feel to the garment in the photo, due to individual properties and qualities of each yarn.

See DROPS lesson: Can I use a different yarn than the one mentioned in the pattern?

All our yarns are categorised into yarn groups (from A to F) according to thickness and knitting tension – group A contains the thinnest yarns and group F the thickest. This makes it easier for you to find alternative yarns to our patterns, should you wish to switch yarn. All yarns within the same group have a similar knitting tension and can easily replace each other. However, different yarn qualities have different structures and properties which will give the finished work a unique look and feel.

Click here for an overview of the yarns in each yarn group

At the top of all our patterns you’ll find a link to our yarn converter, which is a helpful tool should you wish to use a different yarn than suggested. By filling in the yarn quality you wish to replace, the amount (in your size) and number of strands, the converter will present good alternative yarns with the same knitting tension. Additionally it will tell you how much you’ll require in the new qualities and whether you’ll need to work with multiple strands. Most skeins are 50g (some are 25g or 100g).

If the pattern is worked with multiple colours, every colour will have to be converted separately. Similarly, if the pattern is worked with several strands of different yarns (for example 1 strand Alpaca and 1 strand Kid-Silk) you will have to find alternatives for each, individually.

Click here to see our yarn converter

Since different yarns have different qualities and textures we have chosen to keep the original yarn in our patterns. However, you can easily find options among our available qualities by using our yarn converter, or simply pick a yarn from the same yarn group.

It is possible that some retailers still have discontinued yarns in stock, or that someone has a few skeins at home that they would like to find patterns for.

The yarn converter will provide both alternative yarn as well as required amount in the new quality.

If you think it's hard to decide what size to make, it can be a good idea to measure a garment you own already and like the size of. Then you can pick the size by comparing those measures with the ones available in the pattern's size chart.

You'll find the size chart at the bottom of the pattern.

See DROPS lesson: How to read size chart

The needle size provided in the pattern serves only as a guide, the important thing is to follow the knitting tension. And since knitting tension is very individual, you will have to adjust the needle size to ensure that YOUR tension is the same as in the pattern – maybe you’ll have to adjust 1, or even 2 needle sizes, up or down to achieve the correct tension. For this, we recommend that you work test swatches.

Should you work with a different knitting tension than the one provided, the measurements of the finished garment might deviate from the measurement sketch.

See DROPS lesson: How to measure your tension/gauge

See DROPS video: How to make a gauge tension swatch

Working a garment top-down provides more flexibility and room for personal adjustment. For example it is easier to try the garment on while working, as well as making adjustments to length of yoke and shoulder caps.

The instructions are carefully explaining every step, in the correct order. Diagrams are adjusted to the knitting direction and are worked as usual.

The diagram depicts all rows/rounds, and every stitch seen from the right side. It is read from bottom to top, from right to left. 1 square = 1 stitch.

When working back and forth, every other row is worked from the right side and every other row is worked from the wrong side. When working from the wrong side, the diagram will have to be worked reversed: from left to right, knit stitches are purled, purl stitches are knit etc.

When working in the round every round is worked from the right side and the diagram are worked from right to left on all rounds.

See DROPS lesson: How to read knitting diagrams

The diagram depicts all rows/rounds, and every stitch seen from the right side. It is worked from bottom to top, from right to left.

When working back and forth every other row is worked from the right side: from right to left and every other row is worked from the wrong side: from left to right.

When working in the round, every row in the diagram are worked from the right side, from right to left.

When working a circular diagram you start in the middle and work your way outwards, counter clockwise, row by row.

The rows usually start with a given number of chain stitches (equivalent to the height of the following stitch), this will either be depicted in the diagram or explained in the pattern.

See DROPS lesson: How to read crochet diagrams

Instructions for working several diagrams after each other on the same row/round, will often be written like so: “work A.1, A.2, A.3 a total of 0-0-2-3-4 times". This means you work A.1 once, then A.2 is worked once, and A.3 is repeated (in width) the number of times provided for your size – in this case like so: S = 0 times, M = 0 times, L=2 times, XL= 3 times and XXL = 4 times.

The diagrams are worked as usual: begin with the first row in A.1, then work the first row in A.2 etc.

See DROPS lesson: How to read knitting diagrams

See DROPS lesson: How to read crochet diagrams

The total width of the garment (from wrist-to-wrist) will be larger in the larger sizes, despite the actual sleeves being shorter. The larger sizes have longer sleeve caps and wider shoulders, so there will be a good fit in all sizes.

The measurement sketch/schematic drawing provides information regarding the full length of the garment. If it’s a jumper or a jacket the length is measured from the highest point on the shoulder (usually closest to the neckline), and straight down to the bottom of the garment. It is NOT measured from the tip of shoulder. Similarly, the length of yoke is measured from the highest point on the shoulder and down to where yoke is split into body and sleeves.

See DROPS lesson: How to read a schematic drawing

Diagrams are often repeated on the round or in height. 1 repeat is the diagram the way it appears in the pattern. If it says to work 5 repeats of A.1 in the round, then you work A.1 a total of 5 times after/next to each other in the round. If it says to work 2 repeats of A.1 vertically/in height you work the entire diagram once, then begin again at the start and work the entire diagram one more time.

Chain stitches are slightly narrower than other stitches and to avoid working the cast-on edge too tight, we simply chain more stitches to begin with. The stitch count will be adjusted on the following row to fit the pattern and measurement sketch.

The rib edge is more elastic and will contract slightly compared to, for example, stocking stitch. By increasing before the rib edge, you avoid a visible difference in width between the rib edge and the rest of the body.

It’s very easy to cast off too tightly, and by making yarn overs while casting off (and simultaneously casting these off) you avoid a too tight cast off edge.

See DROPS video: How to bind off with yarn overs (yo)

To achieve an even increase (or decrease) you can increase on, for example: every 3rd and 4th row alternately, like so: work 2 rows and increase on the 3rd row, work 3 rows and increase on the 4th. Repeat this until the increase is complete.

See DROPS lesson: Increase or decrease 1 st on every 3rd and 4th row alternately

Should you prefer to work in the round instead of back and forth, you may of course adjust the pattern. You’ll need to add steeks mid-front (usually 5 stitches), and follow the instructions. When you would normally turn and work from the wrong side, simply work across the steek and continue in the round. At the end you’ll cut the piece open, pick up stitches to work bands, and cover the cut edges.

See DROPS video: How to knit steeks and cut open

Should you prefer to work back and forth instead of in the round, you may of course adjust the pattern so you work the pieces separately and then assemble them at the end. Divide the stitches for the body in 2, add 1 edge stitch in each side (for sewing) and work the front and back pieces separately.

See DROPS lesson: Can I adapt a pattern for circular needles into straight needles?

Pattern repeats can vary slightly in the different sizes, in order to get the correct proportions. If you’re not working the exact same size as the garment in the photo, yours might deviate slightly. This has been carefully developed and adjusted so that the complete impression of the garment is the same in all sizes.

Make sure to follow instructions and diagrams for your size!

If you have found a pattern you like which is available in women’s size it’s not very difficult to convert it to men’s size. The biggest difference will be the length of sleeves and body. Start working on the women size that you think would fit across the chest. The additional length will be worked right before you cast off for the armhole/sleeve cap. If the pattern is worked top-down you can add the length right after the armhole or before the first decrease on sleeve.

Regarding additional yarn amount, this will depend on how much length you add, but it is better with a skein too many than too few.

All yarns will have excess fibres (from production) that might come off as lint or shedding. Brushed yarns (ie hairier yarns) have more of these loose, excess fibres, causing more shedding.

Shedding also depends on what is worn under or over the garment, and whether this pulls at the yarn fibres. It’s therefore not possible to guarantee that there will be no shedding

Below are some tips on how to get the best result when working with hairier yarns:

1. When the garment is finished (before you wash it) shake it vigorously so the looser hairs come off. NOTE: do NOT use a lint roller, brush or any method that pulls at the yarn.

2. Place the garment in a plastic bag and put it in your freezer - the temperature will cause the fibres to become less attached to each other, and excess fibres will come off easier.

3. Leave in the freezer for a few hours before taking it out and shaking it again.

4. Wash the garment according to the instructions on the yarn label.

Pilling is a natural process that happens to even the most exclusive of fibers. It's a natural sign of wear and tear that is hard to avoid, and that is most visible in high friction areas of your garment like a sweater's arms and cuffs.

You can make your garment look as new by removing the pilling, using a fabric comb or a pill/lint remover.

Still can't find the answer you need? Then scroll down and leave your question so one of our experts can try to help you. This will be done normally within 5 to 10 working days.
In the meantime, you can read the questions and answers that others have left to this pattern or join the DROPS Workshop on Facebook to get help from fellow knitters/crocheters!

You might also like...

Post a comment to pattern DROPS 176-2

We would love to hear what you have to say about this pattern!

If you want to leave a question, please make sure you select the correct category in the form below, to speed up the answering process. Required fields are marked *.

Comments / Questions (139)

country flag Mona wrote:

Wie erkenne ich denn jetzt welche Größe ich für mich wählen soll? ich trage gr 50...

16.06.2019 - 12:21

DROPS Design answered:

Liebe Mona, Hier lesen Sie mehr über Grössen - beachten Sie bitte nur das die Brustweite ist beim diesem Modell groß, gerne lassen Sie sich von Modellen selber Katalog inspirieren. Ihr DROPS Laden wird Ihnen auch mal gerne weiter helfen - auch telefonisch oder per Mail. Viel Spaß beim häkeln!

17.06.2019 - 08:05

country flag Jannie Jessen wrote:

Hvorfor skal der kun hækles fra 2. Omgang på alle mønstrene/rapporterne. Er gået helt i stå,

22.05.2019 - 22:48

DROPS Design answered:

Hei Jannie. Den første omgangen har du allerede heklet, og er kun med i diagrammene for å vise hvilke masker det hekles i. God fornøyelse

23.05.2019 - 07:15

country flag Coco wrote:

Bonjour, après le diagramme A1b et avoir fait les augmentations demandées j''obtiens bien mes 256 brides. Au diagramme d'après A2b il est dit de le répéter 32 fois or moi je peux le répéter 40 sur mon tour. Je fais forcément une erreur quelque part mais je ne comprends pas a quel moment.

06.05.2019 - 09:16

DROPS Design answered:

Bonjour Coco, si vous avez bien vos 256 brides après A.1b, vous avez suffisamment de mailles pour répéter 32 fois A.2b - A.2b se crochète sur 8 mailles, soit 8 x 32 =256 brides. Bon crochet!

06.05.2019 - 10:54

country flag Corinne wrote:

Bonjour besoin d'aide concernant A2b2 (32 fois) que faut- il répéter 32 fois s'il vous plaît le nombre de motif sur un tour ou le nombre de tour pour ce motif?

05.05.2019 - 21:55

DROPS Design answered:

Bonjour Corinne. Vous répétez le diagramme A.2b 32 fois sur le tour. Bon crochet!

05.05.2019 - 22:28

country flag Bernie wrote:

Is this available in a knit pattern? I don’t know how to crochet.

24.04.2019 - 06:28

DROPS Design answered:

Hi Bernie, If you search under tunics, there are a number of knitted patterns there you can choose from. Happy knitting!

24.04.2019 - 07:43

country flag Catherine wrote:

Bonsoir, Je suis perdue après le rang où l'on saute les arceaux. J'ai bien 2 fois 18 motifs espacés de 18 motifs. Jusque là tout va bien. Mais le tour suivant je ne comprends pas.... dois je faire le tour sur les arceaux des 2 tours précédents ? Merci d'avance

04.04.2019 - 21:39

DROPS Design answered:

Bonjour Catherine, quand vous avez sautez 2 x 18 arceaux pour les manches, vous crochetez maintenant uniquement le dos (2 x 9 arceaux) et le devant (18 arceaux). Vous avez donc 36 arceaux au total et vous crochetez maintenant 2 fosi le 4ème tour de A.3a et A.3b, puis le 5ème tyour de A.3a et A.3b = vous avez 144 arceaux et vous avez crocheté 8 cm depuis la séparation des manches. Continuez avec A.3a et A.3b etc. Bon crochet!

05.04.2019 - 09:52

country flag Martine wrote:

Tout va bien jusqu'à la fin des explications page 2 j ai bien 144 arceaux après j avoue ne plus comprendre du tout et je me retrouve avec beaucoup plus de motifs que prévu.. Si j agrandi votre modèle on saute des arceaux oui mais combien...1 sur deux?

01.04.2019 - 09:44

DROPS Design answered:

Bonjour Martine, vous crochetez ensuite le 2ème rang de A.4a (début du tour) et répétez A.4b en largeur tout le tour (= *1 double bride dans l'arceau (la 1ère fois, remplacez cette double-bride par 4 ml), 2 ml, 2 double-brides, 2 ml, 2 double brides dans l'arceau suivant, 2 ml*, vous répétez de *-* tout le tour pour terminer par 1 mc dans la 4ème ml du début du tour. On crochète ensuite le 3ème tour de A.3a/A.3b puis 4 fois le 4ème tour de A.3a/A.3b. Bon crochet!

01.04.2019 - 15:11

country flag Suzee Williams wrote:

I would really like to make this sweater it is cute and I like it a lot. I’ve had several mini strokes but a do fine with regular patterns. Is there anyway you could send the regular instructions cause I can’t seem to rap my brain around the instructions that are posted. Lol. Thanks in advance

12.01.2019 - 17:56

DROPS Design answered:

Dear Mrs Williams, this pattern is only with diagrams and written pattern explaining how to work the diagrams. You are welcome to ask any question here. Should you need any individual assistance, please contact the store where you bought your yarn. Happy crocheting!

14.01.2019 - 13:18

country flag Melanie Schneiter wrote:

I accomplished the first round. Would you please tell me how to work the second round? Just tell me the stitches for the second round and then maybe I can begin to understand the pattern. Thank you, Melanie Schneiter

30.11.2018 - 02:14

DROPS Design answered:

Dear Mrs Schneiter, work A.1a (beg of round) = 3 chains - Then work A.1b = *1 dc in next dc, 1 ch, skip 1 dc* repeat from *to* and finish with 1 sl st in the 3rd ch from beg of round. On last row in A.1, work A.1a the same way and work A.1b as follows: *1 dc in next dc, 1 dc around the chain* repeat from *-*. Happy crocheting!

30.11.2018 - 08:32

country flag Laura wrote:

Buona sera. Non.capisco molto la.parte dopo.lo.sprone. dopo aver fatto A4 proseguo.con A3 sopo aver fatto i 6 giri di ventagli taglia s devo aumentare di 3 archi ..ma.su che giro? E poi lavorare ultimo.giro di a3 m.a. 5 cat m.a. 5 cat m.a. 5 cat m.m...etc e poi dice lavorare ultimo.giro.di a 5..quindi di nuovo m.a. 5 cat 1 m.a. 5 cat...etce poi riprendere dal 2 giro di a 4? Grazie

01.09.2018 - 23:39

DROPS Design answered:

Buongiorno Laura. Dopo i 6 giri di ventagli, al giro successivo aumenta i 3 archi di catenelle e lavora questo giro come segue: alterna 1 ripetizione in larghezza dell’ultimo giro di A3b con una ripetizione in larghezza dell’ultimo giro di A5b su tutto il giro . Poi prosegue con le istruzioni successive (secondo giro di A4a e A4b). Buon lavoro!

02.09.2018 - 08:37