DROPS Paris
DROPS Paris
100% Cotton
from 1.60 $ /50g
Get the yarn to make this pattern from 14.40$.

The yarn cost is calculated from the pattern’s smallest size and the yarn’s cheapest product type. Looking for an even better price? You might find it on the DROPS Deals!

DROPS SS24

Astoria

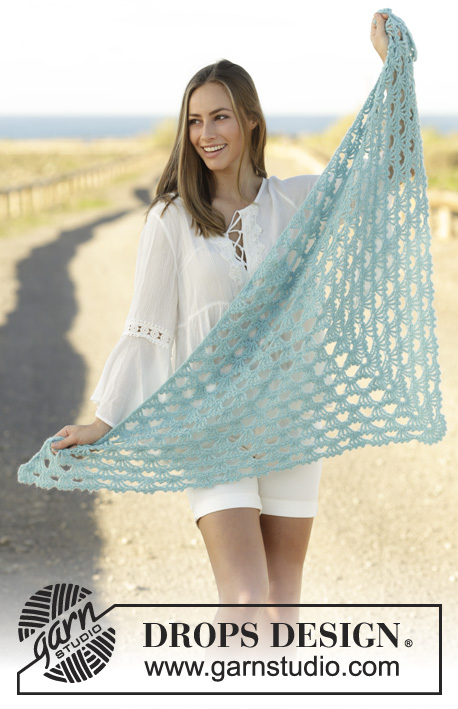
Crocheted top with round yoke, lace pattern, crocheted top down in DROPS Paris. Size: S - XXXL.

DROPS 175-15
DROPS design: Pattern w-623
Yarn group C or A + A
----------------------------------------------------------
Size: S - M - L - XL - XXL - XXXL
Materials:
DROPS PARIS from Garnstudio
450-500-550-600-650-700 g color 38, raspberry

DROPS CROCHET Hook size 5 mm / H/8 - or size needed to get 14 double crochets and 8.5 rows or 14 treble crochets and 5.5 rows = 10 cm / 4" in width and 10 cm / 4" vertically.

-------------------------------------------------------

Alternative Yarn – See how to change yarns here
Yarn Groups A to F – Use the same pattern and change the yarn here
Yarn usage using an alternative yarn – Use our yarn converter here

-------------------------------------------------------

DROPS Paris
DROPS Paris
100% Cotton
from 1.60 $ /50g
Get the yarn to make this pattern from 14.40$.

The yarn cost is calculated from the pattern’s smallest size and the yarn’s cheapest product type. Looking for an even better price? You might find it on the DROPS Deals!

Pattern instructions

NOTE: This pattern is written in American English. All measurements in charts are in cm. For conversion from inches to cm - click here. There are different terms for crocheting in American and British English. If this pattern includes crochet, click for "crochet terms" here. For this pattern in British English, please click here.
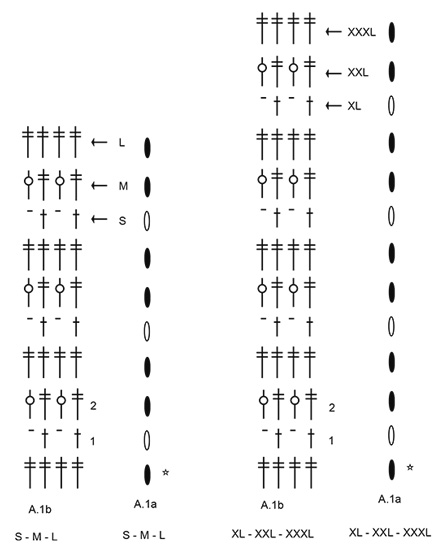
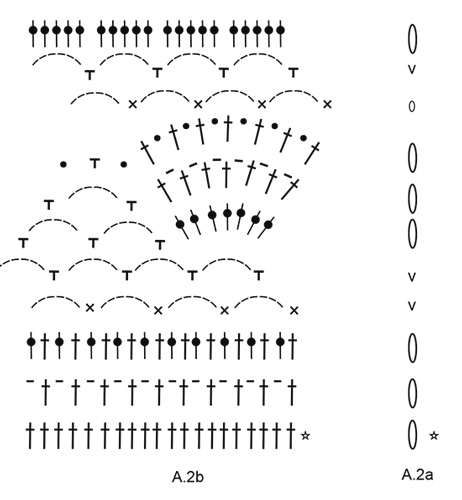
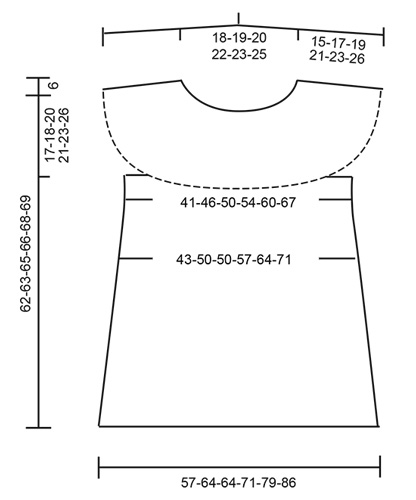
CROCHET INFO:
At beginning of every round with double crochets replace first double crochet with 3 chain stitches. Finish round with 1 slip stitch in 3rd chain stitch.
At beginning of every round with treble crochets replace first treble crochet with 4 chain stitches. Finish round with 1 slip stitch in 4th chain stitch.
At beginning of every round with double treble crochets replace first double treble crochet with 5 chain stitches. Finish round with 1 slip stitch in 5th chain stitch.

INCREASE TIP (evenly spaced):
To calculate how to increase evenly, use the number of stitches increases are done over (e.g. 84 stitches) and divide this number by number of increases to be done (e.g. 24) = 3.5. I.e. in this example increase after alternately approx. every 3rd and 4th stitch.
DECREASE TIP:
Decrease 1 double crochet by working 2 double crochets together as follows:
* Make 1 yarn over, insert hook in next double crochet, get yarn, make 1 yarn over, pull yarn through the 2 first loops on hook *, repeat from *-* one more time, make 1 yarn over and pull yarn through all 3 loops on hook (= 1 double crochet decreased).

PATTERN:
See diagrams A.1 and A.2 (A.1a and A.2a shows how rounds begin and end). Choose diagram for your size.
----------------------------------------------------------

TOP:
Work in the round top down.

YOKE:
Begin with crochet hook 5 mm and Paris, work 100-103-109-115-121-124 chain stitches and form a ring with 1 slip stitch in first chain stitch. Insert a marker thread on the beginning of the round = mid back. Work 4 chain stitches (= 1 treble crochet) - READ CROCHET INFO, work 1 treble crochet in each of the next 3-0-0-0-0-3 chain stitches, * skip 1 chain stitch, work 1 treble crochet in each of the next 5 chain stitches *, repeat from *-* 15-16-17-18-19-19 more times = 84-86-91-96-101-104 treble crochets. Work 1 round with treble crochets and increase 24-30-29-32-31-40 treble crochets evenly - READ INCREASE TIP (evenly spaced) = 108-116-120-128-132-144 treble crochets. REMEMBER THE CROCHET GAUGE!
Insert 4 marker threads in piece without working as follows: Insert 1st marker thread after 8-9-10-11-11-13 treble crochets. Insert 2nd marker thread after another 38-40-40-42- 44-46 treble crochets, 3rd marker thread is after another 16-18-20-22-22-26 treble crochets and 4th marker thread after another 38-40-40-42-44-46 treble crochets. There are now 8-9-10-11-11-13 treble crochets left until mid back.

Work A.1b (choose diagram for your size). A.1a shows how round begins and ends), AT THE SAME TIME increase treble crochets evenly over the 38-40-40-42-44-46 stitches in each side. Number of stitches between the 2 markers mid front and mid back is constant (= 16-18-20-22-22-26 stitches). Increase in the different sizes as follows:

Size S and M:
Increase 14-17 stitches in each side on 2nd and 5th round in A.1b, then increase 16-18 stitches on 6th-8th round = 196-220 stitches.
NOTE! See round marked with arrow for when yoke is done in the different sizes.

Size L, XL, XXL and XXXL:
Increase 14-16-18-19 stitches in each side on 2nd, 5th and 8th round in A.1b, then increase 16-16-20-21 stitches on 9th-9th-11th-11th round = 236-256-280-300 stitches.
NOTE! See round marked with arrow for when yoke is done in the different sizes.

Work next round in all sizes as follows:
NOTE: in sizes S and XL crochet around the chain stitches instead of in the chain stitches. Work 1 treble crochet in each of the first 27-30-32-35-39-43 stitches, work 4-4-6-6-6-8 chain stitches under sleeve, skip 44-50-54-58-62-64 stitches for sleeve, work 1 treble in each of the next 54-60-64-70-78-86 stitches, work 4-4-6-6-6-8 chain stitches under sleeve, skip 44-50-54-58-62-64 stitches for sleeve, work 1 treble in each of the remaining 27-30-32-35-39-43 stitches on round. Piece measures approx. 17-18-20-21-23-25 cm / 6⅝"-7"-7⅞"-8 ¼"-9"-9 ¾" measures from neck edge and down vertically.

BODY:
= 116-128-140-152-168-188 stitches. NOW MEASURE THE PIECE FROM HERE! Work 1 double treble crochet in every stitch. When piece measures 5 cm / 2", increase 4-12-0-8-12-12 double treble crochets evenly = 120-140-140-160-180-200 double treble crochets. Cut the yarn. To fit the pattern symmetrically mid front and mid back on top displace beginning of round as follows: Skip the first 15-5-5-15-5-15 double treble crochets on round and fasten strand with 1 single crochet in next double treble crochet. Begin on 2nd round in diagrams and work A.2a (shows how round begins and ends), work A.2b (= 6-7-7-8-9-10 repetitions).
On last round in diagram increase double crochets. To make the pattern symmetrical mid front and mid back increase the same number of double crochets in each side. Increase 20 double crochets in each side evenly between mid back and fan in pattern mid front on top. Increase 40 double crochets in total evenly in all sizes = 160-180-180-200-220-240 double crochets. Continue from 2nd round in A.2a and A.2b (= 8-9-9-10-11-12 repetitions on round). When diagrams have been worked vertically, work 2nd and 3rd round 1 more time. Piece measures approx. 62-63-65-66-68-69 cm / 24⅜"-24 ¾"-25 ½"-26"-26 ¾"-27⅛" from neck edge mid back and down. Fasten off.

NECK EDGE:
Begin mid back of neck and fasten strand with 1 single crochet.
Work 1 single crochet in every chain stitch but work only in the chain stitches worked with double crochets = 84-86-91-96-101-104 single crochets. Fasten off.

SLEEVE EDGE:
Begin mid under sleeve and work 4 chain stitches (= 1 treble crochet). Work 1 treble crochet in every stitch and work 3 treble crochets around the outermost stitch in transition between yoke and body AT THE SAME TIME decrease 13-15-16-14-12-11 treble crochets evenly on round – READ DECREASE TIP = 41-45-50-56-62-67 treble crochets. Fasten off.

This pattern has been corrected.

Updated online: 09.04.2018
This pattern has been re-written, new drawing and diagrams as well.
Updated online: 03.04.2019
Correction - YOKE: Size S and M: Increase 14-17 stitches in each side on 2nd and 5th round in A.1b, then increase 16-18 stitches on 6th-8th round = 196-220 stitches. Size L, XL, XXL and XXXL: Increase 14-16-18-19 stitches in each side on 2nd, 5th and 8th round in A.1b, then increase 16-16-20-21 stitches on 9th-9th-11th-11th round = 236-256-280-300 stitches.

Diagram

All measurements in charts are in cm.

symbols = = 1 chain stitch
symbols = = 1 single crochet around chain space
symbols = = 1 treble crochet in stitch
symbols = 1 double crochet in stitch
symbols = 1 treble crochet in stitch
symbols = 1 double crochet around chain stitch
symbols = 1 picot: 3 chain stitches, 1 double crochet in first chain stitch
symbols = 6 chain stitches
symbols = round begins with 3 chain stitches and finishes with 1 slip stitch in 3rd chain stitch
symbols = round begins with 4 chain stitches and finishes with 1 slip stitch in 4th chain stitch
symbols = round begins with 1 chain stitch and finishes with 1 slip stitch in 1st chain stitch, then work slip stitches until first chain space
symbols = round begins with 1 chain stitch and finishes with 1 slip stitch in 1st chain stitch
symbols = this round has already been worked, begin on next round
symbols = on this round increase evenly - see explanation in pattern
symbols = 1 treble crochet around chain space
diagram
diagram
diagram
Do you have a question? See a list of frequently asked questions (FAQ)

Knitting tension is what determines the final measurements of your work, and is usually measured per 10 x 10 cm. It is provided like so: number of stitches in width x number of rows in height - eg: 19 stitches x 26 rows = 10 x 10 cm.

The knitting tension is very individual; some people knit/crochet loosely while others work tightly. You adjust the knitting tension with the needle size, which is why the suggested needle size only serve as a guide! You need to adjust this (up or down) to ensure that YOUR knitting tension matches the knitting tension provided in the pattern. If you work with a different knitting tension than provided you will have a different yarn consumption, and your work will have different measurements than what the pattern suggests.

The knitting tension also determines which yarns can replace each other. As long as you achieve the same knitting tension you can replace one yarn with another.

See DROPS lesson: How to measure your tension/gauge

See DROPS video: How to make a gauge tension swatch

The required amount of yarn is provided in grams, eg: 450 g. To calculate how many balls you’ll need you first need to know how many grams are in 1 ball (25g, 50g or 100g). This information is available if you click on the individual yarn quality on our pages. Divide the amount required with the amount of each ball. For example, if each ball is 50g (the most common amount), the calculation will be as follows: 450 / 50 = 9 balls.

The important thing when changing from one yarn to another is that the knitting/crochet tension remains the same. This is so that the measurements of the finished piece will be the same as on the sketch provided. It is easier to achieve the same knitting tension using yarns from the same yarn group. It is also possible to work with multiple strands of a thinner yarn to achieve the knitting tension of a thicker one. Please try our yarn converter. We recommend you to always work a test swatch.

Please NOTE: when changing yarn the garment might have a different look and feel to the garment in the photo, due to individual properties and qualities of each yarn.

See DROPS lesson: Can I use a different yarn than the one mentioned in the pattern?

All our yarns are categorised into yarn groups (from A to F) according to thickness and knitting tension – group A contains the thinnest yarns and group F the thickest. This makes it easier for you to find alternative yarns to our patterns, should you wish to switch yarn. All yarns within the same group have a similar knitting tension and can easily replace each other. However, different yarn qualities have different structures and properties which will give the finished work a unique look and feel.

Click here for an overview of the yarns in each yarn group

At the top of all our patterns you’ll find a link to our yarn converter, which is a helpful tool should you wish to use a different yarn than suggested. By filling in the yarn quality you wish to replace, the amount (in your size) and number of strands, the converter will present good alternative yarns with the same knitting tension. Additionally it will tell you how much you’ll require in the new qualities and whether you’ll need to work with multiple strands. Most skeins are 50g (some are 25g or 100g).

If the pattern is worked with multiple colours, every colour will have to be converted separately. Similarly, if the pattern is worked with several strands of different yarns (for example 1 strand Alpaca and 1 strand Kid-Silk) you will have to find alternatives for each, individually.

Click here to see our yarn converter

Since different yarns have different qualities and textures we have chosen to keep the original yarn in our patterns. However, you can easily find options among our available qualities by using our yarn converter, or simply pick a yarn from the same yarn group.

It is possible that some retailers still have discontinued yarns in stock, or that someone has a few skeins at home that they would like to find patterns for.

The yarn converter will provide both alternative yarn as well as required amount in the new quality.

If you think it's hard to decide what size to make, it can be a good idea to measure a garment you own already and like the size of. Then you can pick the size by comparing those measures with the ones available in the pattern's size chart.

You'll find the size chart at the bottom of the pattern.

See DROPS lesson: How to read size chart

The needle size provided in the pattern serves only as a guide, the important thing is to follow the knitting tension. And since knitting tension is very individual, you will have to adjust the needle size to ensure that YOUR tension is the same as in the pattern – maybe you’ll have to adjust 1, or even 2 needle sizes, up or down to achieve the correct tension. For this, we recommend that you work test swatches.

Should you work with a different knitting tension than the one provided, the measurements of the finished garment might deviate from the measurement sketch.

See DROPS lesson: How to measure your tension/gauge

See DROPS video: How to make a gauge tension swatch

Working a garment top-down provides more flexibility and room for personal adjustment. For example it is easier to try the garment on while working, as well as making adjustments to length of yoke and shoulder caps.

The instructions are carefully explaining every step, in the correct order. Diagrams are adjusted to the knitting direction and are worked as usual.

The diagram depicts all rows/rounds, and every stitch seen from the right side. It is read from bottom to top, from right to left. 1 square = 1 stitch.

When working back and forth, every other row is worked from the right side and every other row is worked from the wrong side. When working from the wrong side, the diagram will have to be worked reversed: from left to right, knit stitches are purled, purl stitches are knit etc.

When working in the round every round is worked from the right side and the diagram are worked from right to left on all rounds.

See DROPS lesson: How to read knitting diagrams

The diagram depicts all rows/rounds, and every stitch seen from the right side. It is worked from bottom to top, from right to left.

When working back and forth every other row is worked from the right side: from right to left and every other row is worked from the wrong side: from left to right.

When working in the round, every row in the diagram are worked from the right side, from right to left.

When working a circular diagram you start in the middle and work your way outwards, counter clockwise, row by row.

The rows usually start with a given number of chain stitches (equivalent to the height of the following stitch), this will either be depicted in the diagram or explained in the pattern.

See DROPS lesson: How to read crochet diagrams

Instructions for working several diagrams after each other on the same row/round, will often be written like so: “work A.1, A.2, A.3 a total of 0-0-2-3-4 times". This means you work A.1 once, then A.2 is worked once, and A.3 is repeated (in width) the number of times provided for your size – in this case like so: S = 0 times, M = 0 times, L=2 times, XL= 3 times and XXL = 4 times.

The diagrams are worked as usual: begin with the first row in A.1, then work the first row in A.2 etc.

See DROPS lesson: How to read knitting diagrams

See DROPS lesson: How to read crochet diagrams

The total width of the garment (from wrist-to-wrist) will be larger in the larger sizes, despite the actual sleeves being shorter. The larger sizes have longer sleeve caps and wider shoulders, so there will be a good fit in all sizes.

The measurement sketch/schematic drawing provides information regarding the full length of the garment. If it’s a jumper or a jacket the length is measured from the highest point on the shoulder (usually closest to the neckline), and straight down to the bottom of the garment. It is NOT measured from the tip of shoulder. Similarly, the length of yoke is measured from the highest point on the shoulder and down to where yoke is split into body and sleeves.

See DROPS lesson: How to read a schematic drawing

Diagrams are often repeated on the round or in height. 1 repeat is the diagram the way it appears in the pattern. If it says to work 5 repeats of A.1 in the round, then you work A.1 a total of 5 times after/next to each other in the round. If it says to work 2 repeats of A.1 vertically/in height you work the entire diagram once, then begin again at the start and work the entire diagram one more time.

Chain stitches are slightly narrower than other stitches and to avoid working the cast-on edge too tight, we simply chain more stitches to begin with. The stitch count will be adjusted on the following row to fit the pattern and measurement sketch.

The rib edge is more elastic and will contract slightly compared to, for example, stocking stitch. By increasing before the rib edge, you avoid a visible difference in width between the rib edge and the rest of the body.

It’s very easy to cast off too tightly, and by making yarn overs while casting off (and simultaneously casting these off) you avoid a too tight cast off edge.

See DROPS video: How to bind off with yarn overs (yo)

To achieve an even increase (or decrease) you can increase on, for example: every 3rd and 4th row alternately, like so: work 2 rows and increase on the 3rd row, work 3 rows and increase on the 4th. Repeat this until the increase is complete.

See DROPS lesson: Increase or decrease 1 st on every 3rd and 4th row alternately

Should you prefer to work in the round instead of back and forth, you may of course adjust the pattern. You’ll need to add steeks mid-front (usually 5 stitches), and follow the instructions. When you would normally turn and work from the wrong side, simply work across the steek and continue in the round. At the end you’ll cut the piece open, pick up stitches to work bands, and cover the cut edges.

See DROPS video: How to knit steeks and cut open

Should you prefer to work back and forth instead of in the round, you may of course adjust the pattern so you work the pieces separately and then assemble them at the end. Divide the stitches for the body in 2, add 1 edge stitch in each side (for sewing) and work the front and back pieces separately.

See DROPS lesson: Can I adapt a pattern for circular needles into straight needles?

Pattern repeats can vary slightly in the different sizes, in order to get the correct proportions. If you’re not working the exact same size as the garment in the photo, yours might deviate slightly. This has been carefully developed and adjusted so that the complete impression of the garment is the same in all sizes.

Make sure to follow instructions and diagrams for your size!

If you have found a pattern you like which is available in women’s size it’s not very difficult to convert it to men’s size. The biggest difference will be the length of sleeves and body. Start working on the women size that you think would fit across the chest. The additional length will be worked right before you cast off for the armhole/sleeve cap. If the pattern is worked top-down you can add the length right after the armhole or before the first decrease on sleeve.

Regarding additional yarn amount, this will depend on how much length you add, but it is better with a skein too many than too few.

All yarns will have excess fibres (from production) that might come off as lint or shedding. Brushed yarns (ie hairier yarns) have more of these loose, excess fibres, causing more shedding.

Shedding also depends on what is worn under or over the garment, and whether this pulls at the yarn fibres. It’s therefore not possible to guarantee that there will be no shedding

Below are some tips on how to get the best result when working with hairier yarns:

1. When the garment is finished (before you wash it) shake it vigorously so the looser hairs come off. NOTE: do NOT use a lint roller, brush or any method that pulls at the yarn.

2. Place the garment in a plastic bag and put it in your freezer - the temperature will cause the fibres to become less attached to each other, and excess fibres will come off easier.

3. Leave in the freezer for a few hours before taking it out and shaking it again.

4. Wash the garment according to the instructions on the yarn label.

Pilling is a natural process that happens to even the most exclusive of fibers. It's a natural sign of wear and tear that is hard to avoid, and that is most visible in high friction areas of your garment like a sweater's arms and cuffs.

You can make your garment look as new by removing the pilling, using a fabric comb or a pill/lint remover.

Still can't find the answer you need? Then scroll down and leave your question so one of our experts can try to help you. This will be done normally within 5 to 10 working days.
In the meantime, you can read the questions and answers that others have left to this pattern or join the DROPS Workshop on Facebook to get help from fellow knitters/crocheters!

You might also like...

Post a comment to pattern DROPS 175-15

We would love to hear what you have to say about this pattern!

If you want to leave a question, please make sure you select the correct category in the form below, to speed up the answering process. Required fields are marked *.

Comments / Questions (53)

country flag Alejandra Cecilia Ruiz Diaz wrote:

¿Por qué se inicia con 115 cadenas si se trabajan 96 puntos altos en la primera vuelta?

01.10.2019 - 20:58

DROPS Design answered:

Hola Alejandra. A menudo en las labores a ganchillo la cadeneta de montaje tiene más puntos que la labor principal, eso permite evitar que el borde de montaje quede tenso.

01.10.2019 - 22:43

country flag Jennifer M wrote:

I'm working on the body, and it says to cut the yarn and skip some stitches and fasten with a sc, then begin 2nd round on the diagram. My question is do I start round one in the same stitch as the sc, or the next one?

23.07.2019 - 00:28

DROPS Design answered:

Dear Jennifer, the rounds start now with the stitch where you worked the sc, just continue working A.2a from the stitch where you joined the yarn, the repeat A.2b in the round from next stitch. Happy crocheting!

06.08.2019 - 09:38

country flag ANA wrote:

Grata pela resposta, mas a pergunta não é sobre o que é um ponto alto, mas sim o que quer dizer: (...)em cada um dos 3-0-0-0-0-3 pontos corrente seguintes, *saltar 1 ponto corrente, 1 ponto alto duplo em cada um dos 5 pontos corrente seguintes*, repetir de * a * mais 15-16-17-18-19-19 vezes = 84-86-91-96-101-104 pontos altos duplos. Obrigada

05.06.2019 - 19:53

DROPS Design answered:

Bom dia, Não compreendemos a sua dúvida... Deve fazer o ponto alto duplo como indicado. entre os asteriscos (*). Depois, repete o que fez mais o número de vezes indicado para o seu tamanho. Esperamos tê-la ajudado com a resposta! Bom Croché!

11.06.2019 - 13:06

country flag Ana wrote:

Boa noite, Não consigo interpretar as explicações para iniciar o meu modelo que adoro É a primeira vez. Podem explicar o que quer dizer o (: Um ponto alto duplo em cada um dos 3-0-0-0-0-3. O modelo é W-623. Muito obrigada.

31.05.2019 - 23:01

DROPS Design answered:

Bom dia, Um ponto alto duplo é um ponto alto em que se fazem mais laçadas para ficar mais alto. Pode ver nas explicações, por baixo da foto, todos os vídeos que a ajudam a fazer este bonito modelo. Aqui fica o link do vídeo que mostra como fazer 1 ponto alto duplo: https://www.garnstudio.com/video.php?id=28&lang=pt Bom croché!

04.06.2019 - 11:05

country flag Zara Pemberton wrote:

How many balls of wool does this require?

07.04.2019 - 19:10

DROPS Design answered:

Dear Zara, depending on the size you want to make, this piece needs between 9-14 piece of 50 gramms balls of DROPS Paris yarn. Happy Crafting!

07.04.2019 - 19:42

country flag Joyce Pierik wrote:

Ik de beschrijving staat in de 2de toer haak 1 dubbel stokje in elk van de volgende 3-0-0-0-0-3 lossen, * sla 1 losse over, haak 1 dubbel stokje in elk van de volgende 5 lossen *, wat wordt er bedoeld met 3-0-0-0-0-3? Graag uw hulpm

03.04.2019 - 16:49

DROPS Design answered:

Dag Joyce,

De reeks getallen met streepjes ertussen slaan op de maten; dus 3 is voor maat S, 0 is voor maat M, enzovoort.

04.04.2019 - 08:08

country flag Amy wrote:

I am confused about the "double double" crochet stitch as listed in the yoke section. Can you please describe how to do this stitch?

03.04.2019 - 03:09

DROPS Design answered:

Dear Amy! I think you mean 'double treble crochet'. Please see the video: HERE. Happy crocheting!

05.04.2019 - 19:00

country flag Theres wrote:

Diagram och skiss saknas på svenska

29.03.2019 - 10:10

country flag Monica wrote:

Hei. Jeg får ikke maskeantallet til å stemme med økningene på bærestykket. Det står at jeg, i str. M skal ha 220 masker når jeg er ferdig med økningene men jeg har bare 216. Det står at jeg skal øke over de 40 maskene i hver side, på 2. og 5. omg 34 masker og 36 masker på 6.-8. omg. 40+34+34+36+36+36 er 216 masker. Jeg vil da få for lite masker da jeg skal dele inn i bol og ermer. Hva er det jeg ikke har fått med meg?

27.03.2019 - 13:18

DROPS Design answered:

Hei Monica. Her var det en feil i maskeantallet: Du øker 17 masker i hver side (totalt 34 masker) på omgang 2 og 5, og du øker 18 masker i hver side (totalt 36 masker) på omgang 8. Dette er nå blitt rettet i oppskriften. Du vil da ha de 116 maskene fra før + 34 + 34 + 36 = 220. God fornøyelse

03.04.2019 - 09:32

country flag Nadja Brolin wrote:

Hej Var finns diagrammet till detta mönster? Hälsningar Nadja Brolin

14.03.2019 - 19:30

DROPS Design answered:

Hej. Du hittar det längst ner på sidan, precis över måttskissen. Lycka till!

18.03.2019 - 10:32