
Popular categories
Looking for a yarn?


|
|
Evening Promenade |
|
|
|
|
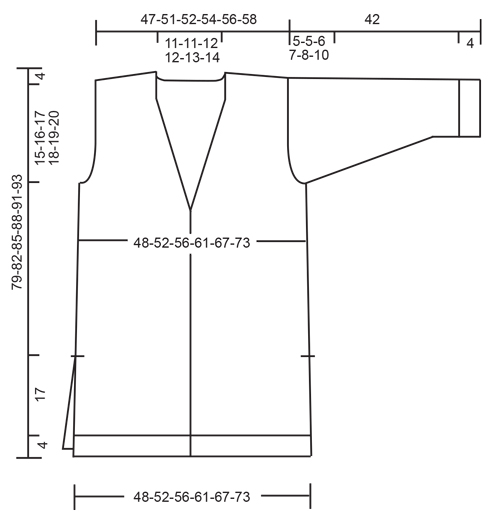
Jacket with deep v-neck and pockets in DROPS Air. Size: S - XXXL
DROPS 176-14 |
|
|
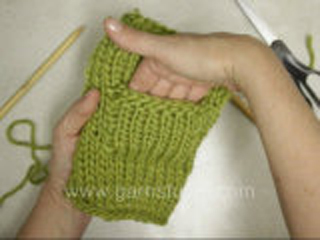
GARTER STITCH (back and forth): 1 ridge = knit 2 rows. DECREASE TIP (applies to neck): Decrease inside 7 band stitches in garter stitch. All decreases are done from the right side. Decrease as follows after 7 band stitches: Slip 1 stitch knitwise, knit 1, pass slipped stitch over stitch worked. Decrease as follows before 7 band stitches: Knit 2 together. INCREASE TIP: Increase 1 stitch by making 1 yarn over, on next row work yarn over twisted to avoid holes. BUTTONHOLES: Decrease for buttonholes on right band. 1 BUTTONHOLE = knit third and fourth stitch from edge together and make 1 yarn over. On next row knit yarn over = hole. Decrease for buttonholes when piece measures: S: 6, 15, 23, 31, 39, 47 and 55 cm M: 5, 13, 22, 30, 39, 47 and 56 cm L: 5, 14, 23, 32, 41, 50 and 59 cm. XL: 4, 12, 20, 28, 36, 44, 52 and 60 cm. XXL: 3, 11, 20, 28, 37, 45, 54 and 62 cm. XXXL: 5, 13, 22, 30, 38, 46, 55 and 63 cm. ---------------------------------------------------------- BACK PIECE: Work piece back and forth on circular needle. Cast on 90-98-106-114-122-134 stitches on circular needle size 4.5 mm with Air. Purl 1 row from wrong side, then work as follows - from right side: 4 stitches in GARTER STITCH - see explanation above, knit 2, * purl 2, knit 2 *, repeat from *-* until 4 stitches remain, finish with 4 stitches in garter stitch. Work rib and garter stitch for 4 cm, then switch to circular needle size 5 mm. Knit 1 row with 4 stitches in garter stitch in each side while decreasing 8-10-10-10-8-10 stitches evenly, do not decrease over stitches in garter stitches = 82-88-96-104-114-124 stitches. Continue in stocking stitch with 4 stitches in garter stitch in each side. REMEMBER THE KNITTING TENSION When piece measures 21 cm, cast on 1 edge stitch in each side at the end of the next 2 rows = 84-90-98-106-116-126 stitches. Then work in stocking stitch with 1 edge stitch in garter stitch in each side of piece. When piece measures 60-62-64-66-68-69 cm, cast off for armholes in each side on every other row as follows: 2-2-3-3-3-3 stitches 1 time, 2 stitches 0-0-1-2-3-4 times and 1 stitch 0-0-0-0-1-3 times = 80-86-88-92-96-98 stitches. When piece measures 75-78-81-84-87-89 cm, begin by working in garter stitch over neck AT THE SAME TIME begin cast off for diagonal shoulder. Work as follows: NECK: Work 3 ridges over the middle 30-30-32-32-34-36 stitches (work the other stitches as before) then cast off the middle 16-16-18-18-20-22 stitches for neck and finish each shoulder separately. Then decrease 1 stitch inside 7 stitches in garter stitch on next row towards neck - Read DECREASE TIP! DIAGONAL SHOULDER: Cast off on every other row for diagonal shoulder as follows: 6-6-6-7-7-7 stitches 4 times, 7-10-10-8-9-9 stitches 1 time (= 31-34-34-36-37-37 stitches in total cast off for diagonal shoulder.) Repeat in the other side. RIGHT FRONT PIECE: Work piece back and forth on circular needle. Cast on 53-57-61-65-69-73 stitches (including 7 band stitches) on circular needle size 4.5 mm with Air. Purl 1 row from wrong side, then work as follows - from right side: 7 band stitches in garter stitch, knit 2, * purl 2, knit 2 *, repeat from *-* until 4 stitches remain, finish with 4 stitches in garter stitch. Work rib and garter stitch for 4 cm - REMEMBER BUTTONHOLE - see explanation above. Then switch to circular needle size 5 mm. Work 1 row in stocking stitch with garter stitch in each side while decreasing 5-6-6-6-5-4 stitches evenly, do not decrease over stitches in garter stitches = 48-51-55-59-64-69 stitches. Continue in stocking stitch with garter stitch in each side as before. REMEMBER THE KNITTING TENSION When piece measures 21 cm, cast on 1 edge stitch at the end of next row from right side = 49-52-56-60-65-70 stitches. Then work in stocking stitch with 7 band stitches in garter stitch and 1 edge stitch in garter stitch in the side. When piece measures 57-58-60-62-64-65 cm, decrease for neck inside 7 band stitches - REMEMBER DECREASE TIP. Repeat decrease every 4th row 3-4-4-5-5-5 times in total and every other row 13-12-13-12-13-14 times in total - AT THE SAME TIME when piece measures 60-62-64-66-68-69 cm, cast off for armhole at the beginning of every row from wrong side as on back piece. When cast off for armhole and decrease for neck are done, there are 31-34-34-36-37-37 stitches on needle. When piece measures 75-78-81-84-87-89 cm, cast off for diagonal shoulder as on back piece. LEFT FRONT PIECE: Cast on and work as right front piece but reversed. I.e. cast off for armhole at beginning of row from right side. Decrease for neck inside band stitches at the end of row from right side. Cast off for diagonal shoulder at beginning of row from right side. Do not decrease for buttonholes. SLEEVE: Work piece back and forth on circular needle. Cast on 38-38-42-42-46-46 stitches (including 1 edge stitch in each side) on circular needle size 4.5 mm with Air. Purl 1 row from wrong side, then work rib (= knit 2/purl 2) with 1 edge stitch in garter stitch in each side. Work rib for 4 cm, then switch to circular needle size 5 mm. Knit 1 row while decreasing 4 stitches evenly = 34-34-38-38-42-42 stitches. Then work in stocking stitch with 1 edge stitch in garter stitch in each side. When piece measures 7-7-6-6-6-7 cm, increase 1 stitch on each side – see INCREASE TIP. Repeat increase every 5½-4-4-3-2½-2 cm 6-8-8-10-11-12 times in total = 46-50-54-58-64-66 stitches. When piece measures 37-37-36-35-34-32 cm (shorter measurements in the larger sizes because of longer sleeve cap and wider shoulders), cast off for sleeve cap at beginning of every row in each side as follows: Cast off 3 stitches 1 time, 2 stitches 4-4-3-5-6-8 times, then cast off 3 stitches in each side until piece measures approx. 42 cm in all sizes. Cast off. Work another sleeve. ASSEMBLY: Sew the shoulder seams. Sew in sleeves. Sew sleeve seams and side seams in one inside 1 edge stitch down to ridges in the side (= 21 cm vent). Sew the buttons on to the left band. POCKET: Worked back and forth. Cast on 38-38-38-40-40-40 stitches (including 1 edge stitch in each side) on circular needle size 5 mm with Air. Knit 1 row from wrong side. Then work in stocking stitch with 1 edge stitch in garter stitch in each side until piece measures 18-18-18-20-20-20 cm. Work 2 ridges, cast off. Work another pocket the same way. Sew pockets on to front piece, approx. 13-13-13-14-14-14 cm from bottom edge and 7-7-8-8-9-9-cm inn from mid front. |
|
|
|
|
Have you made this or any other of our designs? Tag your pictures in social media with #dropsdesign so we can see them! Do you need help with this pattern?You'll find tutorial videos, a Comments/Questions area and more by visiting the pattern on garnstudio.com. © 1982-2024 DROPS Design A/S. We reserve all rights. This document, including all its sub-sections, has copyrights. Read more about what you can do with our patterns at the bottom of each pattern on our site. |


With over 40 years in knitting and crochet design, DROPS Design offers one of the most extensive collections of free patterns on the internet - translated to 17 languages. As of today we count 304 catalogues and 11422 patterns - 11422 of which are translated into English (UK/cm).
We work hard to bring you the best knitting and crochet have to offer, inspiration and advice as well as great quality yarns at incredible prices! Would you like to use our patterns for other than personal use? You can read what you are allowed to do in the Copyright text at the bottom of all our patterns. Happy crafting!
Comments / Questions (53)
Klopt het dat bij het rugpand je de eerste naald averechts aan de verkeerde kant breidt, en bij het voorpand en de mouwen de eerste naald rechts is aan de verkeerde kant??
09.09.2018 - 21:22DROPS Design answered:
Dag Christel, Nee, dat klopt inderdaad niet. Zowel op het rugpand als op de voorpanden en de mouwen is het de bedoeling om 1 naald averecht op de verkeerde kant te breien. Ik heb het patroon aangepast. Bedankt voor het doorgeven en veel breiplezier!
12.09.2018 - 14:19Bonjour, pour le biais des épaules vous dites qu'il faut rabattre 4fois 6 mailles et 1 fois 7 mailles mais c'est de chaque cotés donc 62 mailles au total ? et c'est coté encolure ou cotés emmanchures ? merci d'avance.
14.08.2018 - 13:03DROPS Design answered:
Bonjour Mme Varnier, on rabat les mailles des épaules en début de rang à partir des épaules. Toutes les mailles seront rabattues après les 4 x 6 m et 1x7 m (= on a 31 m pour l'épaule). Bon tricot!
14.08.2018 - 16:15Ohje täsmennys. Taka kpl. Kun työn pituus on 21cm, LUO 2 SEURAAVAN KERROKSEN LOPPUUN kumpaakin reunaan 1 reunasulmukka.. Mitä tarkoittaa tuo isolla kirjoitettu kohta.
04.07.2018 - 15:27DROPS Design answered:
Hei, tämä tarkoittaa, että työn kumpaankin reunaan luodaan kahden seuraavan kerroksen aikana 1 silmukka. Eli uusi silmukka luodaan aina kerroksen lopussa.
05.07.2018 - 14:07Ich bin total begeistert von Ihrer Strickjacke und würde sie gerne nachstricken! Allerdings sollte meine "Traumjacke" auch unbedingt eine Kapuze haben, nur leider habe diesbezüglich noch gar keine Strick-Erfahrung. Wäre es grundsätzlich möglich, an diese Jacke eine Kapuze anzustricken oder würde das eher merkwürdig aussehen? Über eine Antwort würde ich mich sehr freuen und verbleibe mit freundlichen Grüßen
23.04.2018 - 17:24DROPS Design answered:
Liebe Frau Joseph, hier finden Sie unsere Modellen für Jacke mit Kapuzen, so können Sie sich am besten entscheiden. Viel Spaß beim stricken!
24.04.2018 - 08:42Snap niets van het minderen van de hals. Wanneer gebruik ik; minder als volgt VOOR 7 voorbiessteken 2 recht samen? Ik brei de XXL ik minder dus elke 4e naald 5x en daarna 13x een steek om de naald dus 18 steken. Ik minder dus met na de voorbies een steek over te halen. Dus wanneer minder ik VOOR de voorbies 2 steken samen breien?
29.03.2018 - 00:08DROPS Design answered:
Dag Marion, Als je aan de goede kant breit en je bent vlak voor de voorbiessteken als je moet minderen, dan brei je 2 steken samen. Dat is dus op het linker voorpand (gezien als het kledingstuk gedragen wordt.)
29.03.2018 - 11:32Ich bin total begeistert von Ihrer Strickjacke und würde sie gerne nachstricken! Allerdings sollte meine "Traumjacke" auch unbedingt eine Kapuze haben, nur leider habe diesbezüglich noch gar keine Strick-Erfahrung. Wäre es grundsätzlich möglich, an diese Jacke eine Kapuze anzustricken oder würde das eher merkwürdig aussehen? Über eine Antwort würde ich mich sehr freuen und verbleibe mit freundlichen Grüßen
21.03.2018 - 19:34Ciao, quanti grammi mi servono per un cardigan taglia S o M più corto di 10 cm? Grazie
08.03.2018 - 21:49DROPS Design answered:
Buongiorno Federica. Per richieste relative ai quantitativi necessari in seguito a modifiche al modello, può rivolgersi al suo rivenditore Drops di fiducia. Buon lavoro!
09.03.2018 - 09:05Zijn de stekenvoor de mouwen nu al aangepast?
28.11.2017 - 15:36DROPS Design answered:
Hallo Wia, Het stekenaantal blijkt toch te kloppen. Vanwege wijdere schouders en laag ingezette mouwen, zijn de armsagten kleiner dan in andere patronen. Natuurlijk ben je vrij om dit naar eigen inzicht aan te passen. Hallo Wia, Nee, de steken voor de mouwen zijn nog niet aangepast. Het is doorgegeven aan designafdeling en als er aanpassingen op een patroon zijn, kun je die vinden bij het tabblad correcties, rechts naast de afbeelding van het patroon.
29.11.2017 - 08:01Hej! Jag har fått förlänga ärmen och axelpartiet för att koftan ska passa och undrar hur många maskor det är tänkt att man ska ha kvar när ärmen maskas av.
26.11.2017 - 12:03DROPS Design answered:
Hei Amanda. Det kommer an på hvilken størrelse du strikker. I oppskriften står det: Gjenta økningen på hver 5½.-4.-4.-3.-2½.-2.cm totalt 6-8-8-10-11-12 ganger = 46-50-54-58-64-66 masker. Når arbeidet måler 37-37-36-35-34-32 cm, felles det av til ermtopp på begynnelsen av hver pinne, se oppskriften for nærmere beskrivelse. God Fornøyelse!
29.11.2017 - 14:28Ik ben bij de mouwen aangekomen. In het patroon staat "kant dan 3 steken af aan elke kant tot het werk ongeveer 42 cm meet in alle maten" Betekent dit doorgaan met 3 steken minderen tot gewenste lengte of tot steken op? Of betekent het beide kanten 3 steken minderen en dan doorbreien tot gewenste lengte?
24.11.2017 - 14:09DROPS Design answered:
Hallo Danielle, Je kant 3 steken af, dan een aantal keren 2 steken (afhankelijk van je maat) en daarna inderdaad steeds 3 steken aan beide kanten tot de gewenste lengte.
27.11.2017 - 09:52