
Popular categories
Looking for a yarn?


|
|
Evening Promenade |
|
|
|
|
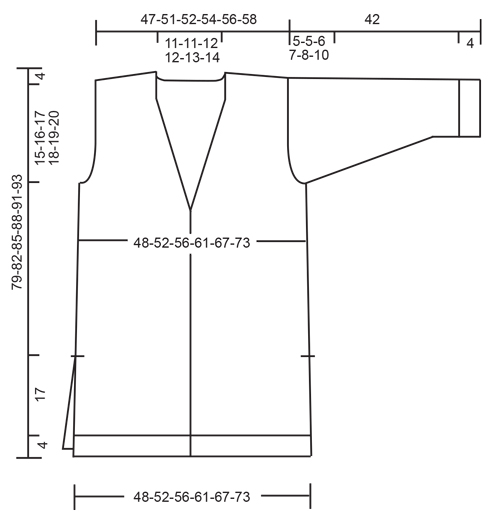
Jacket with deep v-neck and pockets in DROPS Air. Size: S - XXXL
DROPS 176-14 |
|
|
GARTER STITCH (back and forth): 1 ridge = knit 2 rows. DECREASE TIP (applies to neck): Decrease inside 7 band stitches in garter stitch. All decreases are done from the right side. Decrease as follows after 7 band stitches: Slip 1 stitch knitwise, knit 1, pass slipped stitch over stitch worked. Decrease as follows before 7 band stitches: Knit 2 together. INCREASE TIP: Increase 1 stitch by making 1 yarn over, on next row work yarn over twisted to avoid holes. BUTTONHOLES: Decrease for buttonholes on right band. 1 BUTTONHOLE = knit third and fourth stitch from edge together and make 1 yarn over. On next row knit yarn over = hole. Decrease for buttonholes when piece measures: S: 6, 15, 23, 31, 39, 47 and 55 cm M: 5, 13, 22, 30, 39, 47 and 56 cm L: 5, 14, 23, 32, 41, 50 and 59 cm. XL: 4, 12, 20, 28, 36, 44, 52 and 60 cm. XXL: 3, 11, 20, 28, 37, 45, 54 and 62 cm. XXXL: 5, 13, 22, 30, 38, 46, 55 and 63 cm. ---------------------------------------------------------- BACK PIECE: Work piece back and forth on circular needle. Cast on 90-98-106-114-122-134 stitches on circular needle size 4.5 mm with Air. Purl 1 row from wrong side, then work as follows - from right side: 4 stitches in GARTER STITCH - see explanation above, knit 2, * purl 2, knit 2 *, repeat from *-* until 4 stitches remain, finish with 4 stitches in garter stitch. Work rib and garter stitch for 4 cm, then switch to circular needle size 5 mm. Knit 1 row with 4 stitches in garter stitch in each side while decreasing 8-10-10-10-8-10 stitches evenly, do not decrease over stitches in garter stitches = 82-88-96-104-114-124 stitches. Continue in stocking stitch with 4 stitches in garter stitch in each side. REMEMBER THE KNITTING TENSION When piece measures 21 cm, cast on 1 edge stitch in each side at the end of the next 2 rows = 84-90-98-106-116-126 stitches. Then work in stocking stitch with 1 edge stitch in garter stitch in each side of piece. When piece measures 60-62-64-66-68-69 cm, cast off for armholes in each side on every other row as follows: 2-2-3-3-3-3 stitches 1 time, 2 stitches 0-0-1-2-3-4 times and 1 stitch 0-0-0-0-1-3 times = 80-86-88-92-96-98 stitches. When piece measures 75-78-81-84-87-89 cm, begin by working in garter stitch over neck AT THE SAME TIME begin cast off for diagonal shoulder. Work as follows: NECK: Work 3 ridges over the middle 30-30-32-32-34-36 stitches (work the other stitches as before) then cast off the middle 16-16-18-18-20-22 stitches for neck and finish each shoulder separately. Then decrease 1 stitch inside 7 stitches in garter stitch on next row towards neck - Read DECREASE TIP! DIAGONAL SHOULDER: Cast off on every other row for diagonal shoulder as follows: 6-6-6-7-7-7 stitches 4 times, 7-10-10-8-9-9 stitches 1 time (= 31-34-34-36-37-37 stitches in total cast off for diagonal shoulder.) Repeat in the other side. RIGHT FRONT PIECE: Work piece back and forth on circular needle. Cast on 53-57-61-65-69-73 stitches (including 7 band stitches) on circular needle size 4.5 mm with Air. Purl 1 row from wrong side, then work as follows - from right side: 7 band stitches in garter stitch, knit 2, * purl 2, knit 2 *, repeat from *-* until 4 stitches remain, finish with 4 stitches in garter stitch. Work rib and garter stitch for 4 cm - REMEMBER BUTTONHOLE - see explanation above. Then switch to circular needle size 5 mm. Work 1 row in stocking stitch with garter stitch in each side while decreasing 5-6-6-6-5-4 stitches evenly, do not decrease over stitches in garter stitches = 48-51-55-59-64-69 stitches. Continue in stocking stitch with garter stitch in each side as before. REMEMBER THE KNITTING TENSION When piece measures 21 cm, cast on 1 edge stitch at the end of next row from right side = 49-52-56-60-65-70 stitches. Then work in stocking stitch with 7 band stitches in garter stitch and 1 edge stitch in garter stitch in the side. When piece measures 57-58-60-62-64-65 cm, decrease for neck inside 7 band stitches - REMEMBER DECREASE TIP. Repeat decrease every 4th row 3-4-4-5-5-5 times in total and every other row 13-12-13-12-13-14 times in total - AT THE SAME TIME when piece measures 60-62-64-66-68-69 cm, cast off for armhole at the beginning of every row from wrong side as on back piece. When cast off for armhole and decrease for neck are done, there are 31-34-34-36-37-37 stitches on needle. When piece measures 75-78-81-84-87-89 cm, cast off for diagonal shoulder as on back piece. LEFT FRONT PIECE: Cast on and work as right front piece but reversed. I.e. cast off for armhole at beginning of row from right side. Decrease for neck inside band stitches at the end of row from right side. Cast off for diagonal shoulder at beginning of row from right side. Do not decrease for buttonholes. SLEEVE: Work piece back and forth on circular needle. Cast on 38-38-42-42-46-46 stitches (including 1 edge stitch in each side) on circular needle size 4.5 mm with Air. Purl 1 row from wrong side, then work rib (= knit 2/purl 2) with 1 edge stitch in garter stitch in each side. Work rib for 4 cm, then switch to circular needle size 5 mm. Knit 1 row while decreasing 4 stitches evenly = 34-34-38-38-42-42 stitches. Then work in stocking stitch with 1 edge stitch in garter stitch in each side. When piece measures 7-7-6-6-6-7 cm, increase 1 stitch on each side – see INCREASE TIP. Repeat increase every 5½-4-4-3-2½-2 cm 6-8-8-10-11-12 times in total = 46-50-54-58-64-66 stitches. When piece measures 37-37-36-35-34-32 cm (shorter measurements in the larger sizes because of longer sleeve cap and wider shoulders), cast off for sleeve cap at beginning of every row in each side as follows: Cast off 3 stitches 1 time, 2 stitches 4-4-3-5-6-8 times, then cast off 3 stitches in each side until piece measures approx. 42 cm in all sizes. Cast off. Work another sleeve. ASSEMBLY: Sew the shoulder seams. Sew in sleeves. Sew sleeve seams and side seams in one inside 1 edge stitch down to ridges in the side (= 21 cm vent). Sew the buttons on to the left band. POCKET: Worked back and forth. Cast on 38-38-38-40-40-40 stitches (including 1 edge stitch in each side) on circular needle size 5 mm with Air. Knit 1 row from wrong side. Then work in stocking stitch with 1 edge stitch in garter stitch in each side until piece measures 18-18-18-20-20-20 cm. Work 2 ridges, cast off. Work another pocket the same way. Sew pockets on to front piece, approx. 13-13-13-14-14-14 cm from bottom edge and 7-7-8-8-9-9-cm inn from mid front. |
|
|
|
|
Have you made this or any other of our designs? Tag your pictures in social media with #dropsdesign so we can see them! Do you need help with this pattern?You'll find tutorial videos, a Comments/Questions area and more by visiting the pattern on garnstudio.com. © 1982-2024 DROPS Design A/S. We reserve all rights. This document, including all its sub-sections, has copyrights. Read more about what you can do with our patterns at the bottom of each pattern on our site. |


With over 40 years in knitting and crochet design, DROPS Design offers one of the most extensive collections of free patterns on the internet - translated to 17 languages. As of today we count 304 catalogues and 11422 patterns - 11422 of which are translated into English (UK/cm).
We work hard to bring you the best knitting and crochet have to offer, inspiration and advice as well as great quality yarns at incredible prices! Would you like to use our patterns for other than personal use? You can read what you are allowed to do in the Copyright text at the bottom of all our patterns. Happy crafting!
Comments / Questions (53)
Hej gjort koftan men ärmarna är för smala för mig,och för korta. Jag förstår inte mönstret,gjort om armarna 3 ggr. Hjälp🙂
28.02.2021 - 20:25DROPS Design answered:
Hej Irene, Kan det være sådan at du ikke strikker med DROPS Air eller at du har flere end de 17 masker på 10 cm i bredden som vi bruger ifølge opskriften ?
03.03.2021 - 14:46Hallo Beim Rückenteil steht bei einer Länge 66cm beidseitig in jeder 2 Reihe abnehmen. Da ich ich ja am Anfang jeder Reihe abnehme heißt das, dass ich bei rechts an Anfang abnehme dann bei der linken auch und dann eine Reihe rechts und eine Reihe links ohne Abnahme stricke, da ich ja nur bei jeder zweiten Reihe abnehme? Danke schon mal. Steht gerade auf dem Schlauch.. 🙈
04.04.2020 - 21:47DROPS Design answered:
Liebe Katharina, für die Armausschnitte sollen Sie am Anfang der Hin- sowie der Rückreihen abketten, z.B. in die 1. Grösse ketten Sie 2 Maschen am Anfang der 2 nächsten Reihen (= Hin- + Rückreihen) = 2 Maschen werden beidseitig abgekettet. Viel Spaß beim stricken!
09.04.2020 - 13:28Could you please advise me on how many grams of yarn I need for a L size thank you
14.10.2019 - 12:19DROPS Design answered:
Dear Mary, for size L you need 500 grams of DROPS Air. Happy knitting!
14.10.2019 - 12:49Jeg strikkede den i str. XXL og brugte kun 500 g.
25.09.2019 - 20:53Bonjour Je ne vois pas dans ce modèle la quantité de pelotes nécessaire pour réaliser ce gilet ? Cordialement
10.08.2019 - 11:46DROPS Design answered:
Bonjour Mme Delépine. Selon la taille, vous aurez besoin de 400-450-500-550-650-700 g de laine Drops Air, qui correspondent à: 8-9-10-11-13-14 pelotes. Vous trouvez la quantité nécessaire à côté de la photo. Bon tricot!
10.08.2019 - 19:13Ihanan näköistä neuletta Angora Baruk Desing Alitse Real 40 -langalla. Pyörityksen suhteen ihmettelin. Kokoan neuleen ja katson hihat vielä.
24.07.2019 - 14:44Ik zie in veel patronen staan dat het op een rondbreinaald wordt gebreid. Maar in dit hele leuke patroon overigens, zie ik helemaal de toegevoegde waarde niet van een rondbreinaald. Ik heb ouderwets leren breien en dat gaat niet met rondbreinaalden, daarom kan ik er niet goed mee overweg. En daarom wil ik het op normale naalden breien. Dus als er staan brei heen en weer op rondbrei naald, kan het dan ook op gewone breinaalden? Alvast bedankt voor uw antwoord.
01.05.2019 - 22:47DROPS Design answered:
Dag Katja,
Soms worden ook rondbreinaalden aanbevolen bij het heen en weer breien als er heel veel steken op de naald staan. Dat is in dit patroon ook de enige reden, dus als je het aantal steken geen probleem vindt, kun je dit patroon prima op rechte naalden breien.
05.05.2019 - 17:48Voor maat XL zijn er na het minderen voor de armsgaten slechts 90 steken over ipv. 92. Je begint met 104 steken minder aan beide kanten 1x3= 6 steken en 2x2=8 steken, in totaal 14 steken.
08.03.2019 - 16:17Vielen Dank für die schnelle Antwort. Ich bin nur deshalb etwas irritiert, weil in der Beschreibung GLEICHZEITIG steht. Da steht ja, dass über die mittleren 30 Krausrippe gestrickt werden soll und GLEICHZEITIG für die Schulterschräge abgekettet werden soll. Bei Ihrer Erklärung hört es sich aber so an, als müsste ich zuerst die Krausrippen stricken und ANSCHLIEßEND mit dem Abketten für die Schulterschräge beginnen.
10.10.2018 - 14:08Ich verstehe die Passage des Halsausschnittes nicht. (Meine Anzahl der Maschen beträgt 90 an dieser Stelle). Stricke ich nach 75 cm also wie folgt: 6 Maschen abnehmen, dann über die ersten 30, dann über die mittleren 30, die letzten 30, wenden...6 M abnehmen und zurück? Oder: 6 Maschen abnehmen, über die ersten 30, dann die mittleren 30 und zurück? Verstehe diesen Teil leider nicht. Ich bitte um detaillierte Erklärung.
09.10.2018 - 20:17DROPS Design answered:
Liebe Susanne, in der 1. Größe haben Sie 80 M vor dem Halsauschnitt, dann stricken Sie die nächsten 6 Reihen wie zuvor aber die mittleren 30 Maschen sollen krausrechts gestrickt (= bei den Rückreihen werden diese mittleren 30 M rechts getrickt). Dann werden die mittleren 16 Maschen abgekettet (= 7 M kraus rechts auf beiden Seiten dieser 16 M). Dann jede Schulter einzeln fertig stricken: Am Anfang jeder Reihe von der Seite (= gegen Armausschnitt) 6 M. 4 x und 7 M 1 x abketten. Viel Spaß beim stricken!
10.10.2018 - 09:19