
Popular categories
Looking for a yarn?


|
|
Evening Promenade |
|
|
|
|
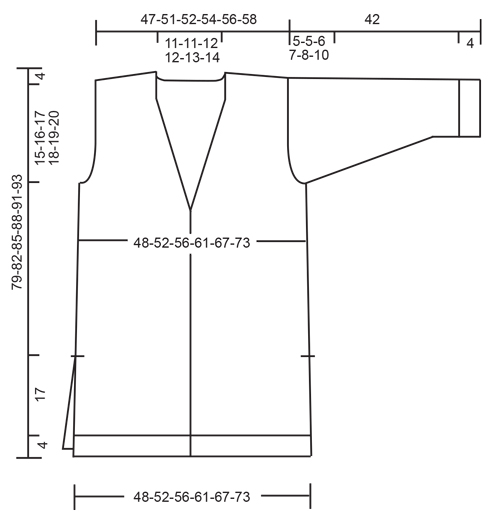
Jacket with deep v-neck and pockets in DROPS Air. Size: S - XXXL
DROPS 176-14 |
|
|
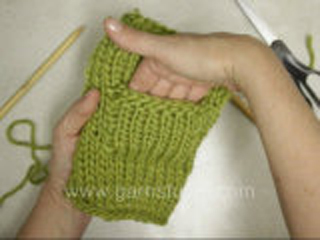
GARTER STITCH (back and forth): 1 ridge = knit 2 rows. DECREASE TIP (applies to neck): Decrease inside 7 band stitches in garter stitch. All decreases are done from the right side. Decrease as follows after 7 band stitches: Slip 1 stitch knitwise, knit 1, pass slipped stitch over stitch worked. Decrease as follows before 7 band stitches: Knit 2 together. INCREASE TIP: Increase 1 stitch by making 1 yarn over, on next row work yarn over twisted to avoid holes. BUTTONHOLES: Decrease for buttonholes on right band. 1 BUTTONHOLE = knit third and fourth stitch from edge together and make 1 yarn over. On next row knit yarn over = hole. Decrease for buttonholes when piece measures: S: 6, 15, 23, 31, 39, 47 and 55 cm M: 5, 13, 22, 30, 39, 47 and 56 cm L: 5, 14, 23, 32, 41, 50 and 59 cm. XL: 4, 12, 20, 28, 36, 44, 52 and 60 cm. XXL: 3, 11, 20, 28, 37, 45, 54 and 62 cm. XXXL: 5, 13, 22, 30, 38, 46, 55 and 63 cm. ---------------------------------------------------------- BACK PIECE: Work piece back and forth on circular needle. Cast on 90-98-106-114-122-134 stitches on circular needle size 4.5 mm with Air. Purl 1 row from wrong side, then work as follows - from right side: 4 stitches in GARTER STITCH - see explanation above, knit 2, * purl 2, knit 2 *, repeat from *-* until 4 stitches remain, finish with 4 stitches in garter stitch. Work rib and garter stitch for 4 cm, then switch to circular needle size 5 mm. Knit 1 row with 4 stitches in garter stitch in each side while decreasing 8-10-10-10-8-10 stitches evenly, do not decrease over stitches in garter stitches = 82-88-96-104-114-124 stitches. Continue in stocking stitch with 4 stitches in garter stitch in each side. REMEMBER THE KNITTING TENSION When piece measures 21 cm, cast on 1 edge stitch in each side at the end of the next 2 rows = 84-90-98-106-116-126 stitches. Then work in stocking stitch with 1 edge stitch in garter stitch in each side of piece. When piece measures 60-62-64-66-68-69 cm, cast off for armholes in each side on every other row as follows: 2-2-3-3-3-3 stitches 1 time, 2 stitches 0-0-1-2-3-4 times and 1 stitch 0-0-0-0-1-3 times = 80-86-88-92-96-98 stitches. When piece measures 75-78-81-84-87-89 cm, begin by working in garter stitch over neck AT THE SAME TIME begin cast off for diagonal shoulder. Work as follows: NECK: Work 3 ridges over the middle 30-30-32-32-34-36 stitches (work the other stitches as before) then cast off the middle 16-16-18-18-20-22 stitches for neck and finish each shoulder separately. Then decrease 1 stitch inside 7 stitches in garter stitch on next row towards neck - Read DECREASE TIP! DIAGONAL SHOULDER: Cast off on every other row for diagonal shoulder as follows: 6-6-6-7-7-7 stitches 4 times, 7-10-10-8-9-9 stitches 1 time (= 31-34-34-36-37-37 stitches in total cast off for diagonal shoulder.) Repeat in the other side. RIGHT FRONT PIECE: Work piece back and forth on circular needle. Cast on 53-57-61-65-69-73 stitches (including 7 band stitches) on circular needle size 4.5 mm with Air. Purl 1 row from wrong side, then work as follows - from right side: 7 band stitches in garter stitch, knit 2, * purl 2, knit 2 *, repeat from *-* until 4 stitches remain, finish with 4 stitches in garter stitch. Work rib and garter stitch for 4 cm - REMEMBER BUTTONHOLE - see explanation above. Then switch to circular needle size 5 mm. Work 1 row in stocking stitch with garter stitch in each side while decreasing 5-6-6-6-5-4 stitches evenly, do not decrease over stitches in garter stitches = 48-51-55-59-64-69 stitches. Continue in stocking stitch with garter stitch in each side as before. REMEMBER THE KNITTING TENSION When piece measures 21 cm, cast on 1 edge stitch at the end of next row from right side = 49-52-56-60-65-70 stitches. Then work in stocking stitch with 7 band stitches in garter stitch and 1 edge stitch in garter stitch in the side. When piece measures 57-58-60-62-64-65 cm, decrease for neck inside 7 band stitches - REMEMBER DECREASE TIP. Repeat decrease every 4th row 3-4-4-5-5-5 times in total and every other row 13-12-13-12-13-14 times in total - AT THE SAME TIME when piece measures 60-62-64-66-68-69 cm, cast off for armhole at the beginning of every row from wrong side as on back piece. When cast off for armhole and decrease for neck are done, there are 31-34-34-36-37-37 stitches on needle. When piece measures 75-78-81-84-87-89 cm, cast off for diagonal shoulder as on back piece. LEFT FRONT PIECE: Cast on and work as right front piece but reversed. I.e. cast off for armhole at beginning of row from right side. Decrease for neck inside band stitches at the end of row from right side. Cast off for diagonal shoulder at beginning of row from right side. Do not decrease for buttonholes. SLEEVE: Work piece back and forth on circular needle. Cast on 38-38-42-42-46-46 stitches (including 1 edge stitch in each side) on circular needle size 4.5 mm with Air. Purl 1 row from wrong side, then work rib (= knit 2/purl 2) with 1 edge stitch in garter stitch in each side. Work rib for 4 cm, then switch to circular needle size 5 mm. Knit 1 row while decreasing 4 stitches evenly = 34-34-38-38-42-42 stitches. Then work in stocking stitch with 1 edge stitch in garter stitch in each side. When piece measures 7-7-6-6-6-7 cm, increase 1 stitch on each side – see INCREASE TIP. Repeat increase every 5½-4-4-3-2½-2 cm 6-8-8-10-11-12 times in total = 46-50-54-58-64-66 stitches. When piece measures 37-37-36-35-34-32 cm (shorter measurements in the larger sizes because of longer sleeve cap and wider shoulders), cast off for sleeve cap at beginning of every row in each side as follows: Cast off 3 stitches 1 time, 2 stitches 4-4-3-5-6-8 times, then cast off 3 stitches in each side until piece measures approx. 42 cm in all sizes. Cast off. Work another sleeve. ASSEMBLY: Sew the shoulder seams. Sew in sleeves. Sew sleeve seams and side seams in one inside 1 edge stitch down to ridges in the side (= 21 cm vent). Sew the buttons on to the left band. POCKET: Worked back and forth. Cast on 38-38-38-40-40-40 stitches (including 1 edge stitch in each side) on circular needle size 5 mm with Air. Knit 1 row from wrong side. Then work in stocking stitch with 1 edge stitch in garter stitch in each side until piece measures 18-18-18-20-20-20 cm. Work 2 ridges, cast off. Work another pocket the same way. Sew pockets on to front piece, approx. 13-13-13-14-14-14 cm from bottom edge and 7-7-8-8-9-9-cm inn from mid front. |
|
|
|
|
Have you made this or any other of our designs? Tag your pictures in social media with #dropsdesign so we can see them! Do you need help with this pattern?You'll find tutorial videos, a Comments/Questions area and more by visiting the pattern on garnstudio.com. © 1982-2024 DROPS Design A/S. We reserve all rights. This document, including all its sub-sections, has copyrights. Read more about what you can do with our patterns at the bottom of each pattern on our site. |


With over 40 years in knitting and crochet design, DROPS Design offers one of the most extensive collections of free patterns on the internet - translated to 17 languages. As of today we count 304 catalogues and 11422 patterns - 11422 of which are translated into English (UK/cm).
We work hard to bring you the best knitting and crochet have to offer, inspiration and advice as well as great quality yarns at incredible prices! Would you like to use our patterns for other than personal use? You can read what you are allowed to do in the Copyright text at the bottom of all our patterns. Happy crafting!
Comments / Questions (53)
Kan ik de parelmoeren knopen ook bestellen?
10.02.2024 - 10:52DROPS Design answered:
Dag Jacqueline,
Het bestellen van garens en knopen e.d. gaat via een van de verkooppunten die onze artikelen verkopen; wij verkopen geen materialen via de site. Via deze link vind je een lijst met verkooppunten.
10.02.2024 - 18:14Jag håller med Gisella angående ärmarna. Jag gjorde om en gång och ökade maskorna till 64 i stl L. Om man vill ha en tröja under koftan, blir det väldigt trångt. Ni brukar ha pålitliga mönster, men här får man vara flexibel, om man har någorlunda normala armar.
22.08.2023 - 23:33Hallo, Lenne egy kérdésem. Nem értem a minta leírását. A hátánál 21 cm-nél van 82 szem, leláncolok egy szélszemet a következő 2 sorban a darab mindkét oldalán, marad 84 szem. Hogy lesz 2-vel több szem ha 4 szemet leláncolok? Köszömöm előre is a válasz.
06.01.2023 - 11:25DROPS Design answered:
Kedves Éva! Köszönjük a kérdését. Javítottuk a mintát, azt a két szemet nem leláncolni kell, hanem a sor két szélén egy-egy szemet fel kell szedni szélszemnek. A leírást javítottuk. Sikeres kézimunkázást!
20.03.2023 - 07:13Hej, Ärmarna är alldeles för smala och korta. Jag stickar med Drops Air och har gjort enligt mönstret. Räknat maskor och centimetrar flera gånger om, men ändå blir det alldeles för litet och trångt. Nu repar jag upp. Ganska irriterande.
18.11.2022 - 21:29DROPS Design answered:
Hei Gisella. Denne jakken har 3/4 armer og skal være ca 42 cm. Sjekk ut målskissen nederst på oppskriften. Passer din strikkefasthet med det som står i oppskriften? 17 masker og 22 pinner glattstrikk på 10 cm i bredden og 10 cm i høyden? mvh DROPS Design
21.11.2022 - 11:01Hello, I have followed the pattern to make the back and both front pieces and they are fine, however I have made a sleeve and it is too narrow. The sleeve cap will not fit the armhole opening, it's too small. I have the correct tension. I used google translate and it appears someone else has had the same problem but I wasn't able to find an answer. Could you please advise if I can fix this by adding more stitches to the sleeve width and how many should I add. Thank you
18.11.2022 - 16:35DROPS Design answered:
Dear Janette, it's not a problem of the sleeve cap; the armhole itself for this model is quite narrow. So you would need to change the armhole's width (not just the sleeve cap). You could check out the following model: https://www.garnstudio.com/pattern.php?id=7129&cid=19 to try if the sleeve will fit better. We will get in touch with the design department to check that there is no problem with the measurements. Happy knitting!
20.11.2022 - 23:52Guten Tag, kurze Frage, muss die Jacke hängend oder liegend gemessen werden? Danke!
01.11.2022 - 11:04DROPS Design answered:
Liebe Anastasia, mit dieser Wolle sollte es keinen Unterschied (oder so wenig) zwischen hängend/liegend sein. Viel Spaß beim stricken!
01.11.2022 - 15:31Liebes DROPS-Team, es heißt "für die Armkugel am Anfang jeder Reihe, d.h. beidseitig, wie folgt abketten: 3 Maschen 1 x, 2 Maschen 4-4-3-5-6-8 x, dann je 3 Maschen beidseitig bis zu einer Länge von ca, 42cm... " Heißt das, man soll vorne und hinten je 3 M abketten (6M), danach je 2 M vorne UND hinten (z.b. bei XXL 12M)? Ist ein bisschen unklar, ob die 2 M auch beidseitig abgekettet werden sollen. Vielen Dank für Eure Hilfe!
21.10.2022 - 20:40DROPS Design answered:
Liebe Marie Luise, die Maschen sollen Sie am Anfang jeder Reihen, dh jeder Hin- sowie jeder Rückreihen abketten, damit dieselbe Maschananzahl beidseitig abgekettet wird, dh in XXL ketten Sie 3 Maschen am Anfang der 2 ersten Reihen (3 M x 1 beiseitig) dann 2 Maschen am Anfang der 12 nächsten Reihen (dh 2 M x 6 beidseitig) ab; dann ketten Sie 3 Maschen am Anfang der 2 nächsten Reihen bis die Arbeit 42 cm misst. Viel Spaß beim stricken!
24.10.2022 - 07:41Går det att göra den med full längd på ärmarna? Hur ska jag gå tillväga då i storlek S?
10.08.2022 - 17:27DROPS Design answered:
Hej Elin, da kan du strikke 8 cm mere (eller ønsket længde) inden du begynder med ærmkullen :)
11.08.2022 - 08:37Vielen Dank für die schnelle Antwort. LG Claudia
23.01.2022 - 11:32Hallo. Ich würde gern wissen,ob beim Rückenteil nach 21 cm nur noch rechte Maschen gestrickt werden, oder die 4 kraus rechts Maschen weiter gestrickt werden? LG Claudia
09.01.2022 - 23:25DROPS Design answered:
Liebe Claudia, wenn Sie die eine Randmasche beidseitig angeschlagen haben, stricken Sie glatt rechts mit je 1 Randmasche Krausrechts beidsetig weiter. Viel Spaß beim stricken!
10.01.2022 - 09:06