
Popular categories
Looking for a yarn?


|
|||||||||||||||||||||||||||||||||||||||||||||||||
See You Soon |
|||||||||||||||||||||||||||||||||||||||||||||||||
 |
 |
||||||||||||||||||||||||||||||||||||||||||||||||
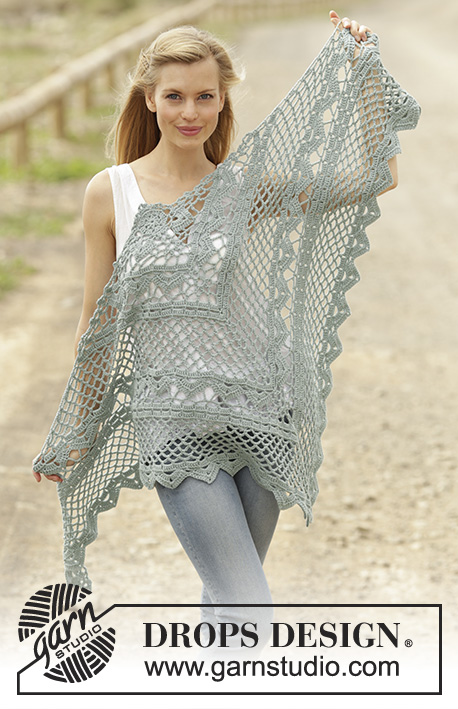
Shawl with lace pattern, crochet from the top down in DROPS Cotton Merino.
DROPS 175-11 |
|||||||||||||||||||||||||||||||||||||||||||||||||
|
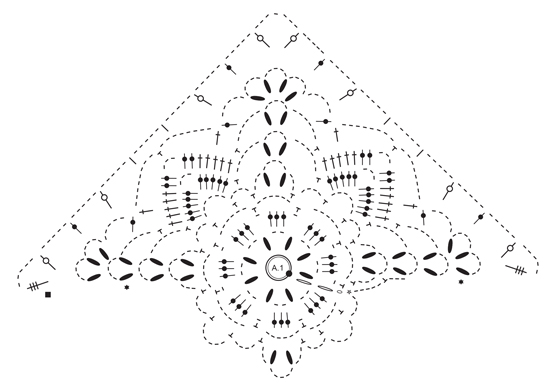
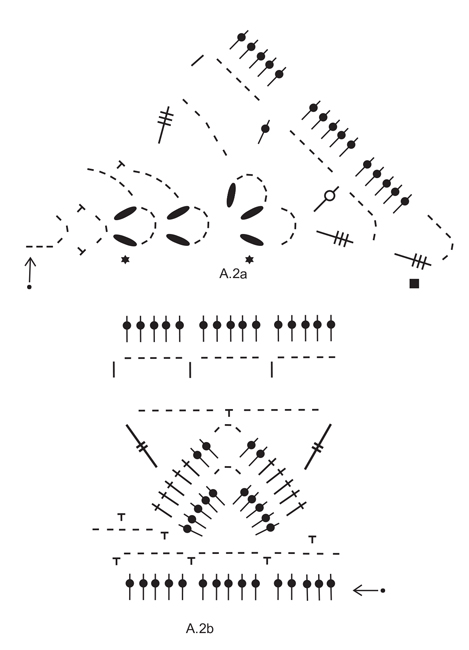
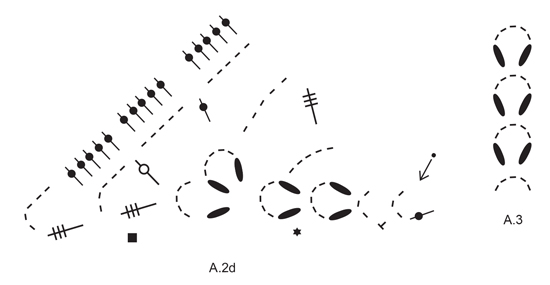
PATTERN: See diagrams A.1 to A.3. ---------------------------------------------------------- SHAWL: Beg with Cotton Merino on hook size 4 mm and work pattern in the round according to diagram A.1. Work chain stitch ring and the first four round in the round, then work the rest of shawl back and forth. REMEMBER THE CROCHET TENSION! When entire A.1 has been worked, continue from first row in diagrams as follows: Work A.2a (3 chain stitches = 1 treble and 3 chain stitches), work A.2b 3 repetitions in total in width (i.e. 5 trebles around each of the first 9 chain spaces), work A.2c (= 3 chain stitches), then work the first 5 trebles in A.2b around same chain space (i.e. the middle chain space), then continue with A.2b until 3 repetitions have been worked in total in width (i.e. 5 trebles around each of the next 8 chain spaces), work A.2d around the last chain space = 46 trebles on each side of the middle chain space. Continue back and forth with A.2a to A.2b. When diagrams have been worked vertically, there are 75 trebles on each side of the middle chain space. Now continue as follows: ROW 1 (from wrong side): Work 7 chain stitches, 1 double crochet around chain space, * work 5 chain stitches, skip 5 trebles, 1 double crochet *, repeat from *-* 14 more times, but work last double crochet around the middle chain space on shawl, 3 chain stitches, 1 double crochet around same chain space, * work 5 chain stitches, skip 5 trebles, work 1 double crochet *, repeat from *-* 14 more times, work 6 chain stitches, 1 double crochet around last chain space. There are now 16 chain spaces on each side of chain space in the middle of shawl. ROW 2: Work 7 chain stitches, * 5 trebles around first/next chain space *, repeat from *-* 15 more times, work (5 trebles, 3 chain stitches, 5 trebles) around chain space in the middle of shawl, * work 5 trebles around first/next chain space *, repeat from *-* 15 more times, work 5 trebles around last chain space, work 4 chain stitches and 1 treble around the last chain space on row. There are now 85 trebles on each side of chain space in the middle of shawl. ROW 3: Work 11 chain stitches, 1 double crochet around first chain space, * 6 chain stitches, skip 5 trebles, 1 double crochet *, repeat from *-* 15 more times, work 6 chain stitches, A.3 around the middle chain space. Continue with * 6 chain stitches, skip 5 trebles, 1 double crochet *, repeat from *-* 15 more times, work 6 chain stitches, 1 double crochet around last chain space, 8 chain stitches, 1 treble around last chain space. There are now 18 chain spaces on each side of A.3. ROW 4: Work 11 chain stitches, 1 double crochet around first chain space, * 6 chain stitches, 1 double crochet around next chain space *, repeat from *-* until chain space in the middle of shawl, work 6 chain stitches, A.3 around chain space in the middle of shawl. Then work * 6 chain stitches, 1 double crochet around next chain space *, repeat from *-* until last chain space, 6 chain stitches, 1 double crochet around last chain space, 8 chain stitches, 1 treble around last chain space. Repeat 4th row 7 more times, but on every row worked repeat *-* 1 more time (i.e. on every row worked there is 1 chain space more on each side of A.3) = 9 rows in total with chain spaces and 26 chain spaces on each side of A.3. Now work pattern from first row in diagrams A.2, the same way as before, but work more repetitions in width as follows: Work A.2a (3 chain stitches = 1 treble and 3 chain stitches), work A.2b 9 repetitions in total in width (i.e. 5 trebles around each of the first 27 chain spaces), work A.2c (= 3 chain stitches), then work the first 5 trebles in A.2b around same chain space (i.e. the middle chain space), then continue with A.2b until 9 repetitions have been worked in total in width (i.e. 5 trebles around each of the next 26 chain spaces), work A.2d around the last chain space = 136 trebles on each side of the middle chain space. Continue back and forth with A.2a to A.2d. When diagrams have been worked vertically, there are 165 trebles on each side of the middle chain space. Now continue as follows: ROW 1 (from wrong side): Work 7 chain stitches, 1 double crochet around chain space, * work 5 chain stitches, skip 5 trebles, 1 double crochet *, repeat from *-* 32 more times, but work last double crochet around the middle chain space on shawl, 3 chain stitches, 1 double crochet around same chain space, * work 5 chain stitches, skip 5 trebles, work 1 double crochet *, repeat from *-* 32 more times, work 6 chain stitches, 1 double crochet around last chain space. There are now 34 chain spaces on each side of chain space in the middle of shawl. ROW 2: Work 7 chain stitches, * 5 trebles around first/next chain space *, repeat from *-* 33 more times, work (5 trebles, 3 chain stitches, 5 trebles) around chain space in the middle of shawl, * work 5 trebles around first/next chain space *, repeat from *-* 33 more times, work 5 trebles around last chain space, work 4 chain stitches and 1 treble around the last chain space on row. There are now 175 trebles on each side of increase in the middle of shawl. ROW 3: Work 11 chain stitches, 1 double crochet around first chain space, * 6 chain stitches, skip 5 trebles *, repeat from *-* 33 more times, work 6 chain stitches, A.3 around the middle chain space. Continue with * 6 chain stitches, skip 5 trebles, 1 double crochet *, repeat from *-* 33 more times, work 6 chain stitches, 1 double crochet around last chain space, 8 chain stitches, 1 treble around last chain space. There are now 36 chain spaces on each side of A.3. ROW 4: Work 11 chain stitches, 1 double crochet around first chain space, * 6 chain stitches, 1 double crochet around next chain space *, repeat from *-* until chain space in the middle of shawl, work 6 chain stitches, A.3 around chain space in the middle of shawl. Then work * 6 chain stitches, 1 double crochet around next chain space *, repeat from *-* until last chain space, 6 chain stitches, 1 double crochet around last chain space, 8 chain stitches, 1 treble around last chain space. Repeat 4th row 7 more times, but on every row worked repeat *-* 1 more time (i.e. on every row worked there is 1 chain space more on each side of the middle chain space) = 9 rows in total with chain spaces and 44 chain spaces on each side of A.3. Now work pattern from first row in diagrams A.2, the same way as before, but work more repetitions in width as follows: Work A.2a (3 chain stitches = 1 treble and 3 chain stitches), work A.2b 15 repetitions in total in width (i.e. 5 trebles around each of the next 45 chain spaces), work A.2c (= 3 chain stitches), then work the first 5 trebles in A.2b around same chain space (i.e. the middle chain space), then continue with A.2b until 15 repetitions have been worked in total in width (i.e. 5 trebles around each of the next 44 chain spaces), work A.2d around the last chain space = 226 trebles on each side of the middle chain space. Continue back and forth with A.2a to A.2d. Finish after 4th row in diagrams. Fasten off. |
|||||||||||||||||||||||||||||||||||||||||||||||||
Diagram explanations |
|||||||||||||||||||||||||||||||||||||||||||||||||
|
|||||||||||||||||||||||||||||||||||||||||||||||||
|
|||||||||||||||||||||||||||||||||||||||||||||||||
|
|||||||||||||||||||||||||||||||||||||||||||||||||

|
|||||||||||||||||||||||||||||||||||||||||||||||||
|
|||||||||||||||||||||||||||||||||||||||||||||||||
|
Have you made this or any other of our designs? Tag your pictures in social media with #dropsdesign so we can see them! Do you need help with this pattern?You'll find tutorial videos, a Comments/Questions area and more by visiting the pattern on garnstudio.com. © 1982-2024 DROPS Design A/S. We reserve all rights. This document, including all its sub-sections, has copyrights. Read more about what you can do with our patterns at the bottom of each pattern on our site. |
|||||||||||||||||||||||||||||||||||||||||||||||||


With over 40 years in knitting and crochet design, DROPS Design offers one of the most extensive collections of free patterns on the internet - translated to 17 languages. As of today we count 304 catalogues and 11422 patterns - 11422 of which are translated into English (UK/cm).
We work hard to bring you the best knitting and crochet have to offer, inspiration and advice as well as great quality yarns at incredible prices! Would you like to use our patterns for other than personal use? You can read what you are allowed to do in the Copyright text at the bottom of all our patterns. Happy crafting!
Comments / Questions (76)
Laura wrote:
Hello, I need some help. On diagram A.2a, after the ch 6, what do I do? It looks like I have to work the sc, ch 3, sc on top of the chains I just made. That confuses me. Also, where in the A1 diagram is this supposed to be attached to? Do I work A.2a on top of the last row of A1? Do I work it separately? I really, really can’t figure this out.
26.01.2018 - 16:17DROPS Design answered:
Dear Laura, when working 1st row in diagram A.2, work A.2a (= 6 chains), then repeat A.2b (starting with 5 dc around next ch-space) around the next 9 ch-spaces, work A.2c (= 3 chains) work the first 5 dc arouns ame ch-space (= the 3 chains in A.2c = the middle ch-spaces), and continue with A.2b until last ch-space, and work A.2c around last ch-space (= 3 ch, 1 dc). Turn and work now 2nd row in each diagram reading from the left towards the right (from WS). Happy crocheting!
29.01.2018 - 08:34Jeg fant ut feilen jeg gjorde. Jeg tulla med hvor halvstavene skulle plasseres. Glemte de i mellomrommene mellom trippelstavene. Beklager! Kanskje lurt å slette innleggene mine😉
13.11.2017 - 22:17DROPS Design answered:
Hei Karina. Så fint at du fant du hva du gjorde feil og kan fortsette videre med dette flott sjalet. God Fornøyelse. mvh Drops design
14.11.2017 - 08:10Hi. I have finished A1. But I don't understand where A2a should be attached to A1? The instructions for A2a say to start with a double crochet , chain 3. Is that a row ? where do we connect it to A1?
09.11.2017 - 00:33DROPS Design answered:
Dear Mrs Rodriguez, start reading A.2a at the arrow: 6 chains, then repeat A.2b starting at the arrow (= 5 dc around each of the next 27 ch-space), then work A.2c (= 3 ch on 1st row), repeat A.2b as before, and finish with A.2d = 3 ch, 1 dc in last st= 136 dc on each side of A.2c (= middle ch-space). On next row work: A.2d, A.2b, A.2c, A.2b, and A.2a. Happy crocheting!
09.11.2017 - 09:12Lynn Peckham wrote:
Hi, I've done A1, but I'm struggling to understand how to continue. After A1 I'm not sure how toolkit he diagrammatic for A2 etc. Please advise. Regards
17.09.2017 - 17:23DROPS Design answered:
Dear Lynn. after pattern A.1 continue with pattern A.2a (from the small arrow - 3 ch sts, 1 tr, 3 ch sts), then 5 tr in each ch-space 9 times (a.2B), 3 ch sts (A.2c), 5 tr into the same ch-space, which is the middle ch-space (the first 5 tr of pattern A.2B, continue with 5 tr into each of the next 8 ch-space (= A.2B, 3 times, and finish with the A2D pattern in the last ch-space. Continue back and forth with A.2a to A.2b. I hope this helps. Happy Crocheting.
18.09.2017 - 00:12Heb A1af. Als ik verder ga lees ik A2a (3 lossen=1st en 3 l). Het telpatroon van A2a, begint nochtans met 6 lossen. Er is zeker iets dat ik uit het oog verlies. Kan u mij inlichten? Beste dank bij voorbaat. Mvg. Aline
16.07.2017 - 11:56DROPS Design answered:
Hoi Aline, Het eerste stokje in het telpatroon wordt vervangen door 3 lossen, waardoor je op 6 lossen uitkomt.
16.07.2017 - 13:23Hallo, ik heb a1 helemaal gehaakt, maar nu snap ik niet hoe ik a.2a moet haken. Zou je a.2a verder kunnen uitleggen wat de bedoeling is?
24.06.2017 - 15:12DROPS Design answered:
Hoi Dymph, Misschien is het verwarrend omdat A.2a ahw gekanteld afgebeeld staat. (Je moet je hoofd naar rechts buigen en dan staat hij rechtop :) ) Je begint bij de pijl links onder, dus met 6 lossen (dat is dus de eerste toer van A.2a), dan ga je verder met de eerste toer van A.2.b. p.s.: A.2d staat ook weer gekanteld weergegeven, maar dan de andere kant op.
25.06.2017 - 20:20Salve, Ho provato più volta a leggere e capire lo schema di questo scialle che mi piace tantissimo ma sensa risultato. E' possibile avere lo schema completo senza vederelo a pezzi?? sinceramente così è complicato.. Grazie!
13.06.2017 - 15:46DROPS Design answered:
Buongiorno Rossella. Purtroppo non ci è possibile modificare le spiegazioni e dare un aiuto così specifico. Spesso è più facile seguire le istruzioni mentre si lavora. Il suo rivenditore Drops di fiducia è a sua disposizione per ogni aiuto più personalizzato. La ringraziamo per la comprensione. Buon lavoro!
13.06.2017 - 16:39Diria que la foto no es correspon amb les explicacions. Les explicacions semblen repetides. Seria millor un gràfic complet sense tants trossets. M'he perdut amb tanta lletra
06.06.2017 - 13:07Dobý den, opět mi nedá nenapsat, že je škoda, že je celé schéma rozložené do jednotlivých částí, které se špatně skládají dohromady nevím, proč jde drops stále touto cestou ... ach jo
26.05.2017 - 20:14Ik heb de eerste keer A2a tm A2d gedaan. Ik keer het werk om en ga gevoelsmatig de volgende rij in A2d en eindig met A2a, keer weer om en ga verder met A2a. Klopt dit? De tekst in het patroon impliceert dat ik elke keer met A2a moet beginnen.....wat moet het zijn?
08.05.2017 - 21:43DROPS Design answered:
Hoi Anja, Je breit elke toer A2a t/m A2d. Na het keren begin je in principe weer met A2a, maar A2a en A2d zijn bijna gelijk aan elkaar (eigenlijk elkaars spiegeleeld), dus ik snap dat je gevoelsmatig met A2d wilt beginnnen. Als je telkens met A2a begint zit je in ieder geval goed.
09.05.2017 - 22:26