
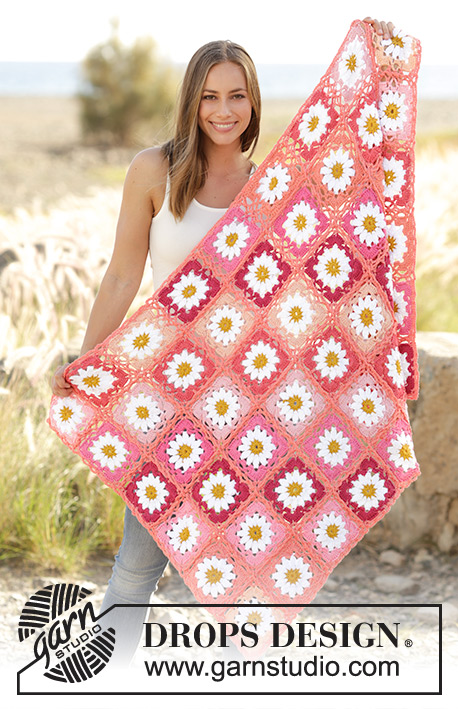
Popular categories
Looking for a yarn?


|
|||||||||||||||||||||||||||||||||||||||||||||||||
See You Soon |
|||||||||||||||||||||||||||||||||||||||||||||||||
 |
 |
||||||||||||||||||||||||||||||||||||||||||||||||
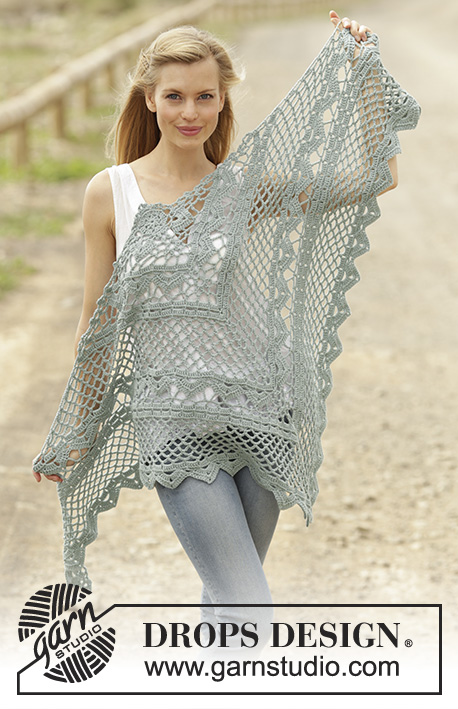
Shawl with lace pattern, crochet from the top down in DROPS Cotton Merino.
DROPS 175-11 |
|||||||||||||||||||||||||||||||||||||||||||||||||
|
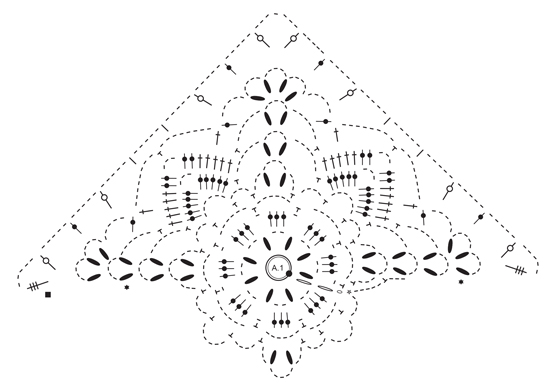
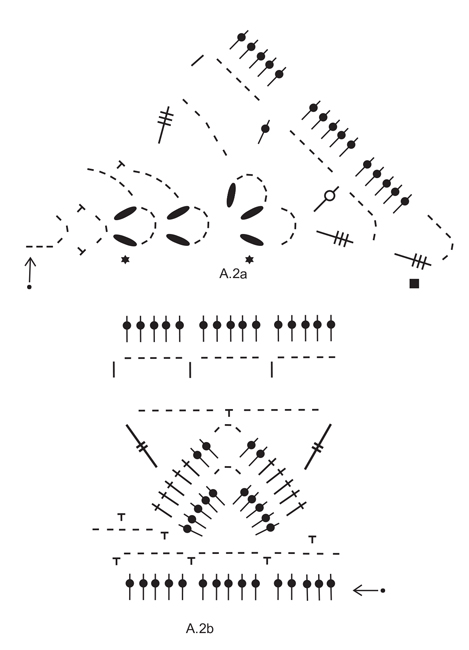
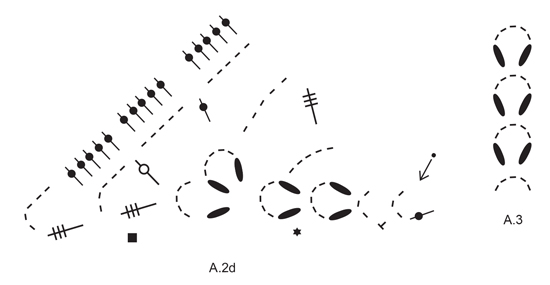
PATTERN: See diagrams A.1 to A.3. ---------------------------------------------------------- SHAWL: Beg with Cotton Merino on hook size 4 mm / G/6 and work pattern in the round according to diagram A.1. Work chain stitch ring and the first four round in the round, then work the rest of shawl back and forth. REMEMBER THE CROCHET GAUGE! When entire A.1 has been worked, continue from first row in diagrams as follows: Work A.2a (3 chain stitches = 1 double crochet and 3 chain stitches), work A.2b 3 repetitions in total in width (i.e. 5 double crochets around each of the first 9 chain spaces), work A.2c (= 3 chain stitches), then work the first 5 double crochets in A.2b around same chain space (i.e. the middle chain space), then continue with A.2b until 3 repetitions have been worked in total in width (i.e. 5 double crochets around each of the next 8 chain spaces), work A.2d around the last chain space = 46 double crochets on each side of the middle chain space. Continue back and forth with A.2a to A.2b. When diagrams have been worked vertically, there are 75 double crochets on each side of the middle chain space. Now continue as follows: ROW 1 (from wrong side): Work 7 chain stitches, 1 single crochet around chain space, * work 5 chain stitches, skip 5 double crochets, 1 single crochet *, repeat from *-* 14 more times, but work last single crochet around the middle chain space on shawl, 3 chain stitches, 1 single crochet around same chain space, * work 5 chain stitches, skip 5 double crochets, work 1 single crochet *, repeat from *-* 14 more times, work 6 chain stitches, 1 single crochet around last chain space. There are now 16 chain spaces on each side of chain space in the middle of shawl. ROW 2: Work 7 chain stitches, * 5 double crochets around first/next chain space *, repeat from *-* 15 more times, work (5 double crochets, 3 chain stitches, 5 double crochets) around chain space in the middle of shawl, * work 5 double crochets around first/next chain space *, repeat from *-* 15 more times, work 5 double crochets around last chain space, work 4 chain stitches and 1 double crochet around the last chain space on row. There are now 85 double crochets on each side of chain space in the middle of shawl. ROW 3: Work 11 chain stitches, 1 single crochet around first chain space, * 6 chain stitches, skip 5 double crochets, 1 single crochet *, repeat from *-* 15 more times, work 6 chain stitches, A.3 around the middle chain space. Continue with * 6 chain stitches, skip 5 double crochets, 1 single crochet *, repeat from *-* 15 more times, work 6 chain stitches, 1 single crochet around last chain space, 8 chain stitches, 1 double crochet around last chain space. There are now 18 chain spaces on each side of A.3. ROW 4: Work 11 chain stitches, 1 single crochet around first chain space, * 6 chain stitches, 1 single crochet around next chain space *, repeat from *-* until chain space in the middle of shawl, work 6 chain stitches, A.3 around chain space in the middle of shawl. Then work * 6 chain stitches, 1 single crochet around next chain space *, repeat from *-* until last chain space, 6 chain stitches, 1 single crochet around last chain space, 8 chain stitches, 1 double crochet around last chain space. Repeat 4th row 7 more times, but on every row worked repeat *-* 1 more time (i.e. on every row worked there is 1 chain space more on each side of A.3) = 9 rows in total with chain spaces and 26 chain spaces on each side of A.3. Now work pattern from first row in diagrams A.2, the same way as before, but work more repetitions in width as follows: Work A.2a (3 chain stitches = 1 double crochet and 3 chain stitches), work A.2b 9 repetitions in total in width (i.e. 5 double crochets around each of the first 27 chain spaces), work A.2c (= 3 chain stitches), then work the first 5 double crochets in A.2b around same chain space (i.e. the middle chain space), then continue with A.2b until 9 repetitions have been worked in total in width (i.e. 5 double crochets around each of the next 26 chain spaces), work A.2d around the last chain space = 136 double crochets on each side of the middle chain space. Continue back and forth with A.2a to A.2d. When diagrams have been worked vertically, there are 165 double crochets on each side of the middle chain space. Now continue as follows: ROW 1 (from wrong side): Work 7 chain stitches, 1 single crochet around chain space, * work 5 chain stitches, skip 5 double crochets, 1 single crochet *, repeat from *-* 32 more times, but work last single crochet around the middle chain space on shawl, 3 chain stitches, 1 single crochet around same chain space, * work 5 chain stitches, skip 5 double crochets, work 1 single crochet *, repeat from *-* 32 more times, work 6 chain stitches, 1 single crochet around last chain space. There are now 34 chain spaces on each side of chain space in the middle of shawl. ROW 2: Work 7 chain stitches, * 5 double crochets around first/next chain space *, repeat from *-* 33 more times, work (5 double crochets, 3 chain stitches, 5 double crochets) around chain space in the middle of shawl, * work 5 double crochets around first/next chain space *, repeat from *-* 33 more times, work 5 double crochets around last chain space, work 4 chain stitches and 1 double crochet around the last chain space on row. There are now 175 double crochets on each side of increase in the middle of shawl. ROW 3: Work 11 chain stitches, 1 single crochet around first chain space, * 6 chain stitches, skip 5 double crochets *, repeat from *-* 33 more times, work 6 chain stitches, A.3 around the middle chain space. Continue with * 6 chain stitches, skip 5 double crochets, 1 single crochet *, repeat from *-* 33 more times, work 6 chain stitches, 1 single crochet around last chain space, 8 chain stitches, 1 double crochet around last chain space. There are now 36 chain spaces on each side of A.3. ROW 4: Work 11 chain stitches, 1 single crochet around first chain space, * 6 chain stitches, 1 single crochet around next chain space *, repeat from *-* until chain space in the middle of shawl, work 6 chain stitches, A.3 around chain space in the middle of shawl. Then work * 6 chain stitches, 1 single crochet around next chain space *, repeat from *-* until last chain space, 6 chain stitches, 1 single crochet around last chain space, 8 chain stitches, 1 double crochet around last chain space. Repeat 4th row 7 more times, but on every row worked repeat *-* 1 more time (i.e. on every row worked there is 1 chain space more on each side of the middle chain space) = 9 rows in total with chain spaces and 44 chain spaces on each side of A.3. Now work pattern from first row in diagrams A.2, the same way as before, but work more repetitions in width as follows: Work A.2a (3 chain stitches = 1 double crochet and 3 chain stitches), work A.2b 15 repetitions in total in width (i.e. 5 double crochets around each of the next 45 chain spaces), work A.2c (= 3 chain stitches), then work the first 5 double crochets in A.2b around same chain space (i.e. the middle chain space), then continue with A.2b until 15 repetitions have been worked in total in width (i.e. 5 double crochets around each of the next 44 chain spaces), work A.2d around the last chain space = 226 double crochets on each side of the middle chain space. Continue back and forth with A.2a to A.2d. Finish after 4th row in diagrams. Fasten off. |
|||||||||||||||||||||||||||||||||||||||||||||||||
Diagram explanations |
|||||||||||||||||||||||||||||||||||||||||||||||||
|
|||||||||||||||||||||||||||||||||||||||||||||||||
|
|||||||||||||||||||||||||||||||||||||||||||||||||
|
|||||||||||||||||||||||||||||||||||||||||||||||||

|
|||||||||||||||||||||||||||||||||||||||||||||||||
|
|||||||||||||||||||||||||||||||||||||||||||||||||
|
Have you made this or any other of our designs? Tag your pictures in social media with #dropsdesign so we can see them! Do you need help with this pattern?You'll find tutorial videos, a Comments/Questions area and more by visiting the pattern on garnstudio.com. © 1982-2024 DROPS Design A/S. We reserve all rights. This document, including all its sub-sections, has copyrights. Read more about what you can do with our patterns at the bottom of each pattern on our site. |
|||||||||||||||||||||||||||||||||||||||||||||||||


With over 40 years in knitting and crochet design, DROPS Design offers one of the most extensive collections of free patterns on the internet - translated to 17 languages. As of today we count 304 catalogs and 11422 patterns - 11417 of which are translated into English (US/in).
We work hard to bring you the best knitting and crochet have to offer, inspiration and advice as well as great quality yarns at incredible prices! Would you like to use our patterns for other than personal use? You can read what you are allowed to do in the Copyright text at the bottom of all our patterns. Happy crafting!
Comments / Questions (76)
I've made this pattern several times now and each time I like it more than the last because of the adjustability it allows should you have limited yarn to work with or have the luxury of extra. It is now a go to pattern for that extra elegance I'm looking for. Thank you!
03.06.2020 - 01:13Beautiful. I’ve made this in drops Paris ice blue and it took some working out. But successfully completed Can I suggest to those struggling. Print pattern out and lay them in order, you know what shape the shawl is imagine a cake cut into slices this pattern is in slices each slice is part of the pattern. Keep reading and looking at pattern it will make sense. Don’t struggle take a break and come back to it. I did and it worked. Love to all crocheters and knitters
24.05.2020 - 23:17Comment réalise le modèle 175-11
14.05.2020 - 15:33DROPS Design answered:
Vous trouverez les vidéos des différentes techniques utilisées dans ce modèle ici, et découvrez en bas de page du modèle les leçons qui pourraient vous aider. Vous pouvez poser votre question ici dans cette rubrique ou bien contacter votre magasin DROPS pour toute assistance personnalisée à la réalisation de ce modèle. Bon crochet!
14.05.2020 - 16:21Bonjour j’aimerais effectué le châle drop design 175 11 mais je ne trouve pas de vidéo montrant comment faire en existe il et ou j aimerai faire cette ouvrage cordialement dans l attente de votre réponse
14.05.2020 - 15:30DROPS Design answered:
Bonjour Mme Bauder, il n'existe pas de vidéo attitrée pour ce modèle, lisez attentivement les explications et regardez ici comment lire les diagrammes. Bon crochet!
14.05.2020 - 16:18Dzień dobry Mam pytanie co oznacza przerabianie oczek zamykających do łuku? Czy oznacza to robienie oczek zajmujących wokół ostatniego słupka- wtedy 3 oczka, słupka potrójnego - wtedy 5 oczek i dopiero potem oczko zamykające w łuk? Z góry dziękuje za odpowiedz Ola Bielecka
03.05.2020 - 22:50DROPS Design answered:
Witaj Olu! W rogu na początku rzędu między słupkiem potrójnym i kolejnymi słupkami jest łuk z oczek łańcuszka. Musisz wykonać oczka zamykające do środka tego łuku, przejście będzie niewidoczne, a kolejny rząd rozpocznie się na środku tego pierwszego łuku. Pozdrawiamy!
04.05.2020 - 08:08Naar welke lossenlus moet ik de halve vasten haken in onderstaande symbolen? = toer begint met halve vasten tot lossenlus, haak dan 4 lossen = toer begint met halve vasten tot lossenlus, haak dan 7 lossen
21.04.2020 - 09:24DROPS Design answered:
Dag Marie-Jose,
Je haakt vasten om het zojuist gehaakte driedubbele stokje of stokje, dus tot waar de lossenlus begint.
29.04.2020 - 09:42If I order yarn from you will I rec a paper pattern in English English as well
19.03.2020 - 14:44DROPS Design answered:
Dear Mrs Thompson, when ordering your yarn you are welcome to ask your DROPS store to add a printed pattern with your yarn. Happy crocheting!
19.03.2020 - 15:07I’m working with the diagram bit by bit, the work is turning out to look almost the same. Just after the I’m done with Aa and Ab and Ac. It says in the description that they are supposed to be 75 stitches, but I have only 65. How could I tell where did I go wrong. And what happens if I just continue, Will it affect the piece in the end?
12.03.2020 - 17:06DROPS Design answered:
Dear Ala, you should have 75 sts on each side of the middle ch-space to get the pattern working afterwards: A.2a = 15 sts (+1 double treble (UK-Eng) + 1 ch-space) then A.2b x 3 (= 45 sts), and A.2c (= 15 sts before mid ch-space)= 15+45+15= 75 sts. Happy crocheting!
13.03.2020 - 08:28I am making your See You Soon Crochetted Shawl (175-11). I have never worked with pattern diagrams before and am having a lot of trouble understanding what is meant when combining A.2A, A.2b, A.2c and A.2d. I love this pattern and would like to complete it. Are you able to help me please?
27.02.2020 - 04:54DROPS Design answered:
Dear Mrs Verus, you will find how to read crochet diagrams here, and especially here in this pattern where you work different diagram on a same row. Happy crocheting!
27.02.2020 - 09:36Can the pattern be translated to English and do you have a video in English. The shawl is beautiful.. thanks
25.02.2020 - 15:38DROPS Design answered:
Dear Mrs Hairston, this pattern is available in US-English, just click on the scroll down menu under picture and change language. Happy crocheting!
25.02.2020 - 15:54