
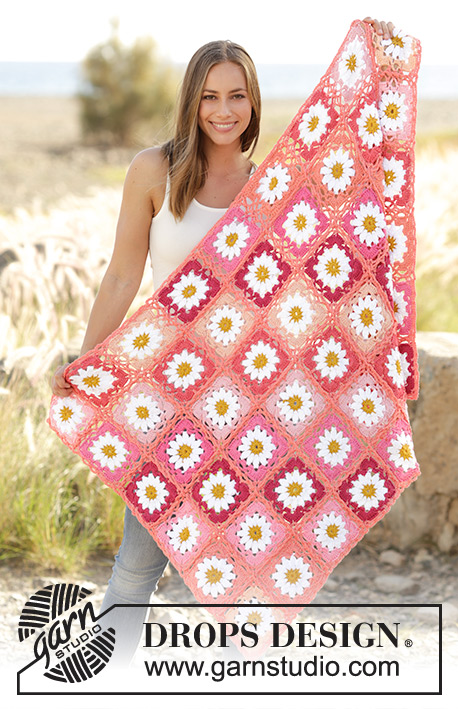
Popular categories
Looking for a yarn?


|
|||||||||||||||||||||||||||||||||||||||||||||||||
See You Soon |
|||||||||||||||||||||||||||||||||||||||||||||||||
 |
 |
||||||||||||||||||||||||||||||||||||||||||||||||
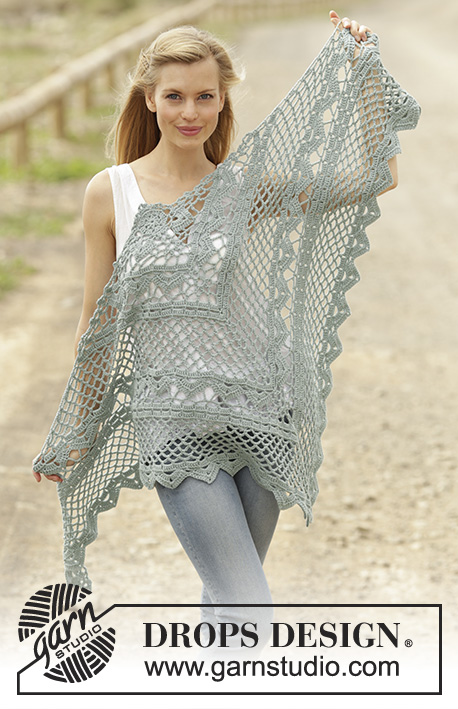
Shawl with lace pattern, crochet from the top down in DROPS Cotton Merino.
DROPS 175-11 |
|||||||||||||||||||||||||||||||||||||||||||||||||
|
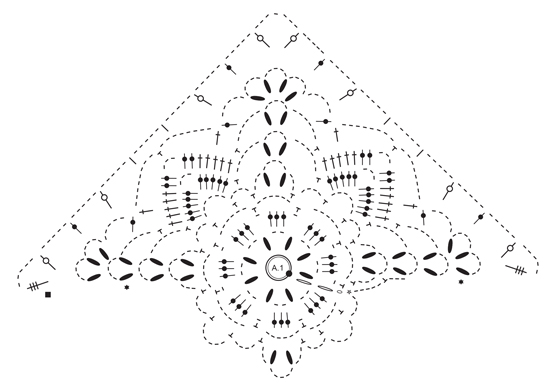
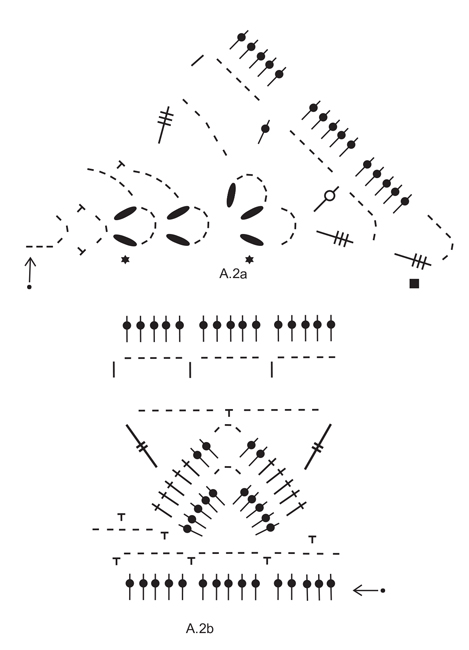
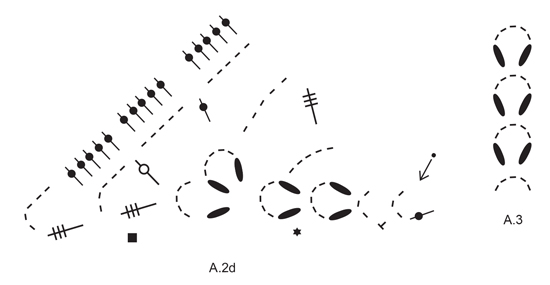
PATTERN: See diagrams A.1 to A.3. ---------------------------------------------------------- SHAWL: Beg with Cotton Merino on hook size 4 mm / G/6 and work pattern in the round according to diagram A.1. Work chain stitch ring and the first four round in the round, then work the rest of shawl back and forth. REMEMBER THE CROCHET GAUGE! When entire A.1 has been worked, continue from first row in diagrams as follows: Work A.2a (3 chain stitches = 1 double crochet and 3 chain stitches), work A.2b 3 repetitions in total in width (i.e. 5 double crochets around each of the first 9 chain spaces), work A.2c (= 3 chain stitches), then work the first 5 double crochets in A.2b around same chain space (i.e. the middle chain space), then continue with A.2b until 3 repetitions have been worked in total in width (i.e. 5 double crochets around each of the next 8 chain spaces), work A.2d around the last chain space = 46 double crochets on each side of the middle chain space. Continue back and forth with A.2a to A.2b. When diagrams have been worked vertically, there are 75 double crochets on each side of the middle chain space. Now continue as follows: ROW 1 (from wrong side): Work 7 chain stitches, 1 single crochet around chain space, * work 5 chain stitches, skip 5 double crochets, 1 single crochet *, repeat from *-* 14 more times, but work last single crochet around the middle chain space on shawl, 3 chain stitches, 1 single crochet around same chain space, * work 5 chain stitches, skip 5 double crochets, work 1 single crochet *, repeat from *-* 14 more times, work 6 chain stitches, 1 single crochet around last chain space. There are now 16 chain spaces on each side of chain space in the middle of shawl. ROW 2: Work 7 chain stitches, * 5 double crochets around first/next chain space *, repeat from *-* 15 more times, work (5 double crochets, 3 chain stitches, 5 double crochets) around chain space in the middle of shawl, * work 5 double crochets around first/next chain space *, repeat from *-* 15 more times, work 5 double crochets around last chain space, work 4 chain stitches and 1 double crochet around the last chain space on row. There are now 85 double crochets on each side of chain space in the middle of shawl. ROW 3: Work 11 chain stitches, 1 single crochet around first chain space, * 6 chain stitches, skip 5 double crochets, 1 single crochet *, repeat from *-* 15 more times, work 6 chain stitches, A.3 around the middle chain space. Continue with * 6 chain stitches, skip 5 double crochets, 1 single crochet *, repeat from *-* 15 more times, work 6 chain stitches, 1 single crochet around last chain space, 8 chain stitches, 1 double crochet around last chain space. There are now 18 chain spaces on each side of A.3. ROW 4: Work 11 chain stitches, 1 single crochet around first chain space, * 6 chain stitches, 1 single crochet around next chain space *, repeat from *-* until chain space in the middle of shawl, work 6 chain stitches, A.3 around chain space in the middle of shawl. Then work * 6 chain stitches, 1 single crochet around next chain space *, repeat from *-* until last chain space, 6 chain stitches, 1 single crochet around last chain space, 8 chain stitches, 1 double crochet around last chain space. Repeat 4th row 7 more times, but on every row worked repeat *-* 1 more time (i.e. on every row worked there is 1 chain space more on each side of A.3) = 9 rows in total with chain spaces and 26 chain spaces on each side of A.3. Now work pattern from first row in diagrams A.2, the same way as before, but work more repetitions in width as follows: Work A.2a (3 chain stitches = 1 double crochet and 3 chain stitches), work A.2b 9 repetitions in total in width (i.e. 5 double crochets around each of the first 27 chain spaces), work A.2c (= 3 chain stitches), then work the first 5 double crochets in A.2b around same chain space (i.e. the middle chain space), then continue with A.2b until 9 repetitions have been worked in total in width (i.e. 5 double crochets around each of the next 26 chain spaces), work A.2d around the last chain space = 136 double crochets on each side of the middle chain space. Continue back and forth with A.2a to A.2d. When diagrams have been worked vertically, there are 165 double crochets on each side of the middle chain space. Now continue as follows: ROW 1 (from wrong side): Work 7 chain stitches, 1 single crochet around chain space, * work 5 chain stitches, skip 5 double crochets, 1 single crochet *, repeat from *-* 32 more times, but work last single crochet around the middle chain space on shawl, 3 chain stitches, 1 single crochet around same chain space, * work 5 chain stitches, skip 5 double crochets, work 1 single crochet *, repeat from *-* 32 more times, work 6 chain stitches, 1 single crochet around last chain space. There are now 34 chain spaces on each side of chain space in the middle of shawl. ROW 2: Work 7 chain stitches, * 5 double crochets around first/next chain space *, repeat from *-* 33 more times, work (5 double crochets, 3 chain stitches, 5 double crochets) around chain space in the middle of shawl, * work 5 double crochets around first/next chain space *, repeat from *-* 33 more times, work 5 double crochets around last chain space, work 4 chain stitches and 1 double crochet around the last chain space on row. There are now 175 double crochets on each side of increase in the middle of shawl. ROW 3: Work 11 chain stitches, 1 single crochet around first chain space, * 6 chain stitches, skip 5 double crochets *, repeat from *-* 33 more times, work 6 chain stitches, A.3 around the middle chain space. Continue with * 6 chain stitches, skip 5 double crochets, 1 single crochet *, repeat from *-* 33 more times, work 6 chain stitches, 1 single crochet around last chain space, 8 chain stitches, 1 double crochet around last chain space. There are now 36 chain spaces on each side of A.3. ROW 4: Work 11 chain stitches, 1 single crochet around first chain space, * 6 chain stitches, 1 single crochet around next chain space *, repeat from *-* until chain space in the middle of shawl, work 6 chain stitches, A.3 around chain space in the middle of shawl. Then work * 6 chain stitches, 1 single crochet around next chain space *, repeat from *-* until last chain space, 6 chain stitches, 1 single crochet around last chain space, 8 chain stitches, 1 double crochet around last chain space. Repeat 4th row 7 more times, but on every row worked repeat *-* 1 more time (i.e. on every row worked there is 1 chain space more on each side of the middle chain space) = 9 rows in total with chain spaces and 44 chain spaces on each side of A.3. Now work pattern from first row in diagrams A.2, the same way as before, but work more repetitions in width as follows: Work A.2a (3 chain stitches = 1 double crochet and 3 chain stitches), work A.2b 15 repetitions in total in width (i.e. 5 double crochets around each of the next 45 chain spaces), work A.2c (= 3 chain stitches), then work the first 5 double crochets in A.2b around same chain space (i.e. the middle chain space), then continue with A.2b until 15 repetitions have been worked in total in width (i.e. 5 double crochets around each of the next 44 chain spaces), work A.2d around the last chain space = 226 double crochets on each side of the middle chain space. Continue back and forth with A.2a to A.2d. Finish after 4th row in diagrams. Fasten off. |
|||||||||||||||||||||||||||||||||||||||||||||||||
Diagram explanations |
|||||||||||||||||||||||||||||||||||||||||||||||||
|
|||||||||||||||||||||||||||||||||||||||||||||||||
|
|||||||||||||||||||||||||||||||||||||||||||||||||
|
|||||||||||||||||||||||||||||||||||||||||||||||||

|
|||||||||||||||||||||||||||||||||||||||||||||||||
|
|||||||||||||||||||||||||||||||||||||||||||||||||
|
Have you made this or any other of our designs? Tag your pictures in social media with #dropsdesign so we can see them! Do you need help with this pattern?You'll find tutorial videos, a Comments/Questions area and more by visiting the pattern on garnstudio.com. © 1982-2024 DROPS Design A/S. We reserve all rights. This document, including all its sub-sections, has copyrights. Read more about what you can do with our patterns at the bottom of each pattern on our site. |
|||||||||||||||||||||||||||||||||||||||||||||||||


With over 40 years in knitting and crochet design, DROPS Design offers one of the most extensive collections of free patterns on the internet - translated to 17 languages. As of today we count 304 catalogs and 11415 patterns - 11410 of which are translated into English (US/in).
We work hard to bring you the best knitting and crochet have to offer, inspiration and advice as well as great quality yarns at incredible prices! Would you like to use our patterns for other than personal use? You can read what you are allowed to do in the Copyright text at the bottom of all our patterns. Happy crafting!
Comments / Questions (76)
Aan het einde van a2 heb ik in plaats van de benodigde 75 stokjes aan beide zeiden maar 65. Wat is de beste manier om dit op te lossen? Ik heb het patroon al een keer uitgetrokken en opnieuw gehaakt maar ik blijf uitkomen op 65.
07.08.2023 - 15:37DROPS Design answered:
Dag Brechtje,
Waarschijnlijk heb je toch ergens een lossenlus met een stokje op een vorige toer over het hoofd gezien. Als het patroon verder symmetrisch is en mooi doorloopt en niet trekt o.i.d. zou het verder geen probleem moeten zijn en zou je verder kunnen haken met minder stokjes.
14.08.2023 - 14:18I've done until just before A.3. So I have 6 chain stitches. Now I have to work 5 chain stitches (=A.3. row1) around the middle chain space. But how? Shouldn't the A.3. row1 be 1sc+3ch+1sc or something like that, instead of 5ch? Otherwise you can't get into the middle chain space. You'll end up 6ch +5ch (and then 6ch again).
09.06.2023 - 18:12DROPS Design answered:
Dear Mick, A.3 is worked in the middle of shawl, after the 6 chains work A.3 = 2 dc together+5 chains + 2 dc together around the chain-space from previous row, then crochet 6 chains and finish row as explained on the other side of shawl. Happy crocheting!
12.06.2023 - 08:11Todo bien hasta llegar a la parte segunda donde pone 75 puntos altos en cada lado. No sé dónde salen esos 75 puntos. A mi me salen 46 que cada lado
29.04.2023 - 15:34DROPS Design answered:
Hola Potxoli, después de llegar a 46 puntos altos, continuar trabajando A.2a y A.2b hasta llegar a 75 puntos altos. Los aumentos están incluidos en el diagrama.
30.04.2023 - 22:20Ik zit vast bij de toer waar je 46 stokjes hebt aan beide kanten....... Wat moet ik nu verder doen? Er staat; ga verder heen en weer met A2a tot en met A2d, tot er 75 stokjes zijn aan beide kanten. Betekent dit dat ik nog een rij van telkens 5 stokjes moet haken?
07.02.2023 - 10:55Hola me encantan los chakes de Drops pero escrito es un lio y con grafico por partes de A2a, A2b..... Aun mas lio, no podrian poner el grafico completo porque por partes es un jaleo, al menos para mi, gracias
18.07.2022 - 18:27Dzień dobry! Czy w pierwszym akapicie w poleceniu: „ Dalej przerabiać schematy A.2a - A.2b w tę i z powrotem.” faktycznie robimy od schematu A.2a do A.2b czy jednak wszystkie schematy po kolei? Pozdrawiam ( :
30.06.2022 - 13:31DROPS Design answered:
Witaj Aleksandro, robimy schematy po kolei, na początku rzędu schemat A.2a jak wcześniej, następnie powtarzamy A.2b na jednym boku szala, na środku (czubek szala) A.2c, dalej powtarzamy A.2 b na drugim boku szala i na końcu rzędu przerabiamy A.2 d. Pozdrawiamy!
30.06.2022 - 18:11I just finished the last row in diagram A.2a with the 5 double crochets. I’m lost on how to begin the next 2 rows before making the arrow looking motif. These are shown in your diagram A.2b.Yep
03.04.2022 - 03:52DROPS Design answered:
Dear Mr Howell, after you have worked A.2a to A.2b and you have 75 dc on each side of the middle chain-space, work as described in the written pattern from ROW 1 to ROW 4 a total of 8 times (with A.3 in the middle as described). Then you will follow diagrams again with A.2a, A.2b and A.2c. Happy crocheting!
04.04.2022 - 09:42I just finished the last row in diagram A.2a with the 5 double crochets. I’m lost on how to begin the next 2 rows before making the arrow looking motif. These are shown in your diagram A.2b.
22.03.2022 - 17:28Is there a way I can send you a picture of where I am at with my work
21.03.2022 - 16:51DROPS Design answered:
Dear Mr Howell, feel free to bring your work to your store or send them a picture per Mail - so that they can help you with an overview of your work. You can also join our DROPS Workshop where other crocheters will be able to help you. Happy crocheting!
22.03.2022 - 09:47Hello and thanks for the quick response. I’m hoping I can send attachments for you to see where I am at.
21.03.2022 - 16:47DROPS Design answered:
Dear Mr Howell, you cannot send any attachment, just write here; but please write your question here giving more all details on what you are working on and which row/which place on the row you are stuck.
22.03.2022 - 09:45