
Popular categories
Looking for a yarn?


|
|||||||||||||||||||||||||||||||||||||||||||||||||
Orient Dream |
|||||||||||||||||||||||||||||||||||||||||||||||||
 |
 |
||||||||||||||||||||||||||||||||||||||||||||||||
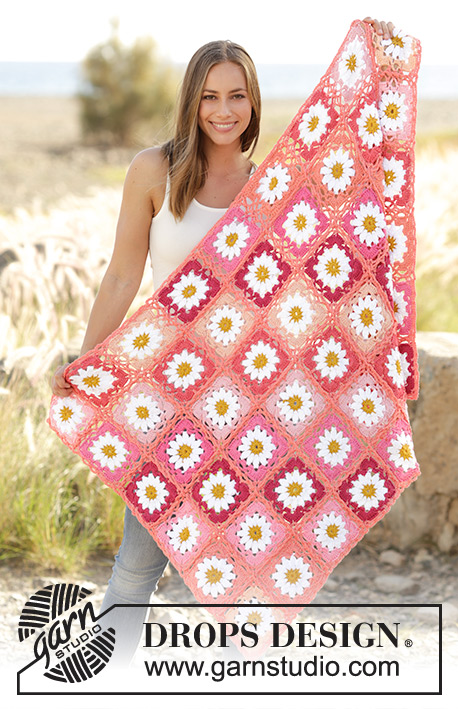
Blanket with crochet squares and lace pattern, in DROPS Paris.
DROPS 175-10 |
|||||||||||||||||||||||||||||||||||||||||||||||||
|
PATTERN: See diagrams A.1 and A.2. ---------------------------------------------------------- BLANKET: Work 6 crochet square and crochet them together before working an edge around the entire blanket. CROCHET SQUARE: Begin with hook size 3.5 mm and apricot and work pattern according to diagram A.1b 4 times in total on round - diagram A.1a shows how round begins and ends and work in addition to A.1b. REMEMBER THE CROCHET TENSION! When entire diagram A.1a and A.1b have been worked vertically, crochet square measures approx. 24 x 24 cm. Cut the yarn. Begin in 4th double crochet before a corner and work from 3rd round in diagrams as follows: Work A.2a in double crochet (A.2a shows how round begins and ends), work A.2b over the first 3 chain stitch spaces, * work A.2c (= corner), work A.2b over the next 9 chain stitch spaces (= 3 repetitions) *, repeat from *-* 2 more times, work A.2c in the corner and finish with A.2b over the remaining 6 chain stitch spaces (= 2 repetitions) on round. When last round in diagram A.2a to A.2c has been worked, fasten off. Crochet square measures approx. 39 x 39 cm. Work another 5 crochet squares the same way = 6 crochet squares in total. ASSEMBLY: Now assemble the 6 crochet squares by working squares together through both layers with apricot as follows: Place 2 crochet squares with wrong side against each other, fasten strand with 1 double crochet around chain stitch space in a corner, * work 1 double crochet through both layers in next treble, 2 chain stitches, skip 1 treble *, repeat from *-* until the entire side has been worked, work 1 double crochet around chain stitch space. Repeat on the other crochet squares so that there are 2 strips with 3 crochet squares in length. Then work the 2 strips together to get 2 crochet squares in width and 3 crochet squares in length. See measurement chart. EDGE: Work an edge around the entire piece in coral. Begin with 1 double crochet around chain stitch space in a corner and work from 2nd round in diagrams as follows: NOTE: On 2nd round in diagrams work 1 double crochet in transition between 2 crochet squares (i.e. where they are crochet together) instead of working 1 double crochet around chain space in corners on each of the crochet squares. There are then 15 chain stitch spaces along each of the sides on crochet squares, Work A.2a (shows how round begins and ends) * work A.2b until next corner on blanket, work A.2c (= corner) *, repeat from *-* 3 more times. When all rounds in A.2a-A.2c are done vertically, fasten off. |
|||||||||||||||||||||||||||||||||||||||||||||||||
Diagram explanations |
|||||||||||||||||||||||||||||||||||||||||||||||||
|
|||||||||||||||||||||||||||||||||||||||||||||||||

|
|||||||||||||||||||||||||||||||||||||||||||||||||

|
|||||||||||||||||||||||||||||||||||||||||||||||||

|
|||||||||||||||||||||||||||||||||||||||||||||||||
|
Have you made this or any other of our designs? Tag your pictures in social media with #dropsdesign so we can see them! Do you need help with this pattern?You'll find tutorial videos, a Comments/Questions area and more by visiting the pattern on garnstudio.com. © 1982-2024 DROPS Design A/S. We reserve all rights. This document, including all its sub-sections, has copyrights. Read more about what you can do with our patterns at the bottom of each pattern on our site. |
|||||||||||||||||||||||||||||||||||||||||||||||||


With over 40 years in knitting and crochet design, DROPS Design offers one of the most extensive collections of free patterns on the internet - translated to 17 languages. As of today we count 304 catalogues and 11422 patterns - 11422 of which are translated into English (UK/cm).
We work hard to bring you the best knitting and crochet have to offer, inspiration and advice as well as great quality yarns at incredible prices! Would you like to use our patterns for other than personal use? You can read what you are allowed to do in the Copyright text at the bottom of all our patterns. Happy crafting!
Comments / Questions (27)
"Comenzar en el 4º punto bajo y trabajar a partir de la 3ª vuelta de los diagramas de la manera siguiente: Trabajar A.2a en el punto bajo..." me quedé aauí porque no se como identificar ese 4to punto bajo, desde donde se empieza a contar? con el video me fue muy bien y entiendo basicamente el gráfico pero esto no lo entendí, gracias por su ayuda
25.10.2020 - 20:45DROPS Design answered:
Hola Maria! Debes contar el 4º punto bajo antes de la esquina (hay 3 arcos de cadenas antes de la esquina) y comenzar aqui. Buen trabajo!
19.11.2020 - 09:16I have written out the instructions for this pattern. Would you be willing to publish them on your website? I see that several people have requested them.
05.06.2020 - 00:40DROPS Design answered:
Dear Mrs Beck, thanks for your feedback, there are already 2 videos to this pattern so that it is very easy to follow them. Happy crocheting!
05.06.2020 - 12:01Is there a written pattern somewhere? I don’t understand diagrams. It’s a beautiful blanket and I would love to crochet this but unfortunately diagrams aren’t my thing. I think there’s probably a lot of people who don’t understand diagrams.
28.06.2019 - 18:10DROPS Design answered:
Dear Deborah, unfortunately we cannot accomondate every wish about pattern writing. Our patterns are available in many languages, and we found the best way to give the pattern to everyone in chart forms. Charts do have their advantages, you can see not only a row (and what comes right after a stitch), but you can also see the relations of stitches to each other, and how rows should follow one another. It is not that difficult to memorize the explanation of the stitches (after a few repeats the mind remembers almost automatically). If you are still stuck, remember, you can always ask for help in person in the store where you bought your DROPS yarn from. Happy Crafting!
28.06.2019 - 21:25Het derde symbool werd verkeerd vertaald vanuit het Engels: " 1 double crochet around chain stitch space/between 2 trebles". Dit werd vertaald naar halve vaste, maar moet een vaste zijn rond de lossenlus. Ook in het filmpje is te zien dat de persoon een vaste haakt....
30.04.2019 - 14:09Ustedes dicen que la lana que hay que utilizar es una del grupo C, pero luego indican utilizar una aguja del 3,5mm. ¿Es correcto esto?
30.03.2019 - 12:55DROPS Design answered:
Hola Olga. Lo importante es la tensión del tejido, en este caso 18 puntos altos x 10.5 filas = 10 cm x 10 cm. El tamaño de la aguja es orientativo.
02.04.2019 - 14:56I've been crocheting for several decades, and I have no issues reading standard charts, but the instructions here are about as incomprehensible as they come and very confusing. As far as I can tell, round 1 ring is 4 chains, but then what? What stitches and how many in the ring?? If I can't even get it started, then I may just have to find another pattern, this is a Christmas project, I don't have a lot of time to waste deciphering this :-/ Thanks
08.10.2017 - 22:26DROPS Design answered:
Dear Diane, after the initial circle made from 4 chain stitch, and closed with a slip stitch, you do 3 treble (UK)/ double (US) (this is ahown in A.1a). [*Then two treble (UK) / double (US) crocheted together, 2 chain stitch.* Repeat *-* one more time (this is A.1b)]. Then repeat [-] 4 times, then close the round with a lip stitch. And so on. A.1 only shows the stitches that are used in order to raise the row to the next level. A1.b is repeated 4 times in the round. I hope this helps. Happy Crocheting!
08.10.2017 - 23:09The diagrams are fine as far as they go, however they don't go nearly far enough. In fact, after following the first snippet of diagram shown, it's nearly impossible to figure out where you are. Those who are having problems with the diagrams (and I've followed diagrams for years), it's not you, it's the creator of the diagram.
26.03.2017 - 17:00DROPS Design answered:
Dear kathleen, in A.1 you just repeat 4 times A.1b in the round, in A.2a-A.2c work A.2b along the sides and A.2c in the corner, A.2a is only showing how to start/finish the round. Happy crocheting!
27.03.2017 - 10:17Is there a written pattern for this? I bought the wool thinking it would have a regular written pattern, but all I see is a diagram which I cannot understand. Very frustrated.
22.02.2017 - 20:32DROPS Design answered:
Dear Mrs Achee, there is only diagram to this pattern, each symbol is matching a st/group of sts and is explaining under diagram text. For any further personnal assistance you are welcome to contact the DROPS store where you bought your yarn, they would be able to assist you, even per mail or telephone. Happy crocheting!
23.02.2017 - 09:51Merci, pas nécessairement en vidéo mais comme le tutoriel de drops children 24-6, tour par tour par écrit pas en diagramme. Merci.
30.01.2017 - 19:54Bonjour, je viens de commencer ce modèle et j'ai un peu de difficulté avec les diagrammes, auriez-vous les explications tour après tour comme pour le patron DROPS children 24-6 (Lovely Lily) que j'ai réussi avec succès. En passant votre site est merveilleux.
30.01.2017 - 03:46DROPS Design answered:
Bonjour Mme Gagnon, votre demande a bien été enregistrée, en attendant la vidéo, vous pouvez suivre le diagramme en vérifiant bien la légende de chaque symbole: A.1a = début/fin de chaque tour, A.1b = à répéter pour former le carré. Bon crochet!
30.01.2017 - 12:08