
Popular categories
Looking for a yarn?


|
|||||||||||||
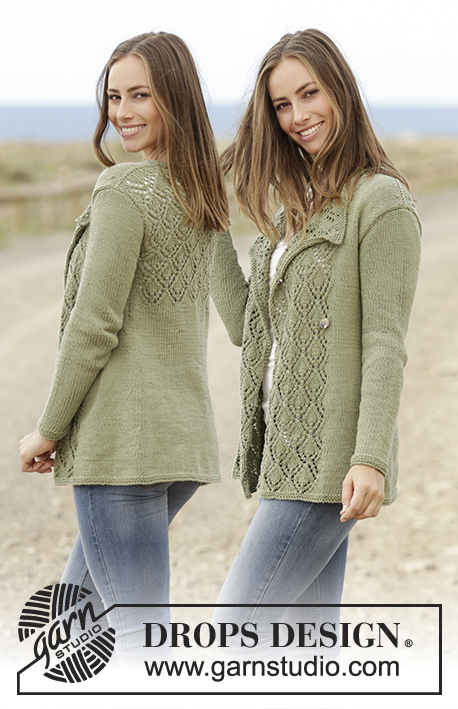
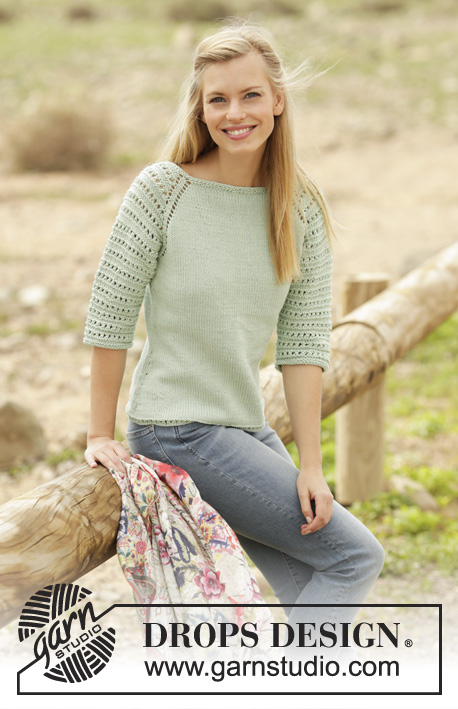
Petronella Top |
|||||||||||||
|
|
|||||||||||||
Knitted top with raglan and lace pattern, worked top down in DROPS Muskat. Sizes S - XXXL.
DROPS 175-32 |
|||||||||||||
|
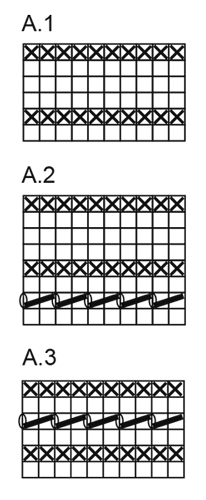
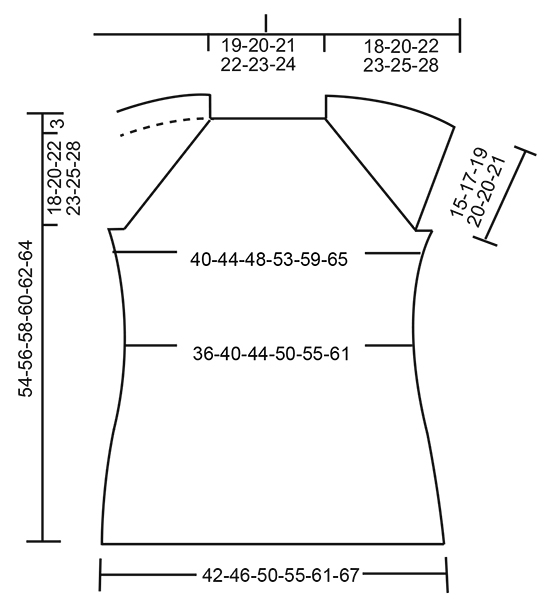
RIDGE/GARTER STITCH (worked in the round): 1 ridge = 2 rounds. Knit 1 round and purl 1 round. PATTERN: See diagrams A.1, A.2 and A.3. The diagrams show all the rows in the pattern from the right side. RAGLAN: Increase every 2nd round as follows: Increase as follows before the marker thread: Start 1 stitch before the marker thread: Make 1 yarn over, knit 1, marker thread. Increase as follows, after the marker thread: Marker thread, knit 1, make 1 yarn over. On the next round work the yarn overs knit, there will be holes. Increase every 4th round as follows: Increase as follows before the marker thread: ROUND 1: Start 1 stitch before the marker thread: Make 1 yarn over, knit1, marker thread. ROUND 2: The yarn overs are worked knit, there will be holes. ROUND 3: Start 3 stitches before the marker thread: Knit 2 together, make 1 yarn over, knit1, marker thread. No increases, but the row of holes continues as before. ROUND 4: The yarn overs are worked knit, there will be holes. Increase as follows, after the marker thread: ROUND 1: Marker thread, knit 1, make 1 yarn over. ROUND 2: The yarn overs are worked knit, there will be holes. ROUND 3: Marker thread, knit 1, make 1 yarn over, slip 1 stitch as if to knit, knit 1, pass the slipped stitch over the knitted stitch. No increases, but the row of holes is continued as before. ROUND 4: Work the yarn overs knit, there will be holes. DECREASE TIP: Start 3 stitches before the marker thread: Knit 2 together, knit 2 (the marker thread sits between these 2 stitches), slip 1 stitch as if to knit, knit 1, pass the slipped stitch over the knitted stitch = 2 stitches decreased. INCREASE TIP: Work until there is 1 stitch left before the marker thread. Make 1 yarn over, knit 2 (the marker thread sits between these 2 stitches) and make 1 yarn over. On the next round work the yarn overs twisted knit to prevent holes (the increased stitches are worked in stocking stitch). --------------------------------------------------------- TOP: The piece is worked in the round with circular needle from mid back, top down. YOKE: Cast on 80-84-88-92-96-100 stitches with circular needle size 4 mm and Muskat. Work 2 RIDGES – see description above, on the last round of the ridges increase 20 stitches evenly along the round = 100-104-108-112-116-120 stitches. Insert 4 marker threads in the piece as follows: first marker thread after 19-20-21-22-23-24 stitches (= half the back piece), second marker thread after 12 new stitches (= sleeve), third marker thread after 38-40-42-44-46-48 new stitches (= front piece), fourth marker thread after 12 new stitches (= sleeve), there are 19-20-21-22-23-24 stitches left on the needle after the last marker thread (= half the back piece). Begin with the increases to RAGLAN as described above and work stocking stitch across the stitches on the back piece and front piece and A.1 across all the sleeve stitches. READ THIS WHOLE SECTION BEFORE WORKING! The increases are different on the front piece/back piece and the sleeves as follows: FRONT PIECE/BACK PIECE: Increase every 2nd round 12-15-17-25-30-35 times, then every 4th round 7-7-7-4-3-2 times. SLEEVES: Increase every 2nd round 18-23-27-29-26-25 times, then every 4th round 4-3-2-2-5-7 times. When A.1 has been completed 1 time in height, repeat A.2 in height. The increased stitches on the sleeves are worked in to the pattern as you go. After the next to last increase on the sleeve (there are 4 rounds left), continue by working garter stitch across the stitches on each sleeve, the stitches on the front piece/back piece are continued in stocking stitch as before. REMEMBER THE KNITTING TENSION! After all the increases to raglan there are 264-296-320-352-372-396 stitches on the needle. The next round is worked as follows: Work 38-42-45-51-56-61 stitches (= half the back piece), cast off the next 56-64-70-74-74-76 stitches, work the next 76-84-90-102-112-122 stitches (= front piece), cast off the next 56-64-70-74-74-76 stitches, work the next 38-42-45-51-56-61 stitches (= half the back piece). BODY: Continue working as follows: work half the back piece, cast on 8-8-10-10-12-14 new stitches, work the front piece, cast on 8-8-10-10-12-14 new stitches, work half the back piece. There are now 168-184-200-224-248-272 stitches on the body. Insert a marker thread in each side, in the middle of the new stitches which were cast on. THE PIECE IS NOW MEASURED FROM HERE. Continue with stocking stitch, but across the 8-8-10-10-12-14 new stitches in each side work 2 ridges, then work stocking stitch across all stitches. When the piece measures 4 cm decrease 1 stitch on each side of the marker threads (= 4 stitches decreased), decrease every 3 cm in total 4 times – READ DECREASE TIP = 152-168-184-208-232-256 stitches. When the piece measures 19-19-19-18-18-19 cm increase 1 stitch on each side of the marker threads (= 4 stitches increased), increase every 2 cm in total 6 times– READ INCREASE TIP = 176-192-208-232-256-280 stitches. When the piece measures 32-32-32-33-33-32 cm work A.3 across all stitches. Then cast off in knit, the piece measures approx. 54-56-58-60-62-64 cm from the shoulder. |
|||||||||||||
Diagram explanations |
|||||||||||||
|
|||||||||||||
|
|||||||||||||
|
|||||||||||||
|
Have you made this or any other of our designs? Tag your pictures in social media with #dropsdesign so we can see them! Do you need help with this pattern?You'll find tutorial videos, a Comments/Questions area and more by visiting the pattern on garnstudio.com. © 1982-2024 DROPS Design A/S. We reserve all rights. This document, including all its sub-sections, has copyrights. Read more about what you can do with our patterns at the bottom of each pattern on our site. |
|||||||||||||


With over 40 years in knitting and crochet design, DROPS Design offers one of the most extensive collections of free patterns on the internet - translated to 17 languages. As of today we count 304 catalogues and 11422 patterns - 11422 of which are translated into English (UK/cm).
We work hard to bring you the best knitting and crochet have to offer, inspiration and advice as well as great quality yarns at incredible prices! Would you like to use our patterns for other than personal use? You can read what you are allowed to do in the Copyright text at the bottom of all our patterns. Happy crafting!
Comments / Questions (96)
Podrían aclararme a que medidas de la prenda terminada corresponde cada talla? Gracias
13.03.2021 - 10:42DROPS Design answered:
Hola Rocio, mira la leccion DROPS AQUI. Buen trabajo!
13.03.2021 - 18:45Nochmals Hallo, Jetzt habe ich die Anleitung verstanden! Der Absatz: in jeder 4. Runde wie folgt zunehmen etc. kommt erst nach den 15 x Raglanzunahmen in jeder 2. Runde zur Anwendung (Größe M) Können Sie mir dies bitte bestätigen? Ein herzliches Dankeschön
21.10.2020 - 22:55DROPS Design answered:
Liebe Stefania, also bei der Grösse M nehmen Sie zuerst beim Vorder-/Rückenteil 15 Mal in jeder 2. Runde (= siehe In jeder 2. Runde wie folgt zunehmen) dann 7 Mal in jeder 4. Runde (= wie unter In jeder 4. Runde wie folgt zunehmen) und bei den Ärmeln: 23 Mal in jede 2. Runde (= siehe In jeder 2. Runde wie folgt zunehmen) und 3 Mal in jeder 4. Runde (= wie unter In jeder 4. Runde wie folgt zunehmen). Viel Spaß beim stricken!
22.10.2020 - 10:25Hallo Ich möchte sicher sein, dass ich diese Anleitung richtig verstehe Raglanzunahme: In der zweiten, vierten, achten, zehnten, vierzehnten, sechzehnten etc. Runde wird zugenommen, in der sechsten, zwölften, achtzehnten also in jeder sechsten Runde wird nur der Lochstreifen fortgesetzt ohne Zunahme. Habe ich das richtig verstanden? Vielen Dank für ihre Hilfe Stefania
21.10.2020 - 18:48DROPS Design answered:
Liebe Stefania, es wird nach einem unterschiedlichen Rythmus beim Vorder- und Rückenteil und bei den Ärmeln zugenommen, dh es wird entweder 8 Maschen pro Runde (= überall) oder nur 4 Maschen (nur bei den Ärmeln oder nur beim Vorder-/Rückenteil, je nach der Größe) zugenommen - siehe RAGLANZUNAHMEN um zu wissen, wie man die Löcher in jede 2. Runde arbeitet muss, wenn man in jede 4. Runde zunimmt. Viel Spaß beim stricken!
22.10.2020 - 10:06Er staan 3 verschillende stukjes over meerderen? Wat moet ik wanneer doen?
19.07.2020 - 22:43DROPS Design answered:
Dag Annemarie,
Eerst gaat het over het meerderen bij de raglan en ho je dit op elke 2e naald doet (dus zonder gaatjes te maken) en hoe je dit voor en na de markeerdraad doet. Dan staat er ook omschreven hoe je voor de raglan meerdert op elke 4e naald (waarbij je gaatjes maakt) en hoe je dit voor en na de markeerdraad doet. Tot slot staat een algemene tip voor het meerderen (na de tip voor het minderen) en deze is voor de mouwen.
20.07.2020 - 08:25Ser nå at mitt problem er; 2 og 4 omgang hvor det bare står at kastene strikkes rett, det skal bli hull.. Såpass forstår jeg, men skal det felles/økes på disse omgangene også? Det vanlige er at det strikkes "glattstrikk" på "vrangen" og mønster på alle oddetall. Men da får jeg ikke omgang 3 til å gå opp med felling/ økning til raglan , omgang nr.2. Aldri hatt sånne problemer før, nettopp strikket og heklet 2 modeller fra dere.
14.06.2020 - 15:50DROPS Design answered:
Hej Bente, I og med du strikker rundt, strikkes hver pind i diagrammet fra retsiden. Hulmønsteret i diagrammet strikkes 2 ret sammen, 1 kast det vil sige at du har samme antal masker efter mønsterpinden ifølge diagrammet. Raglan udtagningerne sker udover udtagningerne i diagrammet, så dem strikker du først på hver 2.omgang og senere på hver 4.omgang. God fornøjelse!
25.06.2020 - 08:07Thank you for your reply. I love Drops patterns, getting brilliant results but think some things do get lost in translation! Where A3 fits in is not explained anywhere in the pattern though perhaps it is a convention well understood in Norway so can I confirm the sleeve pattern? The yoke has a total of 52 rows, and I have tried to work out how that translates into the A1/A2/A3 pattern. Is A2 the repeat one? A1, A2x5,A3?
12.06.2020 - 14:03DROPS Design answered:
Dear Mrs Graham, A.3(= 6 rows) is worked at the very end of body see: When the piece measures 32-32-32-33-33-32 cm work A.3 across all stitches. Then cast off ... - diagrams A.1 and A.2 are worked on yoke: you first work A.1 (= 6 rows), then repeat A.2 (=8 rows) while increasing for raglan as explained in the writte pattern (see RAGLAN)- read more here about diagrams. Happy knitting!
12.06.2020 - 15:12I am not clear about the sleeves. The diagram shows A1, A2 and A3 but there is no mention of A3 though it implies there are 6 rounds. Is the sequence A1, A2, A3, A1, A2, A3?
12.06.2020 - 10:36DROPS Design answered:
Dear Catriona, A.3 is worked at the very end of the body, just before casting off the stitches. Happy knitting!
12.06.2020 - 12:24Jeg sliter også med å forstå økningene på erm/bol. Raglan er jo 4 ganger(8) mellom bol og ermer. Armene er jo mellom forstykket og bakstykket. Kommer dette i tillegg til raglanfellingen?
11.06.2020 - 20:35DROPS Design answered:
Hei Bente. Denne toppen strikkes ovenfra og ned, (raglansøkninger, ikke fellinger). Det økes forskjellig på for-bakstykket og på ermene. For-bakstykket økes det på hver 2.omgang 12-15-17-25-30-35 ganger, deretter på hver 4.omgang 7-7-7-4-3-2 ganger. På ermene økes det (samtidig som for-bakstykket) på hver 2.omgang 18-23-27-29-26-25 ganger, deretter på hver 4.omgang 4-3-2-2-5-7 ganger. I str S vil man øke til både for-bakstykke og ermene på hver 2. omgang 12 ganger, deretter på for-bakstykke øke på hver 4. omgang 7 ganger, samtidig som det ved ermene fortsettes å økes på 2. omgang 6 ganger og deretter på hver 4. omgang 4 ganger. God Fornøyelse!
15.06.2020 - 10:26Rebonjour, j'ai bien avancé mais j'ai besoin d'une confirmation. Est-ce juste qu'après avoir augmenté 15x tous les 2 tours sur le dos/devant, on ne le fait plus et donc on a plus les trous du raglan sur le dos/devant alors que l'on continue sur les manches encore 8x ? (Ça ne se voit pas sur l'image!) Taille M
16.05.2020 - 15:40DROPS Design answered:
Bonjour Fabienne, vous devez avoir des trous tous les 2 tours comme avant - quand vous commencez à diminuer tous les 4 tours, tricotez comme indiqué sous Augmenter tous les 4 tours ainsi: ... avant le fil marqueur... après le fil marqueur. En tricotant les 4 tours décrits, vous augmentez au 1er tour, et au 3ème tour, vous tricotez le motif ajouré (= 1 jeté et 1 diminution pour compenser le jeté). Bon tricot!
18.05.2020 - 08:01Bonjour, je vois que pas mal de questions sont au sujet du raglan et des manches. J'ai déjà lu les réponses mais j'ai encore besoin d'une précision. Quand on commence le raglan doit-on faire successivement les augmentations des 2 tours puis ceux des 4 tours ou tous les 4 tours on additionne les augmentations. Dit autrement, est-ce que le Tour 1 correspond à l'augmentation faite tous les deux tours ? J'espère me faire comprendre ;-)
12.05.2020 - 13:58DROPS Design answered:
Bonjour Fabienne, les augmentations du dos/du devant et des manches se font en même temps mais à un rythme différent, autrement dit vous allez d'abord augmenter 8 mailles tous les 2 tours (dos, devant et manches), puis soit 4 mailles (manches seulement ou dos/devant seulement en fonction de la taille) soit 8 mailles (partout). Vous augmentez donc d'abord tous les 2 tours, puis tous les 4 tours. En espérant répondre à votre question. Bon tricot!
12.05.2020 - 14:28