
Popular categories
Looking for a yarn?


|
|||||||||||||||||||||||||||||||||||||||||||||||||||||||||||||
A Flair for Spring |
|||||||||||||||||||||||||||||||||||||||||||||||||||||||||||||
 |
 |
||||||||||||||||||||||||||||||||||||||||||||||||||||||||||||
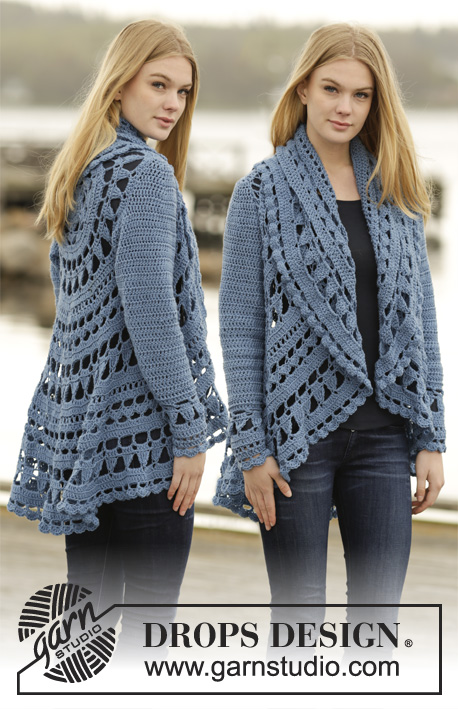
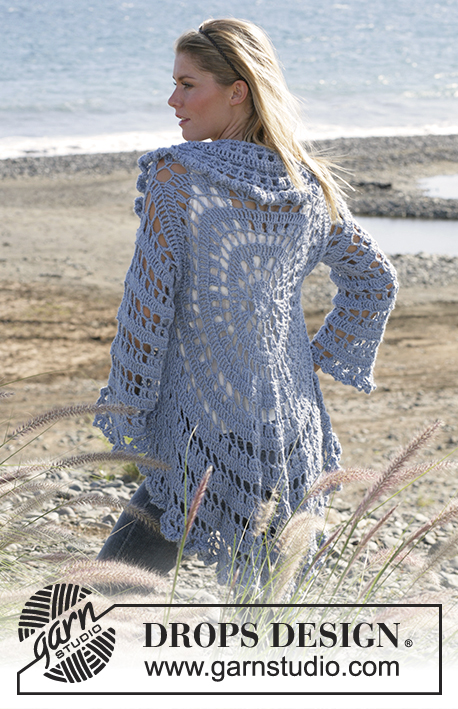
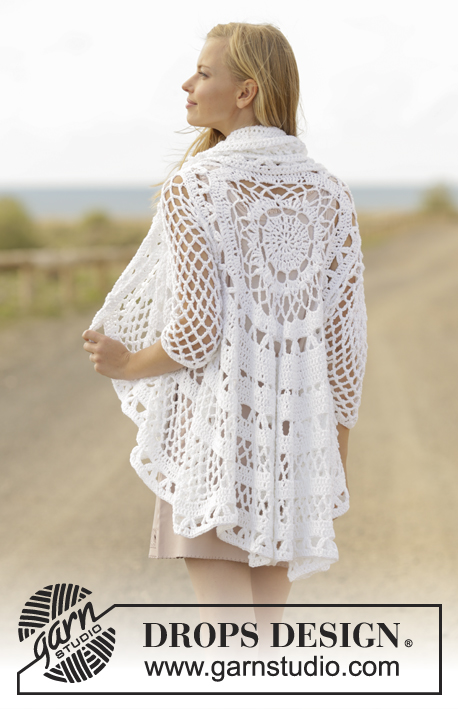
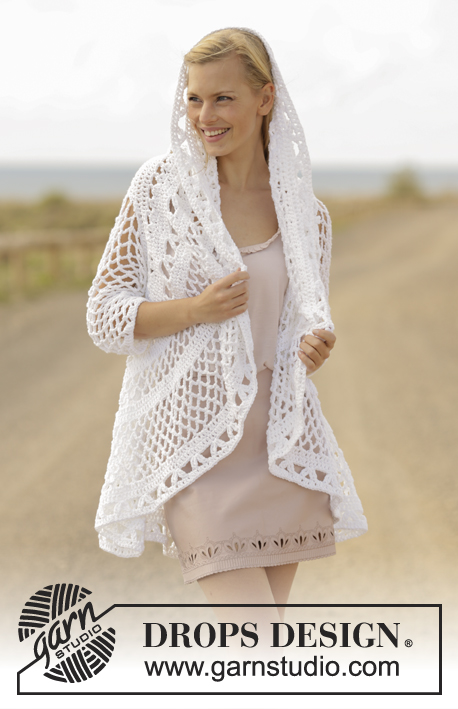
Crochet jacket worked in a circle with lace pattern in DROPS Paris. Size: S - XXXL
DROPS 177-10 |
|||||||||||||||||||||||||||||||||||||||||||||||||||||||||||||
|
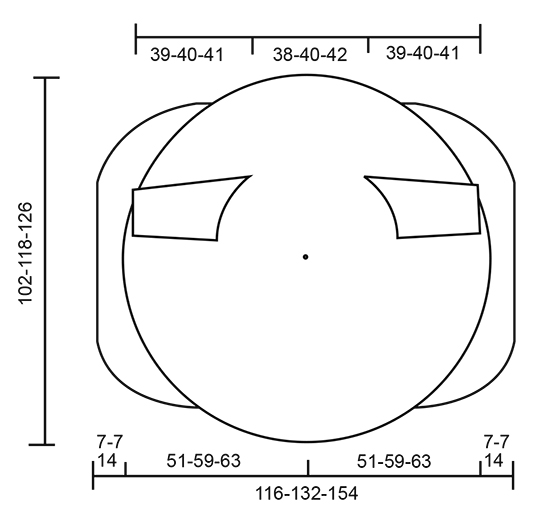
PATTERN: See diagrams A.1 to A.7. A.1 shows beginning and end of every round, work A.2 5 times in total on round. A.3 shows beginning and end of every round, work A.4 12 times in total on round. Work A.5/A.6/A.7 in the round - A.x shows beginning and end of every round. CROCHET INFO: Replace first double crochet at beginning of round with 3 chain stitches, finish with 1 slip stitch in 3rd chain stitch at beginning of round. CROCHET TIP (applies to sleeve): After last single crochet on round work 6 chain stitches and continue on to next round with 1 single crochet around next chain space (= first chain space on next round). NOTE: Mark beginning of round with 1 marker thread between last chain stitch and first single crochet on next round, move the marker thread upwards. NOTE: BE CAREFUL NOT TO DISPLACE THE MARKER THREAD. DECREASE TIP: Work 1 single crochet around next chain space but wait with last pull through, work next single crochet around next chain space (do not work 6 chain stitches between single crochets), on last pull through, pull yarn through all 3 loops on hook. ---------------------------------------------------------- JACKET WORKED IN A CIRCLE: Chain 5 on hook size 4.5 mm/US 7 with Paris and form a ring with 1 slip stitch in first chain stitch. Then work as follows: Work A.1 (the middle of A.1 shows beginning and end of every round, i.e. work from middle of A.1), A.2 5 times in total, finish with the other half of A.1. REMEMBER THE CROCHET GAUGE! When A.1/A.2 have been worked vertically, there are 156-156-156 double crochet on last round. Piece measures approx. 30 cm / 11¾" in diameter. Then work as follows: Work A.3 (the middle of A.3 shows beginning and end of every round, i.e. work from middle of A.3), A.4 12 times in total, finish with the other half of A.3 - AT THE SAME TIME on last round increase 7 double crochet evenly (increase by working 2 double crochet in same double crochet) = 202 double crochet on round. When A.3/A.4 have been worked vertically, piece measures approx. 40 cm / 15¾" in diameter. Work 1 slip stitch in each of the first 2 double crochet, next round begin from here (i.e. mid back of neck). Now work differently in the different sizes. SIZE S-M: ROUND 1: READ CROCHET INFO! Work 1 double crochet in each of the first 30 double crochet, work 32 loose chain stitches for armhole, skip the next 32 double crochet, work 1 double in each of the next 78 double crochet, work 32 loose chain stitches for armhole, skip the next 32 double crochet, work 1 double crochet in each of the last 30 double crochet = 202 stitches. ROUND 2: Work 1 double crochet in every double crochet and 32 double crochet around each chain space - AT THE SAME TIME increase 14 stitches evenly = 216 double crochet. ROUND 3: Work 1 double crochet in every double crochet while AT THE SAME TIME increasing 12 double crochet evenly = 228 double crochet. SIZE L/XL: ROUND 1: READ CROCHET INFO! Work 1 double crochet in every double crochet while AT THE SAME TIME increasing 14 double crochet evenly = 216 stitches. ROUND 2: Work 1 double crochet in each of the first 32 double crochet, work 35 loose chain stitches for armhole, skip the next 35 double crochet, work 1 double crochet in each of the next 82 double crochet, work 35 loose chain stitches for armhole, skip the next 35 double crochet, work 1 double crochet in each of the last 32 double crochet = 216 double crochet. ROUND 3: Work 1 double crochet in every double crochet and 35 double crochet around each chain space - AT THE SAME TIME increase 12 stitches evenly = 228 double crochet. SIZE XXL/XXXL ROUND 1: READ CROCHET INFO! Work 1 double crochet in every double crochet while AT THE SAME TIME increasing 14 double crochet evenly = 216 double crochet. ROUND 2: Work 1 double crochet in every double crochet while AT THE SAME TIME increasing 24 double crochet evenly = 240 stitches. ROUND 3: Work 1 double crochet in each of the first 34 double crochet, work 38 loose chain stitches for armhole, skip the next 38 double crochet, work 1 double crochet in each of the next 96 double crochet, work 38 loose chain stitches for armhole, skip the next 38 double crochet, work 1 double crochet in each of the last 34 double crochet = 240 double crochet. ROUND 4: Work 1 double crochet in every double crochet and 38 double crochet around each chain space - AT THE SAME TIME increase 12 stitches evenly = 252 double crochet. ROUND 5: Work 1st round in A.5 = 84 chain spaces. ROUND 6: Work 2nd round in A.5 while AT THE SAME TIME increasing 12 double crochet evenly = 264 double crochet. ALL SIZES: = 228-228-264 double crochet. Now work in the round according to A.5 (A.x shows how rounds begin and end), AT THE SAME TIME increase (increase on rounds with arrow) as follows: ROUND 1 (no increase): = 76-76-88 chain spaces. ROUND 2: Increase 33-33-33 double crochet evenly (NOTE: increase in single crochets, not around chain spaces) = 261-261-297 double crochet. ROUND 3: Increase 15-15-15 double crochet evenly = 276-276-312 double crochet. ROUND 4: Increase 18-18-18 double crochet evenly = 294-294-330 double crochet. When A.5 has been worked vertically, circle measures approx. 29-29-33 cm / 11½"-11½"-13" from middle (= 58-58-66 cm / 22¾"-22¾"-26" in diameter). Now work in the round according to diagram A.6 (A.x shows how rounds begin and end), AT THE SAME TIME increase (increase on round with arrow) as follows: ROUND 1 (no increase): = 49-49-55 fans. ROUND 2 (increase in diagram): (24-24-27 repetitions of 13 double crochet and 1 repetition of 7 double crochet) = 319-319-358 double crochet. ROUND 3: Increase 23-23-23 double crochet evenly = 342-342-381 double crochet. When A.6 has been worked vertically, circle measures approx. 34-34-38 cm / 13½"-13½"-15" from middle (= 68-68-76 cm / 26¾"-26¾"-30" in diameter). Now work in the round according to A.7 (A.x shows how rounds begin and end), AT THE SAME TIME increase (increase on rounds with arrow) as follows: ROUND 1 (no increase): = 114-114-127 chain spaces. ROUND 2 (no increase): = 114-114-127 chain spaces. ROUND 3: Increase 20-20-20 chain spaces evenly (increase by working 1 double crochet, 2 chain stitches, 1 double crochet and 2 chain stitches around same chain space = 1 chain space increased) = 134-134-147 chain spaces. ROUND 4 (no increase): = 402-402-441 double crochet. ROUND 5: Increase 15-15-15 double crochet evenly = 417-417-456 double crochet. Repeat 1st and 2nd round in A.7 (without increases) = 139-139-152 chain spaces. In size S/M cut the yarn. Continue in size L-XXXL as follows: SIZE L/XL - XXL/XXXL: Repeat 2nd round in A.7 AT THE SAME TIME increase as follows: ROUND 6: Increase 6-6 chain spaces evenly (increase by working 1 single crochet, 6 chain stitches, 1 single crochet and 2 chain stitches around same chain space = 1 chain space increased) = 145-158 chain spaces. ROUND 7 (no increase): = 145-158 chain spaces. ROUND 8: Increase 5-6 chain spaces evenly = 150-164 chain spaces. ROUND 9 (no increase): = 150-164 chain spaces. Cut the yarn. ALL SIZES: = 139-150-164 chain spaces. Continue working only over 39-42-45 chain spaces in each side – i.e. do not work over 30-33-37 chain spaces at the top by neck and 31-33-37 chain spaces at bottom of back. Continue with explanation under left front piece. LEFT FRONT PIECE: = 39-42-45 chain spaces. Continue back and forth as follows: ROW 1: Work slip stitches until middle of the first chain space, 1 single crochet, * work 6 chain stitches, 1 single crochet around next chain space *, repeat from *-* and finish with 1 single crochet around last chain space = 38-41-44 chain spaces. Repeat 1st row 3-3-7 more times. 35-38-37 chain spaces remain at the edge of front piece. Cut the yarn. RIGHT FRONT PIECE: Work same way as on left front piece over 39-42-45 chain spaces in the right side. Cut the yarn. FINISHING EDGE: Work an edge around the entire circle as follows: Repeat 3rd-5th round in A.7 (and A.x) with increases as follows: ROUND 3 (no increase): I.e. around every chain space work 1 double crochet and 2 chain stitches = 147-158-180 chain spaces. ROUND 4: Increase 15-27-18 double crochet evenly = 456-501-558 double crochet. ROUND 5: Increase 12-27-18 double crochet evenly = 468-528-576 double crochet. Now repeat 1st and 2nd round in A.6 (and A.x) as follows: ROUND 1 (no increase): = 78-88-96 fans. ROUND 2 (no increase): (39-44-48 repetitions of 13 double crochet) = 507-572-624 double crochet. Fasten off. Circle measures approx. 51-59-63 cm / 20"-23 1/4-24¾" from middle mid back (= 102-118-126 cm / 40"-46 ½"-49½" in diameter in height), and approx. 58-66-77 cm / 22¾"-26"-30½" from middle out to the side (= 116-132-154 cm / 45¾"-52"-60½" in diameter in width). SLEEVE: Worked in the round from armhole and down, begin mid under sleeve (= 64-70-76 double crochet on armhole). ROUND 1: READ CROCHET TIP! Work * 1 single crochet in double crochet, 6 chain stitches, skip approx. 4 double crochet *, repeat from *-* around entire armhole, there should be 15-18-21 chain spaces around armhole. Continue to work 6 chain stitches and 1 single crochet around every chain space. When piece measures 4 cm / 1½", decrease 1 chain space before marker thread - READ DECREASE TIP! Repeat decrease alternately on each side of marker thread every 4 cm / 1½" 4-5-6 more times = 10-12-14 chain spaces. When piece measures 38-39-40 cm / 15"-15¼"-15¾", work next round as follows: Work 3 chain stitches (= 1 double crochet), work 4 double crochet around every chain space, finish with 1 slip stitch in 3rd chain stitch at beginning of round = 40-48-56 double crochet. Sleeve measures approx. 39-40-41 cm / 15¼"-15¾"-16⅛". Fasten off. Work another sleeve the same way. |
|||||||||||||||||||||||||||||||||||||||||||||||||||||||||||||
Diagram explanations |
|||||||||||||||||||||||||||||||||||||||||||||||||||||||||||||
|
|||||||||||||||||||||||||||||||||||||||||||||||||||||||||||||

|
|||||||||||||||||||||||||||||||||||||||||||||||||||||||||||||

|
|||||||||||||||||||||||||||||||||||||||||||||||||||||||||||||
|
|||||||||||||||||||||||||||||||||||||||||||||||||||||||||||||
|
Have you made this or any other of our designs? Tag your pictures in social media with #dropsdesign so we can see them! Do you need help with this pattern?You'll find tutorial videos, a Comments/Questions area and more by visiting the pattern on garnstudio.com. © 1982-2024 DROPS Design A/S. We reserve all rights. This document, including all its sub-sections, has copyrights. Read more about what you can do with our patterns at the bottom of each pattern on our site. |
|||||||||||||||||||||||||||||||||||||||||||||||||||||||||||||


With over 40 years in knitting and crochet design, DROPS Design offers one of the most extensive collections of free patterns on the internet - translated to 17 languages. As of today we count 304 catalogs and 11422 patterns - 11417 of which are translated into English (US/in).
We work hard to bring you the best knitting and crochet have to offer, inspiration and advice as well as great quality yarns at incredible prices! Would you like to use our patterns for other than personal use? You can read what you are allowed to do in the Copyright text at the bottom of all our patterns. Happy crafting!
Comments / Questions (166)
Hi, I've not worked by diagram. I have chain 5 and slip stitch to form a circle, but haven't figured out how to do A1 then go to A2 or even any further. I do understand the symbols for the stitches, but don't understand how to get started from the circle. I know to chain 3, but what do I do from that point? Do I do 1 chain, 1 double, etc. from the right in A1 to the left in A2? I also don't understand how to finish A1. Is the circle crocheted in panels or is it a circle that goes in rounds?
31.01.2018 - 15:26DROPS Design answered:
Dear Mrs Howell, the circle is worked in the round, work first end of A.1 starting from the 3 ch (= 1 ch on round 1), then repeat A.2 a total of 5 times in the round and finish with last part of A.1 (= beg of A.1, just before the 3 chains = 1 dc, 1 ch, 1 sl st in 3rd ch from beg of round). Continue that way working round 2 in A.1, then repeating round 2 in A.2 and finishing with round 1 at the beg of A.1. Happy crocheting!
31.01.2018 - 15:52Hallo, ich habe ein Verständnisproblem bei den Zunahmen. Ich habe bis A5 und dann bei alle Größen die 2. Runde fertig. Jetzt heißt es, ich soll 33 Maschen gleichzeitig zunehmen. Muss ich die nur vorne und hinten zunehmen oder auch über den Armlöchern? Gibt es einen Trick, der mir hilft, auszurechnen, nach wievielen Maschen ich wieder zunehmen muss? Lieben Dank!
06.01.2018 - 09:59DROPS Design answered:
Liebe Alexandra, diese 33 Maschen sollen um der gesamte Runde zugenommen werden - siehe hier Tipp um die Zunahmen gleichmäßig zu verteilen. Viel Spaß beim häkeln!
08.01.2018 - 08:58Sue Lopez wrote:
Thank you! I think it makes sense!!
28.11.2017 - 18:04Sue Lopez wrote:
Finished round 6 of xxl, 264 dc. Next is all sizes -but its chain spaces not continuation of A.5 round 3. If I go to A.7 it shows 2 rows of chains not the one that is listed, followed by 3 rows of inc dc. I'm not sure which diagram and rows are correct.
27.11.2017 - 16:16DROPS Design answered:
Dear Mrs Lopez, after you have worked the first 2 rounds in A.5 and get the 264 dc, work A.5 from row 1 again (= 88 ch-spaces), then work row 2 to 4 in A.5 increasing eenly 33 dc on row 1, 15 dc on row 2 and 18 dc on row 3 = 330 dc. A.5 has been worked 1 time in height, work now A.6 in the round (= 55 fans on row 1). Happy crocheting!
28.11.2017 - 08:45I love this and it is so beautiful. I understand we are suppose to make it by diagram. Instead is there any way possible to get it in written form such as, row one chain 5 then slip stitch , row two 30 double crochets in circle . I have been crocheting all my life and this is so beautiful but I cannot for the life of me figure out what I am supposed to do.
24.08.2017 - 23:13DROPS Design answered:
Dear Mrs Garland, you will find over diagrams all symbols used in diagram, and the sts /group of sts they are matching too. Should you need any further assistance reading diagrams, you are welcome to contact your DROPS Store even per mail or telephone. Happy crocheting!
28.08.2017 - 13:19RVlry says this pattern is downloadable but I can't figure out how. Is there a link or button I'm missing? Thanks
17.08.2017 - 22:34DROPS Design answered:
Dear Nikki, click on the icon 'Print pattern', just after materials. Happy crocheting!
18.08.2017 - 09:59Hallo :-) Ich habe bis zum Ende A 7 fertig gehäkelt. Ich muss mit "alle größen" weiter machen. Nun nur 39 luftmaschenbögen an beiden Seiten. Nicht mehr über 30 Bögen im Nacken und 31 am Rücken. Und dann mit linkes vorderteil weiter arbeiten. Ich versteht nicht ganz wie und wo genau ich weiter machen muss. Wenn ich 39 Bögen häkeln soll, aber im Nacken 30 und Rücken 31, hab ich 61 Bögen. Links und rechts bei den armen ist dann nichts? Mich verwirrt es gerade. LG caro
08.08.2017 - 09:51DROPS Design answered:
Liebe Caro, schauen Sie mal die Maßskizze, die oberen + die unteren mittleren Bögen werden nicht mehr gehäkelt, nur an beiden Seiten für die Vorderteilen. Folgen Sie den Kreis in der Mitte (damit die Armlöcher gegenüber sind), dann zahlen Sie die 30 Bögen am Nacken und die 38 Bögen unten und inzwischen haben Sie 39 Bögen für beide Vorderteile. Viel Spaß beim häkeln!
08.08.2017 - 11:11Is there a video for this pattern. Found video for Fall Festival.. I´m not good at diagrams thanks Pia.
26.07.2017 - 12:13DROPS Design answered:
Dear Mrs Bøgelund Dworak, we will add your request for a video on our wishlist - start reading diagrams on the bottom conrer on the right side and read every round from the right towards the left. Each symbol = 1 st/group of st as explained under diagram text. Should you need any further assistance for reading diagrams, you are welcome to contact your DROPS store, even per mail or telephone. Happy crocheting!
26.07.2017 - 14:27Hi, is there ant information how much yarn I need for the pattern? Sincerely, M.
24.07.2017 - 09:37DROPS Design answered:
Hi Milena, you will find all informations under tab "Materials", ie: Size: S/M - L/XL - XXL/ XXXL Materials: DROPS PARIS from Garnstudio (belongs to yarn group C) 800-950-1150 g colour 16, white In size S/M for example you need 800 g DROPS Paris / 50 g a ball = 16 balls Paris. Happy crocheting!
24.07.2017 - 09:47Dank u wel voor uw reactie. Ik heb het opnieuw gehaakt. En nu precies 156 stokjes.😃 Nu ga ik verder metA3 en A4. Maar ik kom maar niet uit met de V vorm. Volgens mij moet ik in totaal 26 van die v vorm hebben. En ik kom maar aan 25. Ik kan maar niet vinden waar de fout zit. Kunt u mij helpen à.u.b? Vriendelijke groet, Marianne van Wessel
14.07.2017 - 17:41DROPS Design answered:
Hoi Marianne, Ik heb het patroon even grondig nagekeken op dit punt en als je de herhalingen volgt van de telpatronen kom ik uit op 24 V-vormen en na de 7 meerderingen en kom ik op 187 i.p.v. 202 stokjes. (Volgens de beschrijving zou je inderdaad op 26 v-vormen uit moeten komen.) Waarschijnlijk zit er ergens een foutje. Ik heb het doorgegeven aan design en hoop spoedig op een antwoord/oplossing. Bedankt voor je geduld alvast.
16.07.2017 - 12:57