
Popular categories
Looking for a yarn?


|
||||||||||||||||||||||||||||
Skipper |
||||||||||||||||||||||||||||
 |
 |
|||||||||||||||||||||||||||
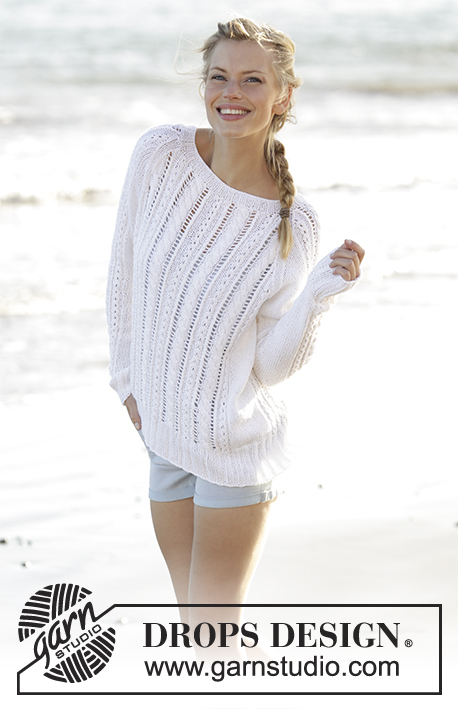
Knitted jumper with cables and raglan in DROPS Belle. Sizes S - XXXL.
DROPS 177-11 |
||||||||||||||||||||||||||||
|
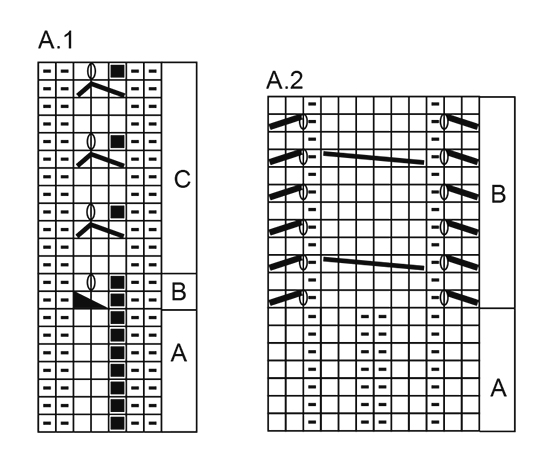
RIDGE/GARTER STITCH (worked in the round): 1 ridge = 2 rounds. Knit 1 round and purl 1 round. PATTERN: See diagrams A.1 and A.2. The diagrams show all rows in the pattern from the right side. RAGLAN: Decrease 2 stitches in each transition from body and sleeves. Decrease as follows from the right side: Work until there are 3 stitches left before the next marker thread. Knit 2 together, knit 2 (the marker thread sits between these 2 stitches), slip 1 stitch as if to knit, knit 1, lift the slipped stitch over. KNITTING TIP: If the knitting tension is not right in height and the work is too tight, the raglan decreases will be too short and the armhole too small. This can be adjusted by working an extra round without decreases evenly spread between rounds with decreases. ---------------------------------------------------------- JUMPER: The body is worked in the round on circular needle. The sleeves are worked in the round on double pointed/small circular needle. Then the body and the sleeves are worked in the round with a raglan decreases. BODY: Cast on 184-200-216-236-268-284 stitches with circular needle size 4 mm and Belle. Knit 1 round, then continue as follows: Purl 1, knit 2, * purl 2 / knit 2 *, work from *-* across the next 4-8-12-8-16-20 stitches, * A.1 A (= 6 stitches), A.2 A (= 12 stitches) *, work from *-* in total 4-4-4-5-5-5 times, A.1 A, * knit 2 /purl 2 *, work from *-* across the next 12-20-28-20-36-44 stitches, knit 2, * A.1 A (= 6 stitches), A.2 A ( = 12 stitches) *, work from *-* in total 4-4-4-5-5-5 times, A.1 A, * knit 2 / purl 2 *, work from *-* across the next 4-8-12-8-16-20 stitches, knit 2,purl 1. Continue this pattern until the piece measures 8 cm, continue with A.1B over A.1 A and A.2 B over A.2A and stocking stitch over the 14-22-30-22-38-46 stitches of rib in each side. When A.1 B has been completed 1 time in height continue with A.1 C over A.1 B, there are now 194-210-226-248-280-296 stitches on the needle. Insert 2 marker threads in the piece, 1 at the beginning of the round and 1 after 97-105-113-124-140-148 stitches = the sides. REMEMBER THE KNITTING TENSION! When the piece measures 34-34-35-35-35-35 cm cast off 8-8-10-10-12-14 stitches in each side (= 4-4-5-5-6-7 stitches on each side of each marker thread) = 89-97-103-114-128-134 stitches on the front piece and on the back piece. Lay the piece to one side and work the sleeves. SLEEVES: The piece is worked in the round with double pointed needles, change to a short circular needle when there are enough stitches. Cast on 38-38-42-42-46-46 stitches with double pointed needles size 4 mm and Belle. Knit 1 round, then work as follows: Sizes S-M-XXL-XXXL: purl 1, * knit 2, purl 2 *, work from *-* over the next 4-4-8-8 stitches, knit 2, A.1 A, A.2 A, A.1A, * knit 2, purl 2 *, work from *-* over the next 4-4-8-8 stitches, knit 2, purl 1. Sizes L-XL: knit 1, * purl 2, knit 2 * work from *-* over the next 8 stitches, A.1 A, A.2 A, A.1A, * knit 2, purl 2 *, work from *-* over the next 8 stitches, knit 1. Continue this pattern until the piece measures 8 cm, continue with A.1B over A.1A and A.2B over A.2 A and stocking stitch over the 14-14-18-18-22-22 stitches rib. When A.1 B has been completed 1 time in height continue with A.1 C over A.1 B, there are now 40-40-44-44-48-48 stitches on the needle. Insert 1 marker thread at the beginning of the round = mid under sleeve. When the piece measures 10-10-10-12-12-12 cm increase 1 stitch on each side of the marker thread, the increased stitches are worked in stocking stitch. Increase every 2-1½1½-1-1-1 cm in total 15-19-21-23-23-25 times = 70-78-86-90-94-98 stitches. When the piece measures 48-47-47-46-44-43 cm, adjust so that the next round to be worked is the same round in the pattern where you stopped on the body, on the next round cast off 8-8-10-10-12-14 stitches mid under sleeve = 62-70-76-80-82-84 stitches. Work the other sleeve in the same way. YOKE: Place the sleeves on the same circular needle as the body where the cast-off stitches are for the armholes = 302-334-358-388-420-436 stitches. Insert a marker thread in each transition between body and sleeves = 4 marker threads. Continue the pattern as before, AT THE SAME TIME as you decrease to RAGLAN – see description above. The decreases are different for the body and sleeves. Decrease as follows: RAGLAN SLEEVE: Decrease every 4th round 3-2-0-0-2-4 times, every 2nd round 17-22-24-28-28-27 times, then every round 0-0-3-1-0-0 times (in total 20-24-27-29-30-31 times). RAGLAN BODY: Decrease every 2nd round 19-22-22-23-23-26 times and every round 5-5-7-11-17-16 times (in total 24-27-29-34-40-42 times). After all the decreases, there are 126-130-134-136-140-144 stitches on the needle. Work 1 RIDGE – see description above, on the first round decrease 34-34-34-32-32-32 stitches evenly along the round = 92-96-100-104-108-112 stitches. Continue with rib (knit 2 / purl 2) for 3 cm. Cast off with knit over knit and purl over purl. ASSEMBLY: Sew the openings mid-under the sleeves. |
||||||||||||||||||||||||||||
Diagram explanations |
||||||||||||||||||||||||||||
|
||||||||||||||||||||||||||||
|
||||||||||||||||||||||||||||

|
||||||||||||||||||||||||||||
|
Have you made this or any other of our designs? Tag your pictures in social media with #dropsdesign so we can see them! Do you need help with this pattern?You'll find tutorial videos, a Comments/Questions area and more by visiting the pattern on garnstudio.com. © 1982-2024 DROPS Design A/S. We reserve all rights. This document, including all its sub-sections, has copyrights. Read more about what you can do with our patterns at the bottom of each pattern on our site. |
||||||||||||||||||||||||||||


With over 40 years in knitting and crochet design, DROPS Design offers one of the most extensive collections of free patterns on the internet - translated to 17 languages. As of today we count 304 catalogues and 11422 patterns - 11422 of which are translated into English (UK/cm).
We work hard to bring you the best knitting and crochet have to offer, inspiration and advice as well as great quality yarns at incredible prices! Would you like to use our patterns for other than personal use? You can read what you are allowed to do in the Copyright text at the bottom of all our patterns. Happy crafting!
Comments / Questions (87)
Bonjour, je ne comprends pas mon erreur. Je fais la taille s donc 184 mailles et une fois que je termine le 1er tour pour les côtes, il me reste 8 mailles. Que veut dire au dessus des 4-8-12-8-16-20 Mon erreur provient peut-être de là. Merci de votre réponse. Je bloque vraiment.
29.01.2020 - 23:26DROPS Design answered:
Bonjour Mme Mouton, en taille S tricotez ainsi: 1 m envers, 2 m endroit, *2 m envers / 2 m endroit*, tricoter de *-* au-dessus des 4 m suivantes (= 4 m), *A.1 A (= 6 m), A.2 A (= 12 m)*, tricoter de *-* (= 18 m) 4 fois au total (= 18 x 4 = 72 m), A.1 A (= 6 m), *2 m endroit /2 m envers*, tricoter de *-* au-dessus des 12 m suivantes (= 12 m), 2 m endroit, *A.1 A (= 6 mailles), A.2 A (= 12 mailles)*, tricoter de *-* (= 18 m) 4 fois au total (= 18 x 4 = 72 m), A.1 A (= 6 m), *2 m endroit / 2 m envers*, tricoter de *-* au-dessus des 4 m suivantes (= 4 m), 2 m endroit, 1 m envers soit: 1+2 + 4 + 72 + 6+12+2+72+6+4+2+1= 184 m. Bon tricot!
30.01.2020 - 09:41Hei jeg lurer på en ting, stemmer det at man skal kun strikke opp til 34 cm på str M, så felle av til arm, synes det var litt kort genser da ? mens armen skal være 47 cm, så felle av under til arm. Beklager siste mld, at jeg ikke så vilke str jeg strikket, men armen har jeg funnet ut av 👍
19.11.2019 - 14:03DROPS Design answered:
Hei Anita. Ja, målene stemmer. Noen vil kanskje syns genseren er kort andre ikke. Men prøv å mål på deg selv etter målene på målskissen. Har du nok garn, kan du fint strikke den litt lengre. På denne modellen er ermene lengre en bolen/bærestykket. mvh DROPS design
25.11.2019 - 14:17Da har jeg fått strikket vrangborden på armen så har jeg da strikket 10 masker først, så A1B og A2B og 10 masker, stemmer dette ???
19.11.2019 - 00:18DROPS Design answered:
Hei Anita, Du sier ikke hvilken størrelse du strikker, men i størrelsene S-M-XXL-XXXL du strikker 11 masker før og etter A,1A, A.2A og A.1A . God fornøyelse!
19.11.2019 - 12:21Da har jeg strikket 1 omg rundt etter vrangborden. Da strikket jeg 11 rette, så A1B over A1A og A2B over A2A, så igjen A1B over A1A og A2B over A2A så hadde jeg 6 masker igjen der strikket jeg A1A og så 22 masker rett, det samme gjorde jeg på andre halvdel, men der sluttet jeg med 11 rette som dere så? Er dette riktig ??
12.11.2019 - 14:24DROPS Design answered:
Hej. Efter de 11 m i glattstrikk stickar du "A1B over A1A och A2B over A2A" totalt 4 gånger, sedan stickar du A1B över A1A. Sedan stickar du 22 m glattstrikk och upprepar diagrammen ("A1B och A2B "totalt 4 gånger och sedan A1B). Sedan avslutar du med 11 m glattstrikk.
13.11.2019 - 08:58Hei nå har jeg strikket vrangborden på 8 cm, så har jeg da strikket A1B over A1A og A2B over A2A og glattstrikk over 22 masker. Så hva gjør jeg nå, begynner forfra igjen? Fir det ikke til å stemme med rundt, å hvor skal neste 22 masker være henne? De skal jo være 22 masker i hver side, men det stemmer ikke, står igjen med 12 masker her?
12.11.2019 - 00:13DROPS Design answered:
Hej. Det är de första 11 m på pinnen tillsammans med de sista 11 m på pinnen som skapar det ena partiet av vrangbord som du nu ska sticka glattstrikk över, och det andra partiet är där du stickat vrangbord "over de neste 20 m " + de 2 m rett efter det. Hoppas det är till hjälp. Mvh DROPS Design
12.11.2019 - 11:51Hei når jeg er ferdig med vrangbprden på 8 hm. Hvordan går då neste runde rundt? Det står her videre fortsetter det med A. 1B og A2B over A2A og glattstrikk over de neste 22 maskene vrangbord i hver side. Dette skjønte jeg ingen ting av, håper dere kan hjelpe det. Mvh Anita Kildahl
11.11.2019 - 12:00DROPS Design answered:
Hej. Se svar över. Du stickar glattstrikk över de första 11 m på pinnen samt de 11 sista (skapar ett parti tillsammans) + på partiet med 22 m vrangbord på andra sidan av genseren. I övrigt stickar du A.1B over A.1 A og A.2 B over A.2A. Lycka till!
12.11.2019 - 11:57Hei jeg holder på med skipper 177-11. Når man er ferdig med vrangborden på 8 hm, så står det! Videre fortsettes det med A. 1B over A.1A og A2B over A2A og glattstrikk over 22 maskene vrangbord i hver side?? Hbor skal vrangborden være henne og hvor mange masker? Mvh Anita Kildahl
11.11.2019 - 10:13Hi I am starting Med size and after adjusting instructions according to Error note above I am getting 201 stitches not 200
25.07.2019 - 13:07DROPS Design answered:
Hi Gail! In size M, you have to cast on 200 stitches for the body. Then we are working following the pattern and we have: 1+2+8+ (6+12)x4 +6+20+2+ (6+12)x4 +6+8+2+1 = 200 stitches. Happy knitting!
25.07.2019 - 18:14Bonjour Merci pour les beaux modèles que vous nous offrez. Je suis en train d'étudier le modèle 177-11 en taille XL, j'ai monté 236 m, fais un tour endroit et au rang suivant je me retrouve déjà avec 248. Comment dois-je faire ?
18.06.2019 - 20:16DROPS Design answered:
Bonjour Marie Jo et merci. Tricotez vos 236 m ainsi: 1 m envers, 2 m endroit, *2 m envers, 2 m endroit* x 4 = 8 m, *A.1 A (= 6 m soit: 2 m env, 2 m end, 2 m env), A.2 A (= 12 m soit 2 m end, 1 m env, 2 m end, 2 m env, 2 m end, 1 m env, 2 m end))* x 5, A.1 A (= 6 m), *2 m endroit, 2 m envers* x 5 = 20 m, 2 m endroit, *A.1 A (= 6 m), A.2 A (= 12 m)* x 5, A.1 A (= 6 m), *2 m endroit, 2 m envers* x 2 (= 8 m), 2 m endroit, 1 m envers, soit: 1+2+8+ (6+12)x5 + 6 + 20 + 2 + (6+12)x5 + 6 + 8 + 2 + 1 = 236 m. Bon tricot!
19.06.2019 - 07:09I absolutely love the looks of this pattern, I have attempted to make the sweater a few times, but can't figure out how to get the twist after k6, p1, yo, k2tog. in A2.B. The "hole" before the k6 (cable stitches) has a nice twist affect, creating a clear hole, after the cable I get two strands of yarn, not twisted at the hole. It does not look symmetrical, any suggestions?
24.05.2019 - 18:40DROPS Design answered:
Dear Danielle, before and after the 6 stitches of the cable there is a purl stitch, a yarn over and a decresase. make sure that the decrease is a K2tog after the cable and an SSK before the cable. I hope this helps. Happy crafting!
25.05.2019 - 10:21