DROPS Cotton Merino
DROPS Cotton Merino
50% Wool, 50% Cotton
from 3.55 £ /50g
Get the yarn to make this pattern from 39.05£.

The yarn cost is calculated from the pattern’s smallest size and the yarn’s cheapest product type. Looking for an even better price? You might find it on the DROPS Deals!

DROPS Super Sale

Sahara Cardigan

Crochet jacket with lace pattern, worked top down in DROPS Cotton Merino. Sizes S - XXXL.

DROPS 176-17
DROPS Design: Pattern no cm-064
Yarn group B
-----------------------------------------------------------
Sizes: S - M - L - XL - XXL - XXXL
Materials:
DROPS COTTON MERINO from Garnstudio (belongs to yarn group B)
550-600-650-700-800-850 g colour 15, mustard

DROPS CROCHET HOOK SIZE 4 MM – or the size needed to get 18 treble crochets and 9 rows on 10 cm in width and 10 cm in height.
DROPS MOTHER OF PEARL BUTTON, Arched (white) NO 522: 8-8-9-9-9-9 items.
----------------------------------------------------------

-------------------------------------------------------

Alternative Yarn – See how to change yarns here
Yarn Groups A to F – Use the same pattern and change the yarn here
Yarn usage using an alternative yarn – Use our yarn converter here

-------------------------------------------------------

DROPS Cotton Merino
DROPS Cotton Merino
50% Wool, 50% Cotton
from 3.55 £ /50g
Get the yarn to make this pattern from 39.05£.

The yarn cost is calculated from the pattern’s smallest size and the yarn’s cheapest product type. Looking for an even better price? You might find it on the DROPS Deals!

DROPS Super Sale

SAVE 30% on 6 cotton favourites!
Valid until 12.04.2024

Pattern instructions

NOTE: This pattern is written in British English. All measurements in charts are in cm. For conversion from cm to inches - click here. There are different terms for crocheting in British and American English. If this pattern includes crochet, click for "crochet terms" here. For this pattern in American English, please click here.
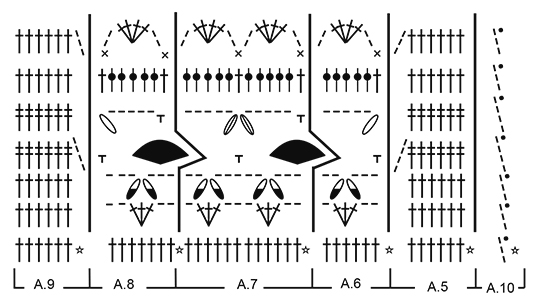
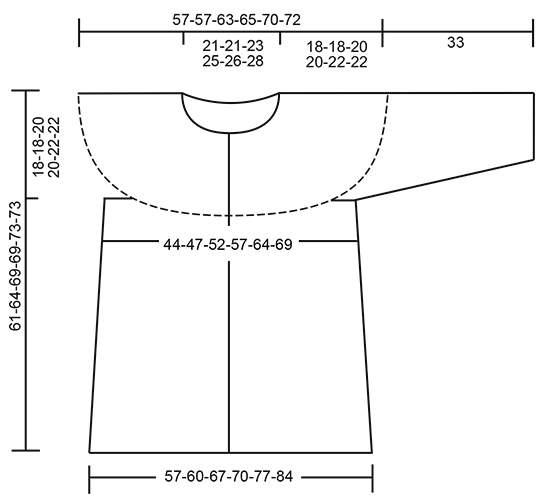
CROCHET INFO:
For when the piece is worked back and forth.
On every row with treble crochets, the first treble crochet is replaced by 3 chain stitches.
On every row with double treble crochets, the first double treble crochet is replaced by 4 chain stitches.
On every row with double crochets, the first double crochet is replaced by 1 chain stitch.

INCREASE TIP:
Increase 1 treble crochet by working 2 treble crochets in 1 treble crochet/double crochet. Do not increase on the band.

DECREASE TIP:
Work 1 treble crochet, but wait with the last yarn over and pull through, then work the next treble crochet and pull the last yarn over through all 3 loops on the hook – you have now decreased 1 treble crochet.

PATTERN:
See diagrams A.1 to A.10. A.10 shows how the pattern starts and finishes when working in the round on the sleeve.
----------------------------------------------------------

YOKE:
The piece is worked top down back and forth. Work 171-171-181-186-191-201 chain stitches with hook size 4 mm and Cotton Merino. Work the next row as follows:
1 treble crochet in the 4th chain stitch (= 2 treble crochets), 1 treble crochet in each of the next 2 chain stitches, * skip 1 chain stitch, 1 treble crochet in each of the next 4 chain stitches *, repeat from *-* = 136-136-144-148-152-160 treble crochets. 

READ CROCHET INFO! Insert 12 markers in the piece as follows: Work 21-21-23-24-25-27 treble crochets AT THE SAME TIME increase 1-5-3-3-4-2 treble crochet/s evenly within these stitches – READ INCREASE TIP, insert the first marker, * work 4 treble crochets, insert the next marker *, repeat from *-* 1 more time, work 16 treble crochets, insert the next marker, * work 4 treble crochets, insert the next marker *, repeat from *-* 1 more time, work 30-30-34-36-38-42 treble crochets AT THE SAME TIME increase 2-10-6-6-8-4 treble crochets within these stitches, insert the next marker, * work 4 treble crochets, insert the next marker *, repeat from *-* 1 more time, work 16 treble crochets, insert the next marker, * work 4 treble crochets, insert the next marker *, repeat from *-* 1 more time, work 21-21-23-24-25-27 treble crochets AT THE SAME TIME increase 1-5-3-3-4-2 treble crochet/s evenly within these stitches = 140-156-156-160-168-168 treble crochets. REMEMBER THE CROCHET TENSION! On the next row from the right side, increase as follows: Increase 1 treble crochet on each side of each marker (= 24 treble crochets increased), repeat the increase on every row from the right side in total 3-3-4-6-7-9 times, then increase before each marker (= 12 treble crochets increased), repeat the increase on every row from the right side in total 4-4-4-2-2-0 times = 260-276-300-328-360-384 treble crochets. The piece now measures approx. 17-17-19-19-21-21 cm. On the next row work as follows: 41-44-48-53-59-63 treble crochets (front piece), 8 chain stitches (armhole), skip 54-56-60-64-68-72 treble crochets from the previous row (will be used later for the sleeve), 70-76-84-94-106-114 treble crochets AT THE SAME TIME increase 1-1-3-1-1-3 treble crochet/s evenly within these stitches (back piece), 8 chain stitches (armhole), skip 54-56-60-64-68-72 treble crochets from the previous row (will be used later for the sleeve) and 41-44-48-53-59-63 treble crochets (front piece) = 169-181-199-217-241-259 treble crochets/chain stitches. THE PIECE IS NOW MEASURED FROM HERE!

Continue by working the first 2 rows in A.x as follows: A.1 (= 6 treble crochet/double treble crochet band), A.2 in total 25-27-30-33-37-40 times in width, A.3, finish with A.4 (= 6 treble crochet/double treble crochet band). Work the 3rd row on A.x (= treble crochet row) and increase 18 treble crochets evenly along the row = 187-199-217-235-259-277 treble crochets. Then work the first 3 rows in A.y, but A.2 is now worked 28-30-33-36-40-43 times in width. Work the 4th row in A.y (= treble crochet row) and increase 18 treble crochets evenly along the row = 205-217-235-253-277-295 treble crochets.

Now work the first 2 rows in A.z. Then repeat the next 2 rows in A.z until the piece measures approx. 25-28-30-30-33-33 cm – adjust after the last of the 2 rows. Then work the 2 last rows in A.z – AT THE SAME TIME on the last row (= treble crochet row) increase 6 treble crochets evenly along the row = 211-223-241-259-283-301 treble crochets. Then work the first 3 rows in A.y, but A.2 is now worked 32-34-37-40-44-47 times in width. Work the 4th row in A.y (= treble crochet row) and increase 6-6-12-6-6-12 treble crochets evenly along the row = 217-229-253-265-289-313 treble crochets.

Continue by working the next 5 rows as follows: A.5 (= band), A.6, A.7 in total 16-17-19-20-22-24 times in width, A.8, finish with A.9 (= band). Then work A.y as follows: A.1 (= 6 treble crochets band), A.2 in total 33-35-39-41-45-49 times in width, A.3, finish with A.4 (= 6 treble crochets band). Then work the last row in A.5-A.9 as follows: A.5 (= band), A.6, A.7 in total 16-17-19-20-22-24 times in width, A.8, finish with A.9 (= band). Cut and fasten the strand.

SLEEVE:
THE PIECE IS NOW MEASURED FROM HERE!
The sleeve is worked in the round and top down - see A.10 for how the rounds start and finish. Start working mid under the sleeve as follows: Work 1 double crochet in the 5th chain stitch of the 8 chain stitches which were worked in the armhole of the body. Work 3 chain stitches (= 1 treble crochet). Continue by working 1 treble crochet in each of the next 3 chain stitches. Continue by working 1 treble crochet in each treble crochet over the sleeve AT THE SAME TIME decrease 1-3-1-5-3-1 treble crochet/s evenly within these stitches – READ DECREASE TIP, before working 1 treble crochet in each of the remaining 4 chain stitches under the sleeve = 61-61-67-67-73-79 treble crochets.

Continue by working the first 2 rounds in A.x as follows: A.2 in total 9-9-10-10-11-12 times in width, finish with A.3. Work the 3rd round in A.x (= treble crochet round) and decrease 6 treble crochets evenly along the round = 55-55-61-61-67-73 treble crochets.
Then work A.y 1 time in height, but A.2 is now worked 8-8-9-9-10-11 times in width.

Now work the first 2 rounds in A.z (A.2/A.3). Then repeat the next 2 rounds in A.z until the piece measures approx. 25-25-25-25-25-25 cm – adjust after the last of these 2 rounds. Then work the 2 last rounds in A.z – AT THE SAME TIME on the last round (= treble crochet round) decrease 6-6-6-6-6-6 treble crochets evenly along the round = 49-49-55-55-61-67 treble crochets. Then work A.y, but A.2 is now worked 7-7-8-8-9-10 times in width. Then work the last round in A.6 and A.8 as follows: A.6 in total 7-7-8-8-9-10 times in width, finish with A.8. Cut and fasten the strand. The sleeve measures approx. 33-33-33-33-33-33 cm. Work the other sleeve the same way.

NECKLINE:
Work a border along the neckline, use hook size 4 mm and Cotton Merino. Start mid front from the right side, work trebles in the chain stitches with trebles in them (i.e. do not work in the chain stitches that were shipped) = 136-136-144-148-152-160 treble crochets - AT THE SAME TIME decrease 27-27-29-33-31-33 treble crochets evenly along these treble crochets = 109-109-115-115-121-127 treble crochets. Then work the last row in A.6 and A.8 as follows: Work A.6 in total 17-17-18-18-19-20 times in width, finish with A.8. Cut and fasten the strand.

ASSEMBLY:
Sew the buttons on the left front piece – the uppermost button is 2 cm from the neckline, the other buttons are placed with approx. 8 cm gaps. The buttons are buttoned between 2 treble crochets on the right front piece.

This pattern has been corrected.

Updated online: 04.06.2018
"The piece is now measured from here" has been added after stitches is set aside for sleeves

Diagram

symbols = slip stitch
symbols = chain stitch
symbols = double crochet in stitch
symbols = double crochet around the chain-space
symbols = treble crochet in stitch
symbols = treble crochet around the chain stitch/chain-space
symbols = double treble crochet in the stitch
symbols = work 1 double treble crochet around the first chain-space, but wait with the last yarn over and pull through, work 1 double treble crochet around the next chain-space and pull the last yarn over through all 3 loops on the hook
symbols = around the chain-space work as follows: Work 1 triple treble crochet, 4 double treble crochets, 5 chain stitches, 4 double treble crochets and 1 triple treble crochet
symbols = work 1 double treble crochet in each of the first 3 double treble crochets, but wait with the last yarn over and pull through on all 3 double treble crochets, skip the next 5 stitches, work 1 double treble crochet in each of the next 2 double treble crochets, but wait with the last yarn over and pull through on both of these double treble crochets, work 1 double treble crochet in the next double treble crochet and pull the last yarn over through all 7 loops on the hook
symbols = work the 3 double treble crochets innermost towards the chain-space as follows: work 1 double treble crochet in each of the first 2 double treble crochets, but wait with the last yarn over and pull through on both of these double treble crochets, work 1 double treble crochet in the next double treble crochet and pull the last yarn over through all 4 loops on the hook
symbols = row/round is already worked, start on the next row/round
diagram
diagram
diagram
Do you have a question? See a list of frequently asked questions (FAQ)

Knitting tension is what determines the final measurements of your work, and is usually measured per 10 x 10 cm. It is provided like so: number of stitches in width x number of rows in height - eg: 19 stitches x 26 rows = 10 x 10 cm.

The knitting tension is very individual; some people knit/crochet loosely while others work tightly. You adjust the knitting tension with the needle size, which is why the suggested needle size is only meant as a guide! You need to adjust this (up or down) to ensure that YOUR knitting tension matches the knitting tension provided in the pattern. If you work with a different knitting tension than provided you will have a different yarn consumption, and your work will have different measurements than what the pattern suggests.

The knitting tension also determines which yarns can replace each other. As long as you achieve the same knitting tension you can replace one yarn with another.

See DROPS lesson: How to measure your tension/gauge

See DROPS video: How to make a gauge tension swatch

The required amount of yarn is provided in grams, eg: 450 g. To calculate how many balls you’ll need you first need to know how many grams are in 1 ball (25g, 50g or 100g). This information is available if you click on the individual yarn quality on our pages. Divide the amount required with the amount of each ball. For example, if each ball is 50g (the most common amount), the calculation will be as follows: 450 / 50 = 9 balls.

The important thing when changing from one yarn to another is that the knitting/crochet tension remains the same. This is so that the measurements of the finished piece will be the same as on the sketch provided. It is easier to achieve the same knitting tension using yarns from the same yarn group. It is also possible to work with multiple strands of a thinner yarn to achieve the knitting tension of a thicker one. Please try our yarn converter. We recommend you to always work a test swatch.

Please NOTE: when changing yarn the garment might have a different look and feel to the garment in the photo, due to individual properties and qualities of each yarn.

See DROPS lesson: Can I use a different yarn than the one mentioned in the pattern?

All our yarns are categorised into yarn groups (from A to F) according to thickness and knitting tension – group A contains the thinnest yarns and group F the thickest. This makes it easier for you to find alternative yarns to our patterns, should you wish to switch yarn. All yarns within the same group have a similar knitting tension and can easily replace each other. However, different yarn qualities have different structures and properties which will give the finished work a unique look and feel.

Click here for an overview of the yarns in each yarn group

At the top of all our patterns you’ll find a link to our yarn calculator, which is a helpful tool should you wish to use a different yarn than suggested. By filling in the yarn quality you wish to replace, the amount (in your size) and number of strands, the calculator will present good alternative yarns with the same knitting tension. Additionally it will tell you how much you’ll require in the new qualities and whether you’ll need to work with multiple strands. Most skeins are 50g (some are 25g or 100g).

If the pattern is worked with multiple colours, every colour will have to be calculated separately. Similarly, if the pattern is worked with several strands of different yarns (for example 1 strand Alpaca and 1 strand Kid-Silk) you will have to find alternatives for each, individually.

Click here to see our yarn calculator

Since different yarns have different qualities and textures we have chosen to keep the original yarn in our patterns. However, you can easily find options among our available qualities by using our yarn calculator, or simply pick a yarn from the same yarn group.

It is possible that some retailers still have discontinued yarns in stock, or that someone has a few skeins at home that they would like to find patterns for.

The yarn calculator will provide both alternative yarn as well as required amount in the new quality.

If you think it's hard to decide what size to make, it can be a good idea to measure a garment you own already and like the size of. Then you can pick the size by comparing those measures with the ones available in the pattern's size chart.

You'll find the size chart at the bottom of the pattern.

See DROPS lesson: How to read size chart

The needle size provided in the pattern serves only as a guide, the important thing is to follow the knitting tension. And since knitting tension is very individual, you will have to adjust the needle size to ensure that YOUR tension is the same as in the pattern – maybe you’ll have to adjust 1, or even 2 needle sizes, up or down to achieve the correct tension. For this, we recommend that you work test swatches.

Should you work with a different knitting tension than the one provided, the measurements of the finished garment might deviate from the measurement sketch.

See DROPS lesson: How to measure your tension/gauge

See DROPS video: How to make a tension/gauge swatch

Working a garment top-down provides more flexibility and room for personal adjustment. For example it is easier to try the garment on while working, as well as making adjustments to length of yoke and shoulder caps.

The instructions are carefully explaining every step, in the correct order. Diagrams are adjusted to the knitting direction and are worked as usual.

The diagram depicts all rows/rounds, and every stitch seen from the right side. It is read from bottom to top, from right to left. 1 square = 1 stitch.

When working back and forth, every other row is worked from the right side and every other row is worked from the wrong side. When working from the wrong side, the diagram will have to be worked reversed: from left to right, knit stitches are purled, purl stitches are knit etc.

When working in the round every round is worked from the right side and the diagram are worked from right to left on all rounds.

See DROPS lesson: How to read knitting diagrams

The diagram depicts all rows/rounds, and every stitch seen from the right side. It is worked from bottom to top, from right to left.

When working back and forth every other row is worked from the right side: from right to left and every other row is worked from the wrong side: from left to right.

When working in the round, every row in the diagram are worked from the right side, from right to left.

When working a circular diagram you start in the middle and work your way outwards, counter clockwise, row by row.

The rows usually start with a given number of chain stitches (equivalent to the height of the following stitch), this will either be depicted in the diagram or explained in the pattern.

See DROPS lesson: How to read crochet diagrams

Instructions for working several diagrams after each other on the same row/round, will often be written like so: “work A.1, A.2, A.3 a total of 0-0-2-3-4 times". This means you work A.1 once, then A.2 is worked once, and A.3 is repeated (in width) the number of times provided for your size – in this case like so: S = 0 times, M = 0 times, L=2 times, XL= 3 times and XXL = 4 times.

The diagrams are worked as usual: begin with the first row in A.1, then work the first row in A.2 etc.

See DROPS lesson: How to read knitting diagrams

See DROPS lesson: How to read crochet diagrams

The total width of the garment (from wrist-to-wrist) will be larger in the larger sizes, despite the actual sleeves being shorter. The larger sizes have longer sleeve caps and wider shoulders, so there will be a good fit in all sizes.

The measurement sketch/schematic drawing provides information regarding the full length of the garment. If it’s a jumper or a jacket the length is measured from the highest point on the shoulder closest to the neckline, and straight down to the bottom of the garment. It is NOT measured from the tip of shoulder. Similarly, the length of yoke is measured from the highest point on the shoulder and down to where yoke is split into body and sleeves.

On a jacket measures are never taken along bands, unless specifically stated. Always measure inside band stitches when measuring the length.

See DROPS lesson: How to read a schematic drawing

Diagrams are often repeated on the round or in height. 1 repeat is the diagram the way it appears in the pattern. If it says to work 5 repeats of A.1 in the round, then you work A.1 a total of 5 times after/next to each other in the round. If it says to work 2 repeats of A.1 vertically/in height you work the entire diagram once, then begin again at the start and work the entire diagram one more time.

Chain stitches are slightly narrower than other stitches and to avoid working the cast-on edge too tight, we simply chain more stitches to begin with. The stitch count will be adjusted on the following row to fit the pattern and measurement sketch.

The rib edge is more elastic and will contract slightly compared to, for example, stocking stitch. By increasing before the rib edge, you avoid a visible difference in width between the rib edge and the rest of the body.

It’s very easy to cast off too tightly, and by making yarn overs while casting off (and simultaneously casting these off) you avoid a too tight cast off edge.

See DROPS video: How to bind off with yarn overs (yo)

To achieve an even increase (or decrease) you can increase on, for example: every 3rd and 4th row alternately, like so: work 2 rows and increase on the 3rd row, work 3 rows and increase on the 4th. Repeat this until the increase is complete.

See DROPS lesson: Increase or decrease 1 st on every 3rd and 4th row alternately

Should you prefer to work in the round instead of back and forth, you may of course adjust the pattern. You’ll need to add steeks mid-front (usually 5 stitches), and follow the instructions. When you would normally turn and work from the wrong side, simply work across the steek and continue in the round. At the end you’ll cut the piece open, pick up stitches to work bands, and cover the cut edges.

See DROPS video: How to knit steeks and cut open

Should you prefer to work back and forth instead of in the round, you may of course adjust the pattern so you work the pieces separately and then assemble them at the end. Divide the stitches for the body in 2, add 1 edge stitch in each side (for sewing) and work the front and back pieces separately.

See DROPS lesson: Can I adapt a pattern for circular needles into straight needles?

Pattern repeats can vary slightly in the different sizes, in order to get the correct proportions. If you’re not working the exact same size as the garment in the photo, yours might deviate slightly. This has been carefully developed and adjusted so that the complete impression of the garment is the same in all sizes.

Make sure to follow instructions and diagrams for your size!

If you have found a pattern you like which is available in women’s size it’s not very difficult to convert it to men’s size. The biggest difference will be the length of sleeves and body. Start working on the women size that you think would fit across the chest. The additional length will be worked right before you cast off for the armhole/sleeve cap. If the pattern is worked top-down you can add the length right after the armhole or before the first decrease on sleeve.

Regarding additional yarn amount, this will depend on how much length you add, but it is better with a skein too many than too few.

All yarns will have excess fibres (from production) that might come off as lint or shedding. Brushed yarns (ie hairier yarns) have more of these loose, excess fibres, causing more shedding.

Shedding also depends on what is worn under or over the garment, and whether this pulls at the yarn fibres. It’s therefore not possible to guarantee that there will be no shedding

Below are some tips on how to get the best result when working with hairier yarns:

1. When the garment is finished (before you wash it) shake it vigorously so the looser hairs come off. NOTE: do NOT use a lint roller, brush or any method that pulls at the yarn.

2. Place the garment in a plastic bag and put it in your freezer - the temperature will cause the fibres to become less attached to each other, and excess fibres will come off easier.

3. Leave in the freezer for a few hours before taking it out and shaking it again.

4. Wash the garment according to the instructions on the yarn label.

Pilling is a natural process that happens to even the most exclusive of fibers. It's a natural sign of wear and tear that is hard to avoid, and that is most visible in high friction areas of your garment like a sweater's arms and cuffs.

You can make your garment look as new by removing the pilling, using a fabric comb or a pill/lint remover.

Still can't find the answer you need? Then scroll down and leave your question so one of our experts can try to help you. This will be done normally within 5 to 10 working days.
In the meantime, you can read the questions and answers that others have left to this pattern or join the DROPS Workshop on Facebook to get help from fellow knitters/crocheters!

You might also like...

Post a comment to pattern DROPS 176-17

We would love to hear what you have to say about this pattern!

If you want to leave a question, please make sure you select the correct category in the form below, to speed up the answering process. Required fields are marked *.

Comments / Questions (28)

country flag Krissy Moore wrote:

Hello - could you please tell me what size to make for a 42 inch (106cm) bust? Is the correct thing to divide 106cm by half to represent the ideal width of the garment across the bust (so: 53cm) and then decide to make the 57-cm-wide garment (for a total 114cm bust measurement)? As 57 is the fourth measurement across the bust in the diagram, does that = the XL measurement? Or is there a little stretch in the pattern, and the 53cm-wide/106cm total/size L measurement OK? Thank you! :)

09.11.2022 - 17:34

DROPS Design answered:

Hi Krissy, You will find a measurement chart for all the different sizes at the bottom of the pattern. Happy crafting!

10.11.2022 - 07:21

country flag Jennifer wrote:

Hi. I would love to make this design. How do I decide which size to make? What is the bust circumference for the sizes? Thank you.

16.05.2022 - 17:05

DROPS Design answered:

Dear Jennifer, you can see in the schematic under the charts the measurements of the garment, including the bust measurements, for each of the sizes, each number corresponding to a specific size. These measurements are all in cm. Happy crocheting!

16.05.2022 - 23:11

country flag Gerda wrote:

Ik kreeg nog geen antwoord op mijn 2de vraag op 17/01/2021 : Ik weet wel dat je eerst A5, dan A6, dan A7 enz. haakt. Maar haak ik eerst 'VIJF' toeren van het A5,A6,A7,A8,A9-patroon en dan het 'HELE Ay-patroon', gevolgd door 'LAATSTE' toer van het A5,A6,A7,A8, A9-patroon?

26.01.2021 - 19:06

DROPS Design answered:

Dag Gerda,

In de beschrijving bij de mouw staat dit precies aan gegeven: Ga verder met de eerste 2 toeren in A.x. Daarna haak je A.y 1 keer in de hoogte, dan de eerste 2 toeren in A.z. Daarna herhaal je de volgende 2 toeren in A.z tot de aangegeven hoogte en tot slot haak je de laatste toeren in A.z

01.02.2021 - 09:07

country flag Gerda wrote:

Ik kreeg nog geen antwoord op mijn 2de vraag op 17/01/2021 : Ik weet wel dat je eerst A5, dan A6, dan A7 enz. haakt. Maar haak ik eerst 'VIJF' toeren van het A5,A6,A7,A8,A9-patroon en dan het 'HELE Ay-patroon', gevolgd door 'LAATSTE' toer van het A5,A6,A7,A8, A9-patroon?

26.01.2021 - 19:06

country flag Gerda Van Den Brande wrote:

Bij mijn 2de vraag op 17/01/2021 bedoelde ik: Haak ik eerst 'VIJF' toeren van het A5,A6,A7,A8,A9-patroon en dan het 'HELE Ay-patroon', gevolgd door 'LAATSTE' toer van het A5,A6,A7,A8, A9-patroon?

18.01.2021 - 08:54

country flag Gerda Van Den Brande wrote:

1) Telpatroon: van A1 naar A2, als er dubbele stokjes zijn in A1, moet je 4 lossen haken. Tellen die als laatste dubbel stokje van A1 of moet je die extra haken na de 6 dubbele stokjes van A1? En moet je die lossenrij vasthaken in de volgende steek, die de eerste vaste is in telpatroon A2? 2) Laatste paragraaf, juist vóór mouw: haak je eerst de eerste 5 toeren van het A5,A6,A7...telpatroon? Dan het volledige Ay-patroon? En daarna de laatste toer van het A5,A6,A7...telpatroon ?

17.01.2021 - 08:41

DROPS Design answered:

Dag Gerda,

De 4 lossen zijn inderdaad extra en die maak je vast met een vaste in het volgende stokje van de vorige toer en dat is inderdaad de eerste vast in A.2.

Tweede deel van je vraag: je haakt eerst telpatroon A.5 en telpatroon A.6. Dan haak je 16-17-19-20-22-24 keer telpatroon A.7, enzovoort.

17.01.2021 - 19:44

country flag Gabriella wrote:

Buongiorno! chiedo ancora aiuto. ho finito di lavorare lo sprone (taglia L) e mi ritrovo con 199maglie alte /catenelle. iniziando a lavorare il motivo traforato mi trovo in difficoltà quando arrivo alle 8 catenelle per lo scalfo: su di esse va eseguito A1? in tal modo sarebbero 180 maglie date dalle 30 ripetizioni di A1+7 per A2 e 12 per i bordi. poi per la lavorazione della manica cosa si intende per fare la maglia bassa nella quinta catenella? grazie mille

20.05.2020 - 18:53

DROPS Design answered:

Buongiorno Gabriella. Lavora il motivo traforato come segue: a1 (bordo=6m), A2 30 volte (comprese le 8 catenelle dello scalfo), A3 (7m), A4 (bordo=6m). In tutto 199 m. Per la manica, inizia fermando il filo con 1 maglia bassa nella 5a delle 8 catenelle avviate per lo scalfo e poi prosegue come indicato. In questo modo la manica viene lavorata a partire dal centro, sotto la manica. Buon lavoro!

21.05.2020 - 08:49

country flag Gabriella wrote:

Grazie! quindi per la taglia M aumento 5 maglie ,per la Large 3 poi per la M aumento 10 ,per la L 6 e per la XXXl 4????

14.05.2020 - 11:37

DROPS Design answered:

Buongiorno Gabriella, si è corretto. Tenga conto che per la taglia M inizia con lo stesso numero di maglie della S, e alla fine della prima parte di aumenti arriverà allo stesso numero di maglie della taglia L. Poi procederà in modo più equilibrato. Buon lavoro!

14.05.2020 - 12:46

country flag Gabriella wrote:

Buongiorno, sono una principiante ed ho avuto modo di apprezzare i video e le indicazioni che accompagnano i vostri modelli, tutti molto utili. grazie mi sto cimentando usando uncinetto 4,5 e Cotton Merino Drops con il modello 176/17 taglia M, ma c'è un errore di stampa negli aumenti dello sprone ? non mi sembra coerenza con le misure delle altre taglie

14.05.2020 - 10:15

DROPS Design answered:

Buongiorno Gabriella, non ci sono errori nelle istruzioni, proceda pure come indicato. Buon lavoro!

14.05.2020 - 10:36

country flag Evelyn Krebs wrote:

Bei 217 Maschen habe ich 34 mal Muster A2 ist das richtig?

09.05.2019 - 06:58

DROPS Design answered:

Liebe Frau Krebs, in die 4. Größe häkeln Sie: A.1 ( = 6 M), A.2 (= 6 M) x 33, A.3 (= 7 M) x 1 und A.4 (= 6 M), dh Sie haben nur 33 x A.2 + 1 x A.3 aber es sind insgesamt 34 Muster-Rapporte / Fächer in der Breite. Viel Spaß beim häklen!

09.05.2019 - 10:56