
Popular categories
Looking for a yarn?


|
||||||||||||||||
Rose Twist |
||||||||||||||||
 |
 |
|||||||||||||||
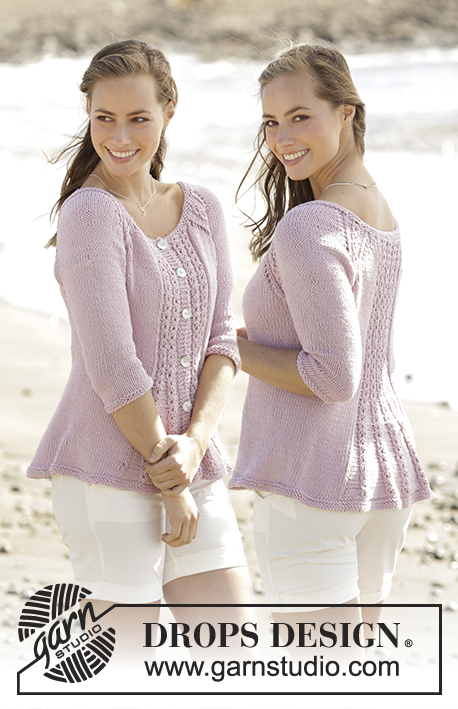
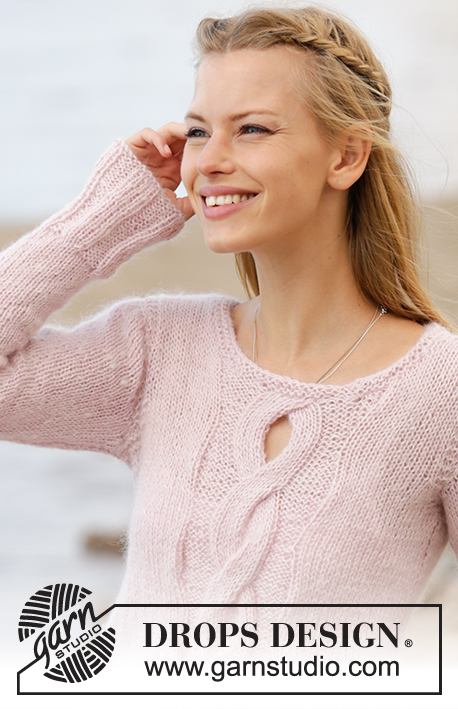
Jumper with open cable mid front worked top down in DROPS Alpaca and DROPS Kid-Silk. Sizes S - XXXL.
DROPS 176-4 |
||||||||||||||||
|
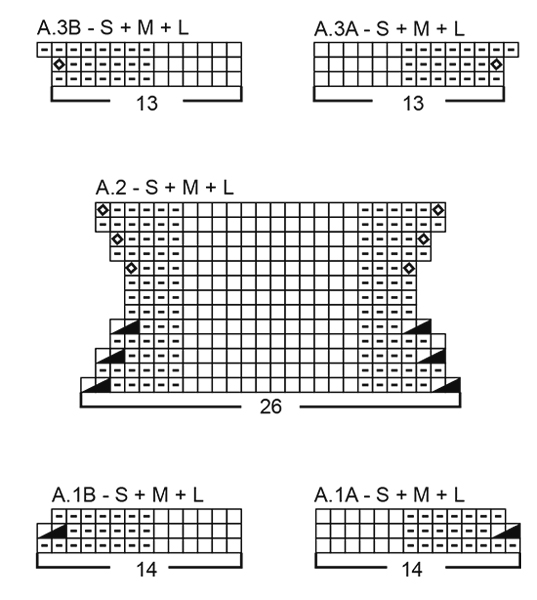
RIDGE/GARTER STITCH (worked in the round): 1 ridge = 2 rounds. Knit 1 round and purl 1 round. RIDGE/GARTER STITCH (worked back and forth): 1 ridge = Knit 2 rows. PATTERN: See diagrams A.1 to A.3. The diagrams show all rows in the pattern from the right side. Choose the diagram for your size. INCREASE TIP-1 (for the armholes): All increases made from the right side. Increase on the inside of 3 edge stitches in garter stitch along the armholes. Increase 1 stitch by making 1 yarn over. On the next row work the yarn overs twisted purl to prevent holes. INCREASE TIP-2 (for the sides on the front and back pieces): All increases made from the right side. Increase on the inside of 1 edge stitch in garter stitch + 2 stitches stockinette stitch (= 3 stitches). Increase 1 stitch by making 1 yarn over. On the next row work the yarn overs twisted purl to prevent holes. INCREASE TIP-3 (for the purl section on each side of the cable mid front): All increases made from the right side. Increase 1 stitch in the last purl stitch before the stockinette stitch on the left hand side of the piece (seen from the right side) and increase 1 stitch in the first purl stitch after the stockinette stitch on the right hand side of the piece (seen from the right side). Increase 1 stitch by making 1 purl both in the front and back of the same stitch. DECREASE TIP-1 (for the purl section on each side of the cable mid front): All decreases made from the right side. Decrease outermost in the purl sections (i.e. out towards the sides). Decrease 1 stitch by purling 2 stitches together. DECREASE TIP-2 (for mid under sleeve): Start 3 stitches before the marker thread, knit 2 together, knit 2 (the marker thread sits between these 2 stitches), slip 1 stitch as if to knit, knit 1, pass the slipped stitch over the knitted stitch (= 2 stitches decreased). ---------------------------------------------------------- JUMPER: Front and back pieces are worked back and forth, with circular needle, in parts. BACK PIECE: Start with the right shoulder (when the garment is worn), then work the left shoulder before casting on stitches for the neck and working across all the stitches. RIGHT SHOULDER BACK (when the garment is worn): Cast on 17-18-19-17-18-19 stitches with circular needle size 5 mm / US 8 and 1 strand Alpaca + 1 strand Kid-Silk (= 2 strands). Knit 1 row (row 1 = wrong side). The next row is worked as follows from the right side (i.e. from the neck): 14-15-16-14-15-16 stitches stockinette stitch, 3 edge stitches in garter stitch towards the armhole. Work back from the wrong side with garter stitch over garter stitch and purl over purl, in addition cast on 1 new stitch at the end of the row towards the neck. Knit 1 row from the right side. Work back from the wrong side with garter stitch over garter stitch and purl over purl, in addition cast on 26-26-26-32-32-32 new stitches at the end of the row = 44-45-46-50-51-52 stitches on the needle. Lay the piece to one side and work the left shoulder back. LEFT SHOULDER BACK (when the garment is worn): Cast on 17-18-19-17-18-19 stitches with circular needle size 5 mm / US 8 and 1 strand of each quality (= 2 strands). Knit 1 row (row 1 = wrong side). The next row is worked as follows from the right side (i.e. from the armhole): 3 edge stitches in garter stitch, work 14-15-16-14-15-16 stitches stockinette stitch, in addition cast on 1 new stitch at the end of the row towards the neck = 18-19-20-18-19-20 stitches on the needle. Work back from the wrong side with purl over purl and garter stitch over garter stitch. On the next row from the right side work the left and right shoulders together to the back piece as follows: BACK PIECE: Start with the stitches from the left shoulder, work 3 edge stitches in garter stitch towards the armhole, work stockinette stitch across the remaining stitches on the left shoulder, continue with stockinette stitch across the stitches from the right shoulder until there are 3 stitches left, finish with 3 edge stitches in garter stitch towards the armhole = 62-64-66-68-70-72 stitches on the needle. Continue back and forth with stockinette stitch and 3 edge stitches in garter stitch in each side. REMEMBER THE GAUGE! When the piece measures 16-16-16-15-13-11 cm / 6¼"-6¼"-6¼"-6"-5"-4½" increase 1 stitch in each side for the armhole – READ INCREASE TIP-1. Increase in this way every 2nd row (i.e. every row from the right side) in total 2-3-5-7-10-13 times, then cast on 3-4-5-6-7-8 new stitches at the end of the next 2 rows = 72-78-86-94-104-114 stitches on the needle. Work stockinette stitch with 6-7-8-9-10-11 edge stitches in garter stitch in each side. When you have worked 1 ridge over the outermost 6-7-8-9-10-11 stitches in each side continue with stockinette stitch and 1 edge stitch in garter stitch in each side. When the piece measures 28-30-31-32-33-34 cm / 11"-11¾"-12¼"-12½"-13"-13½" from the shoulder increase 1 stitch in each side – READ INCREASE TIP-2. Increase in this way every 2½-2½-2½-2-2-2 cm / ⅞"-⅞"-⅞"-¾"-¾"-¾" in total 8-9-9-10-10-12 times in each side = 88-96-104-114-124-138 stitches. Continue until the piece measures 54-56-58-60-62-64 cm / 21¼"-22"-22¾"-23⅝"-24⅜"-25¼" from the shoulder and down (adjust so that the next row is worked from the right side). Change to circular needle size 4 mm / US 6 and work 2 ridges back and forth across all stitches. Change back to circular needle size 5 mm / US 8 and bind off (make sure the bind-off edge is not tight). FRONT PIECE: Start with the left shoulder, cast on stitches for the neck, then work the right shoulder before working across all the stitches. LEFT SHOULDER FRONT (when the garment is worn): Cast on 17-18-19-17-18-19 stitches with circular needle size 5 mm / US 8 and 1 strand of each quality (= 2 strands). Knit 1 row (row 1 = wrong side). The next row is worked as follows from the right side (i.e. from the neck): 1 edge stitch in garter stitch, 13-14-15-13-14-15 stitches stockinette stitch, 3 edge stitches in garter stitch towards the armhole. Continue back and forth with stockinette stitch, 3 edge stitches in garter stitch towards the armhole and 1 edge stitch in garter stitch towards the neck. When the piece measures 3 cm / 1" cast on new stitches towards the neck at the end of every row from the wrong side as follows: Cast on 1 stitch 3 times, 2 stitches 1 time and 18-18-18-24-24-24 stitches 1 time (the increased stitches are worked in stockinette stitch) = 40-41-42-46-47-48 stitches on the needle. After the last stitches have been cast on, lay the piece to one side. Work the right shoulder front. RIGHT SHOULDER FRONT (when the garment is worn): Cast on 17-18-19-17-18-19 stitches with circular needle size 5 mm / US 8 and 1 strand of each quality (= 2 strands). Knit 1 row (row 1 = wrong side). The next row is worked as follows from the right side (i.e. from the armhole): 3 edge stitches in garter stitch, 13-14-15-13-14-15 stitches stockinette stitch, 1 edge stitch in garter stitch towards the neck. Continue back and forth with stockinette stitch, 1 edge stitch in garter stitch towards the neck and 3 edge stitches in garter stitch towards the armhole. When the piece measures 4 cm / 1½" cast on new stitches towards the neck at the end of each row from the right side as follows: Cast on 1 stitch 3 times and 2 stitches 1 time = 22-23-24-22-23-24 stitches. After the last stitches have been cast on, work back from the wrong side with purl over purl and garter stitch over garter stitch. On the next row from the right side work the right and left shoulders together to the front piece as follows: FRONT PIECE: Place the stitches from the right and left shoulders on the same circular needle size 5 mm / US 8 without working the stitches = 62-64-66-68-70-72 stitches on the needle. Insert 1 marker thread after 31-32-33-34-35-36 stitches and let the marker thread follow in piece (= mid front). READ ALL OF THE NEXT PARAGRAPH BEFORE CONTINUING! The next row is worked from the right side as follows: 3 edge stitches in garter stitch towards the armhole, stockinette stitch until there are 11-11-11-14-14-14 stitches left before the marker thread, 8-8-8-10-10-10 stitches purl, knit 2 stitches in each of the next 6-6-6-8-8-8 stitches (= 6-6-6-8-8-8 stitches increased), 8-8-8-10-10-10 stitches purl, stockinette stitch until there are 3 stitches left on the needle and finish with 3 edge stitches garter stitch towards the armhole = 68-70-72-76-78-80 stitches on the needle. Work back from the wrong side with garter stitch over garter stitch, purl over purl and knit over knit (the middle 12-12-12-16-16-16 stitches are worked purl). OPEN CABLE: The next row is worked as follows from the right side: 3 edge stitches in garter stitch, stockinette stitch until there are 14-14-14-18-18-18 stitches left before the marker thread, 8-8-8-10-10-10 stitches purl, place the next 6-6-6-8-8-8 stitches on the cable needle behind the piece, knit 6-6-6-8-8-8 stitches, knit 6-6-6-8-8-8 stitches from the cable needle, purl 8-8-8-10-10-10 stitches, stockinette stitch until there are 3 stitches left on the needle 3 edge stitches in garter stitch. Now divide the piece mid front as follows: Place half of the stitches (i.e. 34-35-36-38-39-40 stitches) in the right hand side of the piece (seen from the right side) on a thread = 34-35-36-38-39-40 stitches left on the needle. Continue back and forth across all the stitches in the left side of the piece with garter stitch over garter stitch, purl over purl and knit over knit – the outermost stitch towards mid front is now worked in garter stitch. AT THE SAME TIME every 2nd row (i.e. each row from the right side) decrease 1 stitch in the purl section – READ DECREASE TIP-1 until there are 4-4-4-5-5-5 purl stitches left. Work 3 rows back and forth without decreases in the purl section. Then increase 1 stitch in the purl section every 2nd row (i.e. every row from the right side) – READ INCREASE TIP-3 until there are 8-8-8-10-10-10 purl stitches. ARMHOLE: AT THE SAME TIME when the piece measures 16-16-16-15-13-11 cm / 6¼"-6¼"-6¼"-6"-5"-4½" increase for the armhole in the side in the same way as for the back piece. When 1 row is worked back from the wrong side after the last stitch has been increased in the purl section, leave the stitches on the left side of the piece. Place the stitches from the thread in the right side of the piece back on the circular needle size 5 mm / US 8 and work in the same way but with decreases and increases in the purl section in the opposite side. When 1 row has been worked back from the wrong side after all the stitches have been increased in the purl section, put the cable together. OPEN CABLE PUT TOGETHER: Work from the right side as before across the stitches in the right side of the piece until there are 6-6-6-8-8-8 stitches left on the needle, place these 6-6-6-8-8-8 stitches on the cable needle behind the piece and knit the 6-6-6-8-8-8 first stitches in the left side of the piece, knit the 6-6-6-8-8-8 stitches from the cable needle and continue as before across the remaining stitches in the left side of the piece. Now divide the piece mid front again and half the stitches, i.e. the stitches in the right hand side of the piece as far as the marker thread (seen from the right side) are placed on 1 thread. READ THE REST OF THE FRONT PIECE BEFORE CONTINUING! CABLE: * Continue across the stitches in the left side of the piece, with garter stitch over garter stitch and purl over purl until there are 14-14-14-18-18-18 stitches left before the marker thread mid front, work A.1B over these stitches – NOTE: row 1 = the wrong side and the diagram is read from left to right. Work 2 more rows of A.1B across the outermost stitches towards mid front, stockinette stitch and garter stitch towards the armhole and decrease as shown in the diagram (when working from the right side, read the diagram from right to left). Now place the stitches on 1 thread. Cut the strand and work 3 rows in the same way across the stitches in the right side of the piece – i.e. start mid front, work the first row from the wrong side with A.1A across the outermost 14-14-14-18-18-18 stitches towards mid front (row 1 = the wrong side and the diagram is read from left to right). Place the stitches from the thread in the left side of the piece on the needle (without working the stitches). Work from the right side as before across the stitches in the right side of the piece until there are 13-13-13-17-17-17 stitches left before the marker thread, work A.2 across the next 26-26-26-34-34-34 stitches (the marker thread sits in the middle of A.2) and continue as before across the remaining stitches in the left side of the piece. Continue the pattern as follows, decrease and increase as shown in the diagram. When A.2 has been completed 1 time in height, divide the piece mid front again and half the stitches, i.e. the stitches in the right side of the piece are placed on 1 thread. Work 3 rows across the stitches in the left side of the piece with garter stitch over garter stitch, stockinette stitch over stockinette stitch and A.3B over the outermost stitches towards mid front, increase as shown in the diagram. Now place the stitches on 1 thread. Cut the strand and work 3 rows in the same way across the stitches in the right side of the piece – i.e. start mid front, work the first row from the wrong side with A.3A over the outermost 13-13-13-17-17-17 stitches towards mid front. Place the stitches from the thread in the left side of the piece back on the needle (without working the stitches). Work from the right side as before across the stitches in the right side of the piece until there are 6-6-6-8-8-8 stitches left before the marker thread, place these 6-6-6-8-8-8 stitches on the cable needle behind the piece, knit the next 6-6-6-8-8-8 stitches. Place the stitches on the right-hand needle on 1 thread. Knit the 6-6-6-8-8-8 stitches on the cable needle and work as before to the end of the needle *. Repeat the whole paragraph from *-* in total 3 times in height. INCREASES IN THE SIDES: AT THE SAME TIME when the piece measures 28-30-31-32-33-34 cm / 11"-11¾"-12¼"-12½"-13"-13½" from the shoulder increase 1 stitch in each side – READ INCREASE TIP-2. Increase in this way every 2½-2½-2½-2-2-2 cm / ⅞"-⅞"-⅞"-¾"-¾"-¾" in total 8-9-9-10-10-12 times in each side. When the last repetition with the cable is complete and the increases in the sides are finished, the piece is again divided in the middle and the stitches on the right side of the piece are placed on 1 thread. Continue across the stitches in the left side of the piece with knit over knit, purl over purl and 1 edge stitch in garter stitch in each side. AT THE SAME TIME decrease in the purl section in the same way as during the cable, but decrease every 4th row (instead of every 2nd row) in total 6-6-6-7-7-7 times. After all the increases and decreases there are 41-45-49-54-59-66 stitches on the needle in the left side of the piece. Continue working until the piece measures 54-56-58-60-62-64 cm / 21¼"-22"-22¾"-23⅝"-24⅜"-25¼" from the shoulder and down (adjust so the next row is worked from the right side). Change to circular needle size 4 mm / US 6 and work 2 ridges back and forth across all the stitches. Change back to circular needle size 5 mm / US 8 and bind off (make sure the bind-off edge is not tight). Work in the same way across the stitches in the right side of the piece, but with the decreases in the opposite side. SLEEVE: The sleeve is worked from the top down. Work the sleeve cap back and forth on circular needle, then work the sleeve in the round on a short circular needle/double pointed needles to finished length. Cast on 20-24-24-24-24-24 stitches on a short circular needle size 5 mm / US 8 with 1 strand of each quality (= 2 strands). Work stockinette stitch back and forth and cast on new stitches for the sleeve cap at the end of each row in each side as follows: Cast on 3 stitches 1 time in all sizes, 2 stitches 3-3-2-2-1-1 times, 1 stitch 2-2-3-4-7-9 times, 2 stitches 2-2-3-3-3-3 times and 3-4-5-6-7-8 stitches 1 time = 56-62-66-70-74-80 stitches on the needle. The piece now measures approx. 8-8-9-10-12-14 cm / 3"-3"-3½"-4"-4¾"-5½". Insert 1 marker thread at the beginning of the row (= mid under sleeve). Continue to work stockinette stitch in the round. When the piece measures 2 cm / ¾" from the marker thread decrease 2 stitches mid under sleeve – READ DECREASE TIP-2. Decrease in this way every 3-2½-2-2-1½-1½ cm / 1⅛"-⅞"-¾"-¾"-½"-½" in total 12-14-15-16-17-19 times = 32-34-36-38-40-42 stitches. When the piece measures 37-37-37-36-35-33 cm / 14½"-14½"-14½"-14¼"-13¾"-13" from the marker thread (the whole sleeve measures approx. 45-45-46-46-47-47 cm / 17¾"-17¾"-18"-18"-18½"-18½" from the top down), knit 1 round where you increase 8-6-12-10-8-14 stitches evenly along the round = 40-40-48-48-48-56 stitches. Change to double pointed needles size 4 mm / US 6. Work rib in the round (= knit 4 / purl 4). When the rib measures 10 cm / 4" bind off with knit over knit and purl over purl – NOTE: It is important that the bind-off edge is not tight. To prevent this you can make 1 yarn over after every 4th stitch (yarn overs bind off as other stitches). The sleeve measures approx. 55-55-56-56-57-57 cm / 21⅝"-21⅝"-22"-22"-22½"-22½" from the cast-on edge and down. Work another sleeve in the same way. ASSEMBLY: Sew the shoulder seams inside the cast-on edge. Sew the side seams from the armhole and down inside 1 edge stitch in each side. Sew in the sleeves – the ridge edge along the armholes should lie out on the sleeve (i.e. let the ridge edge lie a little over the edge of the sleeve cap). NECKLINE: Knit up from the right side approx. 74 to 84 stitches around the neck with a short circular needle size 4 mm / US 6 and 1 strand of each quality. Purl 1 round, knit 1 round and purl 1 round before loosely binding off in knit. |
||||||||||||||||
Diagram explanations |
||||||||||||||||
|
||||||||||||||||
|
||||||||||||||||

|
||||||||||||||||

|
||||||||||||||||
|
Have you made this or any other of our designs? Tag your pictures in social media with #dropsdesign so we can see them! Do you need help with this pattern?You'll find tutorial videos, a Comments/Questions area and more by visiting the pattern on garnstudio.com. © 1982-2024 DROPS Design A/S. We reserve all rights. This document, including all its sub-sections, has copyrights. Read more about what you can do with our patterns at the bottom of each pattern on our site. |
||||||||||||||||


With over 40 years in knitting and crochet design, DROPS Design offers one of the most extensive collections of free patterns on the internet - translated to 17 languages. As of today we count 304 catalogs and 11422 patterns - 11417 of which are translated into English (US/in).
We work hard to bring you the best knitting and crochet have to offer, inspiration and advice as well as great quality yarns at incredible prices! Would you like to use our patterns for other than personal use? You can read what you are allowed to do in the Copyright text at the bottom of all our patterns. Happy crafting!
Comments / Questions (124)
Hallo Jeanette, Ich stricke dieses Modell von unten nach oben, habe die korrekte Wolle und entsprechende Nadeln verwendet. Leider stelle ich beim Stricken des Rückenteils fest, dass sich der kraus rechts gestrickte Saum nach oben rollt. Was kann ich tun, nochmal alles aufmachen ? Vielen Dank für eine Antwort? LG Gudrun
25.11.2021 - 22:56DROPS Design answered:
Liebe Gudrun, Sie können danach den Pullover oder jedes Teil mit Stecknadeln auf einer geeigneten Unterlage spannen, anfeuchten (z.B. mit einer Sprühflasche für Blumen) und trocknen lassen, danach entfernen Sie die Stecknadeln, dann sollte sich der Rand nicht mehr rollen. Viel Spaß beim stricken!
26.11.2021 - 07:42Good morning; I would like to know how much yarn to order for this pattern. I am small. Jackie
12.10.2021 - 20:09DROPS Design answered:
Dear Jacqueline, for size S you need 250 g (5 balls) DROPS Alpaca and 100 g (4 balls) DROPS Kid-Silk. Happy knitting!
12.10.2021 - 21:54Bonjour, Je me demande si la mesure de l’ouvrage (dos du pull), se fait à partir du col ou de l’épaule ?
24.08.2021 - 13:29DROPS Design answered:
Bonjour Anne, s'il s'agit d'un pull ou d'un gilet, la longueur totale est prise à partir du point le plus haut de l'épaule (généralement près du col) jusqu'au bas du vêtement. Il N'est PAS mesuré à partir de la pointe de l'épaule. Bon tricot!
24.08.2021 - 13:44I am just finishing a very lovely jacket made with your alpaca yarn. Wool makes me very itchy, and the alpaca is much better but I will still need to wear something under it. That would not work with this jumper and I am wondering whether you have a yarn I could use for this that would have no itch. Thank you.
19.03.2021 - 15:52DROPS Design answered:
Dear Julia, the sensitivity of each individual is different, a yarn that is fine for most people might be unberably itchy for some, so we cannot say for aní yarn that is guaraanteed not to itch. I've heard, amongh my friends, that Merino Extra Fine, Cotton Merino or Baby Alpaca silk yarn is better, and most cotton yarns do not itch at all, but they will result in a different texture. Happy Knitting!
20.03.2021 - 07:18Ich bin am überlegen, ob das Vorderteil in zwei Farben auch zu stricken wäre... Allerdings habe ich gar keine Idee, wie das funktioniern kann... Können Sie mir da weiterhelfen?
15.03.2021 - 19:00DROPS Design answered:
Liebe Frau Dornhofer, leider können wir jeder Anleitung nach jedem individuellen Frage anpassen und einzelne Modelle auf individuellen Wunsch hin umrechnen. Wenn sie Hilfe damit brauchen, wenden Sie sich bitte an Ihrem DROPS Laden, dort hilft man Ihnen gerne weiter - auch telefonisch oder per E-Mail. Viel Spaß beim stricken!
16.03.2021 - 08:34Dzień dobry. Proszę o po twierdzenie, że wzór jest tak pomyślany, że cały sweter ma być zrobiony z dwóch połączonych włóczek DROPS - włóczki ALPACA i KID-SILK. Czy sweter na zdjęciu jest wykonany właśnie z tych dwóch połączonych włóczek? Nie jest widoczny melanż, a polecane są dwa różne kolory. I drugie pytanie - czy plecy w tym swetrze są gładkie, czy też jest warkocz? Z góry dziękuję za odpowiedź.
06.03.2020 - 10:12DROPS Design answered:
Witaj Agnieszko, sweter jest wykonany 2 nitkami naraz. Nie jest to widoczne gdyż Kid-Silk to bardzo cienka włóczka. Na plecach nie ma warkocza. Pozdrawiamy!
06.03.2020 - 16:23Ik denk dat mijn vraag niet helemaal duidelijk was; ik vroeg me af of er een specifieke reden was om in het voorbeeldpatroon bij de roze alpaca een neutrale (ipv roze) kidsilk te gebruiken. Misschien is er voor een neutrale kidsilk gekozen zodat het opgaat in het roze en dus niet opvalt? En werkt dat dan ook zo met grijsgroene alpaca? Ik ken deze garensoorten nog niet, dus ik weet niet wat het effect is van de combinaties, en er is helaas geen Drops-verkooppunt in de buurt.
15.10.2019 - 21:05DROPS Design answered:
Dag Bloem,
De roze met naturel geeft inderdaad een ietwat gemeleerd effect, wat waarschijnlijk de bedoeling was van de ontwerper. De roze is vrij licht waardoor het niet heel erg opvalt. Hoe donkerder de kleur van de alpaca, des te meer het opvalt.
16.10.2019 - 09:14In het voorbeeld wordt deze trui gebreid met Alpaca Uni kleur 3112 (poederroze) en Kid Silk kleur 01 (naturel). Ik wil graag Alpaca Uni kleur 7139 (grijs/groen) gebruiken. Welke kleur Kid Silk kan ik daar dan het beste bij nemen? Gewoon 01 naturel, of bijv. 06 (light-greyish-green)?
13.10.2019 - 22:42DROPS Design answered:
Dag Bloem,
Kleurkeuze is erg persoonlijk, dus lastig om hierin te adviseren. Als je de mogelijkheid hebt, kun je het beste even langs een winkel gaan om de kleuren te bekijken. Of je bestelt via internet extra kleuren en vraagt of je de kleur die je niet wilt gebruiken terug kunt sturen.
15.10.2019 - 16:09Olá! Lindo modelo, mas realmente devem simplificar as instruções porque estão escritas de uma forma muito rebuscada até para as que temos prática. Obrigada. P.S.- Estou fazendo o modelo em amarelo!
10.08.2019 - 09:47Hei! Problemer med å forstå A 1b og A3b. Det skrives at jeg skal strikke 3 pinner frem og tilbake...økning / felling kommer da på vrangen ? Senere står det strikk 3 pinner A3b og øk som diagrammet. Hvordan skal jeg lese dette?? Utelukker ikke at jeg er dum, men har strikket masse med garn og mønster fra Drops, men ikke vært så vanskelig å forstå da.
01.08.2019 - 15:57DROPS Design answered:
Hej Kirsti, Er du kommet til der det står FLETTE i oppskriften? Når du skal strikke A.1B, skal du strikke 1.pinne fra vrangen og diagrammet leses fra venstre mot høyre. Da vil du få fellingen på retsiden. God fornøjelse!
02.08.2019 - 13:48