DROPS Fabel
DROPS Fabel
75% Wool, 25% Polyamide
from 3.00 $ /50g
Get the yarn to make this pattern from 21.00$.

The yarn cost is calculated from the pattern’s smallest size and the yarn’s cheapest product type. Looking for an even better price? You might find it on the DROPS Deals!

DROPS SS24

Spring Rain

Knitted jumper with edge in wave pattern, ¾-length sleeves, raglan and stripes on yoke in DROPS Fabel. Sizes S - XXXL.

DROPS 177-25
DROPS Design: Pattern no. fa-367
Yarn group A
-----------------------------------------------------------
Sizes: S - M - L - XL - XXL - XXXL
Materials:
DROPS FABEL from Garnstudio (belongs to yarn group A)
300-350-350-400-450-450 g color 100, off white
50-50-50-100-100-100 g color 914, shoreline

DROPS DOUBLE POINTED NEEDLES AND CIRCULAR NEEDLE (40 + 80 cm / 16" + 32") SIZE 3 mm/US 2.5 – or the size needed to get 24 stitches and 32 rows stockinette stitch on 10 cm / 4" in width and 10 cm / 4" in height. And 24 stitches and 40 rows textured pattern (A.5) on 10 cm / 4" in width and 10 cm / 4" in height.
DROPS DOUBLE POINTED NEEDLES AND CIRCULAR NEEDLE (40 cm / 16") SIZE 2.5 mm/ US 1.5 – for garter stitch edging at bottom of sleeves and around neckline.

-------------------------------------------------------

Alternative Yarn – See how to change yarns here
Yarn Groups A to F – Use the same pattern and change the yarn here
Yarn usage using an alternative yarn – Use our yarn converter here

-------------------------------------------------------

DROPS Fabel
DROPS Fabel
75% Wool, 25% Polyamide
from 3.00 $ /50g
Get the yarn to make this pattern from 21.00$.

The yarn cost is calculated from the pattern’s smallest size and the yarn’s cheapest product type. Looking for an even better price? You might find it on the DROPS Deals!

Pattern instructions

NOTE: This pattern is written in American English. All measurements in charts are in cm. For conversion from inches to cm - click here. There are different terms for crocheting in American and British English. If this pattern includes crochet, click for "crochet terms" here. For this pattern in British English, please click here.
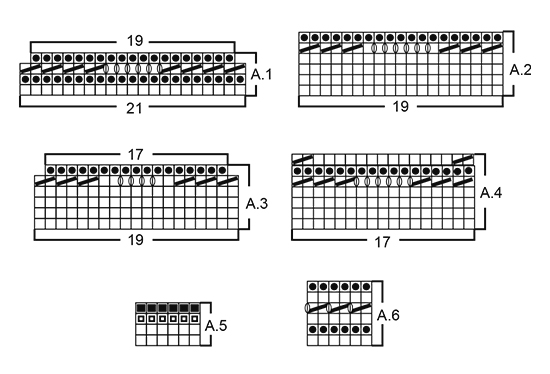
PATTERN:
See diagrams A.1 to A.6.

DECREASE TIP-1 (for sides of body):
Start 12 stitches before the marker thread, knit 2 together, knit 20 (the marker thread sits in the middle of these 20 stitches), slip 1 stitch as if to knit, knit 1, pass the slipped stitch over the knitted stitch (= 2 stitches decreased).

DECREASE TIP-2:
To work out how to decrease evenly, count the total number of stitches on needle (e.g. 144 stitches) and divide by the number of decreases to be made (e.g. 18) = 8. In this example, knit every 7th and 8th stitch together.

INCREASE TIP (for mid under the sleeves):
Start 1 stitch before the marker thread, make 1 yarn over, knit 2 (the marker thread sits between these 2 stitches), make 1 yarn over (= 2 stitches increased). On the next round, work the yarn overs twisted knit to prevent holes.

RAGLAN:
Decrease to raglan every transition between body and sleeves. Start 2 stitches before the marker thread, knit 2 together, marker thread, slip 1 stitch as if to knit, knit 1, pass the slipped stitch over the knitted stitch (= 2 stitches decreased).
---------------------------------------------------------

JUMPER:
The body is worked in the round with circular needle from the bottom up. The sleeves are worked in the round with double pointed needles.

BODY:
Loosely cast on 399-420-462-483-525-567 stitches with circular needle size 3 mm / US 2.5 and off white. Work A.1 around (= 19-20-22-23-25-27 repeats of 21 stitches). When A.1 has been completed 1 time in height there are 361-380-418-437-475-513 stitches on the needle. Work A.2 around (= 19-20-22-23-25-27 repeats of 19 stitches). When A.2 has been completed 1 time in height work A.3 around (= 19-20-22-23-25-27 repeats of 19 stitches). When A.3 has been completed 1 time in height there are 323-340-374-391-425-459 stitches on the needle. Now work A.4 around, but on the last round of A.4 decrease 5-0-10-1-3-5 stitches evenly along the round in addition to the decreases in the diagram. After A.4, there are 280-300-320-344-372-400 stitches on the needle. Insert 1 marker thread at the beginning of the round and 1 marker thread after 140-150-160-172-186-200 stitches (= in the sides). Continue to work stockinette stitch. REMEMBER THE KNITTING GAUGE.
When the piece measures 8 cm / 3⅛" decrease 1 stitch on each side of both marker threads – READ DECREASE TIP-1 (= 4 stitches decreased). Decrease in this way every 1 cm / ⅜" in total 20 times in each side = 200-220-240-264-292-320 stitches. Continue working until the piece measures 40 cm / 15¾" in all sizes. The next round is worked as follows: bind off 3-3-4-4-5-6 stitches for the armhole, work 94-104-112-124-136-148 stitches stockinette stitch (= front piece), bind off 6-6-8-8-10-12 stitches for the armhole, work 94-104-112-124-136-148 stitches stockinette stitch (= back piece) and bind off the remaining 3-3-4-4-5-6 stitches for the armhole. Lay the piece to one side and work the sleeves.

SLEEVE:
Cast on 60-62-64-68-70-72 stitches with double pointed needles size 2.5 mm / US 1.5 and off white. Work A.6 around. Change to double pointed needles size 3 mm / US 2.5. Insert 1 marker thread at the beginning of the round (= mid under sleeve) and work stockinette stitch. When the piece measures 6 cm / 2⅜" in all sizes increase 2 stitches mid under the sleeve – READ INCREASE TIP. Increase in this way every 12th-8th-5th-5th-4th-4th round in total 8-12-16-16-18-19 times = 76-86-96-100-106-110 stitches. When the piece measures 36-36-34-32-31-31 cm / 14¼"-14¼"-13½"-12½"-12¼"-12¼" (shorter measurements in the larger sizes due to longer yoke) bind off the middle 6-6-8-8-10-12 stitches mid under sleeve (3-3-4-4-5-6 stitches on each side of the marker thread) = 70-80-88-92-96-98 stitches on the needle. Lay the piece to one side and work another sleeve in the same way.

YOKE:
Place the sleeves on the same circular needle size 3 mm / US 2.5 as the body where there are bind-off stitches for the armholes (do this without working the stitches) = 328-368-400-432-464-492 stitches on the needle. Insert 1 marker thread in each transition between body and sleeves = 4 marker threads. Work stripes around as shown in A.5. AT THE SAME TIME on the fifth round of A.5 (i.e. a round of knit) decrease to RAGLAN – see description above (= 8 stitches decreased). Decrease in this way every 4th round in total 5-5-5-7-7-8 times, then every 2nd round in total 18-22-26-26-30-32 times = 144-152-152-168-168-172 stitches on the needle.
After the last decrease to raglan, work 1 round knit. Change to short circular needle size 2.5 mm / US 1.5 and off white and knit 1 round where you decrease 18-26-26-32-32-36 stitches evenly along the round – READ DECREASE TIP-2 = 126-126-126-136-136-136 stitches. Purl 1 round, knit 1 round and purl 1 round. Then loosely bind off in knit.

ASSEMBLY:
Sew the openings under the sleeves.

Diagram

All measurements in charts are in cm.

symbols = knit with off white
symbols = purl with off white
symbols = knit with shoreline
symbols = purl with shoreline
symbols = between 2 stitches make 1 yarn over
symbols = knit 2 together
diagram
diagram

Each of our patterns has specific tutorial videos to help you.

Do you have a question? See a list of frequently asked questions (FAQ)

Knitting tension is what determines the final measurements of your work, and is usually measured per 10 x 10 cm. It is provided like so: number of stitches in width x number of rows in height - eg: 19 stitches x 26 rows = 10 x 10 cm.

The knitting tension is very individual; some people knit/crochet loosely while others work tightly. You adjust the knitting tension with the needle size, which is why the suggested needle size only serve as a guide! You need to adjust this (up or down) to ensure that YOUR knitting tension matches the knitting tension provided in the pattern. If you work with a different knitting tension than provided you will have a different yarn consumption, and your work will have different measurements than what the pattern suggests.

The knitting tension also determines which yarns can replace each other. As long as you achieve the same knitting tension you can replace one yarn with another.

See DROPS lesson: How to measure your tension/gauge

See DROPS video: How to make a gauge tension swatch

The required amount of yarn is provided in grams, eg: 450 g. To calculate how many balls you’ll need you first need to know how many grams are in 1 ball (25g, 50g or 100g). This information is available if you click on the individual yarn quality on our pages. Divide the amount required with the amount of each ball. For example, if each ball is 50g (the most common amount), the calculation will be as follows: 450 / 50 = 9 balls.

The important thing when changing from one yarn to another is that the knitting/crochet tension remains the same. This is so that the measurements of the finished piece will be the same as on the sketch provided. It is easier to achieve the same knitting tension using yarns from the same yarn group. It is also possible to work with multiple strands of a thinner yarn to achieve the knitting tension of a thicker one. Please try our yarn converter. We recommend you to always work a test swatch.

Please NOTE: when changing yarn the garment might have a different look and feel to the garment in the photo, due to individual properties and qualities of each yarn.

See DROPS lesson: Can I use a different yarn than the one mentioned in the pattern?

All our yarns are categorised into yarn groups (from A to F) according to thickness and knitting tension – group A contains the thinnest yarns and group F the thickest. This makes it easier for you to find alternative yarns to our patterns, should you wish to switch yarn. All yarns within the same group have a similar knitting tension and can easily replace each other. However, different yarn qualities have different structures and properties which will give the finished work a unique look and feel.

Click here for an overview of the yarns in each yarn group

At the top of all our patterns you’ll find a link to our yarn converter, which is a helpful tool should you wish to use a different yarn than suggested. By filling in the yarn quality you wish to replace, the amount (in your size) and number of strands, the converter will present good alternative yarns with the same knitting tension. Additionally it will tell you how much you’ll require in the new qualities and whether you’ll need to work with multiple strands. Most skeins are 50g (some are 25g or 100g).

If the pattern is worked with multiple colours, every colour will have to be converted separately. Similarly, if the pattern is worked with several strands of different yarns (for example 1 strand Alpaca and 1 strand Kid-Silk) you will have to find alternatives for each, individually.

Click here to see our yarn converter

Since different yarns have different qualities and textures we have chosen to keep the original yarn in our patterns. However, you can easily find options among our available qualities by using our yarn converter, or simply pick a yarn from the same yarn group.

It is possible that some retailers still have discontinued yarns in stock, or that someone has a few skeins at home that they would like to find patterns for.

The yarn converter will provide both alternative yarn as well as required amount in the new quality.

If you think it's hard to decide what size to make, it can be a good idea to measure a garment you own already and like the size of. Then you can pick the size by comparing those measures with the ones available in the pattern's size chart.

You'll find the size chart at the bottom of the pattern.

See DROPS lesson: How to read size chart

The needle size provided in the pattern serves only as a guide, the important thing is to follow the knitting tension. And since knitting tension is very individual, you will have to adjust the needle size to ensure that YOUR tension is the same as in the pattern – maybe you’ll have to adjust 1, or even 2 needle sizes, up or down to achieve the correct tension. For this, we recommend that you work test swatches.

Should you work with a different knitting tension than the one provided, the measurements of the finished garment might deviate from the measurement sketch.

See DROPS lesson: How to measure your tension/gauge

See DROPS video: How to make a gauge tension swatch

Working a garment top-down provides more flexibility and room for personal adjustment. For example it is easier to try the garment on while working, as well as making adjustments to length of yoke and shoulder caps.

The instructions are carefully explaining every step, in the correct order. Diagrams are adjusted to the knitting direction and are worked as usual.

The diagram depicts all rows/rounds, and every stitch seen from the right side. It is read from bottom to top, from right to left. 1 square = 1 stitch.

When working back and forth, every other row is worked from the right side and every other row is worked from the wrong side. When working from the wrong side, the diagram will have to be worked reversed: from left to right, knit stitches are purled, purl stitches are knit etc.

When working in the round every round is worked from the right side and the diagram are worked from right to left on all rounds.

See DROPS lesson: How to read knitting diagrams

The diagram depicts all rows/rounds, and every stitch seen from the right side. It is worked from bottom to top, from right to left.

When working back and forth every other row is worked from the right side: from right to left and every other row is worked from the wrong side: from left to right.

When working in the round, every row in the diagram are worked from the right side, from right to left.

When working a circular diagram you start in the middle and work your way outwards, counter clockwise, row by row.

The rows usually start with a given number of chain stitches (equivalent to the height of the following stitch), this will either be depicted in the diagram or explained in the pattern.

See DROPS lesson: How to read crochet diagrams

Instructions for working several diagrams after each other on the same row/round, will often be written like so: “work A.1, A.2, A.3 a total of 0-0-2-3-4 times". This means you work A.1 once, then A.2 is worked once, and A.3 is repeated (in width) the number of times provided for your size – in this case like so: S = 0 times, M = 0 times, L=2 times, XL= 3 times and XXL = 4 times.

The diagrams are worked as usual: begin with the first row in A.1, then work the first row in A.2 etc.

See DROPS lesson: How to read knitting diagrams

See DROPS lesson: How to read crochet diagrams

The total width of the garment (from wrist-to-wrist) will be larger in the larger sizes, despite the actual sleeves being shorter. The larger sizes have longer sleeve caps and wider shoulders, so there will be a good fit in all sizes.

The measurement sketch/schematic drawing provides information regarding the full length of the garment. If it’s a jumper or a jacket the length is measured from the highest point on the shoulder (usually closest to the neckline), and straight down to the bottom of the garment. It is NOT measured from the tip of shoulder. Similarly, the length of yoke is measured from the highest point on the shoulder and down to where yoke is split into body and sleeves.

See DROPS lesson: How to read a schematic drawing

Diagrams are often repeated on the round or in height. 1 repeat is the diagram the way it appears in the pattern. If it says to work 5 repeats of A.1 in the round, then you work A.1 a total of 5 times after/next to each other in the round. If it says to work 2 repeats of A.1 vertically/in height you work the entire diagram once, then begin again at the start and work the entire diagram one more time.

Chain stitches are slightly narrower than other stitches and to avoid working the cast-on edge too tight, we simply chain more stitches to begin with. The stitch count will be adjusted on the following row to fit the pattern and measurement sketch.

The rib edge is more elastic and will contract slightly compared to, for example, stocking stitch. By increasing before the rib edge, you avoid a visible difference in width between the rib edge and the rest of the body.

It’s very easy to cast off too tightly, and by making yarn overs while casting off (and simultaneously casting these off) you avoid a too tight cast off edge.

See DROPS video: How to bind off with yarn overs (yo)

To achieve an even increase (or decrease) you can increase on, for example: every 3rd and 4th row alternately, like so: work 2 rows and increase on the 3rd row, work 3 rows and increase on the 4th. Repeat this until the increase is complete.

See DROPS lesson: Increase or decrease 1 st on every 3rd and 4th row alternately

Should you prefer to work in the round instead of back and forth, you may of course adjust the pattern. You’ll need to add steeks mid-front (usually 5 stitches), and follow the instructions. When you would normally turn and work from the wrong side, simply work across the steek and continue in the round. At the end you’ll cut the piece open, pick up stitches to work bands, and cover the cut edges.

See DROPS video: How to knit steeks and cut open

Should you prefer to work back and forth instead of in the round, you may of course adjust the pattern so you work the pieces separately and then assemble them at the end. Divide the stitches for the body in 2, add 1 edge stitch in each side (for sewing) and work the front and back pieces separately.

See DROPS lesson: Can I adapt a pattern for circular needles into straight needles?

Pattern repeats can vary slightly in the different sizes, in order to get the correct proportions. If you’re not working the exact same size as the garment in the photo, yours might deviate slightly. This has been carefully developed and adjusted so that the complete impression of the garment is the same in all sizes.

Make sure to follow instructions and diagrams for your size!

If you have found a pattern you like which is available in women’s size it’s not very difficult to convert it to men’s size. The biggest difference will be the length of sleeves and body. Start working on the women size that you think would fit across the chest. The additional length will be worked right before you cast off for the armhole/sleeve cap. If the pattern is worked top-down you can add the length right after the armhole or before the first decrease on sleeve.

Regarding additional yarn amount, this will depend on how much length you add, but it is better with a skein too many than too few.

All yarns will have excess fibres (from production) that might come off as lint or shedding. Brushed yarns (ie hairier yarns) have more of these loose, excess fibres, causing more shedding.

Shedding also depends on what is worn under or over the garment, and whether this pulls at the yarn fibres. It’s therefore not possible to guarantee that there will be no shedding

Below are some tips on how to get the best result when working with hairier yarns:

1. When the garment is finished (before you wash it) shake it vigorously so the looser hairs come off. NOTE: do NOT use a lint roller, brush or any method that pulls at the yarn.

2. Place the garment in a plastic bag and put it in your freezer - the temperature will cause the fibres to become less attached to each other, and excess fibres will come off easier.

3. Leave in the freezer for a few hours before taking it out and shaking it again.

4. Wash the garment according to the instructions on the yarn label.

Pilling is a natural process that happens to even the most exclusive of fibers. It's a natural sign of wear and tear that is hard to avoid, and that is most visible in high friction areas of your garment like a sweater's arms and cuffs.

You can make your garment look as new by removing the pilling, using a fabric comb or a pill/lint remover.

Still can't find the answer you need? Then scroll down and leave your question so one of our experts can try to help you. This will be done normally within 5 to 10 working days.
In the meantime, you can read the questions and answers that others have left to this pattern or join the DROPS Workshop on Facebook to get help from fellow knitters/crocheters!

You might also like...

Post a comment to pattern DROPS 177-25

We would love to hear what you have to say about this pattern!

If you want to leave a question, please make sure you select the correct category in the form below, to speed up the answering process. Required fields are marked *.

Comments / Questions (19)

country flag Coraline wrote:

Bonjour Il n’y aura pas de différence entre le dos et le devant au niveau du raglan ? Merci

03.06.2019 - 18:29

DROPS Design answered:

Bonjour Coraline, le dos et le devant sont identiques au niveau du raglan. Bon tricot!

03.06.2019 - 19:24

country flag Coraline wrote:

Bonjour je ne comprends pas « Diminuer de cette façon 5-5-5-7-7-8 fois au total tous les 4 tours, et 18-22-26-26-30-32 fois tous les 2 tours = 144-152-152-168-168-172 mailles.  » Tous les 2 tours on fait l’étape Raglan de 8 diminutions Mais tous les 4 tours ? On fait 2 fois l’étape du raglan ? 16 diminutions donc tous les 4 rangs ? Merci

03.06.2019 - 18:22

DROPS Design answered:

Bonjour Coraline! Si tu diminues tous les 4 tours, tu diminues toujours 8 mailles par tour (on fait l’étape Raglan, le meme que tous les 2 tours). Bon tricot!

03.06.2019 - 19:45

country flag Anne wrote:

Hva er kyst?

26.02.2019 - 09:30

DROPS Design answered:

hei Anne. Det er fargenavnet på mønsterfargen, så det forteller deg hvilken farge du skal bruke. God fornøyelse

26.02.2019 - 14:52

country flag Dagmar Thiel wrote:

Liebes Drops- Team, ich verstehe nicht, das man beim Rumpfteil nach 40 cm Höhe für alle Größen die Arbeit schon teilen soll. Laut Diagramm sind es 62 cm? Über eine kurze Information würde ich ich freuen! Viele Grüße! Dagmar Thiel

25.01.2019 - 17:53

DROPS Design answered:

Liebe Frau Thiel, in jede Grösse mist das Rumpfteil 40 cm, dann stricken Sie eine unterschiedliche Höhe für die Passe, z.B. in der 1. Grösse: 40 cm Rumpfteil + 22 cm Passe vom Schulter = 62 cm Gesamthöhe vom Schulter bis unteren Rand. Viel Spaß beim stricken!

28.01.2019 - 08:47

country flag DENIS wrote:

Bonjour, J'ai un problème avec l'échantillon. Comme je tricote serré j'ai utilisé les aiguilles n° 4 pour le faire. J'obtiens le bon nombre de rangs mais j'ai 2 mailles en trop. Si je prends du 4,5, j'aurai trop de rangs. Avez vous une astuce ? Merci de votre réponse. Cordialement Laurence

26.09.2017 - 13:29

DROPS Design answered:

Bonjour Laurence, vous pouvez dans un premier temps laver et faire sécher votre échantillon pour vérifier les mesures après lavage, puis ajuster la taille des aiguilles en conséquence. Si vous obtenez la bonne largeur mais pas la bonne hauteur, vous pouvez ajuster la hauteur du raglan en conséquence (par exemple s'il c'est toujours trop serré, tricotez des rangs supplémentaires à intervalles réguliers entre les rangs de diminutions du raglan), vous pourrez ainsi recalculer le nombre de rangs supplémentaire à faire pour vous permettre d'avoir les bonnes mesures. Bon tricot!

26.09.2017 - 14:59

country flag Fab wrote:

Bonjour, Je n'arrive pas à comprendre le nombre de mailles indiquées au départ. Si on prend 24 mailles pour 10 cm, alors pour la taille S, 2x58 cm pour un tour complet, ne devrait il pas faire 116x2,4= 279 mailles soit 294 mailles pour un multiple de 21 pour le diagramme? Du coup, avec les 399 mailles indiquées, je suis un peu perdue. Merci d'avance pour votre aide.

28.05.2017 - 14:33

DROPS Design answered:

Bonjour Fab, l'échantillon se tricote en jersey, si vous avez bien 24 m = 10 cm de large, quand vous ferez le point de vagues du bas du pull, vous aurez la bonne largeur (il faut un peu plus de mailles pour 10 cm pour ce type de motifs). Bon tricot!

29.05.2017 - 09:57

country flag Veronika wrote:

Hei, hvis man ser på siste del av bolen der man skal felle 3 masker, strikke 104, felle 6 masker, og deretter de 3 siste når man har kommet rundt igjen. Når jeg da skal overføre armene har jeg jo en maske i mellom der jeg felte 3 på starten og 3 på slutten... får det ikke til å stemme når jeg da skal sette på armen... burde man ikke da (som på armen) starte 3 masker før merketråden, slik at det ikke blir noen maske i midten. Første genseren min, så dette gav meg skikkelig hodebry.

02.05.2017 - 01:20

DROPS Design answered:

Hei Veronika. Etter du har felt de siste 3 maskene kan du klippe tråden. Når du setter på ermene på samme rundpinne som bolen, kan du strikke videre med tråden du har brukt på ermet. God Fornøyelse!

04.05.2017 - 10:48

country flag Emma wrote:

Hej! Jag undrar om arbetet verkligen ska stickas till 40 cm för att därefter maska av - med tanke på bilden med måtten så känns det lite kort?

02.03.2017 - 14:22

DROPS Design answered:

Hej Emma. Det er kun til aermegabet, saa skal du strikke aermerne og herefter saette alt ind paa ind pind og strikke baerestykket. Saa den hele höjde er mere :)

02.03.2017 - 15:27

country flag Nina wrote:

My favorite!

16.12.2016 - 10:27