DROPS BabyAlpaca Silk
70% Alpaca, 30% Silk
Discontinued
find alternatives
DROPS Kid-Silk
DROPS Kid-Silk
75% Mohair, 25% Silk
from 6.75 $ /25g
DROPS SS24

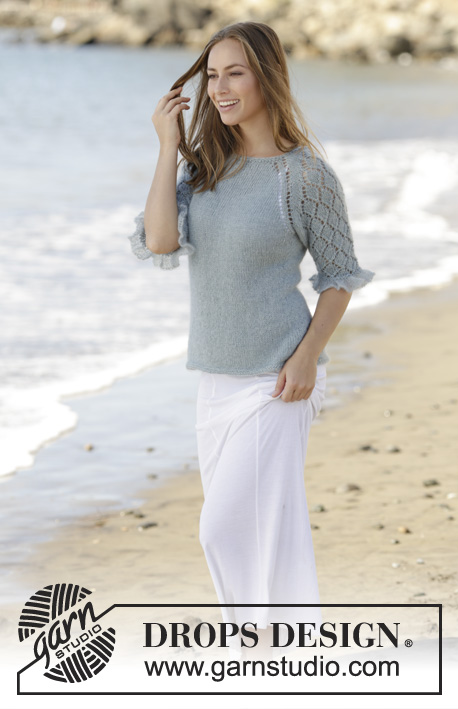
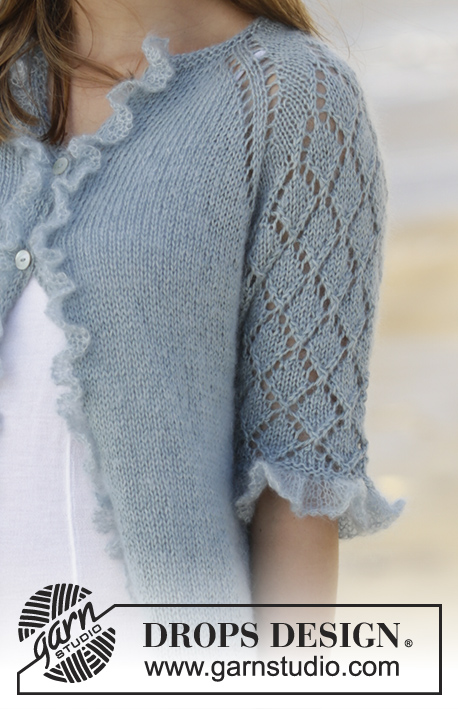
Seaside Dream Cardigan

Jacket worked top down with raglan, ¾ sleeves, lace pattern and flounce in DROPS BabyAlpaca Silk and DROPS Kid-Silk. Size: S - XXXL

DROPS 175-29
DROPS design: Pattern no bs-123
Yarn group A + A or C
----------------------------------------------------------
Size: S - M - L - XL - XXL - XXXL
Materials:
DROPS BABYALPACA SILK from Garnstudio (belongs to yarn group A)
200-250-250-300-300-350 g color 7402, light sea green
And use:
DROPS KID-SILK from Garnstudio (belongs to yarn group A)
100-125-125-150-150-175 g color 06, light gray green

DROPS DOUBLE POINTED NEEDLES AND CIRCULAR NEEDLE (40 + 60 and 80 cm / 16" + 24" and 32") SIZE 5 mm/US 8 – or size needed to get 17 stitches and 22 rows in stockinette stitch with 1 strand of each quality (= 2 strands) = width 10 cm / 4" and 10 cm / 4" vertically.
DROPS DOUBLE POINTED NEEDLES and CIRCULAR NEEDLE (60 or 80 cm / 24" or 32") SIZE 4 mm/US 6 - for edges in garter stitch.
DROPS CROCHET HOOK size 5 mm / H/8 – for flounce mid front.
DROPS MOTHER-OF-PEARL BUTTON ARCHED (white), NO 521: 7-7-7-7-8-8 pieces

-------------------------------------------------------

Alternative Yarn – See how to change yarns here
Yarn Groups A to F – Use the same pattern and change the yarn here
Yarn usage using an alternative yarn – Use our yarn converter here

-------------------------------------------------------

DROPS BabyAlpaca Silk
70% Alpaca, 30% Silk
Discontinued
find alternatives
DROPS Kid-Silk
DROPS Kid-Silk
75% Mohair, 25% Silk
from 6.75 $ /25g

Pattern instructions

NOTE: This pattern is written in American English. All measurements in charts are in cm. For conversion from inches to cm - click here. There are different terms for crocheting in American and British English. If this pattern includes crochet, click for "crochet terms" here. For this pattern in British English, please click here.
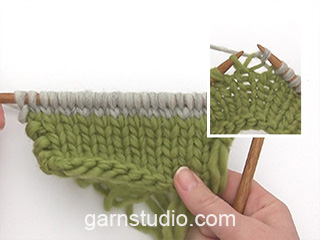
GARTER STITCH (back and forth):
1 ridge = knit 2 rows.

GARTER STITCH (worked in the round):
1 ridge = 2 rounds. Knit 1 round and purl 1 round.

INCREASE TIP-1:
To calculate how to increase evenly, use the total number of stitches on row (e.g. 76 stitches), minus bands (e.g. 6 stitches) and divide the remaining stitches by number of increases to be done (e.g. 8) = 8.75. In this example increase alternately after approx. every 8th and 9th stitch by making 1 yarn over. On next row work yarn overs twisted to avoid holes. Do not increase over bands.

PATTERN:
See diagrams A.1 and A.2. Diagrams show all rows in pattern seen from the right side. A.1 finishes differently depending on the size.

RAGLAN:
Increase for raglan in every transition between sleeves and body. All increases are done from the right side.
Begin 1 stitch before A.1 and work as follows: 1 yarn over, knit 1, marker thread, work A.1 and increase 2 stitches as shown in diagram, marker thread, knit 1, 1 yarn over (= 4 stitches increased). On next row purl yarn overs to make holes.

DECREASE TIP-1 (applies to sides of body):
All decreases are done from the right side. Begin 4 stitches before marker and knit 2 together, knit 4 (marker thread is in the middle of these stitches), slip 1 stitch knitwise, knit 1, pass slipped stitch over stitch worked (= 2 stitches decreased).

INCREASE TIP-2 (applies to sides of body):
All increases are done from right side. Work until 2 stitches remain before marker thread , make 1 yarn over, knit 4 (marker thread is in the middle of these stitches), make 1 yarn over (= 2 stitches increased). On next row purl yarn overs twisted to avoid holes.

DECREASE TIP-2 (applies to mid under sleeve):
Begin 2 stitches before marker thread and knit 2 together, marker thread, slip 1 stitch knitwise, knit 1, pass slipped stitch over stitch worked (= 2 stitches decreased).

BUTTONHOLES:
Decrease for buttonholes on right band (when garment is worn). 1 buttonhole = work until 3 stitches remain on needle, make 1 yarn over, knit 2 together and finish by knitting 1. Decrease for first buttonhole on first row from right side after ridges in neck. Then decrease the next 6-6-6-6-7-7 buttonholes, approx. 8-8-9-9-8-8 cm / 3"-3"-3½"-3½"-3"-3" between each.
----------------------------------------------------------

JACKET:
Work back and forth on circular needle from mid front, work top down. Work sleeves in the round on a short circular needle/double pointed needles.

YOKE:
Cast on 76-80-80-88-92-104 stitches (including 3 band stitches in each side towards mid front) on circular needle size 4 mm / US 6 with 1 strand BabyAlpaca Silk + 1 strand Kid-Silk (= 2 strands). Work 2 ridges in GARTER STITCH - see explanation above. On next row knit from right side and increase 8-8-12-12-16-16 stitches evenly – READ INCREASE TIP-1. AT THE SAME TIME begin to decrease for BUTTONHOLES on right band - see explanation above = 84-88-92-100-108-120 stitches on needle. Switch to circular needle size 5 mm / US 8 and work next row from wrong side as follows: 3 band stitches in garter stitches, purl 14-15-16-18-20-23 stitches, insert 1 marker thread, purl 11 stitches (= right sleeve), insert 1 marker thread, purl 28-30-32-36-40-46 stitches (= back piece), insert 1 marker thread, purl 11 stitches (= left sleeve), insert 1 marker thread, purl 14-15-16-18-20-23 stitches and 3 band stitches in garter stitch. REMEMBER THE KNITTING GAUGE
Then work in stockinette stitch with 3 band stitches in garter stitch in each side towards mid front and A.1 between marker threads on each sleeve. AT THE SAME TIME on first row from right side increase for RAGLAN in every transition between body and sleeves – see explanation above (= 8 stitches increased - NOTE: Increases on sleeves are shown in A.1). Increase like this every other row (i.e. on every row from right side) 20-22-24-26-29-30 times in total.
When A.1 has been worked in your size, increases for raglan are done and there are 244-264-284-308-340-360 stitches on needle. Piece measures now approx. 22-24-26-28-30-31 cm / 8¾"-9½"-10¼"-11"-11¾"-12¼" from shoulder and down.
Work next row as follows from right side: Work the first 37-40-43-47-52-56 stitches as before (= left front piece), slip the next 51-55-59-63-69-71 stitches on 1 stitch holder (= left sleeve), cast on 6-6-8-8-8-10 new stitches on needle (insert 1 marker thread in the middle of these new stitches = in the side on body), knit the next 68-74-80-88-98-106 stitches (= back piece), slip the next 51-55-59-63-69-71 stitches on 1 stitch holder (= right sleeve), cast on 6-6-8-8-8-10 new stitches on needle (insert 1 marker thread in the middle of these new stitches = in the side on body) and work the remaining 37-40-43-47-52-56 stitches as before (= front piece). Then finish body and sleeves separately. NOW MEASURE THE PIECE FROM HERE.

BODY:
= 154-166-182-198-218-238 stitches. Work in stockinette stitch back and forth with 3 band stitches in garter stitch in each side towards mid front. Remember BUTTONHOLES on band - see explanation above. When piece measures 4 cm / 1½", decrease 1 stitch on each side of both marker threads - READ DECREASE TIP-1 (= 4 stitches decreased). Decrease like this every 4 cm / 1½" 3 times in total in each side = 142-154-170-186-206-226 stitches. When piece measures 18 cm / 7" from division, increase 1 stitch on each side of both marker threads - READ INCREASE TIP-2 (= 4 stitches increased). Increase like this every 4 cm / 1½" 3 times in total in each side = 154-166-182-198-218-238 stitches. Switch to circular needle size 4 mm / US 6 when piece measures 33-33-33-33-33-34 cm / 13"-13"-13"-13"-13"-13½" from division. Work 2 ridges back and forth over all stitches. Switch back to circular needle size 5 mm / US 8 and bind off - make sure to avoid a tight bind-off edge. Jacket measures approx. 56-58-60-62-64-66 cm / 22"-22¾"-23⅝"-24⅜"-25¼"-26" from shoulder and down.

SLEEVE:
Work sleeve in the round on a short circular needle/double pointed needles. Slip the 51-55-59-63-69-71 stitches from stitch holder in one side of piece on a short circular needle size 5 mm / US 8 and pick in addition up 1 stitch in each of the 6-6-8-8-8-10 stitches cast on under sleeve = 57-61-67-71-77-81 stitches. Insert 1 marker thread mid under sleeve and move it upwards when working - round begins here.
Then work as follows: 0-2-1-3 2-0 stitches in stockinette stitch, A.2A (= 4 stitches – begin A.2 where A.1 ended in your size), A.2B over the next 48-48-56-56-64-72 stitches (= 6-6-7-7-8-9 repetitions of 8 stitches), A.2C (= 5 stitches) and 0-2-1-3-2-0 stitches in stockinette stitch. Continue pattern like this. When piece measures 2 cm / ¾", decrease 2 stitches mid under sleeve - READ DECREASE TIP-2. Decrease 8-10-12-13-15-17 times in total in S: On every 4th round, in M: On every 3rd round, in L + XL: On every other round, in XXL + XXXL: On every round = 41-41-43-45-47-47 stitches - NOTE: Work the stitches that do not fit the pattern when decreasing in stockinette stitch, make sure that number of decreases and increases in pattern is correct.
When piece measures 18-16-15-14-12-11 cm / 7"-6¼"-6"-5½"-4¾"-11½" from division under sleeve (shorter measurements in the larger sizes because of longer yoke), switch to double pointed needles size 4 mm / US 6. Work 2 ridges in GARTER STITCH in the round - see explanation above. Switch back to double pointed needles size 5 mm / US 8. Remove 1 strand BabyAlpaca Silk and knit 1 round with 2 strands Kid-Silk. Every stitch now consists of 2 stitches because 2 strands were used = 82-82-86-90-94-94 stitches. Remove 1 strand Kid-Silk and continue with 1 strand Kid-Silk as follows: * Knit one of the 2 first/next stitches, make 1 yarn over, knit the second of the 2 first/next stitches *, repeat from *-* the entire round = 123-123-129-135-141-141 stitches on needle. Knit 5 rounds. Then bind off as follows: * bind off 1 stitch, make 1 yarn over on needle, bind off yarn over *, repeat from *-* the entire round. Slip stitches from stitch holder in the other side of piece on a short circular needle size 5 mm / US 8 and work the same way as on first sleeve.

ASSEMBLY:
Sew the buttons on to the left band.

FLOUNCE MID FRONT ALONG LEFT FRONT PIECE:
Begin from right side at the top by neck on left front piece (when garment is worn). Use crochet hook 5 mm and 2 strand Kid-Silk and pick up 1 stitch in every other knit stitch inside the band stitches down along mid front - slip stitches on to circular needle size 5 mm / US 8.
There are 2 stitches in every stitch because 2 strands where used = approx. 116 to 138 stitches. Remove 1 strand Kid-Silk and work with 1 strand Kid-Silk as follows from wrong side: Knit outermost stitch (work through both stitches), * purl one of the 2 first/next stitches, make 1 yarn over, purl the second of the 2 first/next stitches *, repeat from *-* the entire row, but finish with knit 1 in last stitch (work through both stitches) = approx. 170 to 204 stitches on needle. Work 2 rows in stockinette stitch back and forth with 1 edge stitch in garter stitch in each side. Then bind off as follows from right side: * bind off 1 stitch, make 1 yarn over, bind off yarn over *, repeat from *-* until all stitches have been bind off.

FLOUNCE MID FRONT ALONG RIGHT FRONT PIECE:
Work the same way as along left front piece but begin by picking up stitches from right side at the bottom of right front piece.

Diagram

All measurements in charts are in cm.

symbols = knit from the right side, purl from the wrong side
symbols = between 2 stitches make 1 yarn over
symbols = knit 2 together
symbols = slip 1 stitch knitwise, knit 1, pass slipped stitch over stitch worked
symbols = slip 1 stitch knitwise, knit 2 stitches together, pass slipped stitch over stitches worked together
symbols = knitting direction
diagram
diagram

Each of our patterns has specific tutorial videos to help you.

Do you have a question? See a list of frequently asked questions (FAQ)

Knitting tension is what determines the final measurements of your work, and is usually measured per 10 x 10 cm. It is provided like so: number of stitches in width x number of rows in height - eg: 19 stitches x 26 rows = 10 x 10 cm.

The knitting tension is very individual; some people knit/crochet loosely while others work tightly. You adjust the knitting tension with the needle size, which is why the suggested needle size only serve as a guide! You need to adjust this (up or down) to ensure that YOUR knitting tension matches the knitting tension provided in the pattern. If you work with a different knitting tension than provided you will have a different yarn consumption, and your work will have different measurements than what the pattern suggests.

The knitting tension also determines which yarns can replace each other. As long as you achieve the same knitting tension you can replace one yarn with another.

See DROPS lesson: How to measure your tension/gauge

See DROPS video: How to make a gauge tension swatch

The required amount of yarn is provided in grams, eg: 450 g. To calculate how many balls you’ll need you first need to know how many grams are in 1 ball (25g, 50g or 100g). This information is available if you click on the individual yarn quality on our pages. Divide the amount required with the amount of each ball. For example, if each ball is 50g (the most common amount), the calculation will be as follows: 450 / 50 = 9 balls.

The important thing when changing from one yarn to another is that the knitting/crochet tension remains the same. This is so that the measurements of the finished piece will be the same as on the sketch provided. It is easier to achieve the same knitting tension using yarns from the same yarn group. It is also possible to work with multiple strands of a thinner yarn to achieve the knitting tension of a thicker one. Please try our yarn converter. We recommend you to always work a test swatch.

Please NOTE: when changing yarn the garment might have a different look and feel to the garment in the photo, due to individual properties and qualities of each yarn.

See DROPS lesson: Can I use a different yarn than the one mentioned in the pattern?

All our yarns are categorised into yarn groups (from A to F) according to thickness and knitting tension – group A contains the thinnest yarns and group F the thickest. This makes it easier for you to find alternative yarns to our patterns, should you wish to switch yarn. All yarns within the same group have a similar knitting tension and can easily replace each other. However, different yarn qualities have different structures and properties which will give the finished work a unique look and feel.

Click here for an overview of the yarns in each yarn group

At the top of all our patterns you’ll find a link to our yarn converter, which is a helpful tool should you wish to use a different yarn than suggested. By filling in the yarn quality you wish to replace, the amount (in your size) and number of strands, the converter will present good alternative yarns with the same knitting tension. Additionally it will tell you how much you’ll require in the new qualities and whether you’ll need to work with multiple strands. Most skeins are 50g (some are 25g or 100g).

If the pattern is worked with multiple colours, every colour will have to be converted separately. Similarly, if the pattern is worked with several strands of different yarns (for example 1 strand Alpaca and 1 strand Kid-Silk) you will have to find alternatives for each, individually.

Click here to see our yarn converter

Since different yarns have different qualities and textures we have chosen to keep the original yarn in our patterns. However, you can easily find options among our available qualities by using our yarn converter, or simply pick a yarn from the same yarn group.

It is possible that some retailers still have discontinued yarns in stock, or that someone has a few skeins at home that they would like to find patterns for.

The yarn converter will provide both alternative yarn as well as required amount in the new quality.

If you think it's hard to decide what size to make, it can be a good idea to measure a garment you own already and like the size of. Then you can pick the size by comparing those measures with the ones available in the pattern's size chart.

You'll find the size chart at the bottom of the pattern.

See DROPS lesson: How to read size chart

The needle size provided in the pattern serves only as a guide, the important thing is to follow the knitting tension. And since knitting tension is very individual, you will have to adjust the needle size to ensure that YOUR tension is the same as in the pattern – maybe you’ll have to adjust 1, or even 2 needle sizes, up or down to achieve the correct tension. For this, we recommend that you work test swatches.

Should you work with a different knitting tension than the one provided, the measurements of the finished garment might deviate from the measurement sketch.

See DROPS lesson: How to measure your tension/gauge

See DROPS video: How to make a gauge tension swatch

Working a garment top-down provides more flexibility and room for personal adjustment. For example it is easier to try the garment on while working, as well as making adjustments to length of yoke and shoulder caps.

The instructions are carefully explaining every step, in the correct order. Diagrams are adjusted to the knitting direction and are worked as usual.

The diagram depicts all rows/rounds, and every stitch seen from the right side. It is read from bottom to top, from right to left. 1 square = 1 stitch.

When working back and forth, every other row is worked from the right side and every other row is worked from the wrong side. When working from the wrong side, the diagram will have to be worked reversed: from left to right, knit stitches are purled, purl stitches are knit etc.

When working in the round every round is worked from the right side and the diagram are worked from right to left on all rounds.

See DROPS lesson: How to read knitting diagrams

The diagram depicts all rows/rounds, and every stitch seen from the right side. It is worked from bottom to top, from right to left.

When working back and forth every other row is worked from the right side: from right to left and every other row is worked from the wrong side: from left to right.

When working in the round, every row in the diagram are worked from the right side, from right to left.

When working a circular diagram you start in the middle and work your way outwards, counter clockwise, row by row.

The rows usually start with a given number of chain stitches (equivalent to the height of the following stitch), this will either be depicted in the diagram or explained in the pattern.

See DROPS lesson: How to read crochet diagrams

Instructions for working several diagrams after each other on the same row/round, will often be written like so: “work A.1, A.2, A.3 a total of 0-0-2-3-4 times". This means you work A.1 once, then A.2 is worked once, and A.3 is repeated (in width) the number of times provided for your size – in this case like so: S = 0 times, M = 0 times, L=2 times, XL= 3 times and XXL = 4 times.

The diagrams are worked as usual: begin with the first row in A.1, then work the first row in A.2 etc.

See DROPS lesson: How to read knitting diagrams

See DROPS lesson: How to read crochet diagrams

The total width of the garment (from wrist-to-wrist) will be larger in the larger sizes, despite the actual sleeves being shorter. The larger sizes have longer sleeve caps and wider shoulders, so there will be a good fit in all sizes.

The measurement sketch/schematic drawing provides information regarding the full length of the garment. If it’s a jumper or a jacket the length is measured from the highest point on the shoulder (usually closest to the neckline), and straight down to the bottom of the garment. It is NOT measured from the tip of shoulder. Similarly, the length of yoke is measured from the highest point on the shoulder and down to where yoke is split into body and sleeves.

See DROPS lesson: How to read a schematic drawing

Diagrams are often repeated on the round or in height. 1 repeat is the diagram the way it appears in the pattern. If it says to work 5 repeats of A.1 in the round, then you work A.1 a total of 5 times after/next to each other in the round. If it says to work 2 repeats of A.1 vertically/in height you work the entire diagram once, then begin again at the start and work the entire diagram one more time.

Chain stitches are slightly narrower than other stitches and to avoid working the cast-on edge too tight, we simply chain more stitches to begin with. The stitch count will be adjusted on the following row to fit the pattern and measurement sketch.

The rib edge is more elastic and will contract slightly compared to, for example, stocking stitch. By increasing before the rib edge, you avoid a visible difference in width between the rib edge and the rest of the body.

It’s very easy to cast off too tightly, and by making yarn overs while casting off (and simultaneously casting these off) you avoid a too tight cast off edge.

See DROPS video: How to bind off with yarn overs (yo)

To achieve an even increase (or decrease) you can increase on, for example: every 3rd and 4th row alternately, like so: work 2 rows and increase on the 3rd row, work 3 rows and increase on the 4th. Repeat this until the increase is complete.

See DROPS lesson: Increase or decrease 1 st on every 3rd and 4th row alternately

Should you prefer to work in the round instead of back and forth, you may of course adjust the pattern. You’ll need to add steeks mid-front (usually 5 stitches), and follow the instructions. When you would normally turn and work from the wrong side, simply work across the steek and continue in the round. At the end you’ll cut the piece open, pick up stitches to work bands, and cover the cut edges.

See DROPS video: How to knit steeks and cut open

Should you prefer to work back and forth instead of in the round, you may of course adjust the pattern so you work the pieces separately and then assemble them at the end. Divide the stitches for the body in 2, add 1 edge stitch in each side (for sewing) and work the front and back pieces separately.

See DROPS lesson: Can I adapt a pattern for circular needles into straight needles?

Pattern repeats can vary slightly in the different sizes, in order to get the correct proportions. If you’re not working the exact same size as the garment in the photo, yours might deviate slightly. This has been carefully developed and adjusted so that the complete impression of the garment is the same in all sizes.

Make sure to follow instructions and diagrams for your size!

If you have found a pattern you like which is available in women’s size it’s not very difficult to convert it to men’s size. The biggest difference will be the length of sleeves and body. Start working on the women size that you think would fit across the chest. The additional length will be worked right before you cast off for the armhole/sleeve cap. If the pattern is worked top-down you can add the length right after the armhole or before the first decrease on sleeve.

Regarding additional yarn amount, this will depend on how much length you add, but it is better with a skein too many than too few.

All yarns will have excess fibres (from production) that might come off as lint or shedding. Brushed yarns (ie hairier yarns) have more of these loose, excess fibres, causing more shedding.

Shedding also depends on what is worn under or over the garment, and whether this pulls at the yarn fibres. It’s therefore not possible to guarantee that there will be no shedding

Below are some tips on how to get the best result when working with hairier yarns:

1. When the garment is finished (before you wash it) shake it vigorously so the looser hairs come off. NOTE: do NOT use a lint roller, brush or any method that pulls at the yarn.

2. Place the garment in a plastic bag and put it in your freezer - the temperature will cause the fibres to become less attached to each other, and excess fibres will come off easier.

3. Leave in the freezer for a few hours before taking it out and shaking it again.

4. Wash the garment according to the instructions on the yarn label.

Pilling is a natural process that happens to even the most exclusive of fibers. It's a natural sign of wear and tear that is hard to avoid, and that is most visible in high friction areas of your garment like a sweater's arms and cuffs.

You can make your garment look as new by removing the pilling, using a fabric comb or a pill/lint remover.

Still can't find the answer you need? Then scroll down and leave your question so one of our experts can try to help you. This will be done normally within 5 to 10 working days.
In the meantime, you can read the questions and answers that others have left to this pattern or join the DROPS Workshop on Facebook to get help from fellow knitters/crocheters!

You might also like...

Post a comment to pattern DROPS 175-29

We would love to hear what you have to say about this pattern!

If you want to leave a question, please make sure you select the correct category in the form below, to speed up the answering process. Required fields are marked *.

Comments / Questions (15)

country flag Nafula wrote:

This looks fab,might give it a go.

12.07.2023 - 18:00

country flag Geneviève wrote:

Hello, My granddaughter (aged 10) would like me to knit this model for her too (as I did for her mum) would it be possible to get a description (i.c. a stich calculation) for her size? Thank you!

04.07.2022 - 17:50

DROPS Design answered:

Dear Geneviève, please see answer below.

04.07.2022 - 19:11

country flag Geneviève wrote:

Hello, My granddaughter (aged 10) would like me to knit this model for her too (as I did for her mum) would it be possible to get a description (i.c. a stich calculation) for her size? Thank you!

04.07.2022 - 17:49

DROPS Design answered:

Dear Geneviève, we don't make custom patterns. You could work the same pattern as for size S (for the neck and charts) and then adjust the yoke (make it shorter) and the length of the jacket and the sleeves (the desired length). The amount of stitches to be picked up in the flounces will depend on the final length of the front piece Remember that for this to work you need to use the gauge indicated in the pattern. Happy knitting!

04.07.2022 - 19:11

country flag Susanne Mathiasen wrote:

Hej igen, Er den angivede strikkefasthed efter “blocking” eller før. Strikker normalt stramt, men synes pind 5 til de to nævnte garnkvaliteter giver et meget løst udtryk? Er det meningen?

18.03.2021 - 12:50

DROPS Design answered:

Hej Susanne, hvis du har 17 masker på 10 cm med de 2 kvaliteter, så bør din strikkeprøve se ud som på billedet (se gerne på nærbilledet som er forstørret) uden "blocking" God fornøjelse!

18.03.2021 - 14:01

country flag Delphine Lees wrote:

Bonjour, je trouve ce modele magnifique ! En regardant le nuancier, je m'interroge, a-t'il vraiment ete realise avec du baby alpaca silk 7402 vert ocean clair ? Pour moi cela ressemblerait beaucoup plus au 6235 gris bleu. Merci par avance de confirmer la couleur du modele presente, que je voudrais reproduire.

03.03.2019 - 20:47

DROPS Design answered:

Bonjour Mme Lees, ce modèle a bien été tricoté en BabyAlpaca Silk 7402 + Kid-Silk 06, ce qui peut faire apparaître la couleur différemment. L'éclairage le jour de la prise de photo peut également jouer. Pour toute aide dans le choix de la couleur, n'hésitez pas à demander conseil à votre magasin DROPS, même par mail ou téléphone. Bon tricot!

04.03.2019 - 11:14

country flag Lelletta wrote:

Grazie mille! Lelletta

24.01.2019 - 19:03

country flag Elena Cordoni wrote:

Thank you so much ! Good bye.

10.11.2017 - 19:12

country flag Elena Cordoni wrote:

Ok, but after the new 6 sts I find the beginning of the work at the end of the sts ; Have I to do a stripe of St st and, after, begin... Thanks again

09.11.2017 - 16:48

DROPS Design answered:

Dear Mrs Cordoni, beg of round should be in the middle of the 6 new sts mid under arm, knit the first 3 new sts if necessary, place marker and start new round from here. Happy knitting!

10.11.2017 - 07:45

country flag Eena Cordoni wrote:

Hello, I have difficulty starting to work on the sleeves. After taking the 6 points under the sleeve I should start the pattern straight away, there is no space for the two knit stitches ... Then, will the 6 jersey shoots become perforated? Thanks and regards.

08.11.2017 - 09:09

DROPS Design answered:

Dear Mrs Cordoni, when you continue the sleeve, beg of round is in the middle of the new 6 sts and now work 2 sts stocking st, the work A.2A, A.2B over the next 48 sts, A.2C and finish with 2 sts in stocking st. Continue pattern from previous round on yoke. Happy knitting!

08.11.2017 - 09:54

Elize wrote:

Would I be able us use Drops delight for this pattern.

18.02.2017 - 23:45

DROPS Design answered:

Hello, yes, instead of DROPS BabyAlpaca Silk you can use DROPS Delight - both of them are from the same Yarn group A. Happy knitting!

19.02.2017 - 09:45