
Popular categories
Looking for a yarn?


|
||||||||||||||||||||||
To the Beach! |
||||||||||||||||||||||
|
|
||||||||||||||||||||||
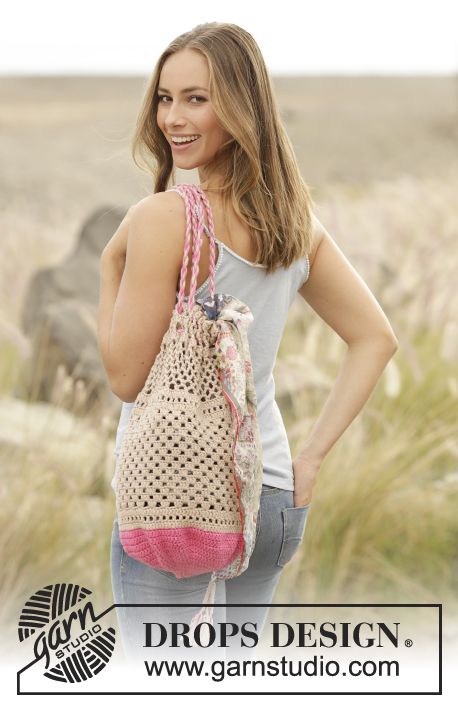
Crochet bag/tote bag with lace pattern in 2 strands DROPS Bomull-Lin.
DROPS 176-23 |
||||||||||||||||||||||
|
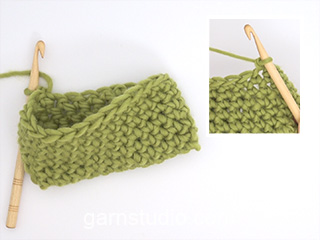
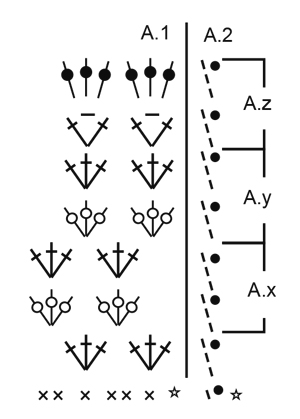
PATTERN: See diagrams A.1 and A.2. A.2 shows how the rounds start and finish. CROCHET INFO: Each round with double crochet starts with 1 chain stitch, finish with 1 slip stitch in the first chain stitch. Each round with treble crochet starts with 3 chain stitches, finish with 1 slip stitch in the 3rd chain stitch. INCREASE TIP: After the marker: Work 1 double crochet in the first double crochet, 2 double crochet in the next double crochet. Before the marker: Work until there are 2 double crochet left before the marker, work 2 double crochet in the first double crochet, 1 double crochet in the next double crochet. ---------------------------------------------------------- BAG: The bag is worked in the round from the bottom up. Work a row of 30 chain stitches with hook size 6 mm and 2 strands beige. Work 1 double crochet in the 2nd chain stitch from the hook, 1 double crochet in each of the next 3 chain stitches, * skip 1 chain stitch, 1 double crochet in each of the next 4 chain stitches *, repeat from *-* 4 times more = 24 double crochet. Continue working around on the opposite side of the chain row - READ CROCHET INFO, work 1 double crochet in each chain stitch with a double crochet (= 24 double crochet), finish with 1 slip stitch in the first double crochet at the start of the round = 48 double crochet on the round. Insert 1 marker in the first double crochet and 1 marker in the 25th double crochet. Continue to work 6 rounds with 1 double crochet in each double crochet AT THE SAME TIME increasing 1 double crochet on each side of each marker (= 4 double crochet increased each round) – READ INCREASE TIP and REMEMBER THE CROCHET TENSION! When the increases are finished, there are 72 double crochet on the last round. Next round work in the round according to diagram A.1 (= 12 repeats in width) - A.2 shows how the rounds start and finish. Work diagram A.1 until A.y has been completed. Repeat A.x and A.y 1 more time. Then work the 1st round of A.y. Change to 2 strands off white and work the 2nd round of A.y, then work A.z 3 times in total. Then work 1 round of double crochet in each treble crochet = 72 double crochet. Work 3 rounds more with 1 double crochet in each double crochet. The piece measures approx. 35 cm. Cut and fasten the strands. HANDLE: The beginning of the round is displaced according to the pattern, therefore lay the bag flat so that the round now starts in the side. Start the next round in one side of the bag and work the round as follows: Remember CROCHET INFO! Work 1 double crochet in each of the first 12 double crochets, work 58 chain stitches (= handle), skip 12 double crochet, work 1 double crochet in each of the next 24 double crochets, work 58 chain stitches (= handle), skip 12 double crochet, work 1 double crochet in each of the last 12 double crochet. Work the next round as follows: Work 1 double crochet in each of the first 12 double crochets, 58 double crochets around the handle, work 1 double crochet in each of the next 24 double crochets, work 58 double crochets around the handle, work 1 double crochet in each of the last 12 double crochets. Work 3 rounds with 1 double crochet in each double crochet, cut and fasten the strand. |
||||||||||||||||||||||
Diagram explanations |
||||||||||||||||||||||
|
||||||||||||||||||||||
|
||||||||||||||||||||||
|
Have you made this or any other of our designs? Tag your pictures in social media with #dropsdesign so we can see them! Do you need help with this pattern?You'll find tutorial videos, a Comments/Questions area and more by visiting the pattern on garnstudio.com. © 1982-2024 DROPS Design A/S. We reserve all rights. This document, including all its sub-sections, has copyrights. Read more about what you can do with our patterns at the bottom of each pattern on our site. |
||||||||||||||||||||||


With over 40 years in knitting and crochet design, DROPS Design offers one of the most extensive collections of free patterns on the internet - translated to 17 languages. As of today we count 304 catalogues and 11422 patterns - 11422 of which are translated into English (UK/cm).
We work hard to bring you the best knitting and crochet have to offer, inspiration and advice as well as great quality yarns at incredible prices! Would you like to use our patterns for other than personal use? You can read what you are allowed to do in the Copyright text at the bottom of all our patterns. Happy crafting!
Comments / Questions (34)
Jeg har heklet denne vesken i dag, denne gangen med to hanker. Det ser ikke riktig ut, skal det i grunnen bare hekles en hanke?
23.04.2024 - 21:06DROPS Design answered:
Hei Hanne, Ja, i denne oppskriften har vesken bare en hank. God fornøyelse!
24.04.2024 - 06:44Hei, nå har jeg heklet ferdig 6 omganger med fm, men jeg sitter igjen med 78 fm, så det ser ut som at jeg har lagt til en ekstra maske hver omgang. Lurer på om det er fordi jeg avslutter med en kjedemaske og begynner med lm? Skal jeg egentlig hoppe over en maske før jeg lager kjedemasken i forrige lm? Og betyr dette at jeg må ta opp og starte på nytt eller kan jeg fortsette med det jeg har? Veldig fin oppskrift forresten! Gleder meg til resultatet :)
03.09.2023 - 14:59DROPS Design answered:
Hei Silje. Litt vanskelig å si nøyaktig hva som er blitt gjort galt. En god ide er å telle maskene etter hver omgang, så har du kontroll på maskeantallet. Om du nå har 78 masker istedenfor 72 masker, vil du få problemer når du skal starte på A.1. Da vil det være 6 masker igjen når du har heklet A.1 12 ganger. Enten rekke opp og få riktig maskeantall, eller rekk opp de 2 siste omgangene og kun øke 2 masker på en av omgangene og ingen økning på den andre omgangen. mvh DROPS Design
11.09.2023 - 14:45Bonjour, pouvez vous m'expliquer comment faire 1 bride dans un groupe de de 2 brides, et aussi 1 bride autour de la maille en l'air ? Merci
20.08.2023 - 09:52Bonjour, pouvez vous m'expliquer comment faire 1 bride dans un groupe de de 2 brides, et aussi 1 bride autour de la maille en l'air ? Merci
20.08.2023 - 09:51DROPS Design answered:
Bonjour Nathalie, pour crocheter autour d'une maille en l'air, insérez simplement votre crochet sous la maille en l'air (dans l'arceau d'1 maille en l'air) - pour ce qui est d'une bride dans un groupe de 2 brides je ne suis pas bien sûre de voir à quelle partie du diagramme vous faites référence. Le 6ème symbole indique de faire 3 brides entre les 2 groupes de brides du rang précédent; et lorsque vous devez crocheter 1 bride dans la maille (ex. 2ème rang de A.x, crochetez simplement 3 brides dans la bride au milieu du groupe de brides du tour précédent. Bon crochet!
21.08.2023 - 08:54Hej jeg er nået til der hvor man skal hækle 6 omgange med fastmasker, men jeg er i tvivl om man stadig skal starte omgangen med luftmasker og slutte med kædemasker, når man jo skal tage ud omkring markørene, og den ene er ved starten.
07.04.2023 - 20:09DROPS Design answered:
Hej Klara, ja hver omgang med fm starter med 1 luftmaske :)
13.04.2023 - 14:28No entiendo muy bien donde hay que empezar con la asa. Los 12 puntos se empiezan donde has acabado el borde de los puntos bajos?
18.02.2023 - 17:00DROPS Design answered:
Hola Ghislaine, empiezas en el borde de puntos bajos, pero en el lateral del bolso.
19.02.2023 - 19:30Hej\r\nJag vill höra med er kan man virka väskan \" to the beach\" bomull lin med hålmönster i storlek bred: 20 och höjd: 25 cm istället för det som står i mönstret? \r\nMvh/ Monica
18.01.2023 - 12:39Nochmal Guten Tag, muss man bei dem Boden mit KM und einer LM zum Anfang einer Reihe arbeiten, ja oder nein? Und zählt dann diese Lm als die erste M. ? Ich komme nämlich nicht mit der Anzahl hin incl. Zunahmen. Ein Video zu der Bodenanfertigung wäre echt genial. Bei dem Video mit den "Häkeln: auf beiden Seiten einer Lm-Kette" wird weder zugenommen noch mit KM +LM am Anfang der Reihe gearbeitet. Würde gerne endlich weiter kommen.
14.07.2022 - 16:12DROPS Design answered:
Liebe Gloria, Sie häkeln wie in der HÄKELINFO beschrieben, d.h. die Runden enden mit 1 Kettmasche und am Anfang häkeln Sie 1 Luftmasche bzw. 3 Luftmaschen. Diese Maschen kommen zusätzlich hinzu, damit später die Diagramme aufgehen. Gutes Gelingen weiterhin!
18.07.2022 - 13:45Guten Tag, ich komme mit der Zunahme Erklärung nicht zurecht. Einerseits steht im Text man soll "... GLEICHZEITIG je 1 feste Masche pro Seite zunehmen...(=4 M.)", aber andererseits auf den Zunahmetipp achten , der allerdings insgesamt 3 M je vor und nach dem Markierer (= für alle 4 Ecken 12 M./Runde) beschreibt. An welche Zunahmen halte ich mich denn nun?? Danke !!!
13.07.2022 - 20:51DROPS Design answered:
Liebe Gloria, der Zunahmetipp beschreibt ja je 1 Zunahme vor und nach jedem Markierer - bei 2 Markierern sind das 4 Zunahmen. Im Zunahmetipp ist erklärt, wo genau Sie die Zunahmen machen: Sie häkeln an beiden Seiten jedes Markierers je eine normale feste Masche und nehmen daneben zu. D.h. um den Markierer herum sind 2 feste Maschen, daneben liegen die Zunahme-Maschen. Gutes Gelingen weiterhin!
18.07.2022 - 13:28Hei! Jeg har lyst å hekle denne i Muskat, og lurer på å bruke tre tråder. Hva vil strikkefastheten bli med tre tråder på pinne 6 være? Jeg lurer også på hva strikkefastheten vil bli på pinne 4,5.
30.05.2022 - 13:37DROPS Design answered:
Hej Camilla, det vil være individuelt, du er nødt til at prøve dig frem :)
02.06.2022 - 09:08