
Popular categories
Looking for a yarn?


|
||||||||||||||||||||||
Sea Hug |
||||||||||||||||||||||
|
|
||||||||||||||||||||||
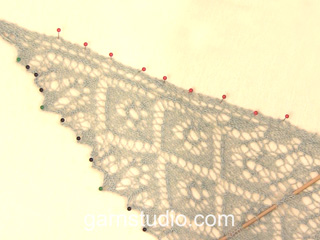
Knitted scarf with lace pattern in DROPS Lace.
DROPS 177-30 |
||||||||||||||||||||||
|
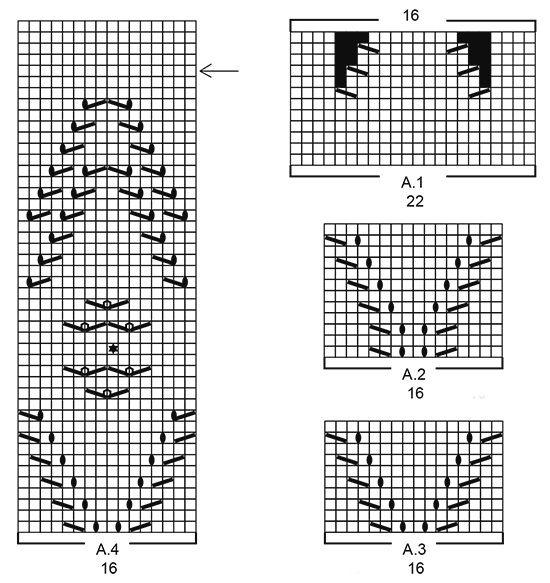
KNITTING GAUGE: The scarf will be soaked and stretched to size afterwards. The knitting gauge is therefore not that important, but to get a sense of whether you are knitting to loose/hard work a test in stockinette stitch on needle size 3 mm / US 2.5. The test should give approx. 24 stitches and 32 rows = 10 cm / 4" in width and 10 cm / 4" vertically. GARTER STITCH (back and forth): 1 ridge = knit 2 rows. PATTERN: See diagrams A.1 to A.4. Diagrams show all rows in pattern seen from the right side. SHAPING: When using another yarn from yarn group A, there is no need to stretch to measurements, but place it gently out in shape and leave to dry. Repeat the process when the scarf has been washed. ---------------------------------------------------------- SCARF: Worked in 2 parts that are sewn together in the middle. PART 1: Cast on 116 stitches on 2 circular needles size 3 mm / US 2.5 with Lace. Pull out one circular needle (cast-on is done like this to avoid a tight cast-on edge). Work 2 ridges in GARTER STITCH - see explanation above. Work next row as follows from the right side: 3 edge stitches in garter stitch, work A.1 over the next 110 stitches (= 5 repetitions of 22 stitches), finish with 3 edge stitches in garter stitch. Continue pattern like this. When A.1 has been worked 1 time vertically, there are 86 stitches on row. * Work next row as follows from right side: 3 edge stitches in garter stitch, work A.2 over the next 80 stitches (= 5 repetitions of 16 stitches), finish with 3 edge stitches in garter stitch. Continue pattern like this. When A.2 has been worked 1 time vertically, work A.3 the same way. When A.3 has been worked 2 times vertically, work A.4 the same way *. After A.4 repeat from *-* 3 more times (= 4 repetitions in total) but finish last repetition after row marked with arrow in diagram. Work 2 ridges in garter stitch, slip stitches on 1 stitch holder or LOOSELY bind off by knitting from right side. PART 2: Work as part 1. ASSEMBLY: Sew the two part tog in the middle with grafting/kitchener stitches (if stitches have been bind off sew together inside bind-off edge). BLOCKING: Place the scarf in lukewarm water until it is soaking wet. Carefully squeeze out the water - do not twist. Roll the scarf in a towel and squeeze to remove more water - the scarf will now only be moist. Place the scarf on a carpet or mattress - carefully stretch it out to size and fasten it with pins. Leave to dry. Repeat the process when the piece has been washed. NOTE: If another yarn in yarn group A has been used - READ SHAPING! |
||||||||||||||||||||||
Diagram explanations |
||||||||||||||||||||||
|
||||||||||||||||||||||
|
||||||||||||||||||||||
|
Have you made this or any other of our designs? Tag your pictures in social media with #dropsdesign so we can see them! Do you need help with this pattern?You'll find tutorial videos, a Comments/Questions area and more by visiting the pattern on garnstudio.com. © 1982-2024 DROPS Design A/S. We reserve all rights. This document, including all its sub-sections, has copyrights. Read more about what you can do with our patterns at the bottom of each pattern on our site. |
||||||||||||||||||||||


With over 40 years in knitting and crochet design, DROPS Design offers one of the most extensive collections of free patterns on the internet - translated to 17 languages. As of today we count 304 catalogs and 11422 patterns - 11417 of which are translated into English (US/in).
We work hard to bring you the best knitting and crochet have to offer, inspiration and advice as well as great quality yarns at incredible prices! Would you like to use our patterns for other than personal use? You can read what you are allowed to do in the Copyright text at the bottom of all our patterns. Happy crafting!
Comments / Questions (29)
Hej Er det for at få en ens afslutning i hver ende af tørklædet at det skal strikkes i to dele og strikkes sammen til sidst? Jeg lurer bare på om det kan strikkes samlet fra starten af eller om det bliver pænest i to dele? Mvh. Nina
29.10.2023 - 12:16DROPS Design answered:
Hei Nina. De strikkes i to delene for å få de like (starten og slutten). Du kan evnt. strikke de som en del, bare å strikke forklaringen bakvendt når 1.del er ferdig. mvh DROPS Design
30.10.2023 - 10:25Je vous remercie beaucoup. Je vais essayer. Bonne journée.
28.06.2023 - 09:01Je vous remercie, je vais essayer. Bonne journée
28.06.2023 - 09:00Bonjour, Je commence cette écharpe et ne comprend le diagramme A1. Le carré noir, pas de maille sauter cette case... Faut il faire 1 diminution ? Merci
27.06.2023 - 22:16DROPS Design answered:
Bonjour MB, la diminution a été faite au rang précédent, autrement dit, au 7ème rang, vous diminuez 2 mailles (cf avant-dernier + dernier symbole de la légende), au 8ème rang, il vous "manque" donc 2 mailles - dessinées en noir dans le diagramme (il reste 20 m dans chaque A.1); au 9ème rang, vous diminuez de nouveau 2 m, il reste 18 m (et on a ainsi 4 cases noires) et ainsi de suite. Bon tricot!
28.06.2023 - 08:24Thank you for your response.
06.12.2022 - 08:42Hi Can one purl the row in a normal us/english way of purling or should we need to do it the norwegian way? it looks really tough in the video tutorial you have. I have to say though, you have amazing aids. Thank you
03.12.2022 - 10:40DROPS Design answered:
Dear Mrs Sharma, you can purl the stitches your own way, we work them with norwegian technique but just purl them as you are used to. Happy knitting!
06.12.2022 - 08:40Hi would it be possible to get a tutorial link or explanation for the between 2 stitches make 2 or 3 YO and drop in purl row. Would really appreciate it. Thank you
02.12.2022 - 19:59DROPS Design answered:
Dear Mrs Sharma, sure, this video shows how to work A.4 and on time code 10:09 you will see how to work the 3 yarn overs, from the wrong side purling the first of them and dropping the last 2 - Happy knitting!
06.12.2022 - 08:22こんにちは、初めまして。 いつもこちらのサイトを楽しませていただいてます。 私は編み物の講師をしておりますが、こちらのパターンを使用して 編み方を生徒に指導することは可能でしょうか。 もし可能でしたら、私が気をつけなくてはならないことはどのような事があるでしょうか。教えていただけると嬉しいです。
24.05.2022 - 17:57DROPS Design answered:
Hi, sorry, we cannot answer in Japanese - you will find the copyright rules at the very bottom of the pattern, hope it will help. Happy knitting!
25.05.2022 - 07:15Hello,, I would like to make this model kipping the aspect as faithful as possíbel to the one of the Lace Yarn. What yarn should I use for that and what quantity should I by? And as for the size of the needles? Thank you
14.10.2020 - 01:11DROPS Design answered:
Dear Luisa T, DROPS Baby Alpaca Silk has same content - you can use our yarn converter to see other alternatives and new yarn amount. Happy knitting!
14.10.2020 - 08:02Ich verstehe auch nicht, warum der Schal mit 130 beginnt und dann mit 80 weitergeht. Soll das so eine Art Rüschen bilden? Trotzdem: Wunderschön!
24.06.2020 - 18:39DROPS Design answered:
Liebe Ingrid, A.1 wird zuerst über 22 Maschen gestrickt, aber 6 Maschen werden in jedem A.1 (siehe Diagram) abgenommen = 16 Maschen sind noch übrig nach A.1, dh 86 Maschen bleiben auf der Nadel. Viel Spaß beim stricken!
25.06.2020 - 08:54