DROPS Air
DROPS Air
65% Alpaca, 28% Polyamide, 7% Wool
from 5.30 € /50g
Get the yarn to make this pattern from 26.50€.

The yarn cost is calculated from the pattern’s smallest size and the yarn’s cheapest product type. Looking for an even better price? You might find it on the DROPS Deals!

DROPS SS24

Marshall

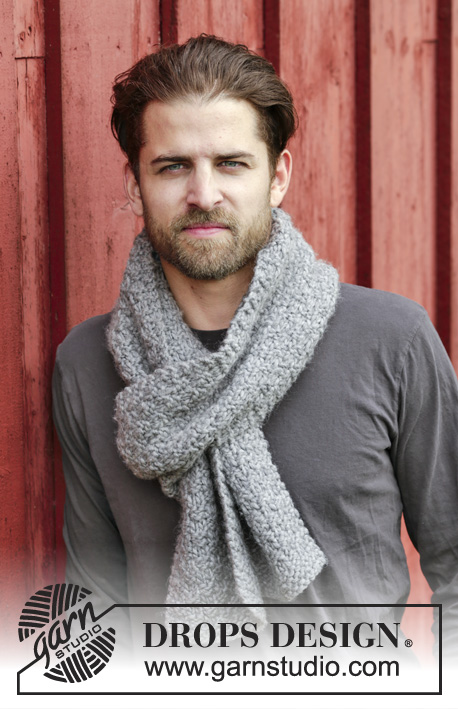
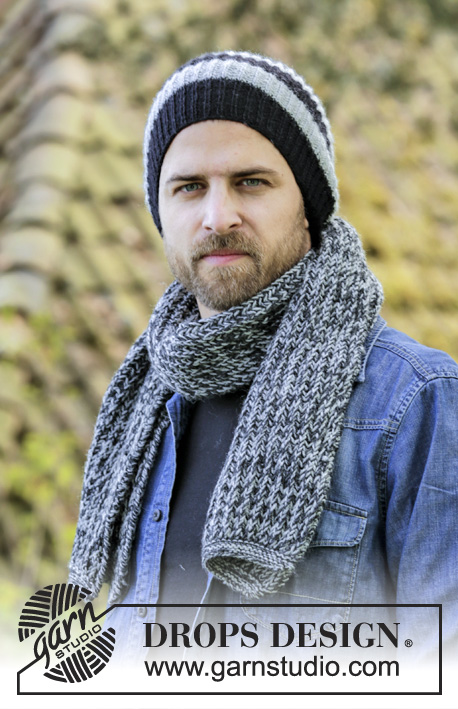
Set consists of: Crochet DROPS men’s hat and scarf with double trebles and double crochet in Air.

DROPS 174-18
DROPS design: Pattern no ai-047
Yarn group C or A + A
----------------------------------------------------------
HAT:
Size: S/M – L/XL
Head circumference: 57/59 - 59/62 cm
Materials:
DROPS AIR from Garnstudio
50-100 g, colour no 04, medium grey

DROPS CROCHET HOOK SIZE 4.5 mm – or size needed to get 16 dtr x 6 rows = 10 x 10 cm.

SCARF:
Measurements: Width: 27 cm Length: 180 cm
Materials:
DROPS AIR from Garnstudio
200 g colour no 04, medium grey

DROPS CROCHET HOOK SIZE 5 mm – or size needed to get 14 dtr x 5.5 rows = 10 x 10 cm.
----------------------------------------------------------

-------------------------------------------------------

Alternative Yarn – See how to change yarns here
Yarn Groups A to F – Use the same pattern and change the yarn here
Yarn usage using an alternative yarn – Use our yarn converter here

-------------------------------------------------------

DROPS Air
DROPS Air
65% Alpaca, 28% Polyamide, 7% Wool
from 5.30 € /50g
Get the yarn to make this pattern from 26.50€.

The yarn cost is calculated from the pattern’s smallest size and the yarn’s cheapest product type. Looking for an even better price? You might find it on the DROPS Deals!

Pattern instructions

NOTE: This pattern is written in British English. All measurements in charts are in cm. For conversion from cm to inches - click here. There are different terms for crocheting in British and American English. If this pattern includes crochet, click for "crochet terms" here. For this pattern in American English, please click here.
CROCHET INFO (hat):
Replace first dc at beg of every dc round with 1 ch. Finish round with 1 sl st in 1st ch at beg of round.
Replace first dtr at beg of every dtr round with 4 ch. Finish round with 1 sl st in 4th ch at beg of round.

CROCHET INFO (scarf):
Replace first dc at beg of every dc row with 1 ch.
Replace first dtr at beg of every dtr row with 4 ch.

PATTERN (applies to scarf):
ROW 1: Work 1 dtr in back loop of every dc.
ROW 2: Work 1 dc in back loop of every dtr.
Repeat rows 1 and 2.
----------------------------------------------------------

HAT:
The piece is worked top down.

Work 4 ch with Air on hook size 4.5 mm and form a ring with 1 sl st in first ch.
BOTH SIZES:
ROUND 1: Work 6 dc in ch-ring – READ CROCHET INFO (hat)!
Then work all sts in back loop of st to get a stripe pattern.
ROUND 2: Work 2 dc in every dc = 12 dc.
ROUND 3: * 1 dc in next dc, 2 dc in next dc *, repeat from *-* = 18 dc.
ROUND 4: * 1 dc in the next 2 dc, 2 dc in next dc *, repeat from *-* = 24 dc.
ROUND 5: * 1 dc in the next 3 dc, 2 dc in next dc *, repeat from *-* = 30 dc.
ROUND 6: * 1 dc in the next 4 dc, 2 dc in next dc *, repeat from *-* = 36 dc. REMEMBER THE CROCHET TENSION

Continue with every other round with dtr + inc and dc as follows:
ROUND 7: * 1 dtr in the next 2 dc, 2 dtr in next dc *, repeat from *-* = 48 dtr.
ROUND 8 AND THE REMAINING ROUNDS WITH EVEN NUMBERS: Work 1 dc in every dtr.
ROUND 9: * 1 dtr in the next 3 dc, 2 dtr in next dc *, repeat from *-* = 60 dtr.
ROUND 11: * 1 dtr in the next 4 dc, 2 dtr in next dc *, repeat from *-* = 72 dtr.
ROUND 13: * 1 dtr in the next 5 dc, 2 dtr in next dc *, repeat from *-* = 84 dtr.
Inc in size S/M is now done. Continue as explained below for size L/XL:
ROUND 14: Work 1 dc in every dtr.
ROUND 15: Work 1 dtr in every dc AT THE SAME TIME inc 4 dtr evenly = 88 dtr.

BOTH SIZES:
Now continue in the round with the same pattern as before without inc. I.e. work every other round with dtr and dc. When piece measures 24-26 cm, work an edge with 1 dc in every dc until piece measures 26-28 cm in total. Fasten off.

SCARF:
Worked back and forth.
Work 44 ch (incl 1 ch to turn with) on hook size 5 mm with Air. Turn and work 1 dc in 2nd ch from hook (= 2 dc) - READ CROCHET INFO (scarf), * skip 1 ch, work 1 dc in each of the next 6 ch *, repeat from *-* 5 more times = 38 dc. Turn piece and continue back and forth with PATTERN - see explanation above. REMEMBER THE CROCHET TENSION! Continue like this until piece measures 180 cm, adjust so that last row is 2nd row in pattern (= dc). Fasten off.
Do you have a question? See a list of frequently asked questions (FAQ)

Knitting tension is what determines the final measurements of your work, and is usually measured per 10 x 10 cm. It is provided like so: number of stitches in width x number of rows in height - eg: 19 stitches x 26 rows = 10 x 10 cm.

The knitting tension is very individual; some people knit/crochet loosely while others work tightly. You adjust the knitting tension with the needle size, which is why the suggested needle size is only meant as a guide! You need to adjust this (up or down) to ensure that YOUR knitting tension matches the knitting tension provided in the pattern. If you work with a different knitting tension than provided you will have a different yarn consumption, and your work will have different measurements than what the pattern suggests.

The knitting tension also determines which yarns can replace each other. As long as you achieve the same knitting tension you can replace one yarn with another.

See DROPS lesson: How to measure your tension/gauge

See DROPS video: How to make a gauge tension swatch

The required amount of yarn is provided in grams, eg: 450 g. To calculate how many balls you’ll need you first need to know how many grams are in 1 ball (25g, 50g or 100g). This information is available if you click on the individual yarn quality on our pages. Divide the amount required with the amount of each ball. For example, if each ball is 50g (the most common amount), the calculation will be as follows: 450 / 50 = 9 balls.

The important thing when changing from one yarn to another is that the knitting/crochet tension remains the same. This is so that the measurements of the finished piece will be the same as on the sketch provided. It is easier to achieve the same knitting tension using yarns from the same yarn group. It is also possible to work with multiple strands of a thinner yarn to achieve the knitting tension of a thicker one. Please try our yarn converter. We recommend you to always work a test swatch.

Please NOTE: when changing yarn the garment might have a different look and feel to the garment in the photo, due to individual properties and qualities of each yarn.

See DROPS lesson: Can I use a different yarn than the one mentioned in the pattern?

All our yarns are categorised into yarn groups (from A to F) according to thickness and knitting tension – group A contains the thinnest yarns and group F the thickest. This makes it easier for you to find alternative yarns to our patterns, should you wish to switch yarn. All yarns within the same group have a similar knitting tension and can easily replace each other. However, different yarn qualities have different structures and properties which will give the finished work a unique look and feel.

Click here for an overview of the yarns in each yarn group

At the top of all our patterns you’ll find a link to our yarn calculator, which is a helpful tool should you wish to use a different yarn than suggested. By filling in the yarn quality you wish to replace, the amount (in your size) and number of strands, the calculator will present good alternative yarns with the same knitting tension. Additionally it will tell you how much you’ll require in the new qualities and whether you’ll need to work with multiple strands. Most skeins are 50g (some are 25g or 100g).

If the pattern is worked with multiple colours, every colour will have to be calculated separately. Similarly, if the pattern is worked with several strands of different yarns (for example 1 strand Alpaca and 1 strand Kid-Silk) you will have to find alternatives for each, individually.

Click here to see our yarn calculator

Since different yarns have different qualities and textures we have chosen to keep the original yarn in our patterns. However, you can easily find options among our available qualities by using our yarn calculator, or simply pick a yarn from the same yarn group.

It is possible that some retailers still have discontinued yarns in stock, or that someone has a few skeins at home that they would like to find patterns for.

The yarn calculator will provide both alternative yarn as well as required amount in the new quality.

If you think it's hard to decide what size to make, it can be a good idea to measure a garment you own already and like the size of. Then you can pick the size by comparing those measures with the ones available in the pattern's size chart.

You'll find the size chart at the bottom of the pattern.

See DROPS lesson: How to read size chart

The needle size provided in the pattern serves only as a guide, the important thing is to follow the knitting tension. And since knitting tension is very individual, you will have to adjust the needle size to ensure that YOUR tension is the same as in the pattern – maybe you’ll have to adjust 1, or even 2 needle sizes, up or down to achieve the correct tension. For this, we recommend that you work test swatches.

Should you work with a different knitting tension than the one provided, the measurements of the finished garment might deviate from the measurement sketch.

See DROPS lesson: How to measure your tension/gauge

See DROPS video: How to make a tension/gauge swatch

Working a garment top-down provides more flexibility and room for personal adjustment. For example it is easier to try the garment on while working, as well as making adjustments to length of yoke and shoulder caps.

The instructions are carefully explaining every step, in the correct order. Diagrams are adjusted to the knitting direction and are worked as usual.

The diagram depicts all rows/rounds, and every stitch seen from the right side. It is read from bottom to top, from right to left. 1 square = 1 stitch.

When working back and forth, every other row is worked from the right side and every other row is worked from the wrong side. When working from the wrong side, the diagram will have to be worked reversed: from left to right, knit stitches are purled, purl stitches are knit etc.

When working in the round every round is worked from the right side and the diagram are worked from right to left on all rounds.

See DROPS lesson: How to read knitting diagrams

The diagram depicts all rows/rounds, and every stitch seen from the right side. It is worked from bottom to top, from right to left.

When working back and forth every other row is worked from the right side: from right to left and every other row is worked from the wrong side: from left to right.

When working in the round, every row in the diagram are worked from the right side, from right to left.

When working a circular diagram you start in the middle and work your way outwards, counter clockwise, row by row.

The rows usually start with a given number of chain stitches (equivalent to the height of the following stitch), this will either be depicted in the diagram or explained in the pattern.

See DROPS lesson: How to read crochet diagrams

Instructions for working several diagrams after each other on the same row/round, will often be written like so: “work A.1, A.2, A.3 a total of 0-0-2-3-4 times". This means you work A.1 once, then A.2 is worked once, and A.3 is repeated (in width) the number of times provided for your size – in this case like so: S = 0 times, M = 0 times, L=2 times, XL= 3 times and XXL = 4 times.

The diagrams are worked as usual: begin with the first row in A.1, then work the first row in A.2 etc.

See DROPS lesson: How to read knitting diagrams

See DROPS lesson: How to read crochet diagrams

The total width of the garment (from wrist-to-wrist) will be larger in the larger sizes, despite the actual sleeves being shorter. The larger sizes have longer sleeve caps and wider shoulders, so there will be a good fit in all sizes.

The measurement sketch/schematic drawing provides information regarding the full length of the garment. If it’s a jumper or a jacket the length is measured from the highest point on the shoulder closest to the neckline, and straight down to the bottom of the garment. It is NOT measured from the tip of shoulder. Similarly, the length of yoke is measured from the highest point on the shoulder and down to where yoke is split into body and sleeves.

On a jacket measures are never taken along bands, unless specifically stated. Always measure inside band stitches when measuring the length.

See DROPS lesson: How to read a schematic drawing

Diagrams are often repeated on the round or in height. 1 repeat is the diagram the way it appears in the pattern. If it says to work 5 repeats of A.1 in the round, then you work A.1 a total of 5 times after/next to each other in the round. If it says to work 2 repeats of A.1 vertically/in height you work the entire diagram once, then begin again at the start and work the entire diagram one more time.

Chain stitches are slightly narrower than other stitches and to avoid working the cast-on edge too tight, we simply chain more stitches to begin with. The stitch count will be adjusted on the following row to fit the pattern and measurement sketch.

The rib edge is more elastic and will contract slightly compared to, for example, stocking stitch. By increasing before the rib edge, you avoid a visible difference in width between the rib edge and the rest of the body.

It’s very easy to cast off too tightly, and by making yarn overs while casting off (and simultaneously casting these off) you avoid a too tight cast off edge.

See DROPS video: How to bind off with yarn overs (yo)

To achieve an even increase (or decrease) you can increase on, for example: every 3rd and 4th row alternately, like so: work 2 rows and increase on the 3rd row, work 3 rows and increase on the 4th. Repeat this until the increase is complete.

See DROPS lesson: Increase or decrease 1 st on every 3rd and 4th row alternately

Should you prefer to work in the round instead of back and forth, you may of course adjust the pattern. You’ll need to add steeks mid-front (usually 5 stitches), and follow the instructions. When you would normally turn and work from the wrong side, simply work across the steek and continue in the round. At the end you’ll cut the piece open, pick up stitches to work bands, and cover the cut edges.

See DROPS video: How to knit steeks and cut open

Should you prefer to work back and forth instead of in the round, you may of course adjust the pattern so you work the pieces separately and then assemble them at the end. Divide the stitches for the body in 2, add 1 edge stitch in each side (for sewing) and work the front and back pieces separately.

See DROPS lesson: Can I adapt a pattern for circular needles into straight needles?

Pattern repeats can vary slightly in the different sizes, in order to get the correct proportions. If you’re not working the exact same size as the garment in the photo, yours might deviate slightly. This has been carefully developed and adjusted so that the complete impression of the garment is the same in all sizes.

Make sure to follow instructions and diagrams for your size!

If you have found a pattern you like which is available in women’s size it’s not very difficult to convert it to men’s size. The biggest difference will be the length of sleeves and body. Start working on the women size that you think would fit across the chest. The additional length will be worked right before you cast off for the armhole/sleeve cap. If the pattern is worked top-down you can add the length right after the armhole or before the first decrease on sleeve.

Regarding additional yarn amount, this will depend on how much length you add, but it is better with a skein too many than too few.

All yarns will have excess fibres (from production) that might come off as lint or shedding. Brushed yarns (ie hairier yarns) have more of these loose, excess fibres, causing more shedding.

Shedding also depends on what is worn under or over the garment, and whether this pulls at the yarn fibres. It’s therefore not possible to guarantee that there will be no shedding

Below are some tips on how to get the best result when working with hairier yarns:

1. When the garment is finished (before you wash it) shake it vigorously so the looser hairs come off. NOTE: do NOT use a lint roller, brush or any method that pulls at the yarn.

2. Place the garment in a plastic bag and put it in your freezer - the temperature will cause the fibres to become less attached to each other, and excess fibres will come off easier.

3. Leave in the freezer for a few hours before taking it out and shaking it again.

4. Wash the garment according to the instructions on the yarn label.

Pilling is a natural process that happens to even the most exclusive of fibers. It's a natural sign of wear and tear that is hard to avoid, and that is most visible in high friction areas of your garment like a sweater's arms and cuffs.

You can make your garment look as new by removing the pilling, using a fabric comb or a pill/lint remover.

Still can't find the answer you need? Then scroll down and leave your question so one of our experts can try to help you. This will be done normally within 5 to 10 working days.
In the meantime, you can read the questions and answers that others have left to this pattern or join the DROPS Workshop on Facebook to get help from fellow knitters/crocheters!

You might also like...

Post a comment to pattern DROPS 174-18

We would love to hear what you have to say about this pattern!

If you want to leave a question, please make sure you select the correct category in the form below, to speed up the answering process. Required fields are marked *.

Comments / Questions (20)

country flag Sigrid Pettersson wrote:

Hej! Jag vill göra denna mössa med en tråd, garngrupp A. Så jag skulle behöva veta hur många cm v1-6 är och 7-15. Och hur många cm kanten är längst ner. Jag behöver alltså 102 m för att den ska passa mig. Tacksam för hjälp med detta!! Hälsningar Sigrid

12.04.2023 - 09:40

DROPS Design answered:

Hei Sigrid. I denne oppskriften er det brukt et garn fra garngruppe C, som er dobbelt så tykk som et garn fra garngruppe A. Design avd har desverre ikke mulighet til å regne om en allerede skrevet oppskrift. Men bruk vår søkemotor og se om du finner en lue som er heklet i garngruppe A og som ligner på luen i DROPS 174-18. mvh DROPS Design

17.04.2023 - 13:49

country flag Linda wrote:

Hi~ This may be a silly question and if so I am sorry. What does single crochet in AIR mean? I have tried to search for it and have been crocheting for decades- from books & not come across that term before. Thank you so much for your time and please try to MORE MENS Patterns? Men & boys patterns are lacking from what I can see in crochet online. Blessings

21.03.2023 - 09:29

LINDA answered:

Ugh I figured it out! So so sorry as I see it is a Brand~ Thank you for your time & again I apologize

21.03.2023 - 09:43

country flag Mariola wrote:

Buenas tardes, quiero hacer la bufanda y no estoy segura de haberlo entendido bien. 44 cad FILA 1: Comenzando en la 2ª cad: 1pb 1pda (en el mismo pto), *salto 1cad, (1pda 1pb ) x 6* y desde *a* x5 (38) giro la labor FILA 2: 1 cad y 38 pb giro la labor y comienzo la FILA 1 con 4 cad, 1pb 1pda (en el mismo pto), *salto 1cad, (1pda 1pb ) x 6* y desde *a* x5 (38) Os agradezco vuestra aclaración

13.09.2022 - 17:12

DROPS Design answered:

Hola Mariola, en la primera fila no trabajas p.a.d (solo los p.b), según lo explicado en la 1ª fila: "Comenzando en la 2ª cad: 1pb, *salto 1cad, 6pb (1 en cada p.de cad) * y desde *a* x5 (38), girar la labor" . En la segunda fila comienzas con el patrón (con la 1ª fila), comienzas con 4 p.de cad y trabajas p.a.d en el bucle posterior de los p.b. La segunda fila del patrón (tercera de la bufanda) trabajas 1 p.de cad y 1 p.b en el bucle posterior de cada p.a.d de la fila anterior. Repetir las filas 2 y 3 de la bufanda (que son las 1 y 2 del patrón).

15.09.2022 - 23:26

country flag Heike Schneider wrote:

Hallo liebes Drops Team, ich möchte den Schal lieber mit Big Merino häkeln und der Umrechner sagt, dann brauche ich statt 200 g Air 400 g Big Merino. Hab ich was falsch verstanden? Wirklich das Doppelte? Im voraus vielen herzlichen Dank.

12.12.2020 - 21:14

DROPS Design answered:

Liebe Frau Schneider, ja es stimmt so, Air ist ca 150 m für 50 g Big Merino ist 75 m für 50 g, dh die Hälfte - hier lesen Sie mehr. Viel Spaß beim häkeln!

14.12.2020 - 08:34

country flag Rack wrote:

Hi same question as Karin, but I can't find the answer. Are we supposed to 6 treble then chain, skip a stitch, repeat, and 6 sc chain, skip a stitch repeat for every row? It doesn't look like it in the picture, but I also don't understand what that part of the pattern means, if that is every row, or just the last row or just the first? Thanks Rack

12.11.2020 - 00:38

DROPS Design answered:

Dear Rack, are you talking about the scarf? Since the foundation chain is most often quite tight, we cast on more chains than you need stitches and skip evenly stitches on first row to get the correct width (and desired elasticity), this means you crochet 44 chains, then starting in the 2nd chain from hook work 1 dc (UK-English)/1 sc (US-English), then repeat *skip next ch, 1 dc/sc in each of the next 6 chains* to the end of the row (= 5 times in total) = there are now 38 dc/sc. Continue now working in pattern. Happy crocheting!

12.11.2020 - 09:16

country flag Mieke wrote:

Ik ben de sjaal aan het haken in de achterste lussen. Maar je krijgt een soort trappetje. Op de foto met die man zie je dat niet. Bij de Marshall sjaal. Wat doe ik verkeerd? Ik zie dat ik hem foto kan sturen. Met vriendelijke groet, Mieke

27.09.2020 - 19:35

DROPS Design answered:

Dag Mieke,

Je zou geen trapjes in het werk moeten krijgen. Maar misschien bedoel je dat je trapjes aan de zijkanten van de sjaal krijgt? In dat geval is onderstaande video wellicht behulpzaam.

28.09.2020 - 16:48

country flag Karin wrote:

Hoi, moet je alleen bij de eerste toer om de zes steken een losse overslaan? Zo ja... Waarom eigenlijk? Lieve Grt, Karin

22.09.2020 - 15:02

country flag Elise wrote:

Misschien een stomme vraag maar ben beginnend haken en kan nergens een uitleg vinden. Wat wordt er bij de tweede toer vasten met 1 vaste overslaan bedoeld? Gewoon overslaan of toch een losse haken, overslaan en dan een vaste?

07.01.2020 - 12:16

DROPS Design answered:

Dag Elise,

Je slaat inderdaad gewoon 1 over, dus geen losse of een andere steek o.i.d.

08.01.2020 - 09:57

country flag Verena wrote:

Muss ich (bei der Mütze) die gesamte Zeit auch bei den Doppelstäbchen nur in das hintere M-Glied häkeln oder bloß bei den festen Maschen in den ersten 6 Runden?

18.12.2019 - 22:24

DROPS Design answered:

Liebe Verena, bei der Mütze häkeln Sie vom Anfang bis zur Ende in das hintere M-Glied, so bekommen Sie ein Struckturmuster. Viel Spaß beim häkeln!

19.12.2019 - 07:58

country flag Martina Hudíková wrote:

Hello, I would like to ask how much grams of yarn more or less I'll need for the cap? Thank you

11.05.2019 - 14:43

DROPS Design answered:

Hello Martina. You will need 50 g for size S/M and 100 g for size L/XL. You can find yarn amounts next to the picture. Happy crocheting!

11.05.2019 - 16:21