
Popular categories
Looking for a yarn?


|
|||||||||||||||||||||||||||||||
The Rower |
|||||||||||||||||||||||||||||||
 |
 |
||||||||||||||||||||||||||||||
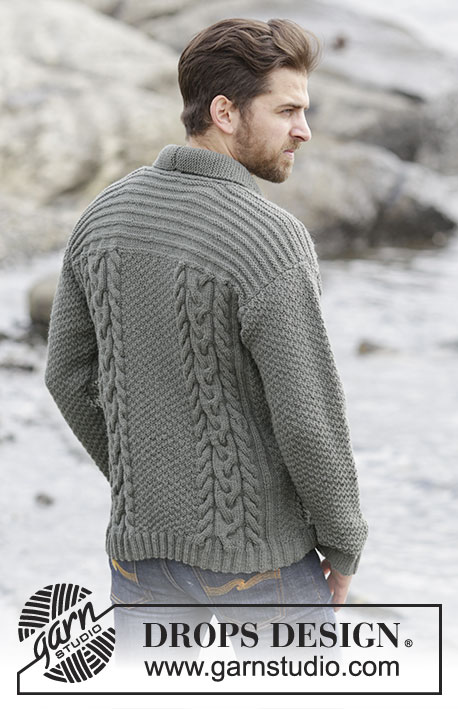
Knitted DROPS men’s jumper with cables, raglan and folding edge at the neck in Karisma. Size: S - XXXL.
DROPS 174-15 |
|||||||||||||||||||||||||||||||
|
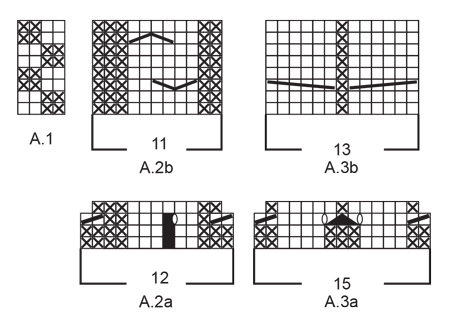
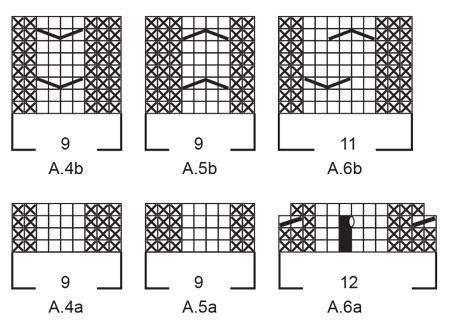
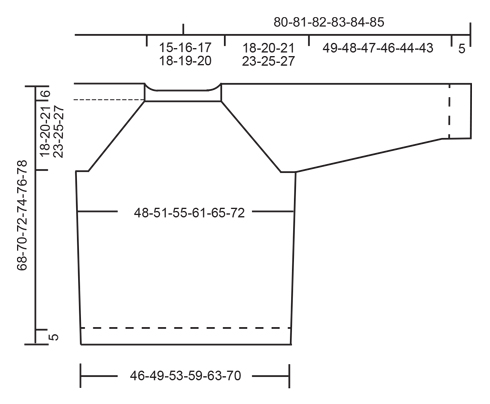
PATTERN: See diagrams A.1 to A.6. INCREASE TIP: Work until 1 st remains before marker, 1 YO, work next 2 (marker is between these sts), 1 YO. On next round work YOs twisted. Work the new sts into the pattern. DECREASE TIP 1 (applies to rib): When dec sts in rib, dec evenly by P 2 tog over sections with P in rib. DECREASE TIP 2 (applies to elevation): All dec are done from RS! Work until 4 sts remain before marker, work the next 3 K tog (= 2 sts dec), work the next 2 K (marker is in the middle of these sts), work the next 3 K twisted tog (= 2 sts dec). Repeat at the other marker. RAGLAN: Dec as follows before marker: Work until 3 sts remain before marker, K 2 tog, K 1 (marker is here). Dec as follows after marker: K 1, slip 1 st as if to K, K 1, psso NOTE: When dec sts in stocking st in diagram A.2, A.3, A.4, A.5 and A.6 (i.e. there is not enough sts for cable), continue with K over K and P over P until all sts in diagram have been dec. ---------------------------------------------------------- JUMPER: Worked in the round. BODY: Cast on 268-280-292-316-340-376 sts with Karisma on circular needle size 3.5 mm. K 1 round. Then work rib as follows: * A.2a (= 12 sts), A.3a (= 15 sts), A.4a (= 9 sts), P 1, (K 3/P 3), repeat from (-) 6-6-7-7-8-8 times in total, K 3, P 1, A.5a (= 9 sts), A.3a, A.6a (= 12 sts), (K 3/P 3), repeat from (-) 3-4-4-6-7-10 times in total, K 3 *, repeat from *-* 1 more time on round. Repeat the first 2 round in diagram and work K over K and P over P the remaining sts until 12 rounds have been worked in total. Now work as follows: * Work 3rd round in diagram over the first 36 sts, the work rib as before over the next 41-41-47-47-53-53 sts AT THE SAME TIME dec 11-7-9-9-11-11 sts evenly - READ DECREASE TIP 1, work 3rd round over the next 36 sts, then work rib as before over the next 21-27-27-39-45-63 sts AT THE SAME TIME dec 7-9-5-5-7-9 sts evenly *, repeat from *-* 1 more time on round = 220-236-252-276-292-324 sts. Work last round in diagram A.2a to A.6.a and K over K and P over P over the remaining sts in rib. Rib measures approx. 5 cm. Switch to circular needle size 4 mm. Now work pattern as follows: * Work A.2b (= 11 sts), A.3b (= 13 sts), A.4b (= 9 sts), work A.1 over the next 28-32-36-36-40-40 sts, work the first 2 sts in A.1, A.5b (= 9 sts), A.3b (= 13 sts), A.6b (= 11 sts), work A.1 over the next 12-16-20-32-36-52 sts, work the first 2 sts in A.1 *, repeat from *-* 1 more time. Continue pattern like this in the round. REMEMBER THE KNITTING TENSION When piece measures 15-15-16-16-17-17 cm, insert 2 markers in piece as follows: Insert 1st marker after 103-109-115-121-127-135 sts and 2nd marker 7-9-11-17-19-27 sts before end of round (= 110-118-126-138-146-162 sts between each of the markers). On next round inc 1 st in each side of marker in each side - Read INCREASE TIP! Repeat inc when piece measures 26-27-27-28-28-29 cm = 228-244-260-284-300-332 sts. When piece measures 44-44-45-45-45-45 cm, work as follows: Work until 5 sts remain before 1st marker, cast off the next 10 sts for armhole (= 5 sts on each side of marker), work until 5 sts remain before 2nd marker, cast off the next 10 sts for armhole (= 5 sts on each side of marker), work the remaining sts on round. There are 104-112-120-132-140-156 sts for both front and back piece. Put piece aside and knit the sleeves. SLEEVES: Worked in the round on double pointed needles/circular needle. Cast on 60-60-66-66-66-72 sts with Karisma on double pointed needles size 3.5 mm. Work rib as follows: K 3, (P 3, K 3) repeat from (-) 3-3-4-4-4-5 times in total, A.4a (= 9 sts), K 3, (P 3, K 3), repeat from (-) 3 times in total for all sizes, A.5a (= 9 sts). Continue like this and repeat the first 2 rounds in diagram until 12 rounds have been worked. Now work from the 3rd round in diagram as follows: Work rib as before over the first 21-21-27-27-27-33 sts AT THE SAME TIME dec 3-3-5-5-5-7 sts evenly, continue over A.4a as before, work rib as before over the next 21 sts AT THE SAME TIME dec 3 sts evenly in all sizes = 54-54-58-58-58-62 sts. Work last round in diagram A.4a to A.5.a and K over K and P over P over the remaining sts. Now continue as follows: K the first 9-9-11-11-11-13 sts, insert a marker here (= mid under sleeve). NOTE: This is done to re-place the start of round. The round starts here now. Change to double pointed needles size 4 mm. Work the last 3-3-1-1-1-3 sts in diagram A.1, then work entire A.1 1-1-2-2-2-2 times in width, work the first 2 sts in A.1, A.4b, work A.1 over the next 18 sts, A.5b, work A.1 2-2-2-2-2-3 times in width and finish with the first 1-1-3-3-3-1 st in A.1. Continue pattern in the round like this. When piece measures 7 cm in all sizes, beg inc under sleeve. READ INCREASE TIP. Inc like this every 12th-9th-9th-7th-6th-6th round 11-5-5-17-15-15 times and every 0-8th-8th-0-5th-5th round 0-10-10-0-4-4 times (= 11-15-15-17-19-19 times in total) = 76-84-88-92-96-100 sts. When piece measures 54-53-52-51-49-48 cm (NOTE: shorter measurements in the larger sizes because of longer yoke), cast off 10 sts mid under sleeve (= 5 sts on each side of marker) = 66-74-78-82-86-90 sts. Knit another sleeve the same way. YOKE: Slip sleeves on to same circular needle size 4 mm as body where armholes were cast off (without working them first) = 340-372-396-428-452-492 sts. Insert 1 marker in every transition between sleeves and body = 4 markers. Continue pattern as before but now work 4 K over every transition between body and sleeves (= 2 K on each side of markers). NOTE: Beg of round is at marker in transition between right sleeve and back piece. AT THE SAME TIME on first round, beg dec for RAGLAN – see explanation above! NOTE: Dec differently on body and sleeves. RAGLAN BODY: Dec like this every other round 17-20-20-22-25-26 times and every round 13-13-15-17-17-22 times (= 30-33-35-39-42-48 times in total). RAGLAN SLEEVES: Dec like this every 4th round 4-3-2-3-4-5 times and every other round 16-21-24-25-26-27 times (= 20-24-26-28-30-32 times in total). When all dec for raglan are done, 140-144-152-160-164-172 sts remain. Work 1 round with pattern as before but finish when 24 sts remain on round in all sizes (= after 2 sts after marker between front piece and right sleeve). Insert a marker here. This is now beg of round. Now work an elevation back and forth in the back of neck as follows: NOTE: Continue with pattern as before and now dec 2 sts on each side of marker in transition between sleeves and back piece (= 8 sts dec on row from RS) - READ DECREASE TIP 2! AT THE SAME TIME work back and forth as follows: ROW 1 (= RS): Work 92-94-98-102-104-108 sts (including the 8 dec sts), ROW 2 (= WS): Turn and work 81-83-87-91-93-97 sts, ROW 3: Turn and work 78-80-84-88-90-94 sts (including the 8 dec sts), ROW 4: Turn and work 67-69-73-77-79-83 sts, ROW 5: Turn and work 64-66-70-74-76-80 sts (including the 8 dec sts), ROW 6: Turn and work 53-55-59-63-65-69 sts, ROW 7: Turn and work 50-52-56-60-62-66 sts (including the 8 dec sts), ROW 8: Turn and work back to marker (= beg of round). 32 sts have been dec in total in elevation and 108-112-120-128-132-140 sts remain on round. Switch to circular needle size 3.5 mm. Now work 1 round K as follows: Work the first 14 sts and inc 1 st (= sleeve), work the next 4 sts, then work the next 24-26-30-34-36-40 sts (= back piece) while inc 3-1-3-5-3-5 sts evenly, work the next 4 sts, work the next 14 sts and inc 1 st (= sleeve), work the next 4 sts, work the next 40-42-46-50-52-56 sts (= front piece) while dec 1-3-1-5-1-5 sts evenly, work the remaining 4 sts = 112-112-124-130-136-142 sts. Now work rib as follows: P 3, K 3, P 3, K 3, P 3, K 4, (P 3, K 3), repeat from (-) 4-4-5-6-6-7 times in total, P 3, K 4, P 3, K 3, P 3, K 3, P 3, K 4, (P 3, K 3), repeat from (-) 6-6-7-7-8-8 times, P 3, K 4. Continue in the round with K over K and P over P until rib measures 7 cm. Loosely cast off. ASSEMBLY: Sew the openings under the sleeves. Fold rib at the top of neck down on inside of garment. Fasten rib to get a folding edge, make sure to avoid a tight edge. |
|||||||||||||||||||||||||||||||
Diagram explanations |
|||||||||||||||||||||||||||||||
|
|||||||||||||||||||||||||||||||
|
|||||||||||||||||||||||||||||||
|
|||||||||||||||||||||||||||||||
|
|||||||||||||||||||||||||||||||
|
Have you made this or any other of our designs? Tag your pictures in social media with #dropsdesign so we can see them! Do you need help with this pattern?You'll find tutorial videos, a Comments/Questions area and more by visiting the pattern on garnstudio.com. © 1982-2024 DROPS Design A/S. We reserve all rights. This document, including all its sub-sections, has copyrights. Read more about what you can do with our patterns at the bottom of each pattern on our site. |
|||||||||||||||||||||||||||||||


With over 40 years in knitting and crochet design, DROPS Design offers one of the most extensive collections of free patterns on the internet - translated to 17 languages. As of today we count 304 catalogues and 11422 patterns - 11422 of which are translated into English (UK/cm).
We work hard to bring you the best knitting and crochet have to offer, inspiration and advice as well as great quality yarns at incredible prices! Would you like to use our patterns for other than personal use? You can read what you are allowed to do in the Copyright text at the bottom of all our patterns. Happy crafting!
Comments / Questions (180)
Hallo! Ich habe Schwierigkeiten mit den allerersten Abnahmen noch im Bund. Ist da ein Fehler bei der Anzahl von Maschen abzunehmen oder verstehe ich die Anleitung nicht. Meine Muttersprache ist Deutsch aber ich lebe in Neuseeland und habe als Sprache fuer die Anleitung "Deutsch" gewaehlt.
07.10.2019 - 03:55DROPS Design answered:
Liebe Margit, die Maschenanzahl sollte stimmen, welche Größe stricken Sie?
07.10.2019 - 10:19Teen M-kokoista kaarroketta. Ohjeessa käsketään toistaa etu-ja takakappaleiden kavennukset joka 2. Kerros 20 kertaa ja joka kerros 13 kertaa. Teenkö ensin 20 joka toisen kerroksen kavennuksen, ja sitten 13 jokaisen kerroksen kavennuksen. Vai teenkö ensin joka kerros 13 kertaa kavennuksen, jonka jälkeen kavennan joka 2. Kerros 20 kertaa? Sama kysymys hihan kavennusten kanssa. Joka 4.krs 3 kertaa ja joka 2.krs 21 kertaa.
05.10.2019 - 15:21DROPS Design answered:
Hei, aluksi teet joka toisen kerroksen kavennuksen 20 kertaa ja vasta sitten teet kavennukset 13 kertaa jokaisella kerroksella.
13.11.2019 - 18:03I would like to have access to the instructions of this pattern of the ROWER (and others if possible) and the wool catalogue and prices in English, French or Portuguese. Can you help me?
29.09.2019 - 10:39DROPS Design answered:
Dear Mrs David, you can edit the language of the pattern (and in each shadecard) to the desired language, in the pattern as well as in the shadecard for each yarn, just click on the scrolling down menu below photo to edit language. Happy knitting!
30.09.2019 - 10:43Hi, I am doing the large size ad working on the sleeves. They seem too wide. Do you do the 8th stitch increase and 9th stitch concurrently or do you do all he 8th then all the 9th? I'm only 20cms in and already at 77 stitches. my gauge is correct.
20.09.2019 - 05:04DROPS Design answered:
Hi Brigitte, You first increase every 9th round 5 times and then, afterwards, every 8th round 10 times. This gives you a total of 15 increases altogether. Happy knitting!
20.09.2019 - 07:16Question2: Toujours dans la taille M, pour la section des diminutions dans les 41 mailles, il faut diminuer 7 fois. J'ai l'intention de diminuer 6 fois dans les sections 3m.env et 1 fois dans une section endroit. Laquelle choisir? Celle au centre?
19.08.2019 - 20:37DROPS Design answered:
Vous trouverez ici comment répartir des diminutions, prenez en nombre de référence le nombre de mailles avant les diminutions (41 m par ex.) et ajustez ensuite les diminutions dans les sections en mailles envers ou en mailles endroit en fonction. Bon tricot!
20.08.2019 - 09:05Question1: même question que Sylvie (datant de 04.04.2019). Pour la taille M, si j'ai bien compris, dans la section des 27m, on diminue donc à la fois dans les sections 3 m.end et 3 m.env pour un total de 9 diminutions. Pour les diminutions dans la section 3m.end, j'imagine qu'on tricote 2 mailles ensemble à l'endroit? C'est bien ça?
19.08.2019 - 20:35DROPS Design answered:
Bonjour Mme Veillette, quand vous diminuez au-dessus des côtes, vous tricotez soit 2 mailles ensemble à l'endroit soit 2 mailles ensemble à l'envers, en fonction de là où vont être placées ces diminutions, au tour suivant, vous tricoterez ces mailles comme elles se présentent.
20.08.2019 - 09:04Na vele jaren weer begonnen met breien. Hoe ga ik om met de aanwijzing "geen steek" in bijvoorbeeld patroon 2A. Gezien de legenda is dit iets anders dan steken samenbreien. Maar dan begrijp ik niet hoe dit kan leiden tot 12 steken.
14.08.2019 - 17:36DROPS Design answered:
Dag Frank,
Dit is letterlijk geen steek in het telpatroon. Je gaat dus verder met de volgende steek in het telpatroon. De eerstvolgende steek op je linker naald brei je dus ook zo als de volgende steek in het telpatroon.
17.10.2019 - 09:58Jeg vil gerne have forklaret ,hvordan man ved udtagningen i siderne på trøjen, får strikket maskerne ind i den dobbelte perlestrik?
15.07.2019 - 11:08DROPS Design answered:
Hei Inge. De nye maskene strikkes fortløpende inn i perlestrikk mønsteret (før det er økt nok masker til en ny A.1 vil det i sidene blien litt bredere perlestrikk) God Fornøyelse!
26.08.2019 - 14:00Bonjour, Je ne comprends pas les explications pratiquement dès le début. Cela dit : "continuer en côtes ainsi : *A.2a (=12m), ....." Les diagrammes n'ayant rien à voir avec des côtes, je ne vois vraiment pas. Merci de m'expliquer car c'est la première fois que j'utilise l'un de vos modèles et que je tricote un pull en rond. Merci d'avance.
25.06.2019 - 18:23DROPS Design answered:
Bonjour Nathalie, les 2 premiers rangs des diagrammes tricotés dès le début sont également des côtes, par ex. A.2a = 3 m env, 5 m end, 4 m env - A.3a = 2 m env, 4 m end, 3 m env, 4 m end, 2 m env - A.4a = 3 m env, 4 m end, 2 m env - , A.5a = 2 m env, 4 m end, 3 m env et A.6a = 4 m env, 5 m end, 3 m env. Vous répétez ces 2 rangs de côtes sur les mailles concernées et tricotez les autres mailles comme indiqué pendant 12 tours, puis vous tricotez le 3ème tour des diagrammes et diminuez dans les côtes pour avoir le bon nombre de mailles au denier rang des diagrammes pour commencer les torsades et point fantaisie. Bon tricot!
26.06.2019 - 06:25Question about the raglan: in size M, the body decreases would take 53 or 54 rows? 20x every other row = 40 rows immediately followed by 13 rows = 53? Or should there be a row in between the 20x and the 13x for 54 rows total? And the sleeve decreases a similar question - dec (row, row, row), dec (row, row, row), dec (row, row, row) = 12 rows then immediately do 21x every other row or put a row in between, i.e. 12 rows plus 42 rows = 54 rows or a row in between for 55 rows? Thanks.
02.05.2019 - 18:17DROPS Design answered:
Dear Matt, in size M you will work a total of 52 rows (start dec on 1st row then every 2nd row 19 times = 20 times = 39 rows + 13 times every row = 52 rows on body. And on sleeves you will work 51 rows: start dec on 1st row too then every 4th row 2 more times (= 9 rows) then 21 times every 2nd row (= 42 rows). Happy knitting!
03.05.2019 - 08:46