DROPS Nepal
DROPS Nepal
65% Wool, 35% Alpaca
from 2.40 £ /50g
Get the yarn to make this pattern from 31.20£.

The yarn cost is calculated from the pattern’s smallest size and the yarn’s cheapest product type. Looking for an even better price? You might find it on the DROPS Deals!

DROPS SS24

Twin River

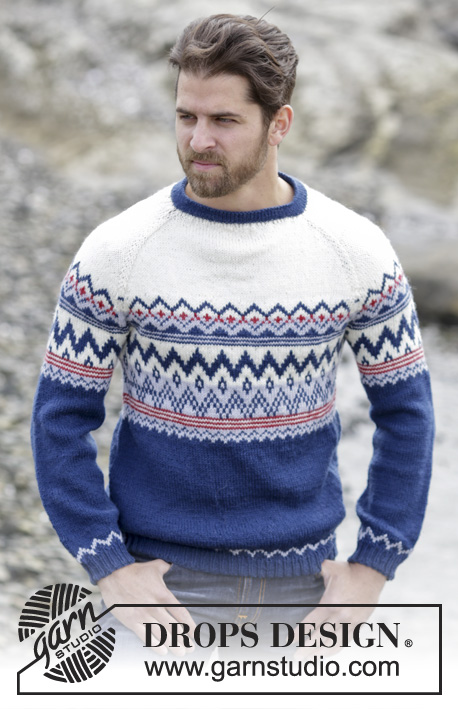
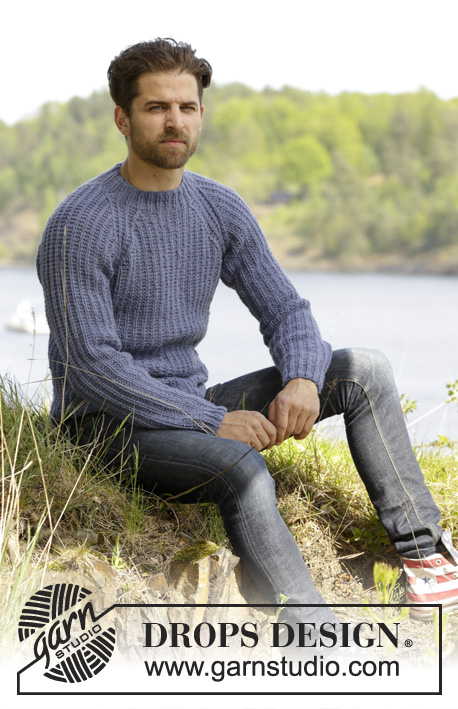
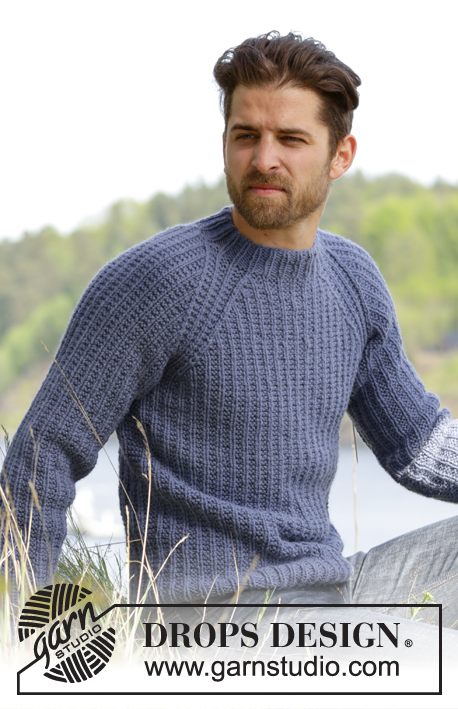
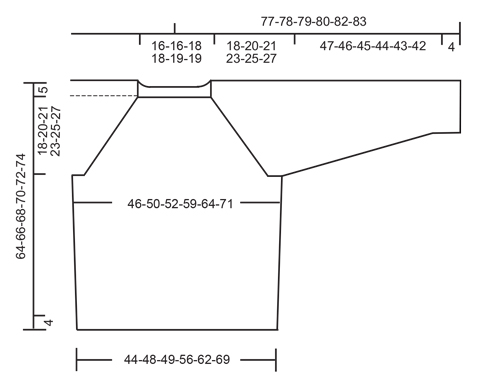
Knitted DROPS men’s jumper with textured pattern and raglan in Nepal. Size: S - XXXL.

DROPS 174-14
DROPS design: Pattern no ne-236

Yarn group C or A + A
----------------------------------------------------------
Size: S - M - L - XL - XXL - XXXL
Materials:
DROPS NEPAL from Garnstudio
650-750-800-900-1000-1100 g colour no 6314, denim blue

DROPS DOUBLE POINTED NEEDLES AND CIRCULAR NEEDLE (60 or 80 cm) SIZE 5 mm - or size needed to get 17 sts x 24 rows in pattern A.1 = 10 x 10 cm.
----------------------------------------------------------

-------------------------------------------------------

Alternative Yarn – See how to change yarns here
Yarn Groups A to F – Use the same pattern and change the yarn here
Yarn usage using an alternative yarn – Use our yarn converter here

-------------------------------------------------------

DROPS Nepal
DROPS Nepal
65% Wool, 35% Alpaca
from 2.40 £ /50g
Get the yarn to make this pattern from 31.20£.

The yarn cost is calculated from the pattern’s smallest size and the yarn’s cheapest product type. Looking for an even better price? You might find it on the DROPS Deals!

Pattern instructions

NOTE: This pattern is written in British English. All measurements in charts are in cm. For conversion from cm to inches - click here. There are different terms for crocheting in British and American English. If this pattern includes crochet, click for "crochet terms" here. For this pattern in American English, please click here.
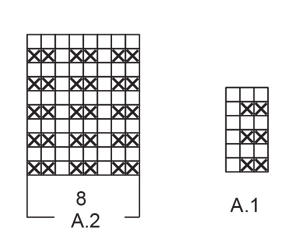
PATTERN:
See diagrams A.1 and A.2.

RAGLAN:
Dec as follows before A.2: Work until 2 sts remain before A.2, K the next 2 tog.
Dec as follows after A.2: Slip 1 st as if to K, K 1, psso

INCREASE TIP (BODY):
Inc 4 sts on round as follows:
Work until 1 st remains before marker in the side, 1 YO, work 2 sts in garter st, 1 YO (= 2 sts inc). Repeat inc in the other side of piece.
On next round work YO twisted to avoid holes. Work the new sts in garter st.

INCREASE TIP (SLEEVE):
Inc as follows mid under sleeve:
Work until 1 st remains before marker, 1 YO, work 2 sts in garter st, 1 YO. On next round work YO twisted to avoid holes. Work the inc sts gradually in the pattern. NOTE: Work sts on each side of marker in garter st.

RAGLAN DEC (ELEVATION):
All dec are done from RS!
Dec as follows after A.2: K 3 twisted tog.
Dec as follows before A.2: Work until 3 sts remain before A.2, K 3 tog.
----------------------------------------------------------

JUMPER:
Worked in the round.

BODY:
Cast on 150-162-168-192-210-234 sts with Nepal on circular needle size 5 mm. * P 1, (K 1, P 2), repeat from (-) 23-25-26-30-33-37 more times, K 1, P 1, insert a marker here (= side) *, repeat from *-* 1 more time. NOTE: Move the markers upwards when working. Continue rib in the round like this until piece measures 4 cm. Now work pattern A.1 as follows: Work the last 2 sts in A.1, then repeat A.1 the entire round until 1 st remains on round, work the first st in A.1. REMEMBER THE KNITTING TENSION When piece measures 13-13-14-14-15-15 cm, inc 1 st on each side of each marker – see INCREASE TIP (BODY). Repeat inc when piece measures 27-28-29-29-30-30 cm = 158-170-176-200-218-242 sts. When piece measures 41-41-42-42-42-42 cm (adjust so that next round worked is 2nd round in A.1), cast off sts for armholes as follows: Cast off the first 5 sts on round, work the next 69-75-78-90-99-111 sts, cast off the next 10 sts for armhole, work the next 69-75-78-90-99-111 sts, cast off the remaining 5 sts. Cut the yarn. Put piece aside and knit the sleeves.

SLEEVE:
Work sleeves in the round on double pointed needles.
Cast on 42-42-42-48-48-48 sts with Nepal on double pointed needles size 5 mm. Insert a marker at beg of round = mid under sleeve. Work rib as follows: P 1, K 1, * P 2, K 1 *, repeat from *-* until 1 st remains on round, P 1. Continue like this in the round until rib measures 4 cm. Now work pattern as follows: Work the last 2 sts in A.1, A.1 until 1 st remains on round, work the first st in A.1. When piece measures 9-8-7-6-10-9 cm, inc 1 st on each side of marker – see INCREASE TIP (SLEEVE). Inc like this approx. every 13th-9th-7th-7th-6th-5th round 8-11-14-14-14-17 times in total = 58-64-70-76-76-82 sts. When piece measures 51-50-49-48-47-46 cm - adjust so that next round worked is 2nd round in A.1, cast off the middle 10 sts under sleeve (= 5 sts on each side of marker) = 48-54-60-66-66-72 sts. Knit another sleeve the same way.

YOKE:
Slip sleeves on to same circular needle size 5 mm as body where armholes were cast off = 234-258-276-312-330-366 sts. This is done without working the sts. Insert a marker in every transition between sleeves and body = 4 markers. Beg round on back piece, 4 sts after marker between sleeve and back piece.
Now continue pattern as before and work in addition A.2 (= 8 sts) in every transition between body and sleeves (markers are in the middle of A.2). On next round start dec for RAGLAN – see explanation above! NOTE: Dec differently on body and sleeves as follows:
RAGLAN BODY:
Dec every other round 21-24-24-24-26-26 times and then every round 0-0-0-6-7-13 times (= 21-24-24-30-33-39 times in total).
RAGLAN SLEEVES:
Dec every 4th round 6-6-4-3-5-5 times and then every other round 9-12-17-21-19-22 times (= 15-18-21-24-24-27 times in total).

When all dec are done, 90-90-96-96-102-102 sts remain on round (= 144-168-180-216-228-264 sts in total dec).

Now work pattern as before over the first 72-72-78-78-84-84 sts. Insert marker here (= between A.2 and right sleeve). Then work an elevation back and forth in neck in pattern as before AT THE SAME TIME dec for raglan on every row from RS over the sts worked – READ RAGLAN DEC (ELEVATION) as follows: NOTE: Tighten yarn at every turn to avoid holes.
ROW 1 (= RS): Work 55-55-58-58-61-61 sts (including the 8 dec sts),
ROW 2 (= WS): Turn and work 45-45-48-48-51-51 sts,
ROW 3: Turn and work 43-43-46-46-49-49 sts (including the 8 dec sts),
ROW 4: Turn and work 33-33-36-36-39-39 sts.
There are now 74-74-80-80-86-86 sts on round.
Turn and continue in the round with rib as follows: Work K over K and P over sts in garter st until rib measures 4 cm. Cast off sts with K over K and P over P. Jumper measures 64-66-68-70-72-74 cm from cast-on edge and up to shoulder. Fasten off.

ASSEMBLY:
Sew the openings under the sleeves.

Diagram

symbols = K
symbols = P
diagram
diagram

Each of our patterns has specific tutorial videos to help you.

Do you have a question? See a list of frequently asked questions (FAQ)

Knitting tension is what determines the final measurements of your work, and is usually measured per 10 x 10 cm. It is provided like so: number of stitches in width x number of rows in height - eg: 19 stitches x 26 rows = 10 x 10 cm.

The knitting tension is very individual; some people knit/crochet loosely while others work tightly. You adjust the knitting tension with the needle size, which is why the suggested needle size is only meant as a guide! You need to adjust this (up or down) to ensure that YOUR knitting tension matches the knitting tension provided in the pattern. If you work with a different knitting tension than provided you will have a different yarn consumption, and your work will have different measurements than what the pattern suggests.

The knitting tension also determines which yarns can replace each other. As long as you achieve the same knitting tension you can replace one yarn with another.

See DROPS lesson: How to measure your tension/gauge

See DROPS video: How to make a gauge tension swatch

The required amount of yarn is provided in grams, eg: 450 g. To calculate how many balls you’ll need you first need to know how many grams are in 1 ball (25g, 50g or 100g). This information is available if you click on the individual yarn quality on our pages. Divide the amount required with the amount of each ball. For example, if each ball is 50g (the most common amount), the calculation will be as follows: 450 / 50 = 9 balls.

The important thing when changing from one yarn to another is that the knitting/crochet tension remains the same. This is so that the measurements of the finished piece will be the same as on the sketch provided. It is easier to achieve the same knitting tension using yarns from the same yarn group. It is also possible to work with multiple strands of a thinner yarn to achieve the knitting tension of a thicker one. Please try our yarn converter. We recommend you to always work a test swatch.

Please NOTE: when changing yarn the garment might have a different look and feel to the garment in the photo, due to individual properties and qualities of each yarn.

See DROPS lesson: Can I use a different yarn than the one mentioned in the pattern?

All our yarns are categorised into yarn groups (from A to F) according to thickness and knitting tension – group A contains the thinnest yarns and group F the thickest. This makes it easier for you to find alternative yarns to our patterns, should you wish to switch yarn. All yarns within the same group have a similar knitting tension and can easily replace each other. However, different yarn qualities have different structures and properties which will give the finished work a unique look and feel.

Click here for an overview of the yarns in each yarn group

At the top of all our patterns you’ll find a link to our yarn calculator, which is a helpful tool should you wish to use a different yarn than suggested. By filling in the yarn quality you wish to replace, the amount (in your size) and number of strands, the calculator will present good alternative yarns with the same knitting tension. Additionally it will tell you how much you’ll require in the new qualities and whether you’ll need to work with multiple strands. Most skeins are 50g (some are 25g or 100g).

If the pattern is worked with multiple colours, every colour will have to be calculated separately. Similarly, if the pattern is worked with several strands of different yarns (for example 1 strand Alpaca and 1 strand Kid-Silk) you will have to find alternatives for each, individually.

Click here to see our yarn calculator

Since different yarns have different qualities and textures we have chosen to keep the original yarn in our patterns. However, you can easily find options among our available qualities by using our yarn calculator, or simply pick a yarn from the same yarn group.

It is possible that some retailers still have discontinued yarns in stock, or that someone has a few skeins at home that they would like to find patterns for.

The yarn calculator will provide both alternative yarn as well as required amount in the new quality.

If you think it's hard to decide what size to make, it can be a good idea to measure a garment you own already and like the size of. Then you can pick the size by comparing those measures with the ones available in the pattern's size chart.

You'll find the size chart at the bottom of the pattern.

See DROPS lesson: How to read size chart

The needle size provided in the pattern serves only as a guide, the important thing is to follow the knitting tension. And since knitting tension is very individual, you will have to adjust the needle size to ensure that YOUR tension is the same as in the pattern – maybe you’ll have to adjust 1, or even 2 needle sizes, up or down to achieve the correct tension. For this, we recommend that you work test swatches.

Should you work with a different knitting tension than the one provided, the measurements of the finished garment might deviate from the measurement sketch.

See DROPS lesson: How to measure your tension/gauge

See DROPS video: How to make a tension/gauge swatch

Working a garment top-down provides more flexibility and room for personal adjustment. For example it is easier to try the garment on while working, as well as making adjustments to length of yoke and shoulder caps.

The instructions are carefully explaining every step, in the correct order. Diagrams are adjusted to the knitting direction and are worked as usual.

The diagram depicts all rows/rounds, and every stitch seen from the right side. It is read from bottom to top, from right to left. 1 square = 1 stitch.

When working back and forth, every other row is worked from the right side and every other row is worked from the wrong side. When working from the wrong side, the diagram will have to be worked reversed: from left to right, knit stitches are purled, purl stitches are knit etc.

When working in the round every round is worked from the right side and the diagram are worked from right to left on all rounds.

See DROPS lesson: How to read knitting diagrams

The diagram depicts all rows/rounds, and every stitch seen from the right side. It is worked from bottom to top, from right to left.

When working back and forth every other row is worked from the right side: from right to left and every other row is worked from the wrong side: from left to right.

When working in the round, every row in the diagram are worked from the right side, from right to left.

When working a circular diagram you start in the middle and work your way outwards, counter clockwise, row by row.

The rows usually start with a given number of chain stitches (equivalent to the height of the following stitch), this will either be depicted in the diagram or explained in the pattern.

See DROPS lesson: How to read crochet diagrams

Instructions for working several diagrams after each other on the same row/round, will often be written like so: “work A.1, A.2, A.3 a total of 0-0-2-3-4 times". This means you work A.1 once, then A.2 is worked once, and A.3 is repeated (in width) the number of times provided for your size – in this case like so: S = 0 times, M = 0 times, L=2 times, XL= 3 times and XXL = 4 times.

The diagrams are worked as usual: begin with the first row in A.1, then work the first row in A.2 etc.

See DROPS lesson: How to read knitting diagrams

See DROPS lesson: How to read crochet diagrams

The total width of the garment (from wrist-to-wrist) will be larger in the larger sizes, despite the actual sleeves being shorter. The larger sizes have longer sleeve caps and wider shoulders, so there will be a good fit in all sizes.

The measurement sketch/schematic drawing provides information regarding the full length of the garment. If it’s a jumper or a jacket the length is measured from the highest point on the shoulder closest to the neckline, and straight down to the bottom of the garment. It is NOT measured from the tip of shoulder. Similarly, the length of yoke is measured from the highest point on the shoulder and down to where yoke is split into body and sleeves.

On a jacket measures are never taken along bands, unless specifically stated. Always measure inside band stitches when measuring the length.

See DROPS lesson: How to read a schematic drawing

Diagrams are often repeated on the round or in height. 1 repeat is the diagram the way it appears in the pattern. If it says to work 5 repeats of A.1 in the round, then you work A.1 a total of 5 times after/next to each other in the round. If it says to work 2 repeats of A.1 vertically/in height you work the entire diagram once, then begin again at the start and work the entire diagram one more time.

Chain stitches are slightly narrower than other stitches and to avoid working the cast-on edge too tight, we simply chain more stitches to begin with. The stitch count will be adjusted on the following row to fit the pattern and measurement sketch.

The rib edge is more elastic and will contract slightly compared to, for example, stocking stitch. By increasing before the rib edge, you avoid a visible difference in width between the rib edge and the rest of the body.

It’s very easy to cast off too tightly, and by making yarn overs while casting off (and simultaneously casting these off) you avoid a too tight cast off edge.

See DROPS video: How to bind off with yarn overs (yo)

To achieve an even increase (or decrease) you can increase on, for example: every 3rd and 4th row alternately, like so: work 2 rows and increase on the 3rd row, work 3 rows and increase on the 4th. Repeat this until the increase is complete.

See DROPS lesson: Increase or decrease 1 st on every 3rd and 4th row alternately

Should you prefer to work in the round instead of back and forth, you may of course adjust the pattern. You’ll need to add steeks mid-front (usually 5 stitches), and follow the instructions. When you would normally turn and work from the wrong side, simply work across the steek and continue in the round. At the end you’ll cut the piece open, pick up stitches to work bands, and cover the cut edges.

See DROPS video: How to knit steeks and cut open

Should you prefer to work back and forth instead of in the round, you may of course adjust the pattern so you work the pieces separately and then assemble them at the end. Divide the stitches for the body in 2, add 1 edge stitch in each side (for sewing) and work the front and back pieces separately.

See DROPS lesson: Can I adapt a pattern for circular needles into straight needles?

Pattern repeats can vary slightly in the different sizes, in order to get the correct proportions. If you’re not working the exact same size as the garment in the photo, yours might deviate slightly. This has been carefully developed and adjusted so that the complete impression of the garment is the same in all sizes.

Make sure to follow instructions and diagrams for your size!

If you have found a pattern you like which is available in women’s size it’s not very difficult to convert it to men’s size. The biggest difference will be the length of sleeves and body. Start working on the women size that you think would fit across the chest. The additional length will be worked right before you cast off for the armhole/sleeve cap. If the pattern is worked top-down you can add the length right after the armhole or before the first decrease on sleeve.

Regarding additional yarn amount, this will depend on how much length you add, but it is better with a skein too many than too few.

All yarns will have excess fibres (from production) that might come off as lint or shedding. Brushed yarns (ie hairier yarns) have more of these loose, excess fibres, causing more shedding.

Shedding also depends on what is worn under or over the garment, and whether this pulls at the yarn fibres. It’s therefore not possible to guarantee that there will be no shedding

Below are some tips on how to get the best result when working with hairier yarns:

1. When the garment is finished (before you wash it) shake it vigorously so the looser hairs come off. NOTE: do NOT use a lint roller, brush or any method that pulls at the yarn.

2. Place the garment in a plastic bag and put it in your freezer - the temperature will cause the fibres to become less attached to each other, and excess fibres will come off easier.

3. Leave in the freezer for a few hours before taking it out and shaking it again.

4. Wash the garment according to the instructions on the yarn label.

Pilling is a natural process that happens to even the most exclusive of fibers. It's a natural sign of wear and tear that is hard to avoid, and that is most visible in high friction areas of your garment like a sweater's arms and cuffs.

You can make your garment look as new by removing the pilling, using a fabric comb or a pill/lint remover.

Still can't find the answer you need? Then scroll down and leave your question so one of our experts can try to help you. This will be done normally within 5 to 10 working days.
In the meantime, you can read the questions and answers that others have left to this pattern or join the DROPS Workshop on Facebook to get help from fellow knitters/crocheters!

You might also like...

Post a comment to pattern DROPS 174-14

We would love to hear what you have to say about this pattern!

If you want to leave a question, please make sure you select the correct category in the form below, to speed up the answering process. Required fields are marked *.

Comments / Questions (198)

country flag Margit Büttner wrote:

Vielen Dank, das geht wunderbar schnell bei Ihnen. Ich verstehe es aber immer noch nicht. Bisher gab es in der Anleitung nur linke und rechte Maschen. Was soll jetzt "kraus rechts" bedeuten. Vielleicht meine Sie nur, das Bündchen geht jetzt anders rum. Das würde auch besser aussehen. Ich glaube, hier ist ein Übersetzungsprogramm dran, was die Verständigung erschwert.

17.11.2020 - 16:30

DROPS Design answered:

Liebe Frau Büttner, die 2 ersten Maschen in A.1/A.2 sind kraus rechts gestrickten Maschen - bei den Bündchen stricken Sie jetzt 2 M li, 1 M re und passen es so an, daß die 2 linke Maschen über die 2 ersten Maschen von A.1/A.2 gestrickt werden und daß die rechte Masche über die rechte Maschen von A.1/A.2 gestrickt werden - so stricken Sie Bündchen 1 Masche rechts/2 Maschen links. Viel Spaß beim stricken!

18.11.2020 - 07:32

country flag Margit Büttner wrote:

Vielen Dank für die Antwort neulich. wie es geht, habe ich dann doch nur durch Ausprobieren herausgefunden. habe ungefähr achtmal wieder aufgeribbelt und neu angefangen. Jetzt verstehe ich die nächste Angabe für das Halsbündchen nicht. Was soll heißen : "re M re und kraus-re M li" stricken??? Geht es im Bündchenmuster (wie beim Anschlag) weiter oder ist das etwas Neues? Die vielen Fragen hier im Forum lassen doch erkennen, dass noch viele andere Probleme mit der Anleitung haben.

17.11.2020 - 15:33

DROPS Design answered:

Liebe Frau Büttner, jetzt stricken Sie das Bündchen mit die rechten Maschen vom Muster wie zuvor und die kraus-rechte Maschen von den Diagrammen stricken Sie jetzt links, dh über 2 M kraus rechts, 1 M re (A.1 z.B.) stricken Sie: 2 M links, 1 M re. Viel Spaß beim Stricken!

17.11.2020 - 16:13

country flag Helen Persson wrote:

Of course I can decrease 2 sts on each sleee, however this will not be in any raglan as raglan for sleeve ended a lot before....If not an error in pattern, very bad explained as so many persons asked saying seems not correct.

17.11.2020 - 11:22

DROPS Design answered:

Hi Helen, nice to hear that you have solved the problem with the last stitches! We have noted your comment and will take it with us in the future. Happy knitting!

17.11.2020 - 11:34

country flag Helena Persson wrote:

I have read and many asked about this and no good explanation. Pattern say decrease as before...You says: "Now work 55 sts decreasing 2 sts at the end of sleeve + 4 sts on back piece + 2 sts at the beg of next sleeve = 47 sts remain on needle" There is no decreasing on sleeves anymore, sleeves was just 12 times while body was 24 times. There is an error in the pattern, on the 55 sts it is only possible to decrease 4 sts.

17.11.2020 - 09:46

DROPS Design answered:

Dear Mrs Persson, when working the 55 stitches you will work from the beg of right sleeve to the end of left sleeve decreasing 2 sts at the end of right sleeve, 2 sts at the beg of back piece, 2 sts at the end of back piece, 2 sts at the beg of left sleeve = 8 sts are decreased, (you worked 55 sts decreasing 8 sts (= K3 tog /K3 twisted tog 4 times) = 47 sts remain on the needle. Turn and work 45 sts from WS. Turn and work 43 sts decreasing as before 8 sts = 37 sts remain, turn and work 33 sts from WS. Hope this will help. Happy knitting!

17.11.2020 - 10:54

country flag Helena Persson Hansson wrote:

Thanks for answer however sounds incorrect, you said in answer: "you first work as before from the previous beg of rounds to the first 72 sts, then insert a marker there, this is the new beg of rows/rounds. Work now the next 55 sts decreasing as before 8 sts (= 45 sts worked in total)" You mean I do the 72 sts, then 55 sts and on these 55 sts I decrease 8 sts? This is impossible as works out to be only 4 sts in the decrease on these 55 sts. 3 sts together twice is only 4 sts

16.11.2020 - 20:30

DROPS Design answered:

Dear Mrs Persson Hansson, work first 72 sts, insert a new marker there = after A.2 and before right sleeve. Now work 55 sts decreasing 2 sts at the end of sleeve + 4 sts on back piece + 2 sts at the beg of next sleeve = 47 sts remain on needle, turn and work 45 sts, turn and work 43 sts decreasing 1 st on sleeve, 2 sts on back piece, 1 st on sleeve = 37 sts remain, turn and work only 33 sts, turn and continue in the round over the remaining 74 sts. Happy knitting!

17.11.2020 - 09:34

country flag Helena Persson wrote:

I don’t understand how to do the elevation for the neck. I have correctly 90 sts. Then tells me to work the first 72 and insert marker and do the elevation and then work 55 including the 8 dec sts. The problem is if I go back and forth on the coming 55 sts, then turn and on 45 sts, turn then on 43 and finally on 33 sts. I only dec for raglan 8 sts. The pattern says I should end with 74 sts. but to end with 74 I need to dec 16.

16.11.2020 - 12:52

DROPS Design answered:

Dear Mrs Persson, you first work as before from the previous beg of rounds to the first 72 sts, then insert a marker there, this is the new beg of rows/rounds. Work now the next 55 sts decreasing as before 8 sts (= 45 sts worked in total), turn and work the 45 sts, turn and work 43 sts decreasing as before (33 sts remain), turn and work the 33 sts, turn = there are now 74 sts on the round (you have decreased a total of 16 sts, 8 sts on row 1 and 8 sts on row 3 of the short rows).. work now in rib over the remaining sts. Happy knitting!

16.11.2020 - 16:19

country flag Margit Büttner wrote:

Hallo, ich komme auch bei der Erhöhung nicht weiter. Die Antworten, die hier im Blog stehen, verstehe ich nicht bzw. helfen nicht weiter. Wo fange ich denn die Zählung der 72 Maschen an? Danach beginnt wohl erst die Zählung der 55, aber wo ist das ? In der Mitte eines Ärmels vielleicht? Sollen die Raglanabnahmen genauso wie vorher weitergehen, d.h. in jeder 2. Reihe?

15.11.2020 - 18:43

DROPS Design answered:

Liebe Frau Büttner, die ersten 72 Maschen sind die ersten Maschen von der nächsten Runde/Reihe, dh die 1. von dieser Masche ist dieselbe wie zuvor. Setzen Sie eine Markierung hier, nach diesen 72 Maschen - die ersten 55 Maschen zählen Sie ab dieser Markierung. Viel Spaß beim stricken!

16.11.2020 - 09:17

country flag Dorota wrote:

Witam. Jestem na początku i zaczynam schemat A1 ale nie ma różnicy między ściągaczem a resztą swetra. Ściągacz zrobiłam 1o.p, 2 o.l. , ale schemat A1 jest taki sam i nie widzę gdzie robie błąd. Możesz mi pomóc, proszę? Pozdrawiam

14.11.2020 - 22:49

DROPS Design answered:

Witaj Doroto! Ściągacz przerabiasz 1 o.p., 2 o.l. i tak aż do końca. A schemat A.1 przerabiasz: w 1 okrążeniu 1 o.p., 2 o.l., a w kolejnym okrążeniu wszystkie oczka na prawo (wtedy między oczkami prawymi będzie przerabiany ścieg francuski, a nie dżersej lewy jak na ściągaczu). Miłej pracy!

16.11.2020 - 09:38

country flag Emilio wrote:

J'ai fait le premier tour après avoir glissé les manches sur le corps. Appelons ceci le "tour 1". A ce point, il faut commencer les diminutions. Est-que on fait les diminutions immédiatement sur le tour 2? Ou "diminuer touts les 2 tours" signifie "la première diminution est au tour 3?

03.11.2020 - 18:21

DROPS Design answered:

Bonjour Emilio, vous diminuez immédiatement au 2ème tour tricoté sur toutes les mailles, puis tricotez 1 tour sans diminuer et répétez ces 2 tours ainsi. Attention, sur les manches, vous diminuez au début tous les 4 tours (1 tour de diminution, 3 tours sans diminuer). Vous allez ainsi diminuer au début alternativement 8 mailles (= dos, devant et manches) ou 4 mailles (dos & devant seulement). Bon tricot!

04.11.2020 - 08:58

country flag Beth wrote:

Do you just need two markers for the body? Don't quite understand the directions.

31.10.2020 - 08:49

DROPS Design answered:

Dear Beth. this sweater is knitted from the bottom up, so for the body you do need only two markers, one for each side. Don't forget, if you need help with the directions you can always ask for help (either in person or over the phone) from the store you bought your DROPS yarn from. Happy Knitting!

31.10.2020 - 13:15