DROPS Karisma
DROPS Karisma
100% Wool
from 3.00 $ /50g
Get the yarn to make this pattern from 24.00$.

The yarn cost is calculated from the pattern’s smallest size and the yarn’s cheapest product type. Looking for an even better price? You might find it on the DROPS Deals!

DROPS SS24

Weston

Set consists of: Knitted DROPS men’s scarf and hat with cables, rib and texture in Karisma or Merino Extra Fine.

DROPS 174-10
DROPS design: Pattern no u-808
Yarn group B
----------------------------------------------------------
HAT:
Size: XS-S – L/XL
Head circumference: 54/56 – 59/62 cm / 21¼"/21⅝"" - 23¼"-24½"
Materials:
DROPS KARISMA from Garnstudio
100-150 g, color no 21, medium gray

Or use: DROPS MERINO EXTRA FINE from Garnstudio
100-150 g, colour no 04, medium grey

DROPS DOUBLE POINTED NEEDLES and CIRCULAR NEEDLE (40 cm / 16") SIZE 4 mm/US 6 - or size needed to get 21 sts x 28 rows in stockinette st = 4" x 4" (10 x 10 cm).
DROPS CIRCULAR NEEDLE (40 cm / 16") SIZE 3.5 mm/US 4 – for rib.

SCARF:
Measurements: Width: 21-23 cm / 8¼"-9" Length: 180 cm / 70"
Materials:
DROPS KARISMA from Garnstudio
300 g color no 21, medium gray
Or use: DROPS MERINO EXTRA FINE from Garnstudio
300 g colour no 04, medium grey

DROPS STRAIGHT NEEDLES size 4 mm / US 6 - or size needed to get 21 sts x 28 rows in stockinette st = 4" x 4" (10 x 10 cm).

-------------------------------------------------------

Alternative Yarn – See how to change yarns here
Yarn Groups A to F – Use the same pattern and change the yarn here
Yarn usage using an alternative yarn – Use our yarn converter here

-------------------------------------------------------

DROPS Karisma
DROPS Karisma
100% Wool
from 3.00 $ /50g
Get the yarn to make this pattern from 24.00$.

The yarn cost is calculated from the pattern’s smallest size and the yarn’s cheapest product type. Looking for an even better price? You might find it on the DROPS Deals!

Pattern instructions

NOTE: This pattern is written in American English. All measurements in charts are in cm. For conversion from inches to cm - click here. There are different terms for crocheting in American and British English. If this pattern includes crochet, click for "crochet terms" here. For this pattern in British English, please click here.
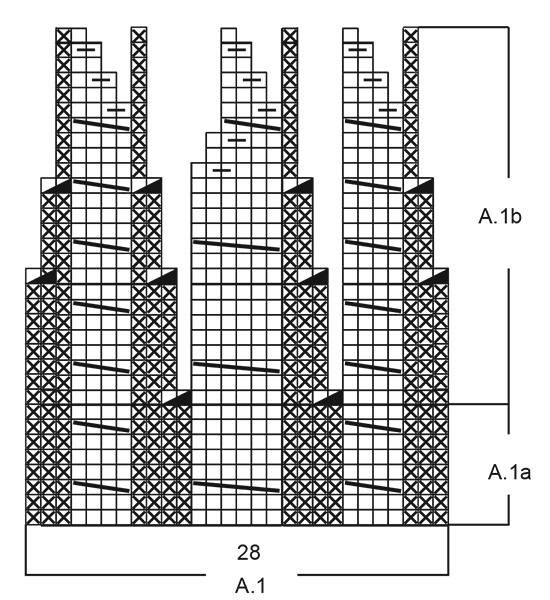
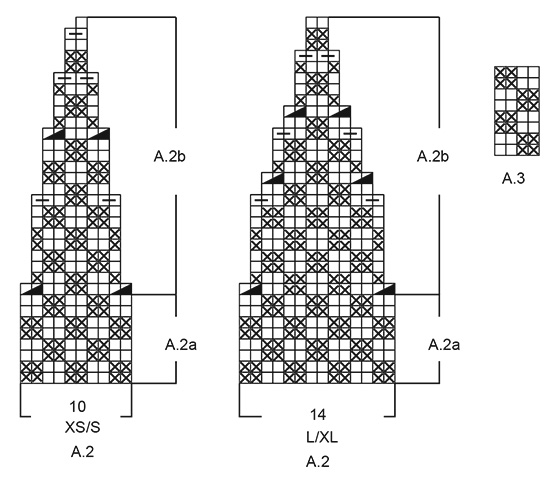
HAT:

PATTERN:
See diagram A.1 and A.2 (see diagram for correct size).
----------------------------------------------------------

HAT:
Worked in the round on circular needle. Switch to double pointed needles when needed.Due to the pattern on the hat, it is available in sizes XS/S and L/XL. Should you wish to make a size S/M (fits head size 57/59 cm = 22½"/23¼") you can follow instructions for XS/S but increase ½ needle size.
Cast on 130-144 sts on circular needle size 3.5 mm / US 4 with Karisma or Merino Extra Fine. P 1 round. Work rib = K 1/P 1 for 9 cm / 3½". REMEMBER THE KNITTING GAUGE K 1 round while dec 16/18 sts evenly = 114-126 sts. Switch to circular needle size 4 mm / US 6. Now work pattern as follows: Work * A.1 (= 28 sts), A.2 - see diagram for correct size (= 10-14 sts) *, repeat from *-* 2 more times on round. When entire A.1a and A.2a have been worked vertically, repeat A.1a and A.2a 4-5 more times vertically. Piece measures approx. 24-27 cm / 9½"-10½". Then work A.1b over A.1a and A.2b over A.2a. When entire diagram has been worked vertically there are 24-27 sts on round. Work 2 more round while K tog all sts 2 by 2 = 6-7 sts. Cut the yarn and pull it through the remaining sts, tighten tog and fasten. Hat measures 32-35 cm / 12½"-13¾" in total (includes rib). Fold rib towards the RS so that folding edge measures approx. 6 cm / 2⅜".
----------------------------------------------------------

SCARF:

GARTER ST (back and forth):
K all rows. 1 ridge = K2 rows.

PATTERN:
See diagram A.3. The diagram shows the pattern seen from RS.

INCREASE TIP:
Inc 1 st by making 1 YO. On next row work YO twisted to avoid holes. NOTE: K or P YOs twisted according to sts in rib.

DECREASE TIP:
Dec 1 st by K 2 sts tog.
----------------------------------------------------------

SCARF:
Worked back and forth on needle.
Cast on 65-71 sts (includes 1 edge st in garter st in each side) with Karisma or Merino Extra Fineas follows: 1 edge st in GARTER ST - see explanation above - * K 1, P 1 *, repeat from *-* until 2 sts remain on needle, K 1 and 1 edge st in garter st. Continue rib like this until piece measures 4 cm / 1½" (adjust so that next row is from RS). Now work as follows: Work the first 7 sts as before, then K the next 51-57 sts AT THE SAME TIME dec 13-15 sts evenly – READ DECREASE TIP, work the last 7 sts on row as before = 52-56 sts. NOTE: Work the outermost 7 sts in each side of piece the same way until finished measurements. On next row from WS K over the middle 38-42 sts. Now work pattern as follows:
Work the first 7 sts, work A.3 (= 4 sts) until 9 sts remain on row (includes the outermost 7 sts), work the first 2 sts in A.3. REMEMBER THE KNITTING GAUGE Continue like this until piece measures approx. 175 cm / 68" (adjust so that next row is from RS). On the next 2 rows P the middle 38-42 sts (i.e. on 1st row P from RS, and on 2nd row P from WS) AT THE SAME TIME on row from WS inc 13-15 sts evenly – READ INCREASE TIP! There are now 65-71 sts on needle. Then work rib as on beg of scarf as follows: 1 edge st in garter st, * K 1, P 1 *, repeat from *-* until 2 sts remain on needle, K 1, 1 edge st in garter st. Continue rib like this until rib measures 4 cm / 1½" (adjust so that next row is from RS). Bind off with K from RS.

This pattern has been corrected.

Updated online: 04.12.2018
Correction - SCARF: Work the first 7 sts, work A.3 (= 4 sts) until 9 sts remain on row (incl the outermost 7 sts), work the first 2 sts in A.3.
Updated online: 05.12.2018
Correction: Due to the pattern on the hat, it is available in sizes XS/S and L/XL. Should you wish to make a size S/M (fits head size 57/59 cm = 22 1/2"/23 1/4") you can follow instructions for XS/S but increase ½ needle size.
Updated online: 06.10.2021
Scarf:... Bind off with K from RS.

Diagram

All measurements in charts are in cm.

symbols = K from RS, P from WS
symbols = P from RS, K from WS
symbols = slip 2 sts on cable needle in front of piece, K 2, K 2 from cable needle
symbols = slip 3 sts on cable needle in front of piece, K 3, K 3 from cable needle
symbols = P 2 tog
symbols = K 2 tog
diagram
diagram
Do you have a question? See a list of frequently asked questions (FAQ)

Knitting tension is what determines the final measurements of your work, and is usually measured per 10 x 10 cm. It is provided like so: number of stitches in width x number of rows in height - eg: 19 stitches x 26 rows = 10 x 10 cm.

The knitting tension is very individual; some people knit/crochet loosely while others work tightly. You adjust the knitting tension with the needle size, which is why the suggested needle size only serve as a guide! You need to adjust this (up or down) to ensure that YOUR knitting tension matches the knitting tension provided in the pattern. If you work with a different knitting tension than provided you will have a different yarn consumption, and your work will have different measurements than what the pattern suggests.

The knitting tension also determines which yarns can replace each other. As long as you achieve the same knitting tension you can replace one yarn with another.

See DROPS lesson: How to measure your tension/gauge

See DROPS video: How to make a gauge tension swatch

The required amount of yarn is provided in grams, eg: 450 g. To calculate how many balls you’ll need you first need to know how many grams are in 1 ball (25g, 50g or 100g). This information is available if you click on the individual yarn quality on our pages. Divide the amount required with the amount of each ball. For example, if each ball is 50g (the most common amount), the calculation will be as follows: 450 / 50 = 9 balls.

The important thing when changing from one yarn to another is that the knitting/crochet tension remains the same. This is so that the measurements of the finished piece will be the same as on the sketch provided. It is easier to achieve the same knitting tension using yarns from the same yarn group. It is also possible to work with multiple strands of a thinner yarn to achieve the knitting tension of a thicker one. Please try our yarn converter. We recommend you to always work a test swatch.

Please NOTE: when changing yarn the garment might have a different look and feel to the garment in the photo, due to individual properties and qualities of each yarn.

See DROPS lesson: Can I use a different yarn than the one mentioned in the pattern?

All our yarns are categorised into yarn groups (from A to F) according to thickness and knitting tension – group A contains the thinnest yarns and group F the thickest. This makes it easier for you to find alternative yarns to our patterns, should you wish to switch yarn. All yarns within the same group have a similar knitting tension and can easily replace each other. However, different yarn qualities have different structures and properties which will give the finished work a unique look and feel.

Click here for an overview of the yarns in each yarn group

At the top of all our patterns you’ll find a link to our yarn converter, which is a helpful tool should you wish to use a different yarn than suggested. By filling in the yarn quality you wish to replace, the amount (in your size) and number of strands, the converter will present good alternative yarns with the same knitting tension. Additionally it will tell you how much you’ll require in the new qualities and whether you’ll need to work with multiple strands. Most skeins are 50g (some are 25g or 100g).

If the pattern is worked with multiple colours, every colour will have to be converted separately. Similarly, if the pattern is worked with several strands of different yarns (for example 1 strand Alpaca and 1 strand Kid-Silk) you will have to find alternatives for each, individually.

Click here to see our yarn converter

Since different yarns have different qualities and textures we have chosen to keep the original yarn in our patterns. However, you can easily find options among our available qualities by using our yarn converter, or simply pick a yarn from the same yarn group.

It is possible that some retailers still have discontinued yarns in stock, or that someone has a few skeins at home that they would like to find patterns for.

The yarn converter will provide both alternative yarn as well as required amount in the new quality.

If you think it's hard to decide what size to make, it can be a good idea to measure a garment you own already and like the size of. Then you can pick the size by comparing those measures with the ones available in the pattern's size chart.

You'll find the size chart at the bottom of the pattern.

See DROPS lesson: How to read size chart

The needle size provided in the pattern serves only as a guide, the important thing is to follow the knitting tension. And since knitting tension is very individual, you will have to adjust the needle size to ensure that YOUR tension is the same as in the pattern – maybe you’ll have to adjust 1, or even 2 needle sizes, up or down to achieve the correct tension. For this, we recommend that you work test swatches.

Should you work with a different knitting tension than the one provided, the measurements of the finished garment might deviate from the measurement sketch.

See DROPS lesson: How to measure your tension/gauge

See DROPS video: How to make a gauge tension swatch

Working a garment top-down provides more flexibility and room for personal adjustment. For example it is easier to try the garment on while working, as well as making adjustments to length of yoke and shoulder caps.

The instructions are carefully explaining every step, in the correct order. Diagrams are adjusted to the knitting direction and are worked as usual.

The diagram depicts all rows/rounds, and every stitch seen from the right side. It is read from bottom to top, from right to left. 1 square = 1 stitch.

When working back and forth, every other row is worked from the right side and every other row is worked from the wrong side. When working from the wrong side, the diagram will have to be worked reversed: from left to right, knit stitches are purled, purl stitches are knit etc.

When working in the round every round is worked from the right side and the diagram are worked from right to left on all rounds.

See DROPS lesson: How to read knitting diagrams

The diagram depicts all rows/rounds, and every stitch seen from the right side. It is worked from bottom to top, from right to left.

When working back and forth every other row is worked from the right side: from right to left and every other row is worked from the wrong side: from left to right.

When working in the round, every row in the diagram are worked from the right side, from right to left.

When working a circular diagram you start in the middle and work your way outwards, counter clockwise, row by row.

The rows usually start with a given number of chain stitches (equivalent to the height of the following stitch), this will either be depicted in the diagram or explained in the pattern.

See DROPS lesson: How to read crochet diagrams

Instructions for working several diagrams after each other on the same row/round, will often be written like so: “work A.1, A.2, A.3 a total of 0-0-2-3-4 times". This means you work A.1 once, then A.2 is worked once, and A.3 is repeated (in width) the number of times provided for your size – in this case like so: S = 0 times, M = 0 times, L=2 times, XL= 3 times and XXL = 4 times.

The diagrams are worked as usual: begin with the first row in A.1, then work the first row in A.2 etc.

See DROPS lesson: How to read knitting diagrams

See DROPS lesson: How to read crochet diagrams

The total width of the garment (from wrist-to-wrist) will be larger in the larger sizes, despite the actual sleeves being shorter. The larger sizes have longer sleeve caps and wider shoulders, so there will be a good fit in all sizes.

The measurement sketch/schematic drawing provides information regarding the full length of the garment. If it’s a jumper or a jacket the length is measured from the highest point on the shoulder (usually closest to the neckline), and straight down to the bottom of the garment. It is NOT measured from the tip of shoulder. Similarly, the length of yoke is measured from the highest point on the shoulder and down to where yoke is split into body and sleeves.

See DROPS lesson: How to read a schematic drawing

Diagrams are often repeated on the round or in height. 1 repeat is the diagram the way it appears in the pattern. If it says to work 5 repeats of A.1 in the round, then you work A.1 a total of 5 times after/next to each other in the round. If it says to work 2 repeats of A.1 vertically/in height you work the entire diagram once, then begin again at the start and work the entire diagram one more time.

Chain stitches are slightly narrower than other stitches and to avoid working the cast-on edge too tight, we simply chain more stitches to begin with. The stitch count will be adjusted on the following row to fit the pattern and measurement sketch.

The rib edge is more elastic and will contract slightly compared to, for example, stocking stitch. By increasing before the rib edge, you avoid a visible difference in width between the rib edge and the rest of the body.

It’s very easy to cast off too tightly, and by making yarn overs while casting off (and simultaneously casting these off) you avoid a too tight cast off edge.

See DROPS video: How to bind off with yarn overs (yo)

To achieve an even increase (or decrease) you can increase on, for example: every 3rd and 4th row alternately, like so: work 2 rows and increase on the 3rd row, work 3 rows and increase on the 4th. Repeat this until the increase is complete.

See DROPS lesson: Increase or decrease 1 st on every 3rd and 4th row alternately

Should you prefer to work in the round instead of back and forth, you may of course adjust the pattern. You’ll need to add steeks mid-front (usually 5 stitches), and follow the instructions. When you would normally turn and work from the wrong side, simply work across the steek and continue in the round. At the end you’ll cut the piece open, pick up stitches to work bands, and cover the cut edges.

See DROPS video: How to knit steeks and cut open

Should you prefer to work back and forth instead of in the round, you may of course adjust the pattern so you work the pieces separately and then assemble them at the end. Divide the stitches for the body in 2, add 1 edge stitch in each side (for sewing) and work the front and back pieces separately.

See DROPS lesson: Can I adapt a pattern for circular needles into straight needles?

Pattern repeats can vary slightly in the different sizes, in order to get the correct proportions. If you’re not working the exact same size as the garment in the photo, yours might deviate slightly. This has been carefully developed and adjusted so that the complete impression of the garment is the same in all sizes.

Make sure to follow instructions and diagrams for your size!

If you have found a pattern you like which is available in women’s size it’s not very difficult to convert it to men’s size. The biggest difference will be the length of sleeves and body. Start working on the women size that you think would fit across the chest. The additional length will be worked right before you cast off for the armhole/sleeve cap. If the pattern is worked top-down you can add the length right after the armhole or before the first decrease on sleeve.

Regarding additional yarn amount, this will depend on how much length you add, but it is better with a skein too many than too few.

All yarns will have excess fibres (from production) that might come off as lint or shedding. Brushed yarns (ie hairier yarns) have more of these loose, excess fibres, causing more shedding.

Shedding also depends on what is worn under or over the garment, and whether this pulls at the yarn fibres. It’s therefore not possible to guarantee that there will be no shedding

Below are some tips on how to get the best result when working with hairier yarns:

1. When the garment is finished (before you wash it) shake it vigorously so the looser hairs come off. NOTE: do NOT use a lint roller, brush or any method that pulls at the yarn.

2. Place the garment in a plastic bag and put it in your freezer - the temperature will cause the fibres to become less attached to each other, and excess fibres will come off easier.

3. Leave in the freezer for a few hours before taking it out and shaking it again.

4. Wash the garment according to the instructions on the yarn label.

Pilling is a natural process that happens to even the most exclusive of fibers. It's a natural sign of wear and tear that is hard to avoid, and that is most visible in high friction areas of your garment like a sweater's arms and cuffs.

You can make your garment look as new by removing the pilling, using a fabric comb or a pill/lint remover.

Still can't find the answer you need? Then scroll down and leave your question so one of our experts can try to help you. This will be done normally within 5 to 10 working days.
In the meantime, you can read the questions and answers that others have left to this pattern or join the DROPS Workshop on Facebook to get help from fellow knitters/crocheters!

You might also like...

Post a comment to pattern DROPS 174-10

We would love to hear what you have to say about this pattern!

If you want to leave a question, please make sure you select the correct category in the form below, to speed up the answering process. Required fields are marked *.

Comments / Questions (51)

country flag Christine wrote:

Pour le bonnet. Pouvez-vous m'expliquer ce que veut dire tricoter A1-et A2 deux fois ??? Est-ce en faisant le tour du bonnet ou en hauteur ? Puis on dit quand ils ont été tricotés 1 fois en hauteur, répéter 4-5 fois A1 et A2 en hauteur ... ? Pouvez-vous m'expliquer ce que je dois faire au juste ? Ce n'est pas clair.

23.11.2020 - 00:46

DROPS Design answered:

Bonjour Christine, A.1 et A.2 correspondent au point fantaisie à tricoter; vous devez tricoter ainsi: (A.1 (les torsades = 28 m), A.2 (= 10 ou 14 m selon la taille au double point de riz) et répéter ces 2 diagrammes tout le tour = vous aurez ainsi 3 fois (A.1, A.2) au total tout le tour. Ces diagrammes font tous 8 rangs, vous répétez 4-5 fois en hauteur ces 8 rangs = 32-40 rangs au total de la même façon en tricotant alternativement (en largeur) A.1 et A.2. Bon tricot!

23.11.2020 - 10:13

country flag Hélène JAILLET wrote:

Bonjour\r\nJ\'aimerais tricoter l\'écharpe avec la laine Karisma coloris Bordeaux, mais vous êtes en rupture de stock. Par quelle qualité de laine puis-je la remplacer. Pensez-vous être livrés dans les semaines à venir ?\r\nEn vous remerciant. Cordialement. Hélène Jaillet

16.10.2020 - 11:05

DROPS Design answered:

Bonjour Mme Jaillet, cette couleur est toujours disponible, n'hésitez pas à vous adresser à votre magasin DROPS pour en savoir plus sur ces disponibilités et ses dates de réassort - d'autres magasins peuvent en avoir en stock - cf nuancier. Vous pouvez également utiliser notre convertisseur pour voir les alternatives possibles. Bon tricot!

16.10.2020 - 11:53

country flag Paulina Pena wrote:

Hola! El diagrama A.1 deberia tener 24 puntos y tiene 28. O me baso en el que dice a1b?

09.10.2020 - 21:52

country flag Patricia Olivia Fuchs wrote:

Zum Waschen habe ich ein Feinwaschmittel verwendet. Hätte ich ein Wollwaschmittel verwenden sollen? Vielleicht stimmt meine Maschenprobe deswegen nicht überein?

20.09.2020 - 17:13

DROPS Design answered:

Liebe Frau Fuchs, mehr über Garnpflege lesen Sie auf jede Banderole sowie auf jeder Farbkarte und mehr Tipps finden Sie hier. Ihr DROPS Laden hat sicher noch mehr Tipps für Sie. Viel Spaß beim stricken!

21.09.2020 - 14:07

country flag Patricia Olivia Fuchs wrote:

Mit den angegebenen Nadeln komme ich bei Merino Extrafine auf eine Maschenprobe von 18x26. Nach dem Waschen (40°C, ohne Weichspüler) sogar auf 16x26! Was um alles in der Welt mache ich falsch? Es kann doch nicht sein, dass die Maschenprobe dermaßen abweicht? Selbst mit einer Nadelstärke kleiner komme ich nicht auf 21x28. Dasselbe gilt übrigens für Big Merino, wo ich nach dem Waschen auf 14x21 komme statt auf 17x22. Tipp?

20.09.2020 - 14:27

DROPS Design answered:

Liebe Frau Fuchs, mit Merino strickt man lieber etwas fest - und die Maschenprobe erst nach waschen messen - bei der Farbkarte lesen Sie mehr. (gleichfalls mit Big Merino. Viel Spaß beim stricken!

21.09.2020 - 13:55

country flag Marleen wrote:

In het kabelgedeelte van de muts geeft de het telpatroon aan dat je 2 steken recht ( teken -)samen moet breien. Dit moet toch 2 averecht samen zijn?

13.01.2020 - 22:15

country flag Britta Link wrote:

Die Materialangabe beim Schal DROPS MERINO EXTRA FINDE wurde falsch übernommen: es muss 300 g heißen und nicht 100-150g

25.11.2019 - 14:13

DROPS Design answered:

Liebe Frau Link, Sie sind ja recht, danke für den Hinweis, deutsche Anleitung wird korrigiert. Viel Spaß beim stricken!

25.11.2019 - 14:25

country flag Veera wrote:

Myssyn ohjeessa käsketään neuloa A.1 mallin mukaan 24 s, mutta kuvassa on 28 s. Miten tuo pitäisi neuloa, koska 24 s olisi oikea lukumäärä puikoilla oleviin silmukoihin nähden, mutta mallikuvan leveys tosiaan 28 s?

17.11.2019 - 20:51

DROPS Design answered:

Hei, piirroksessa A.1 on 28 silmukkaa. Ohjeeseen tehdään korjaus.

19.12.2019 - 13:42

country flag Nathalie wrote:

A la fin de l’echarpe vous préconisez de faire des diminutions alors qu’il faut faire des augmentations.

17.03.2019 - 08:50

DROPS Design answered:

Bonjour Nathalie, cette faute de frappe a été corrigée, merci! Bon tricot!

18.03.2019 - 12:34

country flag Solveig wrote:

Hej Hvis jeg nu gerne vil strikke huen i størrelse S/M, skriver I i opskriften, at den mindste størrelse skal strikkes på 1/2 pindenummer større. Gælder det for alle de pinde der skal bruges? Altså skal ribben så strikkes på pinde 4 og resten på pinde 4,5? Eller er det kun resten der skal strikkes på pinde 4,5? :) Jeg er ret nybegynder, og dette er min første hue jeg skal strikke, så der er en del ting at være i tvivl om :) Tak for opskrifter!

16.01.2019 - 14:36

DROPS Design answered:

Hei Solveig. Pinnenummer er kun veiledende, det er strikkefastheten som avgjør hvilket pinnenummer du må bruke, og siden denne er individuell må man tilpasse pinnestørrelsen etter strikkefastheten. Her bør du finne den pinnestørrelsen som gir deg 21 m x 28 p glstrikk på 10 x 10 cm og så gå opp et halv pinnenummer. Da vil luens mål bli rikitge i forhold til S/M. Gå du opp i størrelse på pinnene du må bruke til både på vrangbord og glattstrikk. God fornøyelse

21.01.2019 - 13:12