
Popular categories
Looking for a yarn?


|
|||||||
January Travel |
|||||||
 |
 |
||||||
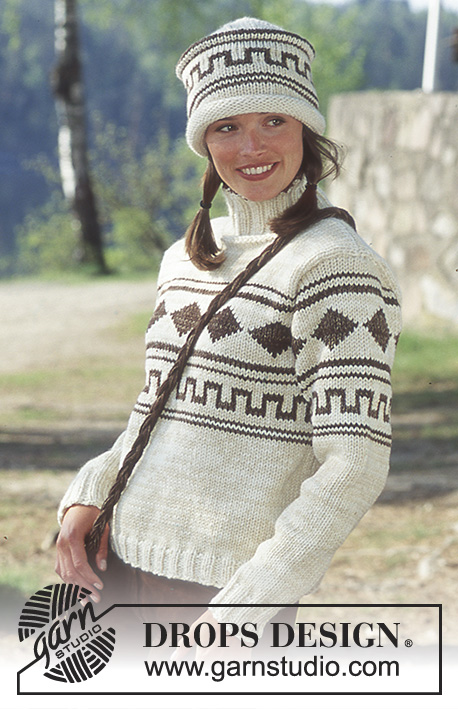
DROPS Pullover, Hat and Bag in Alaska and Silke-Tweed.
DROPS 66-1 |
|||||||
|
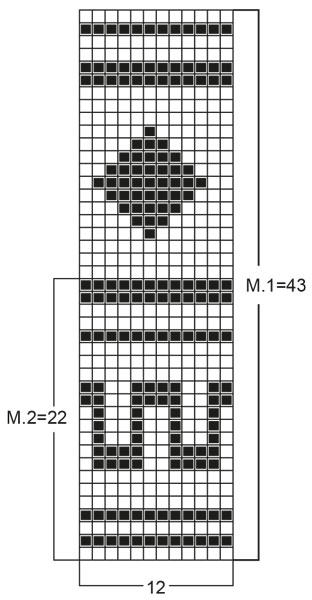
Gauge: Pullover: 13 sts x 17 rows on larger needles with 1 strand Alaska + 1 strand Silke-Tweed in stockinette st = 10 x 10 cm. Hat + Bag: 14 sts x 18 rows on smaller needles with 1 strand Alaska + 1 strand Silke-Tweed = 10 x 10 cm. Rib: * K 2, P 2 *, repeat from * - *. Pattern: See chart. One chart = one repeat. The pattern in the chart is seen from the right side and is knit entirely in stockinette st. PULLOVER: Body: Cast on 120-144-168 sts on smaller circular needles with 1 strand each natural white Alaska + natural white Silke-Tweed; join and place a marker at the join. Knit rib (see instructions above) for 4-4-4 cm. Change to larger circular needles and continue in stockinette st. When the piece measures 20-21-22 cm knit Pattern 1. When the piece measures 34-36-37 cm knit the next row as follows: bind off 3-3-3 sts for armhole, 54-66-78 sts for the front, bind off 6-6-6 sts for armhole, 54-66-78 sts for the back, bind off 3-3-3 sts for armhole. Knit each piece separately. Front: = 54-66-78 sts. Bind off for armhole every other row: 2 sts 0-2-3 times, then 1 st 3-4-7 times = 48-50-52 sts. After Pattern 1 is complete, knit the rest with 1 strand natural white Alaska + 1 strand natural white Silke-Tweed. When the piece measures 50-52-54 cm bind off the center 10-12-12 sts for the neck. Bind off at each neck edge every other row: 2 sts 2-2-2 times, 1 st 2-2-2 times = 13-13-14 sts remain on each shoulder. Bind off when the piece measures 56-58-60 cm. Back: = 54-66-78 sts. Bind off for armhole as on front = 48-50-52 sts. When the piece measures 54-56-58 cm bind off the center 20-22-22 sts for the neck. Dec 1 st at each neck edge on the next row = 13-13-14 sts remain on each shoulder. Bind off when the piece measures 56-58-60 cm. Sleeve: Cast on 36-36-40 sts on smaller double-pointed needles with 1 strand natural white Alaska + 1 strand natural white Silke-Tweed; join and place a marker at the join. Knit rib for 6-6-6 cm. Change to larger double-pointed needles and stockinette st. After the rib, inc 1 st each side of marker 8-8-8 times every 6-5.5-5 cm = 52-52-56 sts. When the piece measures 36-32-28 cm knit Pattern 1. When the piece measures 50-47-43 cm bind off 2-2-2 sts each side of marker and knit the rest back and forth on needles. Bind off for sleeve cap at each side every other row: 2 sts 3-2-1 times, 1 st 1-6-12 times and 2 sts 3-2-1 times. Bind off, the piece measures approx. 58-59-59 cm. Assembly: Sew shoulder seams. Pick up approx. 55 - 65 sts around the neck on smaller double-pointed needles with 1 strand natural white Alaska + 1 strand natural white Silke-Tweed. Join and knit 2 rows reverse stockinette st, then knit Rib for approx. 10 cm, change to 1 strand brown Alaska + 1 strand brown Silke-Tweed and knit 1 row Rib, then bind off loosely in Rib. Sew in sleeves. HAT: Size: Head measurement approx. 56 cm Hat: Cast on 78 sts on smaller double-pointed needles with 1 strand natural white Alaska + 1 strand natural white Silke-Tweed; join and place a marker at the join. Knit stockinette st for 7 cm, then knit Pattern 2. After Pattern 2 the measures piece approx. 19 cm. Knit 3 rows with 1 strand natural white Alaska + 1 strand natural white Silke-Tweed. Make the top edge as follows: fold the work over to the wrong side 6 rows below the current row (3 rows from the end of Pattern 2) and pick up 1 st for every st on needles and knit those 2 sts tog. Do this around the entire row. Continue in stockinette st for 5 rows, then place 6 markers in work with 13 sts between each marker. On the next row dec 1 st after every marker by K 2 tog. Repeat these decs every row until 12 sts remain. Pull a strand of yarn through the remaining sts and pull together. The bottom edge of the hat will roll. BAG: Size: width: 28 cm length: 32 cm Bag: The bag is knit in the round from the upper edge, and knit together at the bottom. Cast on 78 sts on smaller circular needles with 1 strand brown Alaska + 1 strand brown Silke-Tweed. Knit 2 rows garter st, then knit stockinette st until piece measures approx. 31 cm. Put half the sts on another needle. Knit the bag together as follows: Knit 1 st from one needle together with 1 st from the other needle = 39 sts. Turn and bind off all sts. Shoulder strap: Cut 21 strands brown Alaska and 15 strands brown Silke-Tweed approx. 250 cm long. Braid the strands together loosely. The braid will measure approx. 150 cm long. Tie a knot at each end 7-8 cm from the end, leaving the ends loose. Sew braid along each side of bag. Fringe: Make fringe along bottom edge of bag. 1 fringe bundle = 6 strands brown Alaska à approx. 20 cm long (make 7). Fold bundles in half and pull the folded edge through the bottom edge, then pull the ends through the folded loop. |
|||||||
Diagram explanations |
|||||||
|
|||||||
|
|||||||

|
|||||||
|
Have you made this or any other of our designs? Tag your pictures in social media with #dropsdesign so we can see them! Do you need help with this pattern?You'll find tutorial videos, a Comments/Questions area and more by visiting the pattern on garnstudio.com. © 1982-2024 DROPS Design A/S. We reserve all rights. This document, including all its sub-sections, has copyrights. Read more about what you can do with our patterns at the bottom of each pattern on our site. |
|||||||


With over 40 years in knitting and crochet design, DROPS Design offers one of the most extensive collections of free patterns on the internet - translated to 17 languages. As of today we count 304 catalogues and 11422 patterns - 11422 of which are translated into English (UK/cm).
We work hard to bring you the best knitting and crochet have to offer, inspiration and advice as well as great quality yarns at incredible prices! Would you like to use our patterns for other than personal use? You can read what you are allowed to do in the Copyright text at the bottom of all our patterns. Happy crafting!
Comments / Questions (7)
Lisäys vielä edelliseen: englanninkielisessä ohjeessa tuo kohta on kerrottu eritavalla.
03.10.2023 - 16:08Hei! Saisinko selvennystä tuohon rullareunan ohjeen kohtaan. Käsittääkseni se neulotaan heti työn alussa ennen M2 kuviota? Ohje antaa eri käsityksen.
03.10.2023 - 14:27DROPS Design answered:
Hei, olet oikeassa. Rullareuna tehdään työn alussa. Ohjeeseen on tehty korjaus.
18.10.2023 - 16:57Hei. Skal man bare bruke én tråd Alaska for mønsteret i genseren?
13.09.2020 - 15:47DROPS Design answered:
Hej Linda. Genseren stickas med 1 tråd Alaska och 1 tråd Silke-Tweed. Se gärna vår garnkalkylator för alternativa garn till Silke-Tweed, eftersom det utgått ur sortimentet. Mvh DROPS Design
15.09.2020 - 07:42Hvor mye/antall trenger jeg for Drops Melody? Største størrelsen. Det står ikke beskrevet.
09.09.2020 - 22:42DROPS Design answered:
Hej Linda, du skal bruge ca 500 g DROPS Melody, men du vil få et helt andet udtryk end modellen på billedet. Se her Gensere - DROPS Melody genseren på billedet er strikker med 13 masker på 10 cm. God fornøjelse!
10.09.2020 - 15:41Hallo, Ik ben met de muts van patroon 66-1 bezig. Nu staat er in de beschrijving dat ik een bies moet breien....... Zit deze aan de bovenkant van het telpatroon? Of moet ik de steken aan de onderkant van het telpatroon opnemen? Het is mij niet helemaal duidelijk wat hier bedoeld wordt..... Kunt u me hierbij helpen?? Anits Stoker
12.08.2020 - 21:49DROPS Design answered:
Dag Anita,
Deze bies zit boven het telpatroon. Dus als je het telpatroon klaar hebt brei je 3 naalden met gebroken wit en dan brei je de bies. De bies zit dus vlak voor de minderingen. Op de foto kun je ook een soort rand zien boven het patroon.
17.08.2020 - 21:31Er det muligt at strikke blusen kun med 1 tråd Alaska? eller en anden garn type så jeg kun skal strikke med en tråd?
22.03.2020 - 12:33DROPS Design answered:
Hei Ester. For å få akkurat denne tykkelsen (1 tråd Alaska + 1 tråd Silke Tweed), må du nok bruke 2 tråder. Eneste kvaliteten vi har som har nogenlunde samme strikkefastheten som er oppgitt i oppskriften er et mohair garn, DROPS Melody. mvh DROPS design
23.03.2020 - 15:46Hur stickar man rullkanten?
27.12.2017 - 04:15DROPS Design answered:
Rullkanten uppstår då man stickar de 7 cm slätstickning i början på arb. Kanten kommer att rulla sig automatiskt.
02.01.2018 - 14:20