DROPS BabyAlpaca Silk
70% Alpaca, 30% Silk
Discontinued
find alternatives
DROPS Kid-Silk
DROPS Kid-Silk
75% Mohair, 25% Silk
from 5.05 € /25g
DROPS SS24

Radiant Darling Cardigan

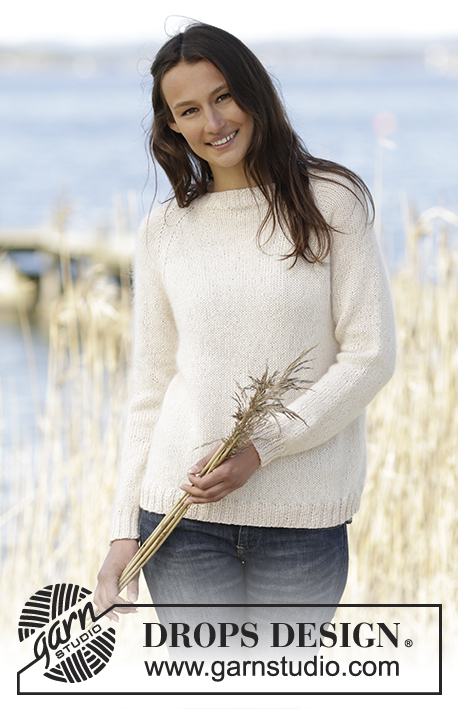
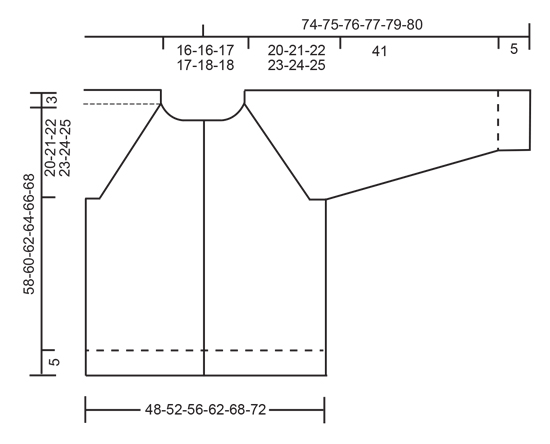
Knitted jacket in DROPS BabyAlpaca Silk and DROPS Kid-Silk with raglan and rib, worked top down. Size: S - XXXL.

DROPS Extra 0-1324
DROPS design: Pattern no bs-090
Yarn group A + A or C
----------------------------------------------------------
Size: S - M - L - XL - XXL - XXXL
Materials:
DROPS BABYALPACA SILK from Garnstudio
250-300-300-350-350-400 g colour no 1306, powder
and use:
DROPS KID-SILK from Garnstudio
100-100-125-125-150-150 g colour no 01, off white

DROPS DOUBLE POINTED NEEDLES and CIRCULAR NEEDLE (80 cm) SIZE 5 mm - or size needed to get 17 sts x 22 rows in stocking st = 10 x 10 cm.
DROPS DOUBLE POINTED NEEDLES and CIRCULAR NEEDLE (60 cm) SIZE 4 mm - for rib.
DROPS MOTHER-OF-PEARL BUTTON: Flower (white), NO 600: 8-8-8-9-9-9 pieces
----------------------------------------------------------

-------------------------------------------------------

Alternative Yarn – See how to change yarns here
Yarn Groups A to F – Use the same pattern and change the yarn here
Yarn usage using an alternative yarn – Use our yarn converter here

-------------------------------------------------------

DROPS BabyAlpaca Silk
70% Alpaca, 30% Silk
Discontinued
find alternatives
DROPS Kid-Silk
DROPS Kid-Silk
75% Mohair, 25% Silk
from 5.05 € /25g

Pattern instructions

NOTE: This pattern is written in British English. All measurements in charts are in cm. For conversion from cm to inches - click here. There are different terms for crocheting in British and American English. If this pattern includes crochet, click for "crochet terms" here. For this pattern in American English, please click here.
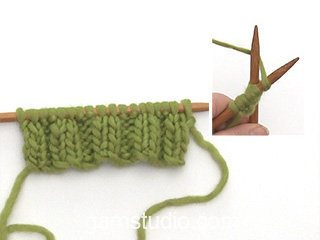
GARTER ST (back and forth):
K all rows. 1 ridge = 2 rows K.

INCREASE TIP:
Always inc from RS.
Inc 2 sts before marker as follows: Work until 3 st remains before marker, 1 YO, K 1, 1 YO, K 2, marker.
Inc 2 sts after marker as follows: Work until marker, K 2, 1 YO, K 1, 1 YO.
Inc 1 sts before marker as follows: Work until 2 sts remain before marker, 1 YO, K 2, marker.
Inc 1 sts after marker as follows: Work until marker, K 2, 1 YO.
P YO twisted on next row, it should not make a hole.

DECREASE TIP:
Dec 1 st before marker as follows: Work until 3 sts remain before marker, slip 1 st as if to K, K 1, psso, K 1, marker. 
Dec 1 st after marker as follows: Work until marker, K 1, K 2 tog. 

BUTTONHOLES:
Dec for buttonholes on right band. 1 buttonhole = work until 4 sts remain on needle (seen from RS), make 1 YO, K 2 tog and finish with K 2.
Dec for buttonholes when piece measures (from neck):
SIZE S: 2, 9, 16, 24, 32, 40, 48 and 56 cm
SIZE M: 2, 10, 18, 26, 34, 42, 50 and 58 cm
SIZE L: 2, 10, 18, 26, 34, 42, 51 and 60 cm
SIZE XL: 2, 9, 16, 23, 31, 39, 47, 55 and 62 cm
SIZE XXL: 2, 9, 16, 23, 31, 39, 47, 55 and 64 cm
SIZE XXXL: 2, 10, 18, 26, 34, 42, 50, 58 and 66 cm
----------------------------------------------------------

JACKET:
Worked back and forth, top down. Cast on 100-104-108-112-116-120 sts (incl 5 band sts in each side of piece) on circular needle size 4 mm with 2 strands BabyAlpaca Silk. Work 5 band sts in GARTER ST - see explanation above - then work rib = K 2/P 2 until 7 sts remain, K 2, finish with 5 band sts in garter st. Dec for BUTTONHOLES - see explanation above - on right band. When rib measures 3 cm (adjust so that next row is worked from WS), switch to 1 strand of each quality. Work 1 row from WS with rib and garter st. Switch to circular needle size 5 mm.

Work as follows from RS: 5 band sts in garter st, stocking st until 5 sts remain, AT THE SAME TIME dec 14-18-18-22-22-26 sts evenly, finish with 5 band sts in garter st = 86-86-90-90-94-94 sts. REMEMBER THE KNITTING TENSION Inc 8-8-16-24-36-40 sts evenly on next row from WS = 94-94-106-114-130-134 sts.

Then insert 4 markers in the piece from RS as follows: 5 band sts in garter st, 16-16-18-20-23-23 sts in stocking st, insert 1st marker (= left front piece), 10-10-12-12-14-16 sts in stocking st, insert 2nd marker (= sleeve), 32-32-36-40-46-46 sts in stocking st, insert 3rd marker (= back piece), 10-10-12-12-14-16 sts in stocking st, insert 4th marker (= sleeve), 16-16-18-20-23-23 sts in stocking st(= right front piece), finish with 5 band sts in garter st. Work band sts in garter st until finished measurements. Work in stocking st AT THE SAME TIME inc for raglan – READ INCREASE TIP - as follows: Inc differently on sleeves and body.

RAGLAN BODY:
Inc before 1st and 3rd marker and after 2nd and 4th marker as follows: Inc 2 sts on every row from RS 2-4-5-7-8-10 times in total, then 1 st on every row from RS 17-16-16-15-15-14 times = 74-80-88-98-108-114 sts on back piece and 42-45-49-54-59-62 sts on each front piece.

RAGLAN SLEEVE:
Inc after 1st and 3rd marker and before 2nd and 4th marker (= 2 sts inc on each sleeve) as follows: Inc 1 st on every row from RS 19-20-21-22-23-24 times in total = 48-50-54-56-60-64 sts on sleeve.

After all inc are done there are 254-270-294-318-346-366 sts on needle.

Work next row as follows: 5 band sts in garter st, 37-40-44-49-54-57 sts in stocking st, slip the next 48-50-54-56-60-64 sts on a stitch holder for sleeve, cast on 8 sts under sleeve, 74-80-88-98-108-114 sts in stocking st, slip the next 48-50-54-56-60-64 sts on a stitch holder for sleeve, cast on 8 sts under sleeve, 37-40-44-49-54-57 sts in stocking st, finish with 5 band sts in garter st = 174-186-202-222-242-254 sts. Insert 1 marker in piece, NOW MEASURE PIECE FROM HERE.

BODY:
Work in stocking st with 5 band sts in garter st in each side. REMEMBER BUTTONHOLES! When piece measures 33-34-35-36-37-38 cm, inc 6 sts evenly = 180-192-208-228-248-260 sts. Switch to circular needle size 4 mm. Work 1 round as follows: 5 band sts in garter st, rib = K 2/P 2 until 7 sts remain, finish with K 2 and 5 band sts in garter st. Switch to 2 strands BabyAlpaca Silk. Work rib and garter st until piece measures 38-39-40-41-42-43 cm. Cast off with K over K and P over P over rib sts and K over sts in garter st.

SLEEVE:
Slip the 48-50-54-56-60-64 sts from stitch holder back on double pointed needles size 5 mm. Cast on 8 sts at the end of round = 56-58-62-64-68-72 sts. Insert 1 marker in the middle of these new sts. NOW MEASURE THE PIECE FROM HERE. Work in the round in stocking st. When piece measures 3 cm, dec 1 st on each side of marker - READ DECREASE TIP, repeat dec every 4½-4-3½-3-3-2½ cm 8-9-10-11-12-13 more times = 38-38-40-40-42-44 sts. When piece measures 41 cm, inc 2-2-4-4-6-4 sts evenly = 40-40-44-44-48-48 sts. Switch to double pointed needles size 4 mm and work 1 round rib = K 2/P 2. Switch to 2 strands BabyAlpaca Silk and work rib until piece measures 46 cm. Cast off sts with K over K and P over P.

ASSEMBLY:
Sew the openings under the sleeves. Sew the buttons on to the left front band.

Diagram

diagram measurements

Each of our patterns has specific tutorial videos to help you.

Do you have a question? See a list of frequently asked questions (FAQ)

Knitting tension is what determines the final measurements of your work, and is usually measured per 10 x 10 cm. It is provided like so: number of stitches in width x number of rows in height - eg: 19 stitches x 26 rows = 10 x 10 cm.

The knitting tension is very individual; some people knit/crochet loosely while others work tightly. You adjust the knitting tension with the needle size, which is why the suggested needle size is only meant as a guide! You need to adjust this (up or down) to ensure that YOUR knitting tension matches the knitting tension provided in the pattern. If you work with a different knitting tension than provided you will have a different yarn consumption, and your work will have different measurements than what the pattern suggests.

The knitting tension also determines which yarns can replace each other. As long as you achieve the same knitting tension you can replace one yarn with another.

See DROPS lesson: How to measure your tension/gauge

See DROPS video: How to make a gauge tension swatch

The required amount of yarn is provided in grams, eg: 450 g. To calculate how many balls you’ll need you first need to know how many grams are in 1 ball (25g, 50g or 100g). This information is available if you click on the individual yarn quality on our pages. Divide the amount required with the amount of each ball. For example, if each ball is 50g (the most common amount), the calculation will be as follows: 450 / 50 = 9 balls.

The important thing when changing from one yarn to another is that the knitting/crochet tension remains the same. This is so that the measurements of the finished piece will be the same as on the sketch provided. It is easier to achieve the same knitting tension using yarns from the same yarn group. It is also possible to work with multiple strands of a thinner yarn to achieve the knitting tension of a thicker one. Please try our yarn converter. We recommend you to always work a test swatch.

Please NOTE: when changing yarn the garment might have a different look and feel to the garment in the photo, due to individual properties and qualities of each yarn.

See DROPS lesson: Can I use a different yarn than the one mentioned in the pattern?

All our yarns are categorised into yarn groups (from A to F) according to thickness and knitting tension – group A contains the thinnest yarns and group F the thickest. This makes it easier for you to find alternative yarns to our patterns, should you wish to switch yarn. All yarns within the same group have a similar knitting tension and can easily replace each other. However, different yarn qualities have different structures and properties which will give the finished work a unique look and feel.

Click here for an overview of the yarns in each yarn group

At the top of all our patterns you’ll find a link to our yarn calculator, which is a helpful tool should you wish to use a different yarn than suggested. By filling in the yarn quality you wish to replace, the amount (in your size) and number of strands, the calculator will present good alternative yarns with the same knitting tension. Additionally it will tell you how much you’ll require in the new qualities and whether you’ll need to work with multiple strands. Most skeins are 50g (some are 25g or 100g).

If the pattern is worked with multiple colours, every colour will have to be calculated separately. Similarly, if the pattern is worked with several strands of different yarns (for example 1 strand Alpaca and 1 strand Kid-Silk) you will have to find alternatives for each, individually.

Click here to see our yarn calculator

Since different yarns have different qualities and textures we have chosen to keep the original yarn in our patterns. However, you can easily find options among our available qualities by using our yarn calculator, or simply pick a yarn from the same yarn group.

It is possible that some retailers still have discontinued yarns in stock, or that someone has a few skeins at home that they would like to find patterns for.

The yarn calculator will provide both alternative yarn as well as required amount in the new quality.

If you think it's hard to decide what size to make, it can be a good idea to measure a garment you own already and like the size of. Then you can pick the size by comparing those measures with the ones available in the pattern's size chart.

You'll find the size chart at the bottom of the pattern.

See DROPS lesson: How to read size chart

The needle size provided in the pattern serves only as a guide, the important thing is to follow the knitting tension. And since knitting tension is very individual, you will have to adjust the needle size to ensure that YOUR tension is the same as in the pattern – maybe you’ll have to adjust 1, or even 2 needle sizes, up or down to achieve the correct tension. For this, we recommend that you work test swatches.

Should you work with a different knitting tension than the one provided, the measurements of the finished garment might deviate from the measurement sketch.

See DROPS lesson: How to measure your tension/gauge

See DROPS video: How to make a tension/gauge swatch

Working a garment top-down provides more flexibility and room for personal adjustment. For example it is easier to try the garment on while working, as well as making adjustments to length of yoke and shoulder caps.

The instructions are carefully explaining every step, in the correct order. Diagrams are adjusted to the knitting direction and are worked as usual.

The diagram depicts all rows/rounds, and every stitch seen from the right side. It is read from bottom to top, from right to left. 1 square = 1 stitch.

When working back and forth, every other row is worked from the right side and every other row is worked from the wrong side. When working from the wrong side, the diagram will have to be worked reversed: from left to right, knit stitches are purled, purl stitches are knit etc.

When working in the round every round is worked from the right side and the diagram are worked from right to left on all rounds.

See DROPS lesson: How to read knitting diagrams

The diagram depicts all rows/rounds, and every stitch seen from the right side. It is worked from bottom to top, from right to left.

When working back and forth every other row is worked from the right side: from right to left and every other row is worked from the wrong side: from left to right.

When working in the round, every row in the diagram are worked from the right side, from right to left.

When working a circular diagram you start in the middle and work your way outwards, counter clockwise, row by row.

The rows usually start with a given number of chain stitches (equivalent to the height of the following stitch), this will either be depicted in the diagram or explained in the pattern.

See DROPS lesson: How to read crochet diagrams

Instructions for working several diagrams after each other on the same row/round, will often be written like so: “work A.1, A.2, A.3 a total of 0-0-2-3-4 times". This means you work A.1 once, then A.2 is worked once, and A.3 is repeated (in width) the number of times provided for your size – in this case like so: S = 0 times, M = 0 times, L=2 times, XL= 3 times and XXL = 4 times.

The diagrams are worked as usual: begin with the first row in A.1, then work the first row in A.2 etc.

See DROPS lesson: How to read knitting diagrams

See DROPS lesson: How to read crochet diagrams

The total width of the garment (from wrist-to-wrist) will be larger in the larger sizes, despite the actual sleeves being shorter. The larger sizes have longer sleeve caps and wider shoulders, so there will be a good fit in all sizes.

The measurement sketch/schematic drawing provides information regarding the full length of the garment. If it’s a jumper or a jacket the length is measured from the highest point on the shoulder closest to the neckline, and straight down to the bottom of the garment. It is NOT measured from the tip of shoulder. Similarly, the length of yoke is measured from the highest point on the shoulder and down to where yoke is split into body and sleeves.

On a jacket measures are never taken along bands, unless specifically stated. Always measure inside band stitches when measuring the length.

See DROPS lesson: How to read a schematic drawing

Diagrams are often repeated on the round or in height. 1 repeat is the diagram the way it appears in the pattern. If it says to work 5 repeats of A.1 in the round, then you work A.1 a total of 5 times after/next to each other in the round. If it says to work 2 repeats of A.1 vertically/in height you work the entire diagram once, then begin again at the start and work the entire diagram one more time.

Chain stitches are slightly narrower than other stitches and to avoid working the cast-on edge too tight, we simply chain more stitches to begin with. The stitch count will be adjusted on the following row to fit the pattern and measurement sketch.

The rib edge is more elastic and will contract slightly compared to, for example, stocking stitch. By increasing before the rib edge, you avoid a visible difference in width between the rib edge and the rest of the body.

It’s very easy to cast off too tightly, and by making yarn overs while casting off (and simultaneously casting these off) you avoid a too tight cast off edge.

See DROPS video: How to bind off with yarn overs (yo)

To achieve an even increase (or decrease) you can increase on, for example: every 3rd and 4th row alternately, like so: work 2 rows and increase on the 3rd row, work 3 rows and increase on the 4th. Repeat this until the increase is complete.

See DROPS lesson: Increase or decrease 1 st on every 3rd and 4th row alternately

Should you prefer to work in the round instead of back and forth, you may of course adjust the pattern. You’ll need to add steeks mid-front (usually 5 stitches), and follow the instructions. When you would normally turn and work from the wrong side, simply work across the steek and continue in the round. At the end you’ll cut the piece open, pick up stitches to work bands, and cover the cut edges.

See DROPS video: How to knit steeks and cut open

Should you prefer to work back and forth instead of in the round, you may of course adjust the pattern so you work the pieces separately and then assemble them at the end. Divide the stitches for the body in 2, add 1 edge stitch in each side (for sewing) and work the front and back pieces separately.

See DROPS lesson: Can I adapt a pattern for circular needles into straight needles?

Pattern repeats can vary slightly in the different sizes, in order to get the correct proportions. If you’re not working the exact same size as the garment in the photo, yours might deviate slightly. This has been carefully developed and adjusted so that the complete impression of the garment is the same in all sizes.

Make sure to follow instructions and diagrams for your size!

If you have found a pattern you like which is available in women’s size it’s not very difficult to convert it to men’s size. The biggest difference will be the length of sleeves and body. Start working on the women size that you think would fit across the chest. The additional length will be worked right before you cast off for the armhole/sleeve cap. If the pattern is worked top-down you can add the length right after the armhole or before the first decrease on sleeve.

Regarding additional yarn amount, this will depend on how much length you add, but it is better with a skein too many than too few.

All yarns will have excess fibres (from production) that might come off as lint or shedding. Brushed yarns (ie hairier yarns) have more of these loose, excess fibres, causing more shedding.

Shedding also depends on what is worn under or over the garment, and whether this pulls at the yarn fibres. It’s therefore not possible to guarantee that there will be no shedding

Below are some tips on how to get the best result when working with hairier yarns:

1. When the garment is finished (before you wash it) shake it vigorously so the looser hairs come off. NOTE: do NOT use a lint roller, brush or any method that pulls at the yarn.

2. Place the garment in a plastic bag and put it in your freezer - the temperature will cause the fibres to become less attached to each other, and excess fibres will come off easier.

3. Leave in the freezer for a few hours before taking it out and shaking it again.

4. Wash the garment according to the instructions on the yarn label.

Pilling is a natural process that happens to even the most exclusive of fibers. It's a natural sign of wear and tear that is hard to avoid, and that is most visible in high friction areas of your garment like a sweater's arms and cuffs.

You can make your garment look as new by removing the pilling, using a fabric comb or a pill/lint remover.

Still can't find the answer you need? Then scroll down and leave your question so one of our experts can try to help you. This will be done normally within 5 to 10 working days.
In the meantime, you can read the questions and answers that others have left to this pattern or join the DROPS Workshop on Facebook to get help from fellow knitters/crocheters!

You might also like...

Post a comment to pattern DROPS Extra 0-1324

We would love to hear what you have to say about this pattern!

If you want to leave a question, please make sure you select the correct category in the form below, to speed up the answering process. Required fields are marked *.

Comments / Questions (12)

country flag Christine wrote:

I don’t understand the 2 increases for the first 2 alternate rows. From the photo I see the yarns over one on top of each other. Further more why purl twisted the yarn over before marker ? Are the increases on the back without holes ?

12.02.2023 - 19:26

DROPS Design answered:

Dear Christine, when increasing for raglan with one or 2 yarn overs, all these yarn overs will be purled twisted on next row (from the wrong side) to avoid holes. Happy knitting!

13.02.2023 - 10:21

country flag Cindy Goodman wrote:

What size button is a #600. I need either a mm or inch size

23.02.2022 - 17:00

DROPS Design answered:

Dear Mrs Goodman, please find all our buttons here, including DROPS no 600 = 15 mm. Happy knitting!

24.02.2022 - 10:03

country flag Anna wrote:

Dzien dobry. Co to znaczy ze inaczej dodaje sie oczka na reglan na rekawie a inaczej na przodzie/tyle? Ktory to reglan rekawa a ktory przod/tyl? I co bedzie jesli bede oddawac na reglan tak samo wszedzie? Pozdrawiam Anna

11.04.2021 - 21:57

DROPS Design answered:

Witaj Aniu, oczka na reglan są dodawane w 4 miejscach w przejściach między tyłem/przodami i rękawami. W każdym z tych miejsc są dodawane oczka zgodnie z opisem w części DODAWANIE OCZEK. Przed 1-szym i 3-cim markerem i za 2-gim i 4-tym markerem – są to reglany tyłu i przodu, za 1-szym i 3-cim markerem i przed 2-gim i 4-tym markerem – reglany rękawów. W tym wzorze jest tak, że oczka są dodawane w innej częstotliwości na tyle/przodach, a w innej na rękawach. Najlepiej sobie gdzieś na kartce to zaznaczać, żeby się nie pomylić. Jak będziesz dodawać tak samo wszędzie, to karczek będzie miał inny kształt niż ten we wzorze. Pozdrawiamy!

12.04.2021 - 10:19

country flag Francesca Antonelli wrote:

Buonasera vorrei fare questo modello con cotone Muscad è possibile?

29.03.2020 - 21:08

DROPS Design answered:

Buongiorno Francesca. Muskat è più sottile del filato consigliato nel modello. Se vuole lavorare con il cotone, potrebbe usare il filato Safran (messo doppio), oppure il filato Paris (con 1 capo solo). Verifichi sempre la correttezza del campione. Il suo rivenditore Drops di fiducia è a sua disposizione per aiutarla nella scelta. Buon lavoro!

30.03.2020 - 12:53

country flag Francesca Antonelli wrote:

Buongiorno oleo fare questo cardigan però ho una lana che mi ha regalato mia zia ..come faccio per far combaciare le misure x fare questo modello ? In più è possibile farlo con il collo più alto ?

30.11.2019 - 22:08

DROPS Design answered:

Buonasera Francesca, deve lavorare un campione e controllare che corrisponda a quello indicato. Per le modifiche del collo può rivolgersi al suo rivenditore DROPS di fiducia. Buon lavoro!

30.11.2019 - 22:15

country flag Ines wrote:

Witam. Chciałabym wykonać ten model z włóczki Flora. Jak musiałabym przeliczyć dodawanie oczek na reglan? Może jest identyczny model z włóczki grupy A, żeby uniknąć przeliczeń? Z góry dziękuję za odpowiedź.

28.03.2019 - 11:23

DROPS Design answered:

Witaj Ines! Jak będziesz wykonywać sweterek 2 nitkami włóczki DROPS Flora, to otrzymasz A+A=C, dokładnie jak we wzorze. Dla pewności wykonaj próbkę, jak nie będzie 100% zgodna zmień rozmiar drutów na trochę mniejszy/większy. Nic nie trzeba będzie już zmieniać we wzorze. Powodzenia!

28.03.2019 - 16:06

country flag Lolih wrote:

Bonjour Je voudrais me tricoter un gilet avec la laine Merino extra fine MAIS AVEC 2 AIGUILLES . Je ne sais pas tricoter avec les aiguilles en rond et.. je n,ai pas envie de m,y mettre. Est ce quelqu’une pourrait me donner r un modèle à suivre svp ... mil merci......

21.03.2019 - 16:21

DROPS Design answered:

Bonjour Lolih! Comment adapter un modèle sur aiguille circulaire pour des aiguilles droites vous trouverez ICI. Bon tricot!

22.03.2019 - 07:58

country flag Annette wrote:

Liebes Drops Team, es gibt in dieser Anleitung einen Fehler : Muss es nicht heißen 8 M gleichmäßig verteilt abnehmen und dann im Text danach : 42 glatt re (Rückenteil) ??? Oder mache ich einen Denkfehler ? habe schon gerechnet, komme aber auf kein anderes Ergebnis. Und stimmen denn die folgenden Angaben ?? Vielen Dank und liebe Grüße

06.11.2018 - 17:18

DROPS Design answered:

Liebe Annette, leider verstehe ich nicht Ihre Frage - wie weit sind Sie genau? Bei der Verteilung für die Ärmel, schlägt man 8 M über die stillgelegten Maschen (unter jeden Ärmel). Dann werden bei jedem Ärmel auch 8 M angeschlagen - diese 8 M werden dann unter dem Arm später zusammengenäht.

07.11.2018 - 08:19

country flag Delavenne Quitterie wrote:

Bonjour, au niveau des augmentations il est indiqué de tricoter le jeté torse a l'envers au rang suivant, mais je ne comprends pas, s'agit il de tous les jetés ou juste du jeté réalisé 1 maille après le marqueur ? (si c'est pour tous les jetés il n'y a pas de jour, et n'est ce pas ça qui fait le raglan?). en outre, les augmentations se font toujours par rapport au marqueur. Au fur et a mesure des augmentations on ne change pas la place des marqueurs? Merci beaucoup,

09.05.2018 - 13:19

DROPS Design answered:

Bonjour Mme Delavenne, tous les jetés seront tricotés torse à l'envers au rang suivant. On augmente avec des jetés pour le raglan, et une petite démarcation sera visible de chaque côté des 4 m du raglan (= 2 m avant le marqueur et 2 m après le marqueur). Les marqueurs restent bien en place et ne bougent pas. Bon tricot!

09.05.2018 - 14:19

country flag Anna wrote:

Hey! I'm knitting this cardigan in size M. I have a question considering decreases and increases right after finishing the collar rib and after switching to needle size 5 mm. There is told to decrease evenly 18 stitches and during the next row then to increase evenly 8 stitches again. Why is it so? Why can't I just decrease evenly 10 stitches, and that's all, instead of decreasing and immediately increasing stiches back?

18.03.2017 - 00:29

DROPS Design answered:

Dear Anna, you first work 1 dec row then 1 inc row to give the correct shape to the piece, to make it nicer. Happy knitting!

20.03.2017 - 08:40