DROPS Merino Extra Fine
100% Wool
from 4.55 $ /50g
Get the yarn to make this pattern from 68.25$.

The yarn cost is calculated from the pattern’s smallest size and the yarn’s cheapest product type. Looking for an even better price? You might find it on the DROPS Deals!

DROPS SS24

Silver Rain

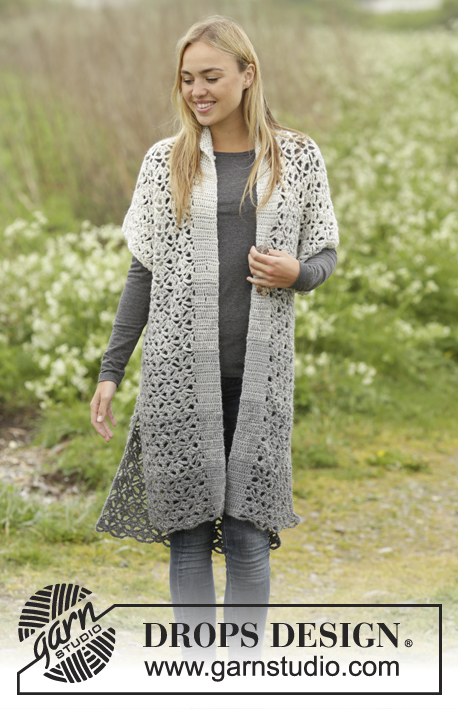
Crochet DROPS jacket with seamless sleeves and wave pattern in ”Merino Extra Fine”. Sizes S/M - XXXL.

DROPS Extra 0-1310
DROPS Design: Model nr me-095
Yarn group B
----------------------------------------------------------
Sizes: S/M - L - XL - XXL - XXXL
Materials:
DROPS MERINO EXTRA FINE from Garnstudio
750-900-1000-1100-1200 g color no 05, light gray

DROPS CROCHET HOOK SIZE 5 mm/H – or size needed to get 14 dc in 10 cm / 4'' in width, or 1 pattern repeat of A.2 in 6 cm / 2 3/8'' in width.
DROPS MOTHER OF PEARL BUTTON: Arched (white) NR 540: 2 pcs in all sizes

-------------------------------------------------------

Alternative Yarn – See how to change yarns here
Yarn Groups A to F – Use the same pattern and change the yarn here
Yarn usage using an alternative yarn – Use our yarn converter here

-------------------------------------------------------

DROPS Merino Extra Fine
100% Wool
from 4.55 $ /50g
Get the yarn to make this pattern from 68.25$.

The yarn cost is calculated from the pattern’s smallest size and the yarn’s cheapest product type. Looking for an even better price? You might find it on the DROPS Deals!

Pattern instructions

NOTE: This pattern is written in American English. All measurements in charts are in cm. For conversion from inches to cm - click here. There are different terms for crocheting in American and British English. If this pattern includes crochet, click for "crochet terms" here. For this pattern in British English, please click here.
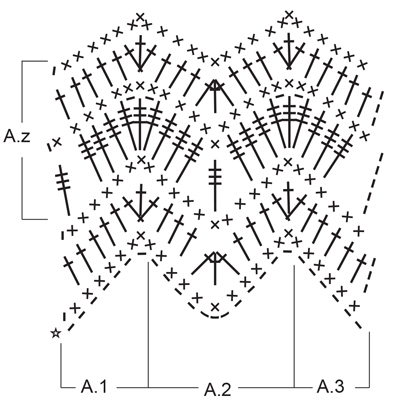
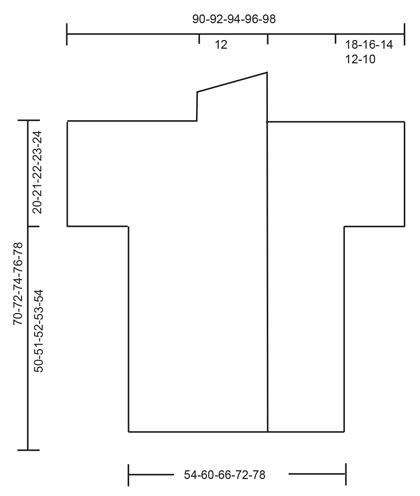
PATTERN:
See diagrams A.1 to A.6.

CROCHET TIP:
Work every row from RS in the back loop of st on previous row and work every row from WS in the front loop of st on previous row. Work every row with sc from WS. Sts that are not worked in diag are worked like the first st in the pattern, i.e. Work the sts in sc on rows with sc in it. NOTE: These sts are also worked in the back and front loop in relation to RS and WS.

CROCHET INFO:
Beg every row with dc with 3 ch (replaces first dc)
Beg every row with sc with 1 ch (replaces first sc)
Beg every row with dtr with 5 ch (replaces first dtr)
----------------------------------------------------------

JACKET:
Work from back piece and up towards the neck, then divide the piece and work down each front piece.

BACK PIECE:
Work 110-122-134-146-158 ch (includes 1 ch for turning) with hook size 5 mm and Merino Extra Fine. Work 1st row of A.1 to A.3 (with sc) from WS as follows: Work A.1 over the 1st 8 ch (includes the ch for turning), then A.2 over the next 96-108-120-132-144 ch (= in total 8-9-10-11-12 times in width), and finish with A.3 over the last 6 ch – READ CROCHET TIP! Continue in pattern like this. Repeat A.z in height. REMEMBER THE CROCHET GAUGE!

When piece measures approx. 50-51-52-53-54 cm / 19 3/4"-20"-20½"-21"-21 1/4" – make sure that next row is a row with dc (= from RS) – cut the thread.

Then work the sleeves as follows: Work 25-22-20-17-14 LOOSE ch, continue working over the back piece from RS like this: Work A.6 over A.3, A.5 over A.2 and A.4 over A.1 - NOTE: Adjust which
row in pattern A.6, A.5 and A.4 to start with so that the pattern
continues with the similar row as before,and finish with 25-22-20-17-14 LOOSE ch (includes 1 ch for turning) – READ CROCHET INFO, turn the piece. Work from RS like this: Work 1 sc in the 2nd ch from hook (= 2 sc), 1 sc in each of the next 23-20-18-15-12 ch, work A.4, A.5 and A.6 as before, work 1 sc in each of the last 25-22-20-17-14 ch = 25-22-20-17-14 sc in each side of the piece and A.4 to A.6 (= in total 159-165-173-179-185 sts). The first and last 25-22-20-17-14 sts are not worked in diag, but like the first st in diag, i.e. Work dtr in i diag work sleeve sts like dtr – REMEMBER THE CROCHET TIP!

Continue like this until work measures in total 70-72-74-76-78 cm / 27½"-28½"-29"-30"-30 3/4", make sure that next row is a row from RS, put piece aside and work the shawl collar.

RIGHT SHAWL COLLAR:
Work 34-39-34-39-34 ch (inkl 3 ch for turning) with hook 5 and Merino Extra Fine. Work 1 dc in the 4th ch from hook (= 2 dc), 1 dc in each of the next 2-0-2-0-2 ch, * skip1 ch, 1 dc in each of the next 6 ch *, repeat from *-* = 28-32-28-32-28 dc.

Then work as follows:
1st ROW (= RS: 5 sc, 5 hdc, 18-22-18-22-18 dc.
2nd ROW (= WS): Work 1 dc in each of the 28-32-28-32-28 sts.
Repeat 1st and 2nd row until piece measures approx. 6-6-7-7-8 cm / 2½"-2½"-2 3/4"-2 3/4"-3" in the most narrow part – make sure to finish with the 2nd row (= WS). Cut and fasten the thread.

RIGHT FRONT PIECE
Then work right front piece tog with the right shawl collar from RS as follows:

Beg on the outermost part of sleeve: Work the first 25-22-20-17-14 sts like the first st in the pattern as before, A.6 as before (= 6 sts), repeat A.5 over the next 36-36-48-48-60 sts (= in total 3-3-4-4-5 times in width), work next A.5 over the next 0-6-0-6-0 sts on the back piece and the first 12-6-12-6-12 dc from the shawl collar, repeat A.5 in total 0-1-0-1-0 more time, A.4 over the next 7 dc, and finish with 9-7-9-7-9 sts like the first st in the pattern (= front band) = repeat A.5 in total 4-5-5-6-6 times in width (= 95-102-102-109-108 sts).

Continue in pattern like this. When piece measures 40-42-44-46-48 cm / 15 3/4"-16½"-17 1/4"-18"-19" from where ch for sleeve were worked (Piece measures in total 90-93-96-99-102 cm / 35½"-36½"-37 3/4"-39"-40"), make sure to work the next row from RS. Cut the thread. Skip the first 25-22-20-17-14 sts (= for sleeve), work A.3 over A.6 (adjust to the row in pattern) and A.5 and A.4 as before, and 9-7-9-7-9 sts like the first st in the pattern (= 70-80-82-92-94 sts).

When piece measures 50-51-52-53-54 cm / 19 3/4"-20"-20½"-21"-21 1/4" from where sts for sleeve were skipped (work measures in total 140-144-148-152-156 cm / 55"-56½"-58"-59 3/4"-61 1/4"), make sure to finish with 1 whole repeat of A.z (make sure the number of repeats in height matches the number of repeats in back piece). Cut and fasten the thread.

LEFT SHAWL COLLAR:
Work 33-37-33-37-33 ch (includes 3 ch for turning) with hook 5 mm and Merino Extra Fine. Work 1 st in the 4th ch from hook (= 2 dc), 1 st in each of the next 1-5-1-5-1 ch, * skip ch 1, 1 dc in each of the next 6 ch *, repeat from *-* = 27-31-27-31-27 dc.

Then work as follows:
1st row (= RS): Work 17-21-17-21-17 dc, 5 hdc and 5 sc.
2nd row (= WS): Work 1 dc in each of the 27-31-27-31-27 sts.
Repeat 1st and 2nd row until work measures approx. 6-6-7-7-8 cm / 2½"-2½"-2 3/4"-2 3/4"-3" in the most narrow part – make sure to finish with 2nd row (= WS).

LEFT FRONT PIECE:
Do not work any longer over the mid 24 sts (= 2 repeats of A.5) = neck.

Work left front piece tog with left shawl collar from RS like this: work the first 9-7-9-7-9 sts from shawl collar like the first st in the pattern, A.6 over the next 6 dc from shawl collar, A.5 in total 0-1-0-1-0 time over shawl collar, repeat A.5 over the next 12-6-12-6-12 dc from shawl collar, skip 24 sts for neck between the right and left front piece (= 2 repeats of A.5), work the remaining 0-6-0-6-0 sts of A.5 over de first 0-6-0-6-0 dc from front piece, repeat A.5 over de next 36-36-48-48-60 sts, A.4 over the next 7 sts, work the next 25-22-20-17-14 sts like the first st in the pattern as before= repeat A.5 in total 4-5-5-6-6 times in width (= 95-102-102-109-108 sts).

Continue in pattern like this. When piece measures 40-42-44-46-48 cm / 15 3/4"-16½"-17 1/4"-18"-19" from where ch for sleeve were worked (work measures in total 90-93-96-99-102 cm / 35½"-36½"-37 3/4"-39"-40"), make sure that next row is a row from RS. Work like this from RS: Work 9-7-9-7-9 sts like the first st in diag as before, A.6 as before, repeat A.5 as before, Work A.1 over A.4, turn and work back again (= 70-80-82-92-94 sts). I.e. do not work any longer over the last 25-22-20-17-14 sts (= sleeve).

When piece measures 50-51-52-53-54 cm / 19 3/4"-20"-20½"-21"-21 1/4" from where sts for sleeve were skipped (Work measures in total 140-144-148-152-156 cm / 55"-56½"-58"-59 3/4"-61 1/4"), make sure to finish with 1 whole repeat of A.z (adjust the pattern after right front piece). Cut and fasten the thread.

ASSEMBLY:
Start at the bottom and work the sides together through both layers from WS as follows: 1 sc, * ch 3, skip 1 cm / 3/8'', 1 sc around next row *, repeat from *-* along the whole side and finish with 1 sc. Continue working under sleeve through both layers as follows: * ch 1, 1 sc in the next st *, repeat from *-* and make sure to finish with 1 sc. Work the collar together mid back like this: 1 sc, * ch 1, 1 sc in the next dc *, repeat from *-*. Sew the collar to the neck. Fold an edge on the sleeves and fasten with a stitch to keep the edge up. Sew on buttons. The buttons are buttoned through the row of dtr on the front band.

Diagram

All measurements in charts are in cm.

symbols = sc in the front loop of st (= from WS)
symbols = ch
symbols = dc in back loop of st (= from RS)
symbols = dtr in back loop of st (= from RS)
symbols = the row of ch is explained in the pattern
diagram
diagram
diagram
Do you have a question? See a list of frequently asked questions (FAQ)

Knitting tension is what determines the final measurements of your work, and is usually measured per 10 x 10 cm. It is provided like so: number of stitches in width x number of rows in height - eg: 19 stitches x 26 rows = 10 x 10 cm.

The knitting tension is very individual; some people knit/crochet loosely while others work tightly. You adjust the knitting tension with the needle size, which is why the suggested needle size only serve as a guide! You need to adjust this (up or down) to ensure that YOUR knitting tension matches the knitting tension provided in the pattern. If you work with a different knitting tension than provided you will have a different yarn consumption, and your work will have different measurements than what the pattern suggests.

The knitting tension also determines which yarns can replace each other. As long as you achieve the same knitting tension you can replace one yarn with another.

See DROPS lesson: How to measure your tension/gauge

See DROPS video: How to make a gauge tension swatch

The required amount of yarn is provided in grams, eg: 450 g. To calculate how many balls you’ll need you first need to know how many grams are in 1 ball (25g, 50g or 100g). This information is available if you click on the individual yarn quality on our pages. Divide the amount required with the amount of each ball. For example, if each ball is 50g (the most common amount), the calculation will be as follows: 450 / 50 = 9 balls.

The important thing when changing from one yarn to another is that the knitting/crochet tension remains the same. This is so that the measurements of the finished piece will be the same as on the sketch provided. It is easier to achieve the same knitting tension using yarns from the same yarn group. It is also possible to work with multiple strands of a thinner yarn to achieve the knitting tension of a thicker one. Please try our yarn converter. We recommend you to always work a test swatch.

Please NOTE: when changing yarn the garment might have a different look and feel to the garment in the photo, due to individual properties and qualities of each yarn.

See DROPS lesson: Can I use a different yarn than the one mentioned in the pattern?

All our yarns are categorised into yarn groups (from A to F) according to thickness and knitting tension – group A contains the thinnest yarns and group F the thickest. This makes it easier for you to find alternative yarns to our patterns, should you wish to switch yarn. All yarns within the same group have a similar knitting tension and can easily replace each other. However, different yarn qualities have different structures and properties which will give the finished work a unique look and feel.

Click here for an overview of the yarns in each yarn group

At the top of all our patterns you’ll find a link to our yarn converter, which is a helpful tool should you wish to use a different yarn than suggested. By filling in the yarn quality you wish to replace, the amount (in your size) and number of strands, the converter will present good alternative yarns with the same knitting tension. Additionally it will tell you how much you’ll require in the new qualities and whether you’ll need to work with multiple strands. Most skeins are 50g (some are 25g or 100g).

If the pattern is worked with multiple colours, every colour will have to be converted separately. Similarly, if the pattern is worked with several strands of different yarns (for example 1 strand Alpaca and 1 strand Kid-Silk) you will have to find alternatives for each, individually.

Click here to see our yarn converter

Since different yarns have different qualities and textures we have chosen to keep the original yarn in our patterns. However, you can easily find options among our available qualities by using our yarn converter, or simply pick a yarn from the same yarn group.

It is possible that some retailers still have discontinued yarns in stock, or that someone has a few skeins at home that they would like to find patterns for.

The yarn converter will provide both alternative yarn as well as required amount in the new quality.

If you think it's hard to decide what size to make, it can be a good idea to measure a garment you own already and like the size of. Then you can pick the size by comparing those measures with the ones available in the pattern's size chart.

You'll find the size chart at the bottom of the pattern.

See DROPS lesson: How to read size chart

The needle size provided in the pattern serves only as a guide, the important thing is to follow the knitting tension. And since knitting tension is very individual, you will have to adjust the needle size to ensure that YOUR tension is the same as in the pattern – maybe you’ll have to adjust 1, or even 2 needle sizes, up or down to achieve the correct tension. For this, we recommend that you work test swatches.

Should you work with a different knitting tension than the one provided, the measurements of the finished garment might deviate from the measurement sketch.

See DROPS lesson: How to measure your tension/gauge

See DROPS video: How to make a gauge tension swatch

Working a garment top-down provides more flexibility and room for personal adjustment. For example it is easier to try the garment on while working, as well as making adjustments to length of yoke and shoulder caps.

The instructions are carefully explaining every step, in the correct order. Diagrams are adjusted to the knitting direction and are worked as usual.

The diagram depicts all rows/rounds, and every stitch seen from the right side. It is read from bottom to top, from right to left. 1 square = 1 stitch.

When working back and forth, every other row is worked from the right side and every other row is worked from the wrong side. When working from the wrong side, the diagram will have to be worked reversed: from left to right, knit stitches are purled, purl stitches are knit etc.

When working in the round every round is worked from the right side and the diagram are worked from right to left on all rounds.

See DROPS lesson: How to read knitting diagrams

The diagram depicts all rows/rounds, and every stitch seen from the right side. It is worked from bottom to top, from right to left.

When working back and forth every other row is worked from the right side: from right to left and every other row is worked from the wrong side: from left to right.

When working in the round, every row in the diagram are worked from the right side, from right to left.

When working a circular diagram you start in the middle and work your way outwards, counter clockwise, row by row.

The rows usually start with a given number of chain stitches (equivalent to the height of the following stitch), this will either be depicted in the diagram or explained in the pattern.

See DROPS lesson: How to read crochet diagrams

Instructions for working several diagrams after each other on the same row/round, will often be written like so: “work A.1, A.2, A.3 a total of 0-0-2-3-4 times". This means you work A.1 once, then A.2 is worked once, and A.3 is repeated (in width) the number of times provided for your size – in this case like so: S = 0 times, M = 0 times, L=2 times, XL= 3 times and XXL = 4 times.

The diagrams are worked as usual: begin with the first row in A.1, then work the first row in A.2 etc.

See DROPS lesson: How to read knitting diagrams

See DROPS lesson: How to read crochet diagrams

The total width of the garment (from wrist-to-wrist) will be larger in the larger sizes, despite the actual sleeves being shorter. The larger sizes have longer sleeve caps and wider shoulders, so there will be a good fit in all sizes.

The measurement sketch/schematic drawing provides information regarding the full length of the garment. If it’s a jumper or a jacket the length is measured from the highest point on the shoulder (usually closest to the neckline), and straight down to the bottom of the garment. It is NOT measured from the tip of shoulder. Similarly, the length of yoke is measured from the highest point on the shoulder and down to where yoke is split into body and sleeves.

See DROPS lesson: How to read a schematic drawing

Diagrams are often repeated on the round or in height. 1 repeat is the diagram the way it appears in the pattern. If it says to work 5 repeats of A.1 in the round, then you work A.1 a total of 5 times after/next to each other in the round. If it says to work 2 repeats of A.1 vertically/in height you work the entire diagram once, then begin again at the start and work the entire diagram one more time.

Chain stitches are slightly narrower than other stitches and to avoid working the cast-on edge too tight, we simply chain more stitches to begin with. The stitch count will be adjusted on the following row to fit the pattern and measurement sketch.

The rib edge is more elastic and will contract slightly compared to, for example, stocking stitch. By increasing before the rib edge, you avoid a visible difference in width between the rib edge and the rest of the body.

It’s very easy to cast off too tightly, and by making yarn overs while casting off (and simultaneously casting these off) you avoid a too tight cast off edge.

See DROPS video: How to bind off with yarn overs (yo)

To achieve an even increase (or decrease) you can increase on, for example: every 3rd and 4th row alternately, like so: work 2 rows and increase on the 3rd row, work 3 rows and increase on the 4th. Repeat this until the increase is complete.

See DROPS lesson: Increase or decrease 1 st on every 3rd and 4th row alternately

Should you prefer to work in the round instead of back and forth, you may of course adjust the pattern. You’ll need to add steeks mid-front (usually 5 stitches), and follow the instructions. When you would normally turn and work from the wrong side, simply work across the steek and continue in the round. At the end you’ll cut the piece open, pick up stitches to work bands, and cover the cut edges.

See DROPS video: How to knit steeks and cut open

Should you prefer to work back and forth instead of in the round, you may of course adjust the pattern so you work the pieces separately and then assemble them at the end. Divide the stitches for the body in 2, add 1 edge stitch in each side (for sewing) and work the front and back pieces separately.

See DROPS lesson: Can I adapt a pattern for circular needles into straight needles?

Pattern repeats can vary slightly in the different sizes, in order to get the correct proportions. If you’re not working the exact same size as the garment in the photo, yours might deviate slightly. This has been carefully developed and adjusted so that the complete impression of the garment is the same in all sizes.

Make sure to follow instructions and diagrams for your size!

If you have found a pattern you like which is available in women’s size it’s not very difficult to convert it to men’s size. The biggest difference will be the length of sleeves and body. Start working on the women size that you think would fit across the chest. The additional length will be worked right before you cast off for the armhole/sleeve cap. If the pattern is worked top-down you can add the length right after the armhole or before the first decrease on sleeve.

Regarding additional yarn amount, this will depend on how much length you add, but it is better with a skein too many than too few.

All yarns will have excess fibres (from production) that might come off as lint or shedding. Brushed yarns (ie hairier yarns) have more of these loose, excess fibres, causing more shedding.

Shedding also depends on what is worn under or over the garment, and whether this pulls at the yarn fibres. It’s therefore not possible to guarantee that there will be no shedding

Below are some tips on how to get the best result when working with hairier yarns:

1. When the garment is finished (before you wash it) shake it vigorously so the looser hairs come off. NOTE: do NOT use a lint roller, brush or any method that pulls at the yarn.

2. Place the garment in a plastic bag and put it in your freezer - the temperature will cause the fibres to become less attached to each other, and excess fibres will come off easier.

3. Leave in the freezer for a few hours before taking it out and shaking it again.

4. Wash the garment according to the instructions on the yarn label.

Pilling is a natural process that happens to even the most exclusive of fibers. It's a natural sign of wear and tear that is hard to avoid, and that is most visible in high friction areas of your garment like a sweater's arms and cuffs.

You can make your garment look as new by removing the pilling, using a fabric comb or a pill/lint remover.

Still can't find the answer you need? Then scroll down and leave your question so one of our experts can try to help you. This will be done normally within 5 to 10 working days.
In the meantime, you can read the questions and answers that others have left to this pattern or join the DROPS Workshop on Facebook to get help from fellow knitters/crocheters!

You might also like...

Post a comment to pattern DROPS Extra 0-1310

We would love to hear what you have to say about this pattern!

If you want to leave a question, please make sure you select the correct category in the form below, to speed up the answering process. Required fields are marked *.

Comments / Questions (13)

country flag Loretta Morandin wrote:

I tried to comment but each time it was too long and then it said I was a spammer so now I dont care about drawing the mistake to your attention.

20.02.2017 - 08:41

DROPS Design answered:

Dear Mrs Morandin, you can try again to shorten your comment or then send your feedback to your Drops store, who will forward us. Thank you. Happy crocheting!

20.02.2017 - 11:01

country flag Mrs Yearick wrote:

Im having trouble doing the back of this pattern. The crochet tips say to crochet stitches not shown in pattern as is the first stitch in pattern, however the sides of the back keep growing on the diagonal. I've gone from 6 stitches to over 10 in less than 6 rows. If I do as the pattern shows I would then have hanging left over stitches on each side. How is the correct way to work the beginning and ending 6 stitches?

12.02.2017 - 17:56

DROPS Design answered:

Dear Mrs Yearick, you should always have the same number of sts and repeat in width, and it should be "straight". Sarting from WS work: A.1 (= over the first 8 chains/sts), repeat A.2 a total of 8-12 times (see size), and finish with A.3 (= over the last 6 chains/sts). From RS work: A.3, repeat A.2 and finish with A.1. Then repeat the last 4 rows in diagram (= A.z). Happy crocheting!

13.02.2017 - 11:32

country flag Susan Schünemann wrote:

Hallo, ich habe Probleme, den Kragen und das Vorderteil zusammen zu bekommen. Ist es richtig, dass die Blende nur über den Kragen gehäkelt wird und nicht über das Rückenteil? Und wie wird dann zu Schluss der Kragen an den Halsausschnitt genäht? Da sind doch nur 24 Maschen "frei". Bis hierhin bin ich super klargekommen, aber dieser Schritt will mir nicht gelingen. Vielen Dank für die Hilfe!

23.01.2017 - 07:24

DROPS Design answered:

Liebe Frau Schünemann, wenn Sie das rechte Vorderteil häkeln, wird der 1. Reihe von dem Ärmel anfangen, dann mit A.5 über die ersten Stb des Schalkragens, A.4 häkeln, und mit den Blendemasschen enden, so werden alle M von dem Kragen gehäkelt. Viel Spaß beim häkeln!

23.01.2017 - 11:08