
Oblíbené kategorie
Hledáte přízi?


|
||||||||||||||||||||||
Newport |
||||||||||||||||||||||
|
|
||||||||||||||||||||||
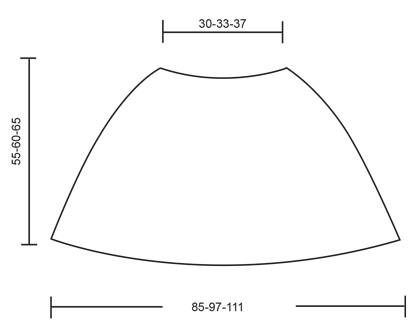
DROPS pončo s pruhy háčkované shora dolů z příze "Big Merino". Velikost: S - XXXL.
DROPS Extra 0-1309 |
||||||||||||||||||||||
|
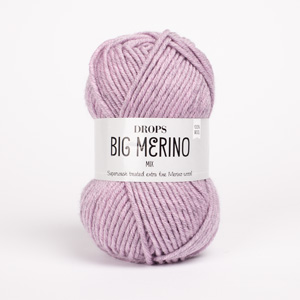
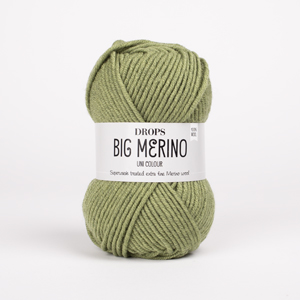
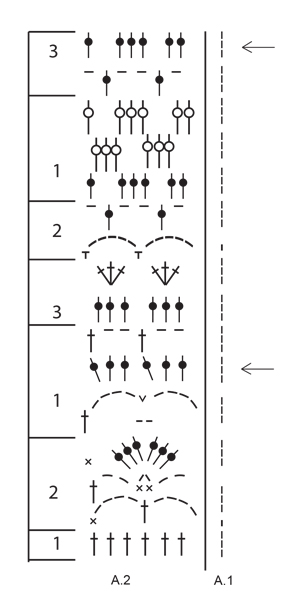
VZOR: Viz schéma A.2. Začátek kruhové řady leží za vzorem A.1. Kruhovou řadu končíme 1 pevným okem do 1./3. řo v kruhové řadě. SLED PRUHŮ: Pončo háčkujeme v barevných pruzích, viz č. 1-3 ve schématu. Barva č. 1 = smetanová. Barva č. 2 = béžová. Barva č. 3 = levandule. TIP - PŘIDÁVÁNÍ: Přidáváme rozháčkováním 1 DS na dva (tj. do 1 DS uháčkujeme 2 DS). ---------------------------------------------------------- PONČO: Háčkujeme v kruhových řadách shora dolů. Barvy střídáme dle SLEDU PRUHŮ – viz výše. Háčkem č. 5,5 uháčkujeme smetanovou přízí 92-99-113 řo a spojíme je pevným okem do kroužku. Pak 1 DS do 1. řo, *1 řo vynecháme, po 1 DS do každého z dalších 6 řo*, *-* opakujeme = 79-85-97 DS. Pokračujeme takto: vzor A.1 (= 1 DS), vzor A.2 nad zbylými DS, začínáme 2. kruhovou řadou ze schématu (= v kruhové řadě máme 13-14-16 sekvencí vzoru). V řadách označených šipkou přidáme nad DS ve vzoru A.2 rovnoměrně 36-42-48 DS – viz TIP - PŘIDÁVÁNÍ, po každém přidávání háčkujeme o 6-7-8 sekvencí vzoru A.2 více (tj. po prvním přidávání háčkujeme 19-21-24 sekvencí vzoru A.2, po dalším přidávání háčkujeme 25-28-32 sekvencí vzoru A.2). Po dokončení 1 celé sekvence vzoru A.2 (na výšku) máme v kruhové řadě 151-169-193 DS. Uháčkujeme ještě 1 celou sekvenci vzoru A.2 (na výšku) a přidáváme stejně jako před tím = v kruhové řadě máme 223-253-289 DS. Nyní uháčkujeme ještě 0-1-2x posledních 5 kruhových řad vzoru A.2 (bez přidávání). Nakonec uháčkujeme první 4 kruhové řady vzoru A.2 a poté práci ukončíme. LEM PRŮKRČNÍKU: Smetanovou přízí uháčkujeme po 1 KS do každého řo z počáteční řetízkové řady. Pak práci ukončíme. |
||||||||||||||||||||||
Vysvětlivky ke schématu |
||||||||||||||||||||||
|
||||||||||||||||||||||
|
||||||||||||||||||||||
|
||||||||||||||||||||||
|
Vyrobili jste si tento nebo nějaký jiný z našich modelů? Přidejte ke svým fotkám na sociálních sítích tag #dropsdesign - díky tomu je uvidíme i my! Potřebujete s tímto návodem poradit?Otevřete-li si návod na stránce garnstudio.com, najdete tam výukových video-ukázek, Komentáře/Dotazy a další užitečné informace. © 1982-2024 DROPS Design A/S. Vyhrazujeme si veškerá práva. Tento dokument, včetně všech jeho dílčích částí, podléhá autorským právům. Podrobnější komentář k možnostem užití našich návodů najdete dole pod každým návodem na našich stránkách. |
||||||||||||||||||||||


V oblasti pletené a háčkované módy působí DROPS Design více než 40 let. Díky tomu vám můžeme nabídnout jednu z nejrozsáhlejších kolekcí modelů s bezplatnými návody dostupnými na internetu - navíc v 17 jazycích. K dnešnímu dni máme na 304 katalogů a 11422 návodů celkem - z nich je už 6300 dostupných v češtině.
Komentáře / Otázky (21)
In het patroon staat “ Meerder op de toer met een pijl 36-42-48 stk gelijkmatig over stk in A.2”. Helaas snap ik niet wat hier mee moet doen als ik het diagram bekijk. Kunt u mij verder helpen? Groeten, Mieke
01.04.2022 - 21:18DROPS Design answered:
Dag Mieke,
Op die toeren meerder je het aantal aangegeven steken , gelijkmatig verspreid over de toer. Je meerdert door 2 stokjes in 1 steek te haken.
04.04.2022 - 11:46Tusen takk for vennlig og lynraskt svar. Jeg har også et spørsmål til 3. siste og nestsiste rad i A2: I nestsiste rad sier diagrammet at det skal hekles staver i luftmasker. Men jeg ser ikke at det blir noen luftmasker å hekle dem i? Ifølge diagrammet skal det så vidt jeg forstår bare være staver i 3. siste rad i A. Så jeg valgte å sette stavene i nestsiste rad mellom stavgruppene (og det går jo bra). Men har jeg oversett / misforstått noe? Eller er symbolet feil?
18.01.2022 - 14:23DROPS Design answered:
Hei Lisen. Du har valgt helt riktig (hekle stav mellom hver stavgruppe siden det ikke er en luftmaske å hekle om). mvh DROPS Design
25.01.2022 - 10:25Hei Drops, tusen takk for alle deres fantastiske mønstre og ditto kundestøtte! Mitt spørsmål: Økning skal skje ved at det hekles to st i en. Men jeg skjønner ikke hvordan det skal la seg gjøre her? Bir det ikke bare å slå ekstra staver rundt lm-buene?
16.01.2022 - 10:52DROPS Design answered:
Hei Lisen. Jo, her burde øketipset vært omformulert til at det økes ved å hekle 1 ekstra stav om luftmasken / luftmaskebuen. Eller bare å fjerne øketipset, som vi når har gjort. Takk for at du gjorde oss oppmerksom på dette. mvh DROPS Design
18.01.2022 - 09:49Bonjour merci pour votre retour. Cependant, ce n'est toujours pas clair parce que vous dites qu'il faut crocheter soit 3 soit 4 brides dans chaque arceau. Or avec un départ de 79 brides, il n'y a que 26 arceaux. Donc si on augmente d'une bride dans chaque arceau, on n'augmente que de 26 brides au lieu de 36. Donc pour chaque arceau, il faut augmenter d'une ou de deux brides et on aura soit 4 ou 5 brides par arceau? Ca fait quand même une fameuse augmentation pour un rang.
10.06.2021 - 17:09DROPS Design answered:
Bonjour Romane, tout à fait, dans ce cas, si vous comptez par arceau, vous aurez 1 bride de A1. + 10 fois 5 brides + 16 fois 4 brides dans chacun des arceaux de A.2 - crochetez ainsi alternativement 4 ou 5 brides autour de chacun des arceaux en les espaçant à intervalles réguliers. Bon crochet!
11.06.2021 - 07:52Bonjour, Y aurait-il moyen que vous fassiez un tutoriel vidéo pour les premiers rangs, et surtout pour le rang d'augmentation? Merci d'avance,
10.06.2021 - 11:39DROPS Design answered:
Bonjour Romane, cette leçon explique comment répartir des augmentations, autrement dit, aux rangs indiqués par une flèche, vous crochèterez soit 3 brides dans chaque arceau (= comme dans le diagramme), soit 4 brides (= 1 augmentation). Est-ce plus facile à comprendre ainsi? Bonne continuation!
10.06.2021 - 13:24A1 means chain in each round? Why do we need it?
27.11.2020 - 13:15DROPS Design answered:
Dear Oshrat, A.1 indicates the beginning of each round. It may start with 1 chain or 3 chains (= 1 treble stitch). Happy crocheting!
29.11.2020 - 18:46I'm having trouble doing the first row. Am I supposed to make one chain between the six dc block ???
14.06.2020 - 01:04DROPS Design answered:
Dear Claudia, to avoid a tight edge and since the foundation chain is often quite too tight, you crochet here more chains than you need sts on first round, and, on first dc round you will skip 1 chain after every 6 trebles so that you get the correct number of sts/width at the end, just skip every 7th chain as explained and check/keep your tension. Happy crocheting!
15.06.2020 - 09:24In the row of first increase, i am not getting 19 repetitions i did increase in each diuble croxhet of the row before (12 dc), i get 13 repetitions not 19 what am i doing wrong??
09.09.2019 - 20:08DROPS Design answered:
Dear Amany, before the first increase you should have 13 repeats in width, on first increase row you should have 6 dc in each A.2 but you have to increase evenly 36 dc (read how to increase evenly here ) = 115 dc in total, ie you have now enough stitches to work 19 repeats of A.2. Happy crocheting!
10.09.2019 - 08:47Buongiorno. Come si fa a lavorare 2 m.a. in 1 m.a. nei giri indicati dalla freccia se nel.giro prima non ci sono maglie alte? Grazie
26.06.2019 - 14:15DROPS Design answered:
Buongiorno Monica. Lavora a intervalli regolari 1 maglia alta in più negli archi di catenelle. Buon lavoro!
26.06.2019 - 15:14Bonjour pouvait vous me détailer le chema mieux merci
25.03.2019 - 12:47DROPS Design answered:
Bonjour Mme Potier, vous trouverez ici quelques indications complémentaires sur la lecture des diagrammes. Bon crochet!
25.03.2019 - 13:17