DROPS Nepal
DROPS Nepal
65% Wool, 35% Alpaca
from 2.40 £ /50g
Get the yarn to make this pattern from 33.60£.

The yarn cost is calculated from the pattern’s smallest size and the yarn’s cheapest product type. Looking for an even better price? You might find it on the DROPS Deals!

DROPS SS24

Harvest Love

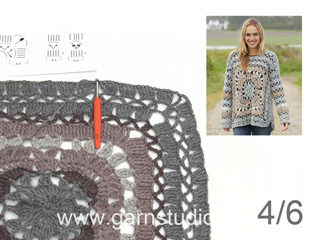
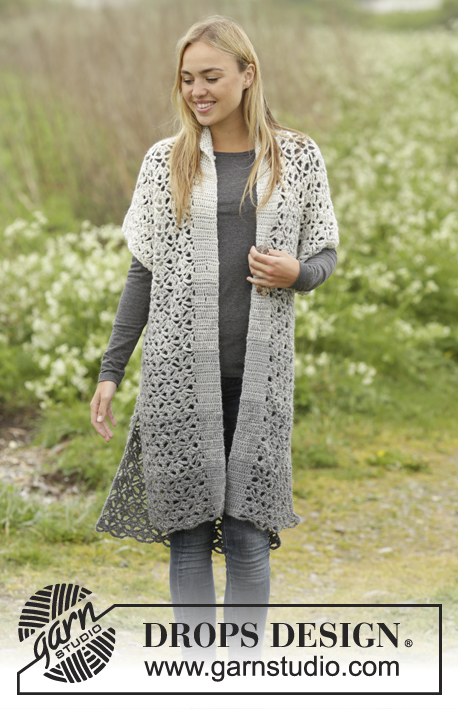
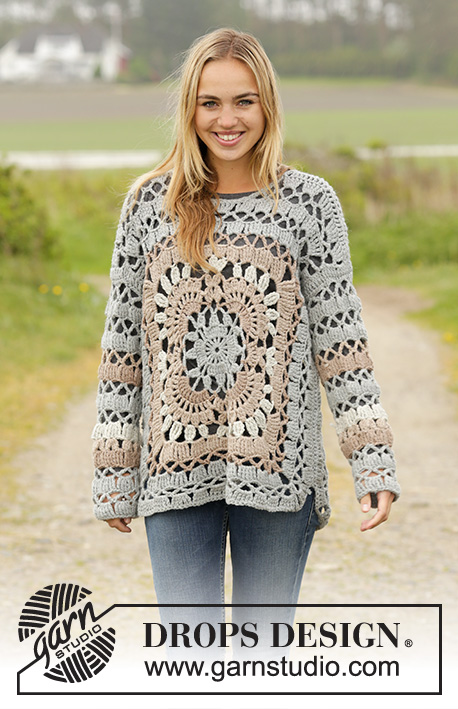
Crochet DROPS jumper with crochet squares and lace pattern in ”Nepal”. Size: S - XXXL.

DROPS 171-35
DROPS design: Pattern no ne-215
Yarn group C or A + A
----------------------------------------------------------
Size: S/M - L/XL - XXL/ XXXL
Materials:
DROPS NEPAL from Garnstudio
400-500-600 g colour no 0501, grey
150-200-200 g colour no 0300, beige
100-100-100 g, colour no 0618, camel
50-100-100 g colour no 0500, light grey

DROPS CROCHET HOOK SIZE 5.5 mm – or size needed to get 13 dtr/triple tr = width 10 cm. Diagram A.5 (= 2 rows/rounds) measures approx. 5 cm vertically.

-------------------------------------------------------

Alternative Yarn – See how to change yarns here
Yarn Groups A to F – Use the same pattern and change the yarn here
Yarn usage using an alternative yarn – Use our yarn converter here

-------------------------------------------------------

DROPS Nepal
DROPS Nepal
65% Wool, 35% Alpaca
from 2.40 £ /50g
Get the yarn to make this pattern from 33.60£.

The yarn cost is calculated from the pattern’s smallest size and the yarn’s cheapest product type. Looking for an even better price? You might find it on the DROPS Deals!

Pattern instructions

NOTE: This pattern is written in British English. All measurements in charts are in cm. For conversion from cm to inches - click here. There are different terms for crocheting in British and American English. If this pattern includes crochet, click for "crochet terms" here. For this pattern in American English, please click here.
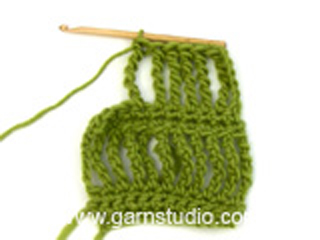
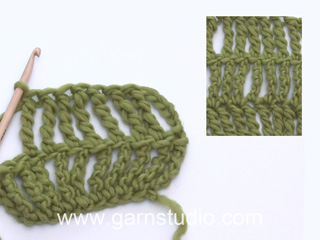
PATTERN:
See diagrams A.1 to A.9.

COLOURS-1 (front/back piece):
Rounds 1-3: grey
Round 4: camel
Rounds 5-6: beige
Round 7: light grey
Round 8: beige
Round 9: camel
Round 10: grey
Then work with grey.

COLOURS-2 (sleeves):
Work with grey to and with 5th-3rd-3rd round. Then 1 round beige, 1 round camel, 3 rounds grey, 1 round light grey, 1 round beige and 1 round camel. Continue with grey.

CROCHET INFO-1:
Replace first dtr at beg of every dtr round/row with 4 ch. Finish round with 1 sl st in 4th ch.
Replace first triple tr at beg of every triple tr round/row with 5 ch. Finish round with 1 sl st in 5th ch, work sl sts until beg of next dtr.

CROCHET INFO-2 (applies to shoulder):
At beg of every row with dtr work 4 ch, finish row with 1 dtr in last triple tr on row.
Beg every row with triple tr with 5 ch, finish row with 1 triple tr in last dtr on row.

DECREASE TIP:
Work 1 triple tr but wait with last pull through (= 2 sts on hook), then work next triple tr but on last pull through, pull yarn through all sts on hook = 1 tr dec.

DTR TOG:
3 dtr tog into 1 dtr as follows: Work 1 dtr but wait with last YO and pull through, work 1 more dtr the same way, work 1 dtr more but now pull last YO through all sts on hook.

TRIPLE TR TOG:
Work 3 triple tr into 1 triple tr as follows: Work 1 triple tr but wait with last YO and pull through, work 1 more triple tr the same way, work 1 triple tr more but now pull last YO through all sts on hook.

5-DTR:
Make 5 YOs on hook, get the yarn under ch-space, * 1 YO on hook, pull yarn through the next 2 sts on hook *, repeat from *-* 5 more times = 1 st on hook.

4-DTR:
Make 4 YOs on hook, get the yarn under ch-space, * 1 YO on hook, pull yarn through the next 2 sts on hook *, repeat from *-* 4 more times = 1 st on hook.

4-DTR TOG:
Work 3 4-dtr into 1 4-dtr as follows: ** Make 4 YOs on hook, get the yarn under ch-space, * 1 YO on hook, pull yarn through the next 2 sts on hook *, repeat from *-* 3 more times, **, repeat from **-** 2 more times (= 4 sts on hook), 1 YO on hook, pull through all sts = 1 st on hook.
----------------------------------------------------------

FRONT PIECE:
First work a square the same way in all sizes. Then work in the round and back and forth on square (different in the different sizes).

SQUARE:
Work 6 ch on hook size 5.5 mm with grey and form a ring with 1 sl st in first ch. Continue in the round according to diagram A.1 - READ CROCHET INFO-1 and COLOURS-1. Then work A.2, A.3 3 times in total in width, finish with A.4. REMEMBER THE CROCHET TENSION! When A.2-A.4 have been worked, there are 55 triple tr along each side, and 4 corner spaces. Square measures approx. 48 x 48 cm.

SIZE S/M:
Then work in the round according to A.5 over triple tr along each side, around each corner space work A.6. When A.5/A.6 have been worked, 10 triple tr have been inc along each side (= 65 triple tr). Cut the yarn.
Now work left shoulder along side-1 (see chart) beg from WS as follows: The middle 9 triple tr are no longer worked (= neck). Beg to work in next triple tr as follows: Work A.8 over the first 13 triple tr, A.5 the entire row as before, around corner space work A.5 (dtr on 1st row in A.5 work around ch-space). When A.5 has been worked vertically, work 1 row as follows: Work 1 dtr in each triple tr Cut the yarn.
Now work right shoulder along the end of side 1, beg from corner from WS: - READ CROCHET INFO-2. Work A.5 over ch-space, A.5 until 13 triple tr remain before neck (= 9 triple tr), work A.7 over the next 13 triple tr. When A.5 has been worked vertically, work 1 row with 1 dtr in every triple tr. Fasten off.

SIZE L/XL - XXL/XXXL:
Then work in the round according to A.5 over triple tr along each side, around each corner space work A.6. When A.5/A.6 have been worked, 10 triple tr have been inc along each side (= 65 triple tr). Cut the yarn.
Now work back and forth along the end of side 1 (see chart), then work along side 2, 3, 4 and beg of side1 beg from WS as follows: The middle 9 triple tr are no longer worked (= neck). Beg to work in next triple tr as follows: Work A.8 over the first 13 triple tr, A.5 the rest of row as before, then work A.6 around the corners and A.5 along the sides as before - work like this back and forth to and with last corner (i.e. along side 2, 3 and 4), then work along the beg of side 1 as follows: A.5 until 13 triple tr remain before neck (= 9 triple tr), work A.7 over the next 13 triple tr. When A.7/A.8 have been worked vertically, there are 75 triple tr along side 2, 3 and 4, and 25 triple tr on each side of neck. Now work differently in the different sizes.

SIZE L/XL (shoulder):
Now work left shoulder, from WS as follows: - READ CROCHET INFO-2. Work 1 dtr in every triple tr the rest of row on side 1, around first ch-space in corner space work 5 dtr. Fasten off. Work right shoulder the same way, but beg around corner space at beg of side 1 from WS.

Size XXL/XXXL: Next row beg from WS. Work A.5 over A.8, continue A.5 along side 1, 2, 3, 4 and 1 and A.6 around corners as before, finish with A.5 over A.7. When A.5/A.6 have been worked 1 time vertically, work shoulder the same way as in size L/XL, fasten off.

BACK PIECE:
Work the same way as front piece but without dec for neck, i.e. work A.5 over all sts along side 1 (instead of A.7/neck/A.8).

ASSEMBLY:
Sew shoulder seams in front loop of outermost sts. Sew side seam as follows: Beg approx. 8 cm from bottom edge (= vent), and sew up to approx. 19-21-23 cm remain until shoulder (= armhole).

SLEEVE:
Work in the round from armhole and outwards. Beg from mid under armhole in the side. Work 50-55-60 dtr on hook size 5.5 mm with grey evenly around armhole (work in/around triple tr/ch-space) - READ COLOURS-2 and remember CROCHET INFO-1!
READ ALL OF SLEEVE BEFORE CONTINUING!
Work as follows: Work A.5 (= 10-11-12 repetitions in width). Continue in the round until 5-4-4 repetitions have been worked vertically, then work A.9 over A.5 1 time in total vertically, and A.5 over A.9 2 times in total vertically, then size L/XL work 1 round with 1 dtr in every triple tr.
AT THE SAME TIME dec 5 triple tr evenly on round with triple tr (= 1 repetition less on every round with dec) as follows:
SIZE S/M: 5th, 7th and 13th round.
SIZE L/XL-XXL/XXXL: 5th, 7th, 11th and 13th round.
When all dec are done, there are 35-35-40 triple tr on round (= 7-7-8 repetitions in width).
Fasten off, sleeve measures approx. 43-40-38 cm (shorter measurements in the larger sizes because of wider shoulders). Work another sleeve the same way.

NECK EDGE:
Work an edge around the neck opening with grey. Start on shoulder and work as follows: * 1 dc around outermost st, 2 ch, skip approx. 1½ cm *, repeat from *-* around the entire opening, finish with 1 sl st in first dc. Fasten off.

Diagram

symbols = ch
symbols = sl st
symbols = dc around ch-space
symbols = dtr in dt
symbols = dtr around ch-space
symbols = triple tr around ch/ch-space
symbols = triple tr in st
symbols = 4-DTR around ch-space/between 2 dtr in corner - see explanation in pattern
symbols = 3 DTR TOG (around ch/ch-space) - see explanation in pattern
symbols = 3 DTR TOG (in st) - see explanation in pattern
symbols = 3 TRIPLE TR TOG (around ch-space) - see explanation in pattern
symbols = 3 4-DTR TOG (around ch-space) - see explanation in pattern
symbols = 5-DTR around ch-space
symbols = shows last round/row on previous diagram, round/row has already been worked
symbols = on next repetition of this round/row vertically work the 2 tr-group around their own ch-space (on each side of 4-dtr)
symbols = 6 ch, 1 sl st in first ch (see point on circle, round beg and ends here)
symbols = crochet direction
diagram
diagram
diagram
Do you have a question? See a list of frequently asked questions (FAQ)

Knitting tension is what determines the final measurements of your work, and is usually measured per 10 x 10 cm. It is provided like so: number of stitches in width x number of rows in height - eg: 19 stitches x 26 rows = 10 x 10 cm.

The knitting tension is very individual; some people knit/crochet loosely while others work tightly. You adjust the knitting tension with the needle size, which is why the suggested needle size is only meant as a guide! You need to adjust this (up or down) to ensure that YOUR knitting tension matches the knitting tension provided in the pattern. If you work with a different knitting tension than provided you will have a different yarn consumption, and your work will have different measurements than what the pattern suggests.

The knitting tension also determines which yarns can replace each other. As long as you achieve the same knitting tension you can replace one yarn with another.

See DROPS lesson: How to measure your tension/gauge

See DROPS video: How to make a gauge tension swatch

The required amount of yarn is provided in grams, eg: 450 g. To calculate how many balls you’ll need you first need to know how many grams are in 1 ball (25g, 50g or 100g). This information is available if you click on the individual yarn quality on our pages. Divide the amount required with the amount of each ball. For example, if each ball is 50g (the most common amount), the calculation will be as follows: 450 / 50 = 9 balls.

The important thing when changing from one yarn to another is that the knitting/crochet tension remains the same. This is so that the measurements of the finished piece will be the same as on the sketch provided. It is easier to achieve the same knitting tension using yarns from the same yarn group. It is also possible to work with multiple strands of a thinner yarn to achieve the knitting tension of a thicker one. Please try our yarn converter. We recommend you to always work a test swatch.

Please NOTE: when changing yarn the garment might have a different look and feel to the garment in the photo, due to individual properties and qualities of each yarn.

See DROPS lesson: Can I use a different yarn than the one mentioned in the pattern?

All our yarns are categorised into yarn groups (from A to F) according to thickness and knitting tension – group A contains the thinnest yarns and group F the thickest. This makes it easier for you to find alternative yarns to our patterns, should you wish to switch yarn. All yarns within the same group have a similar knitting tension and can easily replace each other. However, different yarn qualities have different structures and properties which will give the finished work a unique look and feel.

Click here for an overview of the yarns in each yarn group

At the top of all our patterns you’ll find a link to our yarn calculator, which is a helpful tool should you wish to use a different yarn than suggested. By filling in the yarn quality you wish to replace, the amount (in your size) and number of strands, the calculator will present good alternative yarns with the same knitting tension. Additionally it will tell you how much you’ll require in the new qualities and whether you’ll need to work with multiple strands. Most skeins are 50g (some are 25g or 100g).

If the pattern is worked with multiple colours, every colour will have to be calculated separately. Similarly, if the pattern is worked with several strands of different yarns (for example 1 strand Alpaca and 1 strand Kid-Silk) you will have to find alternatives for each, individually.

Click here to see our yarn calculator

Since different yarns have different qualities and textures we have chosen to keep the original yarn in our patterns. However, you can easily find options among our available qualities by using our yarn calculator, or simply pick a yarn from the same yarn group.

It is possible that some retailers still have discontinued yarns in stock, or that someone has a few skeins at home that they would like to find patterns for.

The yarn calculator will provide both alternative yarn as well as required amount in the new quality.

If you think it's hard to decide what size to make, it can be a good idea to measure a garment you own already and like the size of. Then you can pick the size by comparing those measures with the ones available in the pattern's size chart.

You'll find the size chart at the bottom of the pattern.

See DROPS lesson: How to read size chart

The needle size provided in the pattern serves only as a guide, the important thing is to follow the knitting tension. And since knitting tension is very individual, you will have to adjust the needle size to ensure that YOUR tension is the same as in the pattern – maybe you’ll have to adjust 1, or even 2 needle sizes, up or down to achieve the correct tension. For this, we recommend that you work test swatches.

Should you work with a different knitting tension than the one provided, the measurements of the finished garment might deviate from the measurement sketch.

See DROPS lesson: How to measure your tension/gauge

See DROPS video: How to make a tension/gauge swatch

Working a garment top-down provides more flexibility and room for personal adjustment. For example it is easier to try the garment on while working, as well as making adjustments to length of yoke and shoulder caps.

The instructions are carefully explaining every step, in the correct order. Diagrams are adjusted to the knitting direction and are worked as usual.

The diagram depicts all rows/rounds, and every stitch seen from the right side. It is read from bottom to top, from right to left. 1 square = 1 stitch.

When working back and forth, every other row is worked from the right side and every other row is worked from the wrong side. When working from the wrong side, the diagram will have to be worked reversed: from left to right, knit stitches are purled, purl stitches are knit etc.

When working in the round every round is worked from the right side and the diagram are worked from right to left on all rounds.

See DROPS lesson: How to read knitting diagrams

The diagram depicts all rows/rounds, and every stitch seen from the right side. It is worked from bottom to top, from right to left.

When working back and forth every other row is worked from the right side: from right to left and every other row is worked from the wrong side: from left to right.

When working in the round, every row in the diagram are worked from the right side, from right to left.

When working a circular diagram you start in the middle and work your way outwards, counter clockwise, row by row.

The rows usually start with a given number of chain stitches (equivalent to the height of the following stitch), this will either be depicted in the diagram or explained in the pattern.

See DROPS lesson: How to read crochet diagrams

Instructions for working several diagrams after each other on the same row/round, will often be written like so: “work A.1, A.2, A.3 a total of 0-0-2-3-4 times". This means you work A.1 once, then A.2 is worked once, and A.3 is repeated (in width) the number of times provided for your size – in this case like so: S = 0 times, M = 0 times, L=2 times, XL= 3 times and XXL = 4 times.

The diagrams are worked as usual: begin with the first row in A.1, then work the first row in A.2 etc.

See DROPS lesson: How to read knitting diagrams

See DROPS lesson: How to read crochet diagrams

The total width of the garment (from wrist-to-wrist) will be larger in the larger sizes, despite the actual sleeves being shorter. The larger sizes have longer sleeve caps and wider shoulders, so there will be a good fit in all sizes.

The measurement sketch/schematic drawing provides information regarding the full length of the garment. If it’s a jumper or a jacket the length is measured from the highest point on the shoulder closest to the neckline, and straight down to the bottom of the garment. It is NOT measured from the tip of shoulder. Similarly, the length of yoke is measured from the highest point on the shoulder and down to where yoke is split into body and sleeves.

On a jacket measures are never taken along bands, unless specifically stated. Always measure inside band stitches when measuring the length.

See DROPS lesson: How to read a schematic drawing

Diagrams are often repeated on the round or in height. 1 repeat is the diagram the way it appears in the pattern. If it says to work 5 repeats of A.1 in the round, then you work A.1 a total of 5 times after/next to each other in the round. If it says to work 2 repeats of A.1 vertically/in height you work the entire diagram once, then begin again at the start and work the entire diagram one more time.

Chain stitches are slightly narrower than other stitches and to avoid working the cast-on edge too tight, we simply chain more stitches to begin with. The stitch count will be adjusted on the following row to fit the pattern and measurement sketch.

The rib edge is more elastic and will contract slightly compared to, for example, stocking stitch. By increasing before the rib edge, you avoid a visible difference in width between the rib edge and the rest of the body.

It’s very easy to cast off too tightly, and by making yarn overs while casting off (and simultaneously casting these off) you avoid a too tight cast off edge.

See DROPS video: How to bind off with yarn overs (yo)

To achieve an even increase (or decrease) you can increase on, for example: every 3rd and 4th row alternately, like so: work 2 rows and increase on the 3rd row, work 3 rows and increase on the 4th. Repeat this until the increase is complete.

See DROPS lesson: Increase or decrease 1 st on every 3rd and 4th row alternately

Should you prefer to work in the round instead of back and forth, you may of course adjust the pattern. You’ll need to add steeks mid-front (usually 5 stitches), and follow the instructions. When you would normally turn and work from the wrong side, simply work across the steek and continue in the round. At the end you’ll cut the piece open, pick up stitches to work bands, and cover the cut edges.

See DROPS video: How to knit steeks and cut open

Should you prefer to work back and forth instead of in the round, you may of course adjust the pattern so you work the pieces separately and then assemble them at the end. Divide the stitches for the body in 2, add 1 edge stitch in each side (for sewing) and work the front and back pieces separately.

See DROPS lesson: Can I adapt a pattern for circular needles into straight needles?

Pattern repeats can vary slightly in the different sizes, in order to get the correct proportions. If you’re not working the exact same size as the garment in the photo, yours might deviate slightly. This has been carefully developed and adjusted so that the complete impression of the garment is the same in all sizes.

Make sure to follow instructions and diagrams for your size!

If you have found a pattern you like which is available in women’s size it’s not very difficult to convert it to men’s size. The biggest difference will be the length of sleeves and body. Start working on the women size that you think would fit across the chest. The additional length will be worked right before you cast off for the armhole/sleeve cap. If the pattern is worked top-down you can add the length right after the armhole or before the first decrease on sleeve.

Regarding additional yarn amount, this will depend on how much length you add, but it is better with a skein too many than too few.

All yarns will have excess fibres (from production) that might come off as lint or shedding. Brushed yarns (ie hairier yarns) have more of these loose, excess fibres, causing more shedding.

Shedding also depends on what is worn under or over the garment, and whether this pulls at the yarn fibres. It’s therefore not possible to guarantee that there will be no shedding

Below are some tips on how to get the best result when working with hairier yarns:

1. When the garment is finished (before you wash it) shake it vigorously so the looser hairs come off. NOTE: do NOT use a lint roller, brush or any method that pulls at the yarn.

2. Place the garment in a plastic bag and put it in your freezer - the temperature will cause the fibres to become less attached to each other, and excess fibres will come off easier.

3. Leave in the freezer for a few hours before taking it out and shaking it again.

4. Wash the garment according to the instructions on the yarn label.

Pilling is a natural process that happens to even the most exclusive of fibers. It's a natural sign of wear and tear that is hard to avoid, and that is most visible in high friction areas of your garment like a sweater's arms and cuffs.

You can make your garment look as new by removing the pilling, using a fabric comb or a pill/lint remover.

Still can't find the answer you need? Then scroll down and leave your question so one of our experts can try to help you. This will be done normally within 5 to 10 working days.
In the meantime, you can read the questions and answers that others have left to this pattern or join the DROPS Workshop on Facebook to get help from fellow knitters/crocheters!

You might also like...

171-35 Harvest Love

margswaff, United States

171-35 Harvest Love

Tiggerkeogh, Ireland

Harvest Love

Sonja, Germany

Post a comment to pattern DROPS 171-35

We would love to hear what you have to say about this pattern!

If you want to leave a question, please make sure you select the correct category in the form below, to speed up the answering process. Required fields are marked *.

Comments / Questions (41)

country flag Luis wrote:

Des difficultes apres le carre pour realiser coins notamment...9 triples brides du milieu du cote 1 ne sont plus travaillees.... Coins comment evoluent ils apres le carre? J ai l impression de tout melanger un dessin plus complet aurait ete mieux pour moi.... quelqu un. Peut m aider? Merci

16.10.2017 - 16:48

DROPS Design answered:

Bonjour Luis, les 9 triple-brides au milieu du côté 1 sont pour l'encolure. On va crocheter maintenant chaque épaule (en taille S/M) ou continuer le carré à partir de l'épaule (autres tailles) après ces 9 triple brides et continuer ce côté/le rang jusqu'à l'autre côté du côté 1 en veillant à laisser ces 9 mailles non travaillées pour l'encolure. Bon crochet!

17.10.2017 - 09:25

Penny wrote:

I'm struggling with the tension for this jumper. I've resorted to attempting the A5 gauge (I'm not very good at gauges) with a 4mm hook but it's still slightly more than 5cm. Can a hook 1.5mm smaller than required be right!? Thanks for any advice.

24.09.2017 - 18:21

DROPS Design answered:

Dear Penny, the way we crochet or knit can vary by each person widely. I personally knit/crochet very loosely, and often use needles in sizes 2 mm smaller than suggested. So, you should always nake a gauge swatch, and keep trying to find a needle with which you can achieve the given gauge, even if it is one or even 2 mm off from the suggested size. I hope this helps. Happy Crafing!

25.09.2017 - 00:09

Wendy Nice wrote:

Thank you for this lovely pattern! I am working the back piece. I have finished the square, and the round of A.5/A.6. After I finish A.5 over all sts along side 1, should I then work one row with tr in every dtr as instructed for the front piece? I can't tell from the video if the tr row is on the back piece also. Thanks for your help!

14.07.2017 - 00:20

DROPS Design answered:

Hi wendy, Glad you like the pattern! Yes, you work the back piece as instructed for the front piece, but without the decreases for the neck. Happy crocheting!

14.07.2017 - 08:49

country flag Veronique wrote:

Ik ben gekomen tot 10 dubbelstokjes gemeerderd naar 65 driedubbelstokjes (A5 en A6 zijn nu klaar). Ik wil maat L maken. In het patroon staat: haak nu heen en weer langs het einde van kant 1. Moeten er nu extra toeren gehaakt worden voor ik aan de schouder begin of begin ik net als in maat S en M aan de schouder? En als ik extra toeren moet haken langs kant 1 voor ik aan de schouder moet beginnen, hoeveel toeren en welke steken?

12.06.2017 - 18:53

DROPS Design answered:

Hoi Veronique, In het patroon staat voor jouw maat precies beschreven hoe je dit doet. Haak nu heen en weer ...als volgt: Je kunt gewoon de beschrijving volgen die achter 'als volgt' staat. Veel haakplezier!

13.06.2017 - 14:56

country flag Sandy wrote:

Hi there. While I'm thoroughly enjoying this project, I seem to have hit a problem with a particular instruction for the sleeve i.e. 'dec 5 triple tr evenly on round with triple tr (= 1 repetition less on every round with dec). Is there a video that shows how to do this as I'm not sure how to proceed. Many thanks.

19.05.2017 - 12:31

DROPS Design answered:

Dear Sandy, when dec 5 triple tr evenly, work 2 triple tr tog evenly distributed on row - see here how to dec evenly. To work 2 triple tr tog: Work 1 triple tr but wait with last YO and pull through, work 1 more triple tr the same way, but now pull last YO through all sts on hook. Happy crocheting!

19.05.2017 - 13:50

country flag Grace Day wrote:

I love this pattern and the video instructions are very helpful. I have noticed the colors in the video differ from the picture in the pattern. What colors are the ones in the picture? I would much prefer shades of blue. Also, there is a color you are out of stock, the 0300 beige, when do you expect that in stock? Best, Grace

04.03.2017 - 13:40

DROPS Design answered:

Dear Mrs Day, you will find required colours and materials under tab "Materials". You are welcome to contact directly your DROPS store for any further assistance choosing colour or about their own stock. Happy crocheting!

06.03.2017 - 09:03

country flag Sandra wrote:

Ik ben gekomen tot 10 dubbelstokjes gemeerderd naar 65 3 dubbelstokjes per kant. Ik wil maat L/XL verder maken maar loop volledig vast. Met de video ernaast lukt het me ook niet omdat die de kleinste maat laat zien. Verder ben ik heel blij met deze video's. Ik leer er veel van. Maar nu kom ik er niet meer uit.

09.11.2016 - 22:38

DROPS Design answered:

Hoi Sandra. Het principe is hetzelfde als in de kleine maat, je hebt alleen meer stk op de grotere maat.

10.11.2016 - 14:54

Sara Constanza Lara Falla wrote:

Hola buenta tarde. Soy de Bogotá, Colombia y estoy interesada en comprar el material de este proyecto, me podrian indicar si aca se consigue este material?

23.09.2016 - 00:35

DROPS Design answered:

Hola Sara. De momento no tenemos tiendas en Colombia. Puedes comprar en una tienda online que tiene envíos internacionales: https://www.garnstudio.com/findastore.php?s=w&cid=23

23.09.2016 - 19:08

country flag Amanda wrote:

Hej! Jag förstår inte riktigt hur jag ska minska antalet maskor/stolpar på ärmarna, jag tycker bara att de blir större. Har fattat det som att man ska minska en 3-dst jämt fördelat för att i slutändan ha gjort denna minskning 5 gånger. Men jag får ändå inte till det! Det är fortfarande 10 rapporter på bredden! Virkar man två 3-dst ihop under samma maska? Är det något annat sätt man ska göra det på eller är det jag som läser instruktionerna fel? Med vänlig hälsning Amanda

22.09.2016 - 17:29

DROPS Design answered:

Du minskar genom att virka ihop stolpar så här: Virka 1 3-dst, men vänta med sista genomdragningen (= 2 m på nålen), virka sedan nästa 3-dst, men när sista genomdragningen görs dras tråden genom alla m på nålen - det har nu minskats 1 st. Du virkar alltså i olika maskor.

20.04.2017 - 16:47

Sue Cone wrote:

I have made up this jumper in big delight and my children are fighting over it. It is lovely. I will a photo soon. It is a very quick pattern.

21.09.2016 - 02:44