DROPS Alpaca
DROPS Alpaca
100% Alpaca
from 3.40 £ /50g
Get the yarn to make this pattern from 78.20£.

The yarn cost is calculated from the pattern’s smallest size and the yarn’s cheapest product type. Looking for an even better price? You might find it on the DROPS Deals!

DROPS SS24

Stavanger

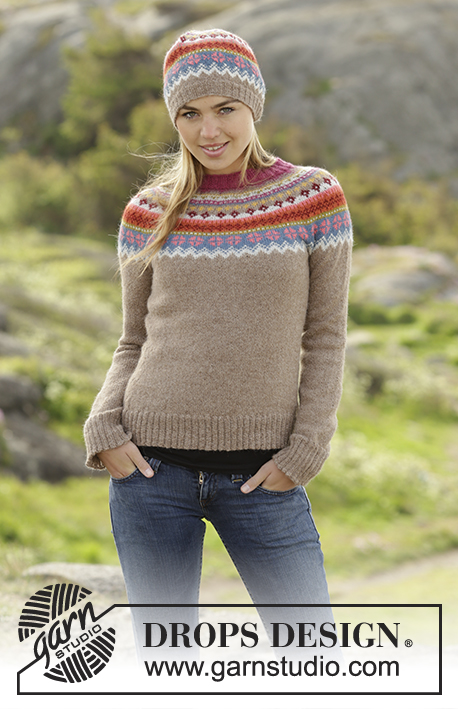
Set consists of: Knitted DROPS jumper worked top down with round yoke and multi-coloured pattern on yoke in ”Alpaca”. Hat with multi-coloured pattern in “Alpaca”. Size: S - XXXL.

DROPS 173-51
DROPS design: Pattern no z-773
Yarn group A
----------------------------------------------------------
JUMPER:
Size: S - M - L - XL - XXL - XXXL
Materials:
DROPS ALPACA from Garnstudio
300-350-350-400-450-450 g colour no 618, light beige
50 g for all sizes of the following colours:
colour no 2923, goldenrod
colour no 2925, rust
colour no 3650, maroon
colour no 3770, dark rose
colour no 6309, medium petrol
colour no 7233, olive
colour no 9020, light pearl grey
colour no 9022, coral

DROPS DOUBLE POINTED NEEDLES AND CIRCULAR NEEDLE (40 + 60 or 80 cm) SIZE 3 mm - or size needed to get 24 sts x 32 rows in stocking st = 10 x 10 cm.
DROPS DOUBLE POINTED NEEDLES AND CIRCULAR NEEDLE (40 and 80 cm) SIZE 2.5 mm for rib - or size needed to get 26 sts x 34 rows in stocking st = 10 x 10 cm.

HAT:
Size: S/M – L/XL
Head circumference: approx. 54/56 - 58/60 cm
Materials:
DROPS ALPACA from Garnstudio
50 g for all sizes of the following colours:
colour no 618, light beige
colour no 2923, goldenrod (2-2 g)
colour no 2925, rust (4-5 g)
colour no 3650, rust (5-6 g)
colour no 3770, dark rose (3-3 g)
colour no 6309, medium petrol (8-9 g)
colour no 7233, olive (3-3 g)
colour no 9020, light pearl grey (7-8 g)
colour no 9022, coral (6-7 g)

No in (-) shows approx. how many grams are used of each colour if left-over yarn is used.

DROPS DOUBLE POINTED NEEDLES and CIRCULAR NEEDLE (40 cm) SIZE 3 mm - or size needed to get 24 sts x 32 rows in stocking st = 10 x 10 cm.
DROPS CIRCULAR NEEDLE (40 cm) SIZE 2.5 mm for rib - or size needed to get 26 sts x 34 rows in stocking st = 10 x 10 cm.

-------------------------------------------------------

Alternative Yarn – See how to change yarns here
Yarn Groups A to F – Use the same pattern and change the yarn here
Yarn usage using an alternative yarn – Use our yarn converter here

-------------------------------------------------------

DROPS Alpaca
DROPS Alpaca
100% Alpaca
from 3.40 £ /50g
Get the yarn to make this pattern from 78.20£.

The yarn cost is calculated from the pattern’s smallest size and the yarn’s cheapest product type. Looking for an even better price? You might find it on the DROPS Deals!

Pattern instructions

NOTE: This pattern is written in British English. All measurements in charts are in cm. For conversion from cm to inches - click here. There are different terms for crocheting in British and American English. If this pattern includes crochet, click for "crochet terms" here. For this pattern in American English, please click here.
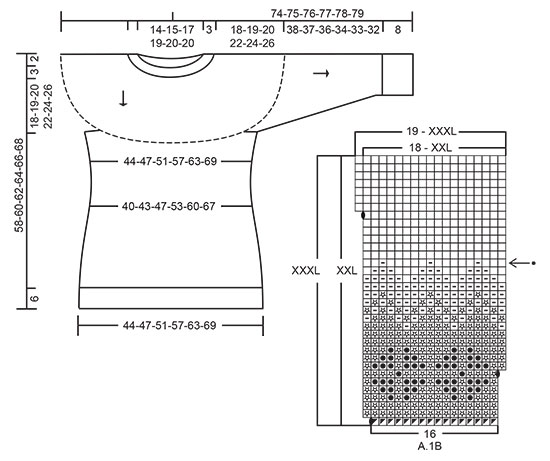
JUMPER:

DECREASE/INCREASE TIP:
To calculate how often dec/inc should be done, use the total no of sts on row (e.g. 120 sts) and divide by no of dec/inc to be done (e.g. 25) = 4.8. I.e. in this example K approx. every 4th and 5th st tog when dec. If inc, do this is approx. every 5th st.

PATTERN:
See diagram A.1 (choose diagram for correct size). Work entire pattern in stocking st.

KNITTING TIP:
To avoid the knitting tension to tighten when working pattern, it is important not to tighten the strands on back side of piece. Switch to a higher needle no when working pattern if the pattern is somewhat tight.

DECREASE TIP-1 (applies to sides on body and mid under sleeve):
Beg 4 sts before marker and K 2 tog, K 4 (marker is between these 4 sts), slip 1 st as if to K, K 1, psso (= 2 sts dec).

INCREASE TIP-1 (applies to sides of body):
Work until 2 sts remain before marker: Make 1 YO, K 4 (marker is in the middle of these 4 sts), make 1 YO (= 2 sts inc). On next round K YOs twisted to avoid holes.
----------------------------------------------------------

JUMPER:
Worked in the round on circular needle from top down.

YOKE:
Cast on 120-128-136-144-148-148 sts on a short circular needle size 2.5 mm with dark rose. K 1 round. Then work rib in the round = K 2/P 2. When rib measures 3 cm, K 1 round while at the same time dec 25-28-26-24-23-23 sts evenly - READ DECREASE/INCREASE TIP = 95-100-110-120-125-125 sts. Switch to circular needle size 3 mm.
For better shape work an elevation in the back of neck as follows: Insert 1 marker mid back. Beg from RS with dark rose and K 9-10-11-11-12-12 sts past marker, turn, tighten yarn and P 18-20-22-22-24-24 sts back. Turn, tighten yarn and K 27-30-33-33-36-36 sts, turn, tighten yarn and P 36-40-44-44-48-48 sts back. Turn, tighten yarn and K 45-50-55-55-60-60 sts, turn, tighten yarn and P 54-60-66-66-72-72 sts back. Turn, tighten yarn and K 63-70-77-77-84-84 sts, turn, tighten yarn and P 72-80-88-88-96-96 sts back. Turn and K until mid back.
Now work pattern in the round according to diagram A.1 (= 19-20-22-24-25-25 repetitions of 5 sts - NOTE: choose diagram for correct size – in size XXL + XXXL: work first A.1A then A.1B over A.1A)). Continue pattern and inc as shown in diagram. REMEMBER THE KNITTING TENSION On round marked with arrow in diagram inc 2-4-0-0-10-13 sts evenly (inc in the sections with light beige). When diagram A.1 has been worked, there are 344-364-396-432-460-488 sts on needle and piece measures approx. 18-19-20-22-24-26 cm (measured mid front without rib in neck). Work next round as follows: K with light beige over the first 50-52-56-63-69-75 sts (= ½ back piece), slip the next 72-78-86-90-92-94 sts on a stitch holder (= sleeve), cast on 6-8-10-10-14-16 new sts (= in the side under sleeve), K over the next 100-104-112-126-138-150 sts (= front piece), slip the next 72-78-86-90-92-94 sts on a stitch holder (= sleeve), cast on 6-8-10-10-14-16 sts (= in the side under sleeve), K over the remaining 50-52-56-63-69-75 sts (= ½ back piece).
Finish body and sleeves separately.

BODY:
= 212-224-244-272-304-332 sts. Insert 1 marker in each side = 106-112-122-136-152-166 sts between markers. NOW MEASURE PIECE FROM HERE! Continue in the round with light beige and stocking st. When piece measures 2-2-2-3-3-4 cm, dec 1 st on each side of both markers – READ DECREASE TIP-1 (= 4 sts dec). Dec like this every 2½-2½-2½-3-3-4 cm a total of 5-5-5-4-4-3 times in each side = 192-204-224-256-288-320 sts. When piece measures 16-17-18-18-18-18 cm, inc 1 st on each side of both markers – READ INCREASE TIP-1 (= 4 sts inc). Inc like this every 3-3-3-4-4-5 cm a total of 5-5-5-4-4-3 times in each side = 212-224-244-272-304-332 sts. Continue until piece measures 29-30-31-31-31-31 cm (jumper measures 52-54-56-58-60-62 cm from shoulder). K 1 round while inc 60-72-76-80-80-84 sts evenly - READ DECREASE/INCREASE TIP = 272-296-320-352-384-416 sts. Switch to circular needle size 2.5 mm and work rib = K 2/P 2. When rib measures 6 cm (jumper measures approx. 58-60-62-64-66-68 cm from shoulder) inc 1 st in every transition between K 2 and P 2 by making 1 YO (= 68-74-80-88-96-104 sts inc) = 340-370-400-440-480-520 sts on needle (this inc is done to avoid a tight cast-off edge). On next round cast off with K over K and P over P (work YOs twisted before casting them off as regular sts).

SLEEVE:
Worked in the round on a short circular needle from top down. Switch to double pointed needles when needed. Slip the sts from stitch holder in one side of piece on a short circular needle size 3 mm and pick in addition up 1 st in each of the 6-8-10-10-14-16 sts cast on under sleeve = 78-86-96-100-106-110 sts. Insert 1 marker in the middle of the 6-8-10-10-14-16 sts under sleeve (= beg of round). NOW MEASURE PIECE FROM HERE! Work in stocking st in the round with light beige. When sleeve measures 1-1-3-3-1-3 cm, dec 2 sts mid under sleeve - READ DECREASE TIP-1. Dec like this every 3-2½-1½-1½-1½-1 cm 13-15-19-20-22-23 times in total = 52-56-58-60-62-64 sts. When piece measures 38-37-36-34-33-32 cm, K 1 round while inc 16-16-18-20-22-24 sts evenly = 68-72-76-80-84-88 sts. Switch to double pointed needles size 2.5 mm and work rib in the round = K 2/P 2. When rib measures 8 cm (or desired length) inc 1 st in every transition between K 2 and P 2 by making 1 YO (= 17-18-19-20-21-22 sts inc) = 85-90-95-100-105-110 sts. On next round cast off with K over K and P over P (work YOs twisted before casting them off as regular sts). Now sleeve measures approx. 46-45-44-42-41-40 cm. Work the other sleeve the same way.

----------------------------------------------------------

HAT:

PATTERN: See diagram A.2. Work entire pattern in stocking st.
----------------------------------------------------------

HAT:
Worked in the round on a short circular needle from bottom up. Switch to double pointed needles when needed.
Cast on 140-152 sts on circular needle size 2.5 mm with light beige. K 1 round. Then work rib in the round = K 2/P 2 for 3 cm. Switch to a short circular needle size 3 mm and work 1-4 rounds in stocking st while AT THE SAME TIME dec 0-2 sts evenly = 140-150 sts. Then work pattern according to diagram A.2 (= 14-15 repetitions of 10 sts). REMEMBER THE KNITTING TENSION When A.2 has been worked, piece measures approx. 22-23 cm vertically and there are 42-45 sts on needle. Continue with dark rose and K 1 round while K all sts tog 2 by 2. K 1 round. On next round K all sts tog 2 by 2 again = 11-12 sts on needle. Cut the yarn and pull it through the remaining sts, tighten tog and fasten.

This pattern has been corrected.

Updated online: 08.02.2019
Correction - YOKE:Now work pattern in the round according to diagram A.1 (= 19-20-22-24-25-25 repetitions of 5 sts - NOTE: choose diagram for correct size – in size XXL + XXXL: work first A.1A then A.1B over A.1A)

Diagram

symbols = dark pink
symbols = light beige
symbols = goldenrod
symbols = light pearl grey
symbols = olive
symbols = medium petrol
symbols = maroon
symbols = coral
symbols = rust
symbols = 1 YO in base colour in pattern stripe, on next round K YO twisted to avoid hole
symbols = K 2 tog with base colour in pattern stripe
symbols = knitting direction
symbols = inc round
diagram
diagram
diagram

Each of our patterns has specific tutorial videos to help you.

Do you have a question? See a list of frequently asked questions (FAQ)

Knitting tension is what determines the final measurements of your work, and is usually measured per 10 x 10 cm. It is provided like so: number of stitches in width x number of rows in height - eg: 19 stitches x 26 rows = 10 x 10 cm.

The knitting tension is very individual; some people knit/crochet loosely while others work tightly. You adjust the knitting tension with the needle size, which is why the suggested needle size is only meant as a guide! You need to adjust this (up or down) to ensure that YOUR knitting tension matches the knitting tension provided in the pattern. If you work with a different knitting tension than provided you will have a different yarn consumption, and your work will have different measurements than what the pattern suggests.

The knitting tension also determines which yarns can replace each other. As long as you achieve the same knitting tension you can replace one yarn with another.

See DROPS lesson: How to measure your tension/gauge

See DROPS video: How to make a gauge tension swatch

The required amount of yarn is provided in grams, eg: 450 g. To calculate how many balls you’ll need you first need to know how many grams are in 1 ball (25g, 50g or 100g). This information is available if you click on the individual yarn quality on our pages. Divide the amount required with the amount of each ball. For example, if each ball is 50g (the most common amount), the calculation will be as follows: 450 / 50 = 9 balls.

The important thing when changing from one yarn to another is that the knitting/crochet tension remains the same. This is so that the measurements of the finished piece will be the same as on the sketch provided. It is easier to achieve the same knitting tension using yarns from the same yarn group. It is also possible to work with multiple strands of a thinner yarn to achieve the knitting tension of a thicker one. Please try our yarn converter. We recommend you to always work a test swatch.

Please NOTE: when changing yarn the garment might have a different look and feel to the garment in the photo, due to individual properties and qualities of each yarn.

See DROPS lesson: Can I use a different yarn than the one mentioned in the pattern?

All our yarns are categorised into yarn groups (from A to F) according to thickness and knitting tension – group A contains the thinnest yarns and group F the thickest. This makes it easier for you to find alternative yarns to our patterns, should you wish to switch yarn. All yarns within the same group have a similar knitting tension and can easily replace each other. However, different yarn qualities have different structures and properties which will give the finished work a unique look and feel.

Click here for an overview of the yarns in each yarn group

At the top of all our patterns you’ll find a link to our yarn calculator, which is a helpful tool should you wish to use a different yarn than suggested. By filling in the yarn quality you wish to replace, the amount (in your size) and number of strands, the calculator will present good alternative yarns with the same knitting tension. Additionally it will tell you how much you’ll require in the new qualities and whether you’ll need to work with multiple strands. Most skeins are 50g (some are 25g or 100g).

If the pattern is worked with multiple colours, every colour will have to be calculated separately. Similarly, if the pattern is worked with several strands of different yarns (for example 1 strand Alpaca and 1 strand Kid-Silk) you will have to find alternatives for each, individually.

Click here to see our yarn calculator

Since different yarns have different qualities and textures we have chosen to keep the original yarn in our patterns. However, you can easily find options among our available qualities by using our yarn calculator, or simply pick a yarn from the same yarn group.

It is possible that some retailers still have discontinued yarns in stock, or that someone has a few skeins at home that they would like to find patterns for.

The yarn calculator will provide both alternative yarn as well as required amount in the new quality.

If you think it's hard to decide what size to make, it can be a good idea to measure a garment you own already and like the size of. Then you can pick the size by comparing those measures with the ones available in the pattern's size chart.

You'll find the size chart at the bottom of the pattern.

See DROPS lesson: How to read size chart

The needle size provided in the pattern serves only as a guide, the important thing is to follow the knitting tension. And since knitting tension is very individual, you will have to adjust the needle size to ensure that YOUR tension is the same as in the pattern – maybe you’ll have to adjust 1, or even 2 needle sizes, up or down to achieve the correct tension. For this, we recommend that you work test swatches.

Should you work with a different knitting tension than the one provided, the measurements of the finished garment might deviate from the measurement sketch.

See DROPS lesson: How to measure your tension/gauge

See DROPS video: How to make a tension/gauge swatch

Working a garment top-down provides more flexibility and room for personal adjustment. For example it is easier to try the garment on while working, as well as making adjustments to length of yoke and shoulder caps.

The instructions are carefully explaining every step, in the correct order. Diagrams are adjusted to the knitting direction and are worked as usual.

The diagram depicts all rows/rounds, and every stitch seen from the right side. It is read from bottom to top, from right to left. 1 square = 1 stitch.

When working back and forth, every other row is worked from the right side and every other row is worked from the wrong side. When working from the wrong side, the diagram will have to be worked reversed: from left to right, knit stitches are purled, purl stitches are knit etc.

When working in the round every round is worked from the right side and the diagram are worked from right to left on all rounds.

See DROPS lesson: How to read knitting diagrams

The diagram depicts all rows/rounds, and every stitch seen from the right side. It is worked from bottom to top, from right to left.

When working back and forth every other row is worked from the right side: from right to left and every other row is worked from the wrong side: from left to right.

When working in the round, every row in the diagram are worked from the right side, from right to left.

When working a circular diagram you start in the middle and work your way outwards, counter clockwise, row by row.

The rows usually start with a given number of chain stitches (equivalent to the height of the following stitch), this will either be depicted in the diagram or explained in the pattern.

See DROPS lesson: How to read crochet diagrams

Instructions for working several diagrams after each other on the same row/round, will often be written like so: “work A.1, A.2, A.3 a total of 0-0-2-3-4 times". This means you work A.1 once, then A.2 is worked once, and A.3 is repeated (in width) the number of times provided for your size – in this case like so: S = 0 times, M = 0 times, L=2 times, XL= 3 times and XXL = 4 times.

The diagrams are worked as usual: begin with the first row in A.1, then work the first row in A.2 etc.

See DROPS lesson: How to read knitting diagrams

See DROPS lesson: How to read crochet diagrams

The total width of the garment (from wrist-to-wrist) will be larger in the larger sizes, despite the actual sleeves being shorter. The larger sizes have longer sleeve caps and wider shoulders, so there will be a good fit in all sizes.

The measurement sketch/schematic drawing provides information regarding the full length of the garment. If it’s a jumper or a jacket the length is measured from the highest point on the shoulder closest to the neckline, and straight down to the bottom of the garment. It is NOT measured from the tip of shoulder. Similarly, the length of yoke is measured from the highest point on the shoulder and down to where yoke is split into body and sleeves.

On a jacket measures are never taken along bands, unless specifically stated. Always measure inside band stitches when measuring the length.

See DROPS lesson: How to read a schematic drawing

Diagrams are often repeated on the round or in height. 1 repeat is the diagram the way it appears in the pattern. If it says to work 5 repeats of A.1 in the round, then you work A.1 a total of 5 times after/next to each other in the round. If it says to work 2 repeats of A.1 vertically/in height you work the entire diagram once, then begin again at the start and work the entire diagram one more time.

Chain stitches are slightly narrower than other stitches and to avoid working the cast-on edge too tight, we simply chain more stitches to begin with. The stitch count will be adjusted on the following row to fit the pattern and measurement sketch.

The rib edge is more elastic and will contract slightly compared to, for example, stocking stitch. By increasing before the rib edge, you avoid a visible difference in width between the rib edge and the rest of the body.

It’s very easy to cast off too tightly, and by making yarn overs while casting off (and simultaneously casting these off) you avoid a too tight cast off edge.

See DROPS video: How to bind off with yarn overs (yo)

To achieve an even increase (or decrease) you can increase on, for example: every 3rd and 4th row alternately, like so: work 2 rows and increase on the 3rd row, work 3 rows and increase on the 4th. Repeat this until the increase is complete.

See DROPS lesson: Increase or decrease 1 st on every 3rd and 4th row alternately

Should you prefer to work in the round instead of back and forth, you may of course adjust the pattern. You’ll need to add steeks mid-front (usually 5 stitches), and follow the instructions. When you would normally turn and work from the wrong side, simply work across the steek and continue in the round. At the end you’ll cut the piece open, pick up stitches to work bands, and cover the cut edges.

See DROPS video: How to knit steeks and cut open

Should you prefer to work back and forth instead of in the round, you may of course adjust the pattern so you work the pieces separately and then assemble them at the end. Divide the stitches for the body in 2, add 1 edge stitch in each side (for sewing) and work the front and back pieces separately.

See DROPS lesson: Can I adapt a pattern for circular needles into straight needles?

Pattern repeats can vary slightly in the different sizes, in order to get the correct proportions. If you’re not working the exact same size as the garment in the photo, yours might deviate slightly. This has been carefully developed and adjusted so that the complete impression of the garment is the same in all sizes.

Make sure to follow instructions and diagrams for your size!

If you have found a pattern you like which is available in women’s size it’s not very difficult to convert it to men’s size. The biggest difference will be the length of sleeves and body. Start working on the women size that you think would fit across the chest. The additional length will be worked right before you cast off for the armhole/sleeve cap. If the pattern is worked top-down you can add the length right after the armhole or before the first decrease on sleeve.

Regarding additional yarn amount, this will depend on how much length you add, but it is better with a skein too many than too few.

All yarns will have excess fibres (from production) that might come off as lint or shedding. Brushed yarns (ie hairier yarns) have more of these loose, excess fibres, causing more shedding.

Shedding also depends on what is worn under or over the garment, and whether this pulls at the yarn fibres. It’s therefore not possible to guarantee that there will be no shedding

Below are some tips on how to get the best result when working with hairier yarns:

1. When the garment is finished (before you wash it) shake it vigorously so the looser hairs come off. NOTE: do NOT use a lint roller, brush or any method that pulls at the yarn.

2. Place the garment in a plastic bag and put it in your freezer - the temperature will cause the fibres to become less attached to each other, and excess fibres will come off easier.

3. Leave in the freezer for a few hours before taking it out and shaking it again.

4. Wash the garment according to the instructions on the yarn label.

Pilling is a natural process that happens to even the most exclusive of fibers. It's a natural sign of wear and tear that is hard to avoid, and that is most visible in high friction areas of your garment like a sweater's arms and cuffs.

You can make your garment look as new by removing the pilling, using a fabric comb or a pill/lint remover.

Still can't find the answer you need? Then scroll down and leave your question so one of our experts can try to help you. This will be done normally within 5 to 10 working days.
In the meantime, you can read the questions and answers that others have left to this pattern or join the DROPS Workshop on Facebook to get help from fellow knitters/crocheters!

You might also like...

Stavanger

bauhausprincess, Germany

Stavanger

Laia Mas, Spain

Baltic Yoke Sweater

nugova, Germany

Stavanger Jumper

Wendy, United Kingdom

Stavanger

Meine_masche, Afghanistan

173-51 Stavanger Jumper

Sedativexxx, Germany

Post a comment to pattern DROPS 173-51

We would love to hear what you have to say about this pattern!

If you want to leave a question, please make sure you select the correct category in the form below, to speed up the answering process. Required fields are marked *.

Comments / Questions (52)

country flag Uta Grosse wrote:

Hallo. Wenn ich in A1 pro Rapport 11M zunehme bei Größe XXL, komme ich insgesamt auf 400M . In der Anleitung stehen aber nach A1 460M ?? Und es ist auch keine Pfeilmarkierung für die zusätzlichen 10M. Hilfe!!!!

03.02.2019 - 16:14

DROPS Design answered:

Liebe Frau Grosse, in Größe XXL und XXXL stricken Sie A.1B nach A.1A, und nehmen bei dem Pfeil zu. Korrektur kommt gleich. Viel Spaß beim stricken!

08.02.2019 - 08:29

country flag Helena Willems wrote:

Hallo Bij het patroon muts - A2 staat bij aanvang van de tweede rij het teken om één steek te meerderen. Is het de bedoeling om elke 10 steek één meerdering (1 omslag) te maken? Indien ja, is het dan ook zo voor de vijfde rij? Daar staat op op het einde van het patroon één meerdering (lus), bedoelt dit dan ook dat elke elfde steek één steek gemeerderd wordt? Hartelijk dank voor uw antwoord.

20.01.2019 - 21:50

DROPS Design answered:

Dag Helena,

Ja, dat klopt. Je herhaalt het telpatroon in de breedte en dus herhaal je ook de meerderingen in de breedte. Dit geldt ook voor de 5e naald.

23.01.2019 - 10:18

country flag Mariluz wrote:

Me encanta el jersey pero la talla S me resulta grande como podría sacar una talla menos ? No sencuentro proporción entre tallas para poder confeccionar una talla menor

11.11.2018 - 17:10

DROPS Design answered:

Hola Mariluz. No hacemos patrones personalizados. Mira nuestra selección de jerseis, tienes varios modelos para la talla XS ( el diagrama con las medidas están bajo el patrón). Después, tienes que hacer los cálculos según la tensión de la muestra.

30.12.2018 - 17:16

country flag Tania wrote:

Nel maglione Stavanger che indica lo schema A.1B? Sto seguendo il diagramma A.1A nella misura XXXL. Il diagramma è senza aumenti?

04.10.2018 - 14:04

country flag Katarina wrote:

Dobry den, chcela by som sa poradit, strikujem velkost M. Momentalne mam na ihlici 100 ociek a zacinam robit vzor A1. Pochopila som, ze v rade oznacenou sipkou mam pridavat ocka. Nerozumiem ale uplne v ktorej casti tohto riadku a kolko ociek mam v takejto rade pridat, aby som sa na konci sedla dopracovala k poctu 364 ociek. Dakujem vopred za odpoved.

22.09.2018 - 08:46

DROPS Design answered:

Dobrý den, Katarino, přidávání je zakomponováno ve schématu vzoru (takže vlastně přidáváte v každé sekvenci), v kruhové řadě označené šipkou ale přidáte navíc ještě 4 oka (pro velikost M). Tato 4 oka přidáte rovnoměrně - viz TIP - UJÍMÁNÍ/PŘIDÁVÁNÍ - v úsecích pletených světle béžovou přízí. Hodně zdaru! Hana

22.09.2018 - 23:03

Jeanette wrote:

Sie können wohl das gestrickte model wiegen Dan Weiss man doch wie viel wolle für die,die einfarbig stricken möchte. Zum beispiel jenny.

05.05.2018 - 08:25

country flag ARIANE wrote:

Un grand merci pour votre explication :)

27.03.2018 - 20:58

country flag ARIANE wrote:

Bonjour, Juste une petite question qui va vous paraître bête :( Pourquoi faut-il utiliser des aiguilles "doubles pointes" ? A quoi servent-elles ? Les circulaires ne suffisent pas ? Pouvez-vous m'expliquer svp. En vous remerciant vivement d'avance. NB : Bravo pour le travail que vous faites sur ce site ;)

23.03.2018 - 19:48

DROPS Design answered:

Bonjour Ariane et merci. Les aiguilles doubles vont être utilisées quand on tricote en rond mais que l'on n'a pas suffisamment de mailles pour qu'elles tiennent toutes sur l'aiguille circulaire. Vous pouvez utiliser également la technique du magic loop pour éviter les aiguilles doubles pointes. Bon tricot!

26.03.2018 - 10:46

country flag Michaela wrote:

Dobrý den, potřebovala bych poradit.. Již jsem upletla vzor, a jsem ve fázi dělení na rukáv a trup. Nyní jsem v řádku, kde jsem upletla polovinu ZD, potřebný počet ok se odložilo na pomocnou jehlici (-rukáv) a nyní se mají nahodit nová oka (podpaží), ale nevím, kterou jehlicí je nahazovat.. Jestli původní, nebo tou druhou (na rukáv).. Prosím poraďte

22.03.2018 - 17:12

DROPS Design answered:

Dobrý den, Michaelo, oka pro podpaží nahazujeme na původní kruhovou jehlici, na které budeme dál plést trup (podpaží spojuje přední a zadní díl po odložení rukávu, jinak by byl průramek v podpaží moc stažený a těsný). Hodně zdaru! Hana

27.04.2018 - 22:02

country flag M. Stokyte wrote:

Hallo! Ich stricke diesen Pullover einfarbig. Das Bündchen am Hals ist fertig. Die Zunahmen verstehe ich leider nicht. 95 M habe ich. In der Runde mit dem Pfeil (1Runde), wie viele Maschen soll man da zunehmen? Nur 2 insgesamt innerhalb von 95? Dann wie komme ich auf 344 Maschen, wenn ich den Pullover einfarbig stricke? Soll ich so stricken als ob in Muster und da zunehmen, wo die Zunahmen in Muster markiert sind? Danke für die Hilfe!

20.03.2018 - 18:57

DROPS Design answered:

Liebe Frau Stokyte, in der 1. Größe wird A.1 19 Mal wiederholt (am Anfang gibt es 5 M in jedem A.1), dann wie im Diagram zunehmen, und wenn alle Zunahmen gemacht sind, sind es 18 M in jedem A.1 (= 13 M wurden in jedem Rapport zugenommen) = 18 M x 19 A.1 = 342 + 2 Zunahmen bei der Reihe mit dem Pfeil = 344 M. Viel Spaß beim stricken!

21.03.2018 - 09:09