DROPS Nepal
DROPS Nepal
65% Wool, 35% Alpaca
from 2.40 £ /50g
Get the yarn to make this pattern from 38.40£.

The yarn cost is calculated from the pattern’s smallest size and the yarn’s cheapest product type. Looking for an even better price? You might find it on the DROPS Deals!

DROPS SS24

Lobelia

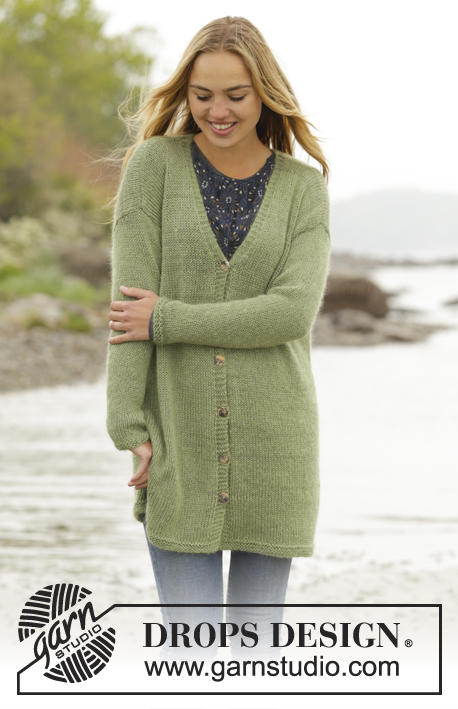
Knitted DROPS jacket with raglan and cables, worked top down in ”Nepal”. Size S-XXXL.

DROPS 171-14
DROPS design: Pattern no ne-235
Yarn group C or A + A
----------------------------------------------------------
Size: S - M - L - XL - XXL - XXXL
Materials:
DROPS NEPAL from Garnstudio
800-850-950-1050-1150-1250 g colour no 6314, denim blue

DROPS DOUBLE POINTED NEEDLES and CIRCULAR NEEDLE (80 cm) SIZE 5 mm - or size needed to get 17 sts x 22 rows in stocking st = 10 x 10 cm.
DROPS DOUBLE POINTED NEEDLES AND CIRCULAR NEEDLE (80 cm) SIZE 4.5 mm for garter st - or size needed to get 18 sts x 23 rows in stocking st = 10 x 10 cm.
DROPS MOTHER-OF-PEARL BUTTON ROUND (blue), NO 612: 6 pieces for all sizes

-------------------------------------------------------

Alternative Yarn – See how to change yarns here
Yarn Groups A to F – Use the same pattern and change the yarn here
Yarn usage using an alternative yarn – Use our yarn converter here

-------------------------------------------------------

DROPS Nepal
DROPS Nepal
65% Wool, 35% Alpaca
from 2.40 £ /50g
Get the yarn to make this pattern from 38.40£.

The yarn cost is calculated from the pattern’s smallest size and the yarn’s cheapest product type. Looking for an even better price? You might find it on the DROPS Deals!

Pattern instructions

NOTE: This pattern is written in British English. All measurements in charts are in cm. For conversion from cm to inches - click here. There are different terms for crocheting in British and American English. If this pattern includes crochet, click for "crochet terms" here. For this pattern in American English, please click here.
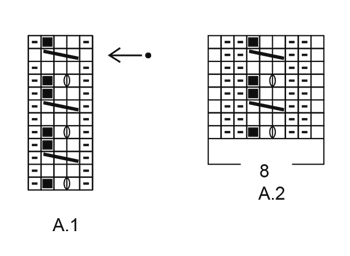
GARTER ST (worked in the round):
1 ridge = 2 rounds. * K 1 round and P 1 round *, repeat from *-*.

GARTER ST (back and forth):
K all rows. 1 ridge = 2 rows K.

PATTERN:
See diagrams A.1 and A.2. The diagrams show all rows in pattern seen from RS.

INCREASE TIP-1 (evenly spaced):
To calculate how often inc should be done, use the total no of sts on row (e.g. 97 sts), minus bands (e.g. 8 sts) and divide the remaining sts by no of inc to be done (e.g. 20) = 4.4. I.e. in this example inc 1 st alternately for every 4th and 5th st (and do not inc over bands).

INCREASE TIP-2 (body):
All inc are done from RS.
Inc 1 st P by making a YO. On next row K YO twisted to avoid holes.

RAGLAN SLEEVE:
Inc 1 st after/before A.2 on sleeve by making a YO (= 2 sts inc on each sleeve). On next row P YOs to make holes.

RAGLAN BODY:
Inc first 2 sts before/after A.2 on front and back piece (= 8 sts inc in total), then inc 1 st before/after A.2 on front and back piece (= 4 sts inc in total).

Inc 2 sts before A.2 as follows:
Work until 1 st remains before A.2, 1 YO, K 1, 1 YO.
Inc 2 sts after A.2 as follows:
1 YO, K 1, 1 YO.
NOTE: On next row P YOs closest A.2 to make holes. P the other YOs twisted to avoid holes.

Inc 1 st before/after A.2 as follows: Inc 1 st by making a YO. On next row P YOs to make holes.

DECREASE TIP-1 (body):
Work until 4 sts remain before marker, K 2 tog, K 4 (marker is between these sts), slip next st as if to K, K 1, psso. Repeat in the other side (= 4 sts dec).

DECREASE TIP-2 (sleeve):
Work until 2 sts remain before A.2, K 2 tog, A.2, slip next st as if to K, K 1, psso (= 2 sts dec).

BUTTONHOLES:
Dec for buttonholes on right band. I.e. band at the end of row seen from RS. 1 buttonhole = K tog third and fourth st from edge and make 1 YO.
Dec for buttonholes when piece measures (from cast-on edge and along the band):
SIZE S: 2, 11, 20, 29, 38 and 47 cm.
SIZE M: 2, 11, 20, 29, 38 and 47 cm.
SIZE L: 2, 12, 21, 31, 40 and 50 cm.
SIZE XL: 2, 12, 21, 31, 40 and 50 cm.
SIZE XXL: 2, 12, 22, 32, 42 and 52 cm.
SIZE XXXL: 2, 12, 22, 32, 42 and 52 cm.

CAST-OFF TIP:
To avoid a tight cast-off edge you may use a needle ½ size larger.
----------------------------------------------------------

JACKET:
Worked back and forth on circular needle, top down.

YOKE:
Cast on 97-99-103-109-111-117 sts (incl 4 band sts in garter st in each side) on circular needle size 4.5 mm. Work 2 ridges in GARTER ST - see explanation above and inc 17-19-19-25-27-25 sts evenly on last row from RS - READ INCREASE TIP-1 = 114-118-122-134-138-142 sts. Switch to circular needle size 5 mm.
Now work an elevation in stocking st in the back of neck as follows:
Work the first 61-63-67-73-77-79 sts, turn and work 16-16-20-20-24-24 sts, turn and work 20-20-24-24-28-28 sts, turn and work 24-24-28-28-32-32 sts, turn and work the rest of row. Then P 1 row with 4 band sts in garter st in each side. REMEMBER BUTTONHOLES!
Now work pattern as follows from RS: 4 band sts in garter st, P 1, A.1 (= 4 sts) 2-2-2-3-3-3 times, P 1, K 1-2-2-1-2-3 (= left front piece), A.2 (= 8 sts on 1st row), K 14-14-16-16-16-16 (= sleeve), A.2, K 1-2-2-1-2-3, P 1, A.1 5-5-5-7-7-7 times, P 1, K 1-2-2-1-2-3, (= back piece) A.2, K 14-14-16-16-16-16 (= sleeve), A.2, K 1-2-2-1-2-3, P 1, A.1 2-2-2-3-3-3 times, P 1, 4 band sts in garter st. Work 1 row from WS the same way. REMEMBER THE KNITTING TENSION
On next row from RS, beg inc for RAGLAN BODY and RAGLAN SLEEVE – see explanation above. NOTE: Inc differently on sleeves and body.
BODY:
Inc 2 sts every other row 4-4-5-6-7-9 times and 1 st every other row 11-14-14-14-15-14 times (= 15-18-19-20-22-23 times in total).
SLEEVES:
Inc like this every other row 15-18-19-20-22-23 times in total.

When all inc are done there are 250-278-294-318-342-362 sts on needle. Now work as follows from WS: Work the first 38-42-44-49-53-57 sts (= right front piece), slip the next 52-58-62-64-68-70 sts on a stitch holder (= sleeve), cast on 6-6-8-8-10-12 sts under sleeve, work the next 70-78-82-92-100-108 sts (= back piece), slip the next 52-58-62-64-68-70 sts on a stitch holder (= sleeve), cast on 6-6-8-8-10-12 sts under sleeve, work the remaining 38-42-44-49-53-57 sts (= left front piece). Piece measures approx. 15-17-18-19-21-22 cm along band.

BODY:
There are now 158-174-186-206-226-246 sts for body. NOW MEASURE THE PIECE FROM HERE. Continue pattern back and forth as before and insert a marker in the middle of the new sts under sleeve in each side. Then dec in each side and in pattern as follows:
DECREASE IN THE SIDES:
When piece measures 4 cm, dec 1 st on each side of marker in each side - READ DECREASE TIP-1 (body). Repeat dec every 8th row 2 times in total = 8 sts dec in total.
DECREASE IN PATTERN:
When piece measures 6 cm, dec 1 st P by P 2 tog in every section with P between 2 cables = 6-6-6-10-10-10 sts dec (i.e. dec 1-1-1-2-2-2 sts on each front piece and 4-4-4-6-6-6 sts on back piece).

When all dec are done, there are 144-160-172-188-208-228 sts on needle. When piece measures 15-15-16-16-16-16 cm, inc 1 st P in every section where P sts were dec – READ INCREASE TIP-2 (= 6-6-6-10-10-10 sts inc) = 150-166-178-198-218-238 sts. On next row from RS inc 1 st P on each side of each cable = 18-18-18-26-26-26 sts inc on needle. Inc like this every 10th-10th-10th-14th-14th-14th row (= every 5th-5th-5th-7th-7th-7th row from RS) 7-7-7-5-5-5 times in total = 276-292-304-328-348-368 sts. When all inc are done, continue back and forth in pattern. When piece measures 56-56-57-57-57-57 cm – adjust to finish after 4th or 8th row in pattern, work 2 rows in stocking st inside 4 band sts in garter st in each side. Switch to circular needle size 4.5 mm and work 2 ridges. Cast off - READ CAST-OFF TIP.

SLEEVE:
Work sleeves in the round on double pointed needles.
Slip the 52-58-62-64-68-70 sts from stitch holder on double pointed needles size 5 mm and pick up 1 st in each of the 6-6-8-8-10-12 new sts cast on under sleeves = 58-64-70-72-78-82 sts. Insert a marker in the middle of the new sts. NOW MEASURE THE PIECE FROM HERE.
Now work A.2 (= 8 sts on 1st row) mid under sleeve (i.e. there are 4 sts of A.2 on each side of marker), work the remaining sts on round in stocking st. When piece measures 4 cm, dec 1 st on each side of A.2 - READ DECREASE TIP-2 (sleeve). Dec like this every 8th-6th-5th-4th-4th-4th round 11-14-15-19-18-19 times in total = 36-36-40-40-42-44 sts. When sleeve measures 48-47-46-45-44-44 cm, switch to double pointed needles size 4.5 mm. Work 2 ridges. Cast off. Knit another sleeve the same way.

ASSEMBLY:
Sew the buttons on to left band.

This pattern has been corrected.

Updated online: 21.10.2016
BODY:
There are now 158-174-186-206-226-246 sts for body. NOW MEASURE THE PIECE FROM HERE. Continue pattern back and forth as before and insert a marker in the middle of the new sts under sleeve in each side. Then dec in each side and in pattern as follows:...

Diagram

symbols = K from RS, P from WS
symbols = P from RS, K from WS
symbols = 1 YO between 2 sts On next row K YOs to make holes.
symbols = K 3, pass first st worked over the other 2 so that this st is around the last 2 sts on right needle (= 1 st dec)
symbols = on this row work K between cables (i.e. there will be a ridge on this row) This is done so that texture will not contract
symbols = this st has been dec, skip square
diagram
diagram

Each of our patterns has specific tutorial videos to help you.

Do you have a question? See a list of frequently asked questions (FAQ)

Knitting tension is what determines the final measurements of your work, and is usually measured per 10 x 10 cm. It is provided like so: number of stitches in width x number of rows in height - eg: 19 stitches x 26 rows = 10 x 10 cm.

The knitting tension is very individual; some people knit/crochet loosely while others work tightly. You adjust the knitting tension with the needle size, which is why the suggested needle size is only meant as a guide! You need to adjust this (up or down) to ensure that YOUR knitting tension matches the knitting tension provided in the pattern. If you work with a different knitting tension than provided you will have a different yarn consumption, and your work will have different measurements than what the pattern suggests.

The knitting tension also determines which yarns can replace each other. As long as you achieve the same knitting tension you can replace one yarn with another.

See DROPS lesson: How to measure your tension/gauge

See DROPS video: How to make a gauge tension swatch

The required amount of yarn is provided in grams, eg: 450 g. To calculate how many balls you’ll need you first need to know how many grams are in 1 ball (25g, 50g or 100g). This information is available if you click on the individual yarn quality on our pages. Divide the amount required with the amount of each ball. For example, if each ball is 50g (the most common amount), the calculation will be as follows: 450 / 50 = 9 balls.

The important thing when changing from one yarn to another is that the knitting/crochet tension remains the same. This is so that the measurements of the finished piece will be the same as on the sketch provided. It is easier to achieve the same knitting tension using yarns from the same yarn group. It is also possible to work with multiple strands of a thinner yarn to achieve the knitting tension of a thicker one. Please try our yarn converter. We recommend you to always work a test swatch.

Please NOTE: when changing yarn the garment might have a different look and feel to the garment in the photo, due to individual properties and qualities of each yarn.

See DROPS lesson: Can I use a different yarn than the one mentioned in the pattern?

All our yarns are categorised into yarn groups (from A to F) according to thickness and knitting tension – group A contains the thinnest yarns and group F the thickest. This makes it easier for you to find alternative yarns to our patterns, should you wish to switch yarn. All yarns within the same group have a similar knitting tension and can easily replace each other. However, different yarn qualities have different structures and properties which will give the finished work a unique look and feel.

Click here for an overview of the yarns in each yarn group

At the top of all our patterns you’ll find a link to our yarn calculator, which is a helpful tool should you wish to use a different yarn than suggested. By filling in the yarn quality you wish to replace, the amount (in your size) and number of strands, the calculator will present good alternative yarns with the same knitting tension. Additionally it will tell you how much you’ll require in the new qualities and whether you’ll need to work with multiple strands. Most skeins are 50g (some are 25g or 100g).

If the pattern is worked with multiple colours, every colour will have to be calculated separately. Similarly, if the pattern is worked with several strands of different yarns (for example 1 strand Alpaca and 1 strand Kid-Silk) you will have to find alternatives for each, individually.

Click here to see our yarn calculator

Since different yarns have different qualities and textures we have chosen to keep the original yarn in our patterns. However, you can easily find options among our available qualities by using our yarn calculator, or simply pick a yarn from the same yarn group.

It is possible that some retailers still have discontinued yarns in stock, or that someone has a few skeins at home that they would like to find patterns for.

The yarn calculator will provide both alternative yarn as well as required amount in the new quality.

If you think it's hard to decide what size to make, it can be a good idea to measure a garment you own already and like the size of. Then you can pick the size by comparing those measures with the ones available in the pattern's size chart.

You'll find the size chart at the bottom of the pattern.

See DROPS lesson: How to read size chart

The needle size provided in the pattern serves only as a guide, the important thing is to follow the knitting tension. And since knitting tension is very individual, you will have to adjust the needle size to ensure that YOUR tension is the same as in the pattern – maybe you’ll have to adjust 1, or even 2 needle sizes, up or down to achieve the correct tension. For this, we recommend that you work test swatches.

Should you work with a different knitting tension than the one provided, the measurements of the finished garment might deviate from the measurement sketch.

See DROPS lesson: How to measure your tension/gauge

See DROPS video: How to make a tension/gauge swatch

Working a garment top-down provides more flexibility and room for personal adjustment. For example it is easier to try the garment on while working, as well as making adjustments to length of yoke and shoulder caps.

The instructions are carefully explaining every step, in the correct order. Diagrams are adjusted to the knitting direction and are worked as usual.

The diagram depicts all rows/rounds, and every stitch seen from the right side. It is read from bottom to top, from right to left. 1 square = 1 stitch.

When working back and forth, every other row is worked from the right side and every other row is worked from the wrong side. When working from the wrong side, the diagram will have to be worked reversed: from left to right, knit stitches are purled, purl stitches are knit etc.

When working in the round every round is worked from the right side and the diagram are worked from right to left on all rounds.

See DROPS lesson: How to read knitting diagrams

The diagram depicts all rows/rounds, and every stitch seen from the right side. It is worked from bottom to top, from right to left.

When working back and forth every other row is worked from the right side: from right to left and every other row is worked from the wrong side: from left to right.

When working in the round, every row in the diagram are worked from the right side, from right to left.

When working a circular diagram you start in the middle and work your way outwards, counter clockwise, row by row.

The rows usually start with a given number of chain stitches (equivalent to the height of the following stitch), this will either be depicted in the diagram or explained in the pattern.

See DROPS lesson: How to read crochet diagrams

Instructions for working several diagrams after each other on the same row/round, will often be written like so: “work A.1, A.2, A.3 a total of 0-0-2-3-4 times". This means you work A.1 once, then A.2 is worked once, and A.3 is repeated (in width) the number of times provided for your size – in this case like so: S = 0 times, M = 0 times, L=2 times, XL= 3 times and XXL = 4 times.

The diagrams are worked as usual: begin with the first row in A.1, then work the first row in A.2 etc.

See DROPS lesson: How to read knitting diagrams

See DROPS lesson: How to read crochet diagrams

The total width of the garment (from wrist-to-wrist) will be larger in the larger sizes, despite the actual sleeves being shorter. The larger sizes have longer sleeve caps and wider shoulders, so there will be a good fit in all sizes.

The measurement sketch/schematic drawing provides information regarding the full length of the garment. If it’s a jumper or a jacket the length is measured from the highest point on the shoulder closest to the neckline, and straight down to the bottom of the garment. It is NOT measured from the tip of shoulder. Similarly, the length of yoke is measured from the highest point on the shoulder and down to where yoke is split into body and sleeves.

On a jacket measures are never taken along bands, unless specifically stated. Always measure inside band stitches when measuring the length.

See DROPS lesson: How to read a schematic drawing

Diagrams are often repeated on the round or in height. 1 repeat is the diagram the way it appears in the pattern. If it says to work 5 repeats of A.1 in the round, then you work A.1 a total of 5 times after/next to each other in the round. If it says to work 2 repeats of A.1 vertically/in height you work the entire diagram once, then begin again at the start and work the entire diagram one more time.

Chain stitches are slightly narrower than other stitches and to avoid working the cast-on edge too tight, we simply chain more stitches to begin with. The stitch count will be adjusted on the following row to fit the pattern and measurement sketch.

The rib edge is more elastic and will contract slightly compared to, for example, stocking stitch. By increasing before the rib edge, you avoid a visible difference in width between the rib edge and the rest of the body.

It’s very easy to cast off too tightly, and by making yarn overs while casting off (and simultaneously casting these off) you avoid a too tight cast off edge.

See DROPS video: How to bind off with yarn overs (yo)

To achieve an even increase (or decrease) you can increase on, for example: every 3rd and 4th row alternately, like so: work 2 rows and increase on the 3rd row, work 3 rows and increase on the 4th. Repeat this until the increase is complete.

See DROPS lesson: Increase or decrease 1 st on every 3rd and 4th row alternately

Should you prefer to work in the round instead of back and forth, you may of course adjust the pattern. You’ll need to add steeks mid-front (usually 5 stitches), and follow the instructions. When you would normally turn and work from the wrong side, simply work across the steek and continue in the round. At the end you’ll cut the piece open, pick up stitches to work bands, and cover the cut edges.

See DROPS video: How to knit steeks and cut open

Should you prefer to work back and forth instead of in the round, you may of course adjust the pattern so you work the pieces separately and then assemble them at the end. Divide the stitches for the body in 2, add 1 edge stitch in each side (for sewing) and work the front and back pieces separately.

See DROPS lesson: Can I adapt a pattern for circular needles into straight needles?

Pattern repeats can vary slightly in the different sizes, in order to get the correct proportions. If you’re not working the exact same size as the garment in the photo, yours might deviate slightly. This has been carefully developed and adjusted so that the complete impression of the garment is the same in all sizes.

Make sure to follow instructions and diagrams for your size!

If you have found a pattern you like which is available in women’s size it’s not very difficult to convert it to men’s size. The biggest difference will be the length of sleeves and body. Start working on the women size that you think would fit across the chest. The additional length will be worked right before you cast off for the armhole/sleeve cap. If the pattern is worked top-down you can add the length right after the armhole or before the first decrease on sleeve.

Regarding additional yarn amount, this will depend on how much length you add, but it is better with a skein too many than too few.

All yarns will have excess fibres (from production) that might come off as lint or shedding. Brushed yarns (ie hairier yarns) have more of these loose, excess fibres, causing more shedding.

Shedding also depends on what is worn under or over the garment, and whether this pulls at the yarn fibres. It’s therefore not possible to guarantee that there will be no shedding

Below are some tips on how to get the best result when working with hairier yarns:

1. When the garment is finished (before you wash it) shake it vigorously so the looser hairs come off. NOTE: do NOT use a lint roller, brush or any method that pulls at the yarn.

2. Place the garment in a plastic bag and put it in your freezer - the temperature will cause the fibres to become less attached to each other, and excess fibres will come off easier.

3. Leave in the freezer for a few hours before taking it out and shaking it again.

4. Wash the garment according to the instructions on the yarn label.

Pilling is a natural process that happens to even the most exclusive of fibers. It's a natural sign of wear and tear that is hard to avoid, and that is most visible in high friction areas of your garment like a sweater's arms and cuffs.

You can make your garment look as new by removing the pilling, using a fabric comb or a pill/lint remover.

Still can't find the answer you need? Then scroll down and leave your question so one of our experts can try to help you. This will be done normally within 5 to 10 working days.
In the meantime, you can read the questions and answers that others have left to this pattern or join the DROPS Workshop on Facebook to get help from fellow knitters/crocheters!

You might also like...

Post a comment to pattern DROPS 171-14

We would love to hear what you have to say about this pattern!

If you want to leave a question, please make sure you select the correct category in the form below, to speed up the answering process. Required fields are marked *.

Comments / Questions (80)

country flag Natascha Gruber wrote:

Hallo, ich glaube, in der Anleitung hat sich ein Fehler beim Ärmel eingeschlichen. Bei der Größe XL sind nach Aufnahme der 8 Maschen aus den neu angeschlagenen Maschen gesamt 72 Maschen auf der Nadel. Nach 4cm wird in jeder Runde abgenommen, jeweils 2 Maschen und das 19 mal. Danach sollen sollen 40 Maschen übrig sein. Sollte hier nicht eher 16 mal abgenommen werden? 72-38(2x19)= 34, nicht 40.

01.06.2022 - 21:25

DROPS Design answered:

Liebe Frau Gruber, danke für den Hinweis, Ihre Frage wurde unser Design Team weiterleitet - ja ich würde dann nur 16 Mal abnehmen, damit 40 Maschen bleiben. Viel Spaß beim stricken!

02.06.2022 - 08:52

country flag Kathrin Schmeisser wrote:

Hallo, wenn ich das Richtig lese gibt es im linken Vorderteil keine A2 somit keine Zunahmen, Laut Beschreibung wird A2 eingeteilt in linker Arm 2 M Zun. Rückteil im Wechsel 2 / 4 M Zun. rechter Arm 2M. Zun. rechter Vorderteil Im Wechsel 2/ 4 M. Zun. Ich muss jetzt zum zweiten mal alles auftrennen da im linken Vorderteil viel weniger Maschen sind.

28.03.2022 - 11:37

DROPS Design answered:

Liebe Frau Schmeisser, A.2 stricken Sie bei jedem Übergang zwischen Vorder-/Ärmel, Ärmel/Rückenteil, Rückenteil/Ärmel, und Ärmel/Vorderteil. Es wird vor/nach A.2 für den Ragaln zugenommen, so sollen Sie die gleiche Maschenanzahl an beiden Vorderteile haben (beachten Sie daß die Zunahmen entstehen an einem unterschiedlichen Rythmus beim Rumpfteil und bei den Ärmeln). Viel Spaß beim stricken!

28.03.2022 - 16:04

country flag Kathrin Schmeißer wrote:

Hallo. Danke für die Antwort nun stehe ich wieder vor einem Rätsel .Ich weiß wo ich die Zunahmen in der Passe machen muss .Auch wie ich sie in der Rückrunde Stricken muss . Meine Frage wie stricke ich die zugenommen maschen in der Hinrunde? Verschiebt sich dann mein ganzes Muster oder werden die maschen einfach rechts gestrickt und das Muster folgt dann ? Irgendwie verschiebt sich gerade alles !

14.03.2022 - 21:34

DROPS Design answered:

Liebe Frau Schmeißer, die Raglanzunahmen werden unter RAGLANZUNAHMEN ÄRMEL: und RAGLANZUNAHMEN RUMPFTEIL: erklärt - die neuen Maschen werden immer glatt rechts gestrickt; bei der 1. Rückreihen stricken Sie die Umschläge links, so daß Löcher entstehen. Wenn Sie aber 2 Maschen/Umschläge haben, dann soll nur 1 davon ein Loch bilden (das Loch direkt neben A.2, der andere Umschlag sollen Sie dann verschränkt links stricken). Viel Spaß beim stricken!

15.03.2022 - 10:31

country flag Schmeißer wrote:

Hallo , wird die Anschlagreihe als erste Reihe somit als Hinreihe gezählt ?

11.03.2022 - 21:24

DROPS Design answered:

Liebe Frau Schmeißer, die Anschlagsreihe ist nicht als 1. Reihe gezählt, dh nachdem Sie alle Maschen angeschlagen haben, stricken Sie die 2 Krausrippen (1. Reihe = Hinreihe). Viel Spaß beim stricken!

14.03.2022 - 10:03

country flag Julie Godfrey wrote:

Hello. After my first row of increasing, added 12 sts (xxl) how do I incorporate them into the pattern? The next row I know is knit the purl and so. But how do I do the next row? Nothing matches. Thank you

09.03.2021 - 00:38

DROPS Design answered:

Dear Mrs Godfrey, the stitches increased for raglan are worked in stocking stitch, ie either purl or purl twisted on first row after increase ( see RAGLAN SLEEVES and RAGLAN BODY) then work them in stocking stitch (= knit from RS and purl from WS). Happy knitting!

09.03.2021 - 07:50

country flag Nadia Trouillet wrote:

Suite à votre réponse de ce matin. Si j'ai bien compris nous aurons donc sur l'arrêt de maille A2 soit 8 mailles - 42 mailles jersey-A2 soit 8 mailles. Merci d'avoir répondu rapidement. A bientôt Nadia

16.02.2021 - 12:26

DROPS Design answered:

Bonjour Mme Trouillet, pas exactement, vous devez mettre en attente les 38 m du devant (= 4m de bordure devant, 1 m env, 8 m de A.1, 1 m env, 2 m end, 22 augmentations raglan) + les 4 premières mailles de A.2 = 42 mailles. Autrement dit, les A.2 des raglans sont divisés en 2 et répartis moitié sur le devant/le dos et moitié sur les manches. (manches = 4 m de A.2 + 18 augm + 14 m + 18 augm + 4 m de A.2 = 58 m)). Bon tricot!

16.02.2021 - 13:37

country flag Nadia Trouillet wrote:

Bonsoir, je réalise la taille M, j'ai tricoté 17 cm , mis les mailles des manches sur arrêt de mailles, mais je ne comprend pas : quand et comment arrêter les torsades et les trous du raglan. Dois-je tricoter tout en jersey à partir des augmentations des 6 mailles du dessous de bras. merci d'avance pour votre rapidité à répondre. Cordialement. nadia

15.02.2021 - 18:19

DROPS Design answered:

Bonjour Mme Trouillet, vous tricotez toutes les mailles comme avant, mais les 6 mailles montées sous chacune des deux manches se tricotent maintenant en jersey. Vous n'avez ainsi plus que les torsades de chaque devant et celles du dos. Bon tricot!

16.02.2021 - 09:12

country flag Nadia Trouillet wrote:

Bonjour, sur les diagrammes vous indiquez pour la case noire cette maille a été diminuée sautez cette case mais que fait-on de la maille ? Par ailleurs, vous serait-il possible dans le logiciel d'avoir toutes les questions posées dans la langue du modèle ( pour moi en Français) car il est peut être possible qu'une autre personne à l'autre bout du monde se pose la même question. Merci d'avance.

03.02.2021 - 10:34

DROPS Design answered:

Bonjour Mme Trouillet, comme cette case noire ne représente pas de mailles, sautez la simplement à la lecture, autrement dit, au 1er rang de A.1 tricotez: 1 m env, 1 m end, 1 jeté, 1 m end, 1 m env (= 4 mailles augmentées à 5 avec le jeté), vous avez ensuite 3 m end au milieu, et comme vous en diminuez 1 au 3ème rang, au 4ème rang, vous n'aurez plus que 2 mailles endroit (= à tricoter à l'envers sur l'endroit). J'espère que ce complément d'informations pourra vous aider. Vous pouvez utiliser un traducteur en ligne pour vous donner une idée des questions/réponses dans d'autres langues ou bien simplement poser votre question ici, tout comme vous avez fait. Bon tricot!

03.02.2021 - 11:22

country flag Mona wrote:

Etter man har tatt av til armene, strikkes d en rad med mønster A2 under armen på bolen også?

21.11.2020 - 22:23

country flag Ute Marx wrote:

Hallo liebes Drops-Team, ich verzweifel gerade. Zählen die beiden Vorderteile auch zum Rumpf? Ich denke ja. Aber dann habe ich im linken Vorderteil kein A2, vor/nach dem ich zunehmen kann. Und im rechten Vorderteil habe ich auch mehr Maschen (weil es dort ja A1 und A2 gibt) als im linken Vorderteil. Oder sind in der Anleitung die Kommata falls gesetzt und die Ärmel bestehen aus A2. 16M re A2? Ich bin verwirrt. Liebe Grüße Ute Marx

29.07.2020 - 20:37

DROPS Design answered:

Liebe Frau Marx, so werden die Maschen verteilt: 4 Blenden-M, 1 M li, A.1 (= 4 M) 2-2-2-3-3-3 x, 1 M li, 1-2-2-1-2-3 M re (= linkes Vorderteil), A.2, 14-14-16-16-16-16 M re (= Ärmel), A.2, 1-2-2-1-2-3 M re, 1 M li, A.1 5-5-5-7-7-7 x, 1 M li, 1-2-2-1-2-3 M re, (= Rückenteil), A.2, 14-14-16-16-16-16 M re (= Ärmel), A.2, 1-2-2-1-2-3 M re, 1 M li, A.1 2-2-2-3-3-3 x, 1 M li, 4 Blenden-M(= rechtes Vorderteil). Es sind 4 Mal A.2 insgesamt. Viel Spaß beim stricken!

30.07.2020 - 09:06