
Popular categories
Looking for a yarn?


|
|||||||||||||||||||||||||||||||||||||
Helsinki Cardigan |
|||||||||||||||||||||||||||||||||||||
 |
 |
||||||||||||||||||||||||||||||||||||
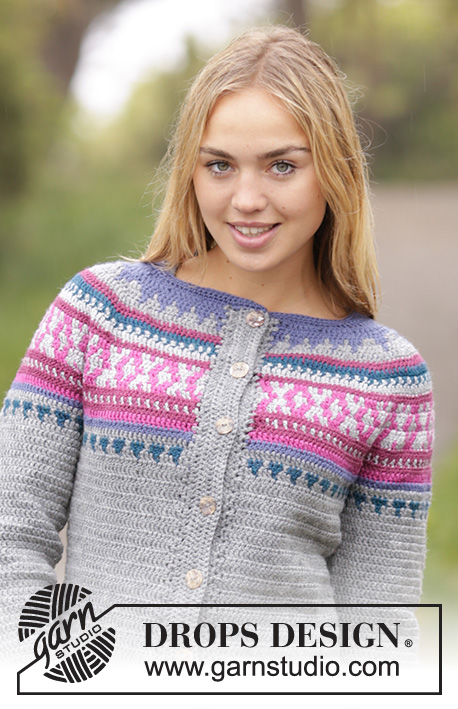
Crochet DROPS jacket with multi-coloured pattern and round yoke, worked top down in ”Karisma”. Size: S - XXXL.
DROPS 172-34 |
|||||||||||||||||||||||||||||||||||||
|
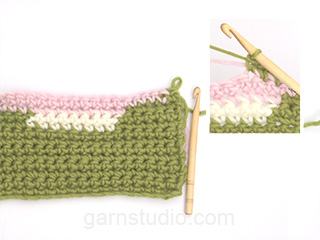
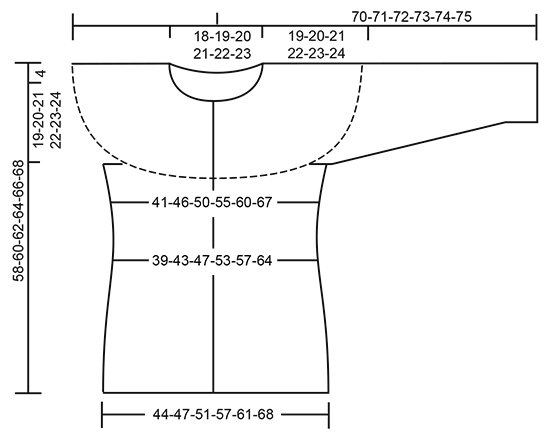
PATTERN: See diagrams A.1 to A.13. Diagrams show colour pattern on jacket. See diagram for correct size. Work diagrams A.2, A.5, A.7 and A.10 only in size M-XL-XXXL. CROCHET INFO: Beg every tr row with 3 ch (does not replace first tr). Replace first tr at beg of every tr round with 3 ch. Finish round with 1 sl st in 3rd ch at beg of round. INCREASE TIP-1: Work 2 tr with same colour in 1 tr on previous row. COLOUR PATTERN (worked back and forth): When changing colour work as follows: Work last tr with first colour but wait with last pull through, switch to next colour and work last pull through, then work next tr. When working with two colour place strand for the colour not worked over sts from previous row/round, work around the strand so that it is hidden and follows when working. Make sure to avoid tights yarn and not to tighten yarn when picking it up from previous row/round. COLOUR PATTERN (worked in the round): Work as COLOUR PATTERN (worked back and forth) but: Replace first tr with 3 ch, if last tr on previous round and first tr on next round are different colour work last tr as follows: Work last tr with first colour but wait with last pull through, switch to next colour and work last pull through, 1 sl st in 3rd ch at beg of round, then work 3 ch (= beg of round). DECREASE TIP: Work until 4 tr remain before marker, work 2 tr tog, work 1 tr in each of the next 4 tr, (marker is in the middle of these sts), work the next 2 tr tog (= 2 tr dec). Repeat at both markers. INCREASE TIP-2: Work until 3 tr remain before marker, work 2 tr in next tr, 1 tr in each of the next 4 tr (marker is in the middle of these sts) and 2 tr in next tr (= 2 tr inc). Repeat at both markers. ---------------------------------------------------------- JACKET: Worked back and forth, top down. Work bands at the end. YOKE: Work 111-116-120-125-130-134 ch (incl 3 ch to turn with) on hook size 4 mm with denim blue. Work 1 tr in 4th ch from hook (= 1 tr) - READ CROCHET INFO, 1 tr in each of the next 2-0-4-2-0-4 ch, * skip 1 ch, 1 tr in each of the next 6 ch *, repeat from *-* = 93-97-101-105-109-113 tr. Work 1st row in A.1 to A.5 and inc evenly as follows (= from RS): Work A.1 (= 1 tr) over 1 st, A.2 (= 2 tr) over the next 0-2-0-2-0-2 tr, repeat A.3 (= 4 tr) over the next 14-13-16-15-18-17 tr and inc 2-3-4-5-6-7 tr (= left front piece) – READ INCREASE TIP-1, A.4 (= 4 tr) – see diagram, repeat A.3 over the next 10 tr and inc 2-2-2-2-6-6 tr, A.4 over the next 4 tr (= left sleeve), repeat A.3 over the next 28-30-32-34-36-38 tr and inc 4-6-8-10-12-14 tr (= back piece), A.4 over the next 4 tr, repeat A.3 over the next 10 tr and inc 2-2-2-2-6-6 tr, A.4 over the next 4 tr (= right sleeve), repeat A.3 (= 4 tr) over the next 14-13-16-15-18-17 tr and inc 2-3-4-5-6-7 tr, finish with A.5 over the next 0-2-0-2-0-2 tr = 113-121-129-137-153-161 tr (incl inc in A.4) – READ COLOUR PATTERN (work back and forth)! Work 2nd row in A.1 to A.5 as follows (= from WS): Work A.5 over the first 0-2-0-2-0-2 tr, repeat A.3 over the next 16-16-20-20-24-24 tr, A.4, repeat A.3 over the next 12-12-12-12-16-16 tr, A.4, repeat A.3 over the next 32-36-40-44-48-52 tr, A.4, repeat A.3 over the next 12-12-12-12-16-16 tr, A.4, repeat A.3 over the next 16-16-20-20-24-24 tr, finish with A.2 over the next 0-2-0-2-0-2 tr and A.1 over the last st = 121-129-137-145-161-169 sts (incl inc in A.4). REMEMBER THE CROCHET TENSION! Work 5th row in A.1 to A.5 and inc evenly as follows (= from RS): Work A.1 over 1 tr, A.2 over the next 0-2-0-2-0-2 tr, repeat A.3 over the next 16-16-20-20-24-24 tr and inc 0-2-4-4-4-4 tr (= left front piece), A.4, repeat A.3 over the next 12-12-12-12-16-16 tr and inc 4-4-4-4-8-8 tr, A.4 (= left sleeve), repeat A.3 over the next 32-36-40-44-48-52 tr and inc 0-4-4-4-8-8 tr (= back piece), A.4, repeat A.3 over the next 12-12-12-12-16-16 tr and inc 4-4-4-4-8-8 tr, A.4 (= right sleeve), repeat A.3 over the next 16-16-20-20-24-24 tr and inc 0-2-4-4-4-4 tr, finish with A.5 over the last 0-2-0-2-0-2 tr = 153-169-181-189-217-225 tr (incl inc in A.4). Work 6th row in A.1 to A.5 as follows (= from WS): Work A.5 over the first 0-0-0-2-0-2 tr, repeat A.3 over the next 16-20-24-24-28-28 tr, A.4, repeat A.3 over the next 16-16-16-16-24-24 tr, A.4, repeat A.3 over the next 32-40-44-48-56-60 tr, A.4, repeat A.3 over the next 16-16-16-16-24-24 tr, A.4, repeat A.3 over the next 16-20-24-24-28-28 tr, A.2 over the next 0-0-0-2-0-2 tr, finish with A.1 over the last tr = 161-177-189-197-225-233 tr (incl inc in A.4). Then work as follows in each size: SIZE S: The even inc is now done, continue and work A.1 to A.5 and inc as in A.4. When A.1 to A.5 have been worked 1 time vertically, there are 181 tr. SIZE M-L-XL-XXL-XXXL: Work 7th row in A.1 to A.5 and inc evenly as follows (= from RS): Work A.1 over 1 tr, A.2 over the next 0-0-2-0-2 tr, repeat A.3 over the next 20-24-24-28-28 tr and inc 0-0-2-4-4 tr, A.4, repeat A.3 over the next 16-16-16-24-24 tr and inc 4 tr, A.4, repeat A.3 over the next 40-44-48-56-60 tr and inc 0-4-4-4-8 tr, A.4, repeat A.3 over the next 16-16-16-24-24 tr and inc 4 tr, A.4, repeat A.3 over the next 20-24-24-28-28 tr and inc 0-0-2-4-4 tr, finish with A.5 over the last 0-0-2-0-2 tr = 185-201-213-245-257 tr. Work 8th row in A.1 to A.5 as follows (= from WS): Work A.5 over the first 0-0-0-0-2 tr, repeat A.3 over the next 20-24-28-32-32 tr, A.4, repeat A.3 over the next 20-20-20-28-28 tr, A.4, repeat A.3 over the next 40-48-52-60-68 tr, A.4, repeat A.3 over the next 20-20-20-28-28 tr, A.4, repeat A.3 over the next 20-24-28-32-32 tr, A.2 over the next 0-0-0-0-2 tr, finish with A.1 over the last tr = 193-209-221-253-265 tr (incl inc in A.4). Work 9th row in A.1 to A.5 and inc evenly as follows (= from RS): Work A.1 over 1 tr, A.2 over the next 0-0-0-0-2 tr, repeat A.3 over the next 20-24-28-32-32 tr and inc 0-0-0-0-2 tr, A.4, repeat A.3 over the next 20-20-20-28-28 tr and inc 4 tr, A.4, repeat A.3 over the next 40-48-52-60-68 tr and inc 0-0-4-4-4 tr, A.4, repeat A.3 over the next 20-20-20-28-28 tr and inc 4 tr, A.4, repeat A.3 over the next 20-24-28-32-32 tr and inc 0-0-0-0-2 tr, A.5 over the last 0-0-0-0-2 tr = 213-229-245-277-293 tr (incl inc in A.4). ALL SIZES: Piece now measures approx. 11 cm. Work 1st row in A.6 to A.10 as follows (= from WS): Work A.10 (= 4 tr) over the first 0-4-0-4-0-4 tr, repeat A.8 (= 8 tr) over the next 16-16-24-24-32-32 tr, repeat A.9 (= 7 tr) over the next 21 tr, A.8 over the next 16-24-24-24-32-32 tr, repeat A.9 over the next 21 tr, repeat A.8 over the next 32-40-48-56-64-72 tr, repeat A.9 over the next 21 tr, A.8 over the next 16-24-24-24-32-32 tr, repeat A.9 over the next 21 tr, repeat A.8 over the next 16-16-24-24-32-32 tr, A.7 (= 4 tr) over the next 0-4-0-4-0-4 tr, A.6 (= 1 tr) over last tr. Continue pattern like this and inc as shown in A.9. Work 5-5-7-7-9-9 rows of A.6 to A.10. On 6th-6th-8th-8th-10th-10th row – see arrow in diagram in A.6 to A.10 work and inc evenly as follows (= from RS): Work A.6 over 1 tr, A.7 over the next 0-4-0-4-0-4 tr, A.8 over the next 16-16-24-24-32-32 tr and inc 2-2-2-2-2-4 tr, repeat A.9 over the next 30 tr, A.8 over the next 16-24-24-24-32-32 tr and inc 4-0-2-6-0-4 tr, A.9 over the next 30 tr, A.8 over the next 32-40-48-56-64-72 tr and inc 4-4-4-4-4-8 tr, repeat A.9 over the next 30 tr, A.8 over the next 16-24-24-24-32-32 tr and inc 4-0-2-6-0-4 tr, repeat A.9 over the next 30 tr, repeat A.8 over the next 16-16-24-24-32-32 tr and inc 2-2-2-2-2-4 tr, A.10 over the last 0-4-0-4-0-4 tr = 233-257-277-301-321-353 tr. Work 1-2-1-2-1-2 rows more AT THE SAME TIME on first row inc 0-4-16-16-16-12 tr evenly on first row (i.e. 7-8-9-10-11-12 rows of A.6 to A.10 have been worked in total) = 233-261-293-317-337-365 tr. Piece measures approx. 19-20-21-22-23-24 cm. Then work as follows in each size: SIZE M-XL-XXXL: Work next row as follows - from WS: Work A.8 over the first 37-45-55 tr (= right front piece), work 8-8-10 ch, insert 1 marker between these sts, skip the next 56-68-72 tr (= right sleeve), A.8 over the next 74-90-110 tr (= back piece), work 8-8-10 ch, insert 1 marker between these sts, skip the next 56-68-72 tr (= left sleeve), A.8 over the last 38-46-56 tr (= left front piece) = 165-197-241 tr. SIZE S-L-XXL: Work next row as follows from RS: Work A.8 over the first 34-42-50 tr (= left front piece), skip the next 50-64-70 tr (= left sleeve), work 8-8-10 ch, insert 1 marker between these sts, A.8 over the next 66-82-98 tr (= back piece), skip the next 50-64-70 tr (= right sleeve), work 8-8-10 ch, insert 1 marker between these sts, A.8 over the next 33-41-49 tr (= right front piece) = 149-181-217 tr. ALL SIZES: = 149-165-181-197-217-241 tr. Insert 1 marker in the piece. NOW MEASURE THE PIECE FROM HERE. Work next row as follows: Repeat A.11 until 1 st remain, work last st as first st in A.11 (this is done so that the piece is the same in both sides). Continue piece in medium grey. When piece measures 4 cm from marker, dec 2 tr at each marker - READ DECREASE TIP. Dec like this every 9-5-5-10-6-6 cm 2-3-3-2-3-3 times in total = 141-153-169-189-205-229 tr. When piece measures 15-17-17-19-19-21 cm, inc 2 tr at each marker – see INCREASE TIP-2. Inc like this every 3 cm a total of 4 times = 157-169-185-205-221-245 tr. When piece measures 31-33-33-35-35-37 cm, inc 0-0-2-0-2-2 tr evenly = 157-169-187-205-223-247 tr. Adjust so that next row is from RS. Work A.12 (= 6 sts) until 1 st remains, work first st in A.12 (this is done so that the pattern is the same in both sides). When A.12 has been worked 1 time vertically, piece measures approx. 54-56-58-60-62-64 cm from neck edge. Fasten off. SLEEVE: = 50-56-64-68-70-72 tr. Sleeve is worked in the round, top down. Beg by working mid under sleeve as follows: Work 8th-9th-10th-11th-12th-13th round in diagram A.8 over all sts like this (i.e. work stripes, diagram will not fit no of sts). Work 1 dc in 5th ch of the 8-8-8-8-10-10 ch work in armhole on body, 3 ch (= 1 tr), work 1 tr in each of the next 3-3-3-3-5-5 ch, work 1 tr in every tr over sleeve, work 1 tr in each of the remaining 4 ch under sleeve = 58-64-72-76-80-82 tr. Insert 1 marker thread mid under sleeve. Insert 1 marker in piece, NOW MEASURE PIECE FROM HERE. Leave marker in piece, move marker thread when working. Work like this on next round: Work 1-0-0-0-0-1 tr, repeat A.11 over the next 56-64-72-76-80-80 tr (= 14-16-18-19-20-20 times in width), finish with 1-0-0-0-0-1 tr. When A.11 has been worked 1 time vertically, continue with medium grey. When piece measures 5 cm, dec 1 tr on each side of marker thread (= 2 tr dec). Dec like this every 3- 2½-2-1½-1½-1½ cm 9-12-14-16-16-17 times in total = 40-40-44-44-48-48 tr. When piece measures 40-40-39-39-38-38 cm (shorter measurements in the larger sizes because of longer yoke), work A.13 (= 2 tr) on round. Fasten off when A.13 has been worked 1 time vertically. Piece measures approx. 70-71-72-73-74-75 cm from neck edge. Work the other sleeve the same way. BAND: Beg at top of neck edge. Worked back and forth. Work with medium grey as follows: Work 1 sl st around first tr, 1 dc around same tr, * 2 ch, 1 dc around next tr *, repeat from *-* down the entire edge on jacket, finish with 1 dc in last tr. Then work 95 to 115 tr around ch-spaces evenly (make sure to avoid tightening or widening piece). Continue with 1 tr in every tr until band measures 4 cm. Fasten off. Work the other band the same way. NECK EDGE: Worked back and forth from mid front. Work ch where tr were worked (i.e. do not work over the ch skipped = 93-97-101-105-109-113 tr and over band). Work with denim blue: ROW 1 (from RS): Work 7 dc evenly around band tr, 1 dc in each of the first 8-9-10-11-12-13 sts, * 1 htr in each of the next 3 sts, 1 tr in each of the next 3 sts, 1 dtr in each of the next 18 ch, 1 tr in each of the next 3 sts, 1 htr in each of the next 3 sts *, 1 dc in each of the next 16-18-20-22-24-26 sts, repeat from *-* 1 time, 1 dc in each of the last 9-10-11-12-13-14 sts, work 7 dc evenly on band tr = 107-111-115-119-123-127 sts. ROW 2 (= from WS): Work 1 dc in each of the first 20-21-22-23-24-25 sts, ** 1 htr in each of the next 3 sts, 1 tr in each of the next 3 sts, * work the next 2 dtr tog as dtr*, repeat from *-* 4 more times, 1 tr in each of the next 3 sts, 1 htr in each of the next 3 sts **, 1 dc in each of the next 24-26-28-30-32-34 sts, repeat from **-** 1 more time, finish with 1 dc in each of the last 19-20-21-22-23-24 sts = 97-101-105-109-113-117 sts. Work 1 row with 1 dc in every st. Fasten off. ASSEMBLY: Sew on buttons on left band. Fasten 1st button approx. 2 cm from neck edge, then fasten them approx. 8 cm apart. Button between 2 tr on right band. |
|||||||||||||||||||||||||||||||||||||
Diagram explanations |
|||||||||||||||||||||||||||||||||||||
|
|||||||||||||||||||||||||||||||||||||

|
|||||||||||||||||||||||||||||||||||||
|
|||||||||||||||||||||||||||||||||||||
|
Have you made this or any other of our designs? Tag your pictures in social media with #dropsdesign so we can see them! Do you need help with this pattern?You'll find tutorial videos, a Comments/Questions area and more by visiting the pattern on garnstudio.com. © 1982-2024 DROPS Design A/S. We reserve all rights. This document, including all its sub-sections, has copyrights. Read more about what you can do with our patterns at the bottom of each pattern on our site. |
|||||||||||||||||||||||||||||||||||||


With over 40 years in knitting and crochet design, DROPS Design offers one of the most extensive collections of free patterns on the internet - translated to 17 languages. As of today we count 304 catalogues and 11422 patterns - 11422 of which are translated into English (UK/cm).
We work hard to bring you the best knitting and crochet have to offer, inspiration and advice as well as great quality yarns at incredible prices! Would you like to use our patterns for other than personal use? You can read what you are allowed to do in the Copyright text at the bottom of all our patterns. Happy crafting!
Comments / Questions (129)
I am concerned about the sizing. I am looking at the XL, when yoke is finished the final stitch count starting the body is 197, according to swatch with 18 sts to 4 inches, that is 4.5 sts per inch, which would be just under 44 inches, plus the two bands 1.5 inch ea, so a total of just under 47. When I look at the pattern is shows a measurement of 55 inches at this point?
06.03.2017 - 21:17DROPS Design answered:
Dear Mrs Lozoya, measurements in the chart are in cm, so that 197 sts = approx. 55 cm. Read more about sizing and convert here. Happy crocheting!
07.03.2017 - 08:38Lucia wrote:
Hola! gracias por su anterior respuesta! Tengo una nueva duda respecto de la fila 3. La fila 2 se termina con tres p.a. (A.1 y A.2) despues de A.3, y segun lei las filas 3 y 4 se tejen repitiendo las instrucciones de la fila 2. Pero si se repiten, se debe comenzar con A.5 y luego A.3, esto hace que el dibujo de A.3 quede desplazado. Se debe comenzar la fila 3 tejiendo A.1, A.2 y luego A.3??? No estoy segura de que el dibujo que obtengo al comenzar de esta forma sea el correcto....
12.02.2017 - 11:04DROPS Design answered:
Hola Lucia, no debes olvidar que se trabaja de ida y vuelta. Al trabajar la vuelta debes leer el dibujo alrevés. La 3ª fila se comienza con A.1, A.2 y A.3 y la 4ª fila empieza con A.5.
16.02.2017 - 11:11Lucia wrote:
Buen dia, me ha encantado este cardigan y me dispongo a comenzar el trabajo, pero tengo algunas dudas. Como interpretar el "0" en las indicaciones? Cuando decis "1 p.a. en cada uno de los sig 2-0-4-2-0-4 p.de cad," el numero cero quiere decir que se debe saltear un punto? espero una respuesta! Gracias!
29.01.2017 - 10:42DROPS Design answered:
Hola Lucia. Con los patrones de Drops puedes tejer desde la talla S hasta la talla XXXL. Cuando en el texto vienen varios números como "los sig 2-0-4-2-0-4 p.de cad" significa que el primer número (en este caso 2 p.de cad.) es para la talla S, el 0 - para la talla M ( es decir, que para la talla M no se trabaja esta parte de patrón, y se pasa al siguiente paso - que es *saltar 1 p.de cad, 1 p.a. en cada uno de los sig 6 p.de cad *).
29.01.2017 - 13:33Jag får inte ihop varv 1, hur är meningen att man ska göra ökningarna? Jag har provat olika sätt men jag får inte ihop det. Det är lite svårt att förstå hur det är menat??
16.01.2017 - 17:35DROPS Design answered:
Hej Anna. Naar der staar: gjenta A.3 (= 4 st) over de neste 14-13-16-15-18-17 st og øk 2-3-4-5-6-7 st (= venstre forstk) – LES ØKETIPS-1, saa skal du f.eks. öke 2 st over de 14 m i A.3 i den mindste str. Du kan laese i ØKETIPS-1 at du öker ved at hekle 2 st i 1 st
17.01.2017 - 14:31GW wrote:
Thank you Nora! The pattern should have read...ROW 3 AND 4 REPEAT ROW 2...that would have made it so much easier!
30.12.2016 - 23:31At places in the pattern where you are reading just M and above (after Row 6), the stitch numbers for small size are not there so instead of using the second number in the sequence of the stitch numbers, you use the first. I had a hard time figuring that out. Although it is a little hard to follow, it is well worth the effort. I consulted a knitter for help also.
30.12.2016 - 20:46I have finished the yoke for this cardigan. Rows 3 and 4 are repeating the instructions for row 2. So you follow the instructions but move up a row on the color chart. For even numbered rows, you read the chart from left to right and for odd numbered rows, you read from right to left.
30.12.2016 - 20:45Have I missed something on yoke as it seems to go from 2nd row to 5th row ...where are rows 3 and 4 please?
29.12.2016 - 23:05DROPS Design answered:
Dear GW, work row 3 and 4 in pattern following diagrams as explained before. Happy crocheting!
02.01.2017 - 08:14Hej Jeg er nået til ALLE STR og ved udtagningen. Skal jeg tage ud, hækle 3 cm på række og tage ud igen (over ryg stykket) eller tage ud, lave rækker og tage ud igen når jeg har hæklet rækker svarende til 3 cm? De 15 cm måles fra mærket sat i starten, ikke? Det er korrekt hvis hver ind og udtagning er under ærme/i siden, ikke?
20.12.2016 - 17:55DROPS Design answered:
Hej Anna. Du er faerdig med baerestykket og saetter nu et nyt maerke. Du maaler nu herfra. Först tager du IND ved 4 cm og det gentager du herefter paa hver x cm i alt 2 eller 3 gange. Du tager ud i siderne (under aermet). Naar det maaler 15 cm (fra maerket du satte da du var faerdig med baerestk), saa skal du tage ud 4 gange. 1e gang ved cm, saa efter 3 cm (18 cm), saa 21, 24 og sidste 27 cm
21.12.2016 - 14:16Hi I am making xxl and struggling to get the pattern to look right. I have read diagrams from bottom right for right side and left for ws. Row 3 just doesn't work for me, I have done as said and worked a1, a3 then a4, repeatedly. Please help, thanks
19.12.2016 - 20:29DROPS Design answered:
Dear Sally, please make sure you inc evenly in A.3 on row 1 so that you have correct of repetitions on row 2 - and remember to inc also in A.3 as shown in diagram. Happy crocheting!
20.12.2016 - 08:54