
Popular categories
Looking for a yarn?


|
|||||||||||||||||||||||||||||||||||||
Helsinki Cardigan |
|||||||||||||||||||||||||||||||||||||
 |
 |
||||||||||||||||||||||||||||||||||||
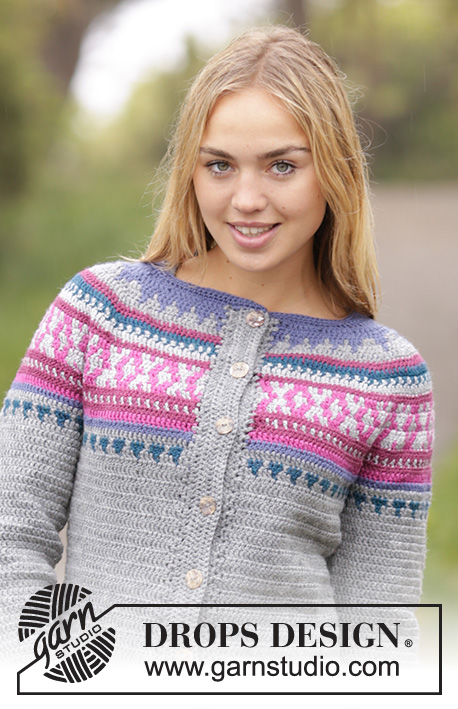
Crochet DROPS jacket with multi-coloured pattern and round yoke, worked top down in ”Karisma”. Size: S - XXXL.
DROPS 172-34 |
|||||||||||||||||||||||||||||||||||||
|
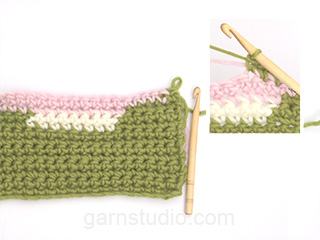
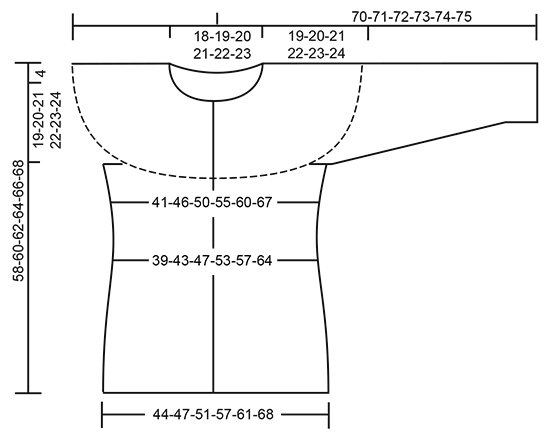
PATTERN: See diagrams A.1 to A.13. Diagrams show colour pattern on jacket. See diagram for correct size. Work diagrams A.2, A.5, A.7 and A.10 only in size M-XL-XXXL. CROCHET INFO: Beg every tr row with 3 ch (does not replace first tr). Replace first tr at beg of every tr round with 3 ch. Finish round with 1 sl st in 3rd ch at beg of round. INCREASE TIP-1: Work 2 tr with same colour in 1 tr on previous row. COLOUR PATTERN (worked back and forth): When changing colour work as follows: Work last tr with first colour but wait with last pull through, switch to next colour and work last pull through, then work next tr. When working with two colour place strand for the colour not worked over sts from previous row/round, work around the strand so that it is hidden and follows when working. Make sure to avoid tights yarn and not to tighten yarn when picking it up from previous row/round. COLOUR PATTERN (worked in the round): Work as COLOUR PATTERN (worked back and forth) but: Replace first tr with 3 ch, if last tr on previous round and first tr on next round are different colour work last tr as follows: Work last tr with first colour but wait with last pull through, switch to next colour and work last pull through, 1 sl st in 3rd ch at beg of round, then work 3 ch (= beg of round). DECREASE TIP: Work until 4 tr remain before marker, work 2 tr tog, work 1 tr in each of the next 4 tr, (marker is in the middle of these sts), work the next 2 tr tog (= 2 tr dec). Repeat at both markers. INCREASE TIP-2: Work until 3 tr remain before marker, work 2 tr in next tr, 1 tr in each of the next 4 tr (marker is in the middle of these sts) and 2 tr in next tr (= 2 tr inc). Repeat at both markers. ---------------------------------------------------------- JACKET: Worked back and forth, top down. Work bands at the end. YOKE: Work 111-116-120-125-130-134 ch (incl 3 ch to turn with) on hook size 4 mm with denim blue. Work 1 tr in 4th ch from hook (= 1 tr) - READ CROCHET INFO, 1 tr in each of the next 2-0-4-2-0-4 ch, * skip 1 ch, 1 tr in each of the next 6 ch *, repeat from *-* = 93-97-101-105-109-113 tr. Work 1st row in A.1 to A.5 and inc evenly as follows (= from RS): Work A.1 (= 1 tr) over 1 st, A.2 (= 2 tr) over the next 0-2-0-2-0-2 tr, repeat A.3 (= 4 tr) over the next 14-13-16-15-18-17 tr and inc 2-3-4-5-6-7 tr (= left front piece) – READ INCREASE TIP-1, A.4 (= 4 tr) – see diagram, repeat A.3 over the next 10 tr and inc 2-2-2-2-6-6 tr, A.4 over the next 4 tr (= left sleeve), repeat A.3 over the next 28-30-32-34-36-38 tr and inc 4-6-8-10-12-14 tr (= back piece), A.4 over the next 4 tr, repeat A.3 over the next 10 tr and inc 2-2-2-2-6-6 tr, A.4 over the next 4 tr (= right sleeve), repeat A.3 (= 4 tr) over the next 14-13-16-15-18-17 tr and inc 2-3-4-5-6-7 tr, finish with A.5 over the next 0-2-0-2-0-2 tr = 113-121-129-137-153-161 tr (incl inc in A.4) – READ COLOUR PATTERN (work back and forth)! Work 2nd row in A.1 to A.5 as follows (= from WS): Work A.5 over the first 0-2-0-2-0-2 tr, repeat A.3 over the next 16-16-20-20-24-24 tr, A.4, repeat A.3 over the next 12-12-12-12-16-16 tr, A.4, repeat A.3 over the next 32-36-40-44-48-52 tr, A.4, repeat A.3 over the next 12-12-12-12-16-16 tr, A.4, repeat A.3 over the next 16-16-20-20-24-24 tr, finish with A.2 over the next 0-2-0-2-0-2 tr and A.1 over the last st = 121-129-137-145-161-169 sts (incl inc in A.4). REMEMBER THE CROCHET TENSION! Work 5th row in A.1 to A.5 and inc evenly as follows (= from RS): Work A.1 over 1 tr, A.2 over the next 0-2-0-2-0-2 tr, repeat A.3 over the next 16-16-20-20-24-24 tr and inc 0-2-4-4-4-4 tr (= left front piece), A.4, repeat A.3 over the next 12-12-12-12-16-16 tr and inc 4-4-4-4-8-8 tr, A.4 (= left sleeve), repeat A.3 over the next 32-36-40-44-48-52 tr and inc 0-4-4-4-8-8 tr (= back piece), A.4, repeat A.3 over the next 12-12-12-12-16-16 tr and inc 4-4-4-4-8-8 tr, A.4 (= right sleeve), repeat A.3 over the next 16-16-20-20-24-24 tr and inc 0-2-4-4-4-4 tr, finish with A.5 over the last 0-2-0-2-0-2 tr = 153-169-181-189-217-225 tr (incl inc in A.4). Work 6th row in A.1 to A.5 as follows (= from WS): Work A.5 over the first 0-0-0-2-0-2 tr, repeat A.3 over the next 16-20-24-24-28-28 tr, A.4, repeat A.3 over the next 16-16-16-16-24-24 tr, A.4, repeat A.3 over the next 32-40-44-48-56-60 tr, A.4, repeat A.3 over the next 16-16-16-16-24-24 tr, A.4, repeat A.3 over the next 16-20-24-24-28-28 tr, A.2 over the next 0-0-0-2-0-2 tr, finish with A.1 over the last tr = 161-177-189-197-225-233 tr (incl inc in A.4). Then work as follows in each size: SIZE S: The even inc is now done, continue and work A.1 to A.5 and inc as in A.4. When A.1 to A.5 have been worked 1 time vertically, there are 181 tr. SIZE M-L-XL-XXL-XXXL: Work 7th row in A.1 to A.5 and inc evenly as follows (= from RS): Work A.1 over 1 tr, A.2 over the next 0-0-2-0-2 tr, repeat A.3 over the next 20-24-24-28-28 tr and inc 0-0-2-4-4 tr, A.4, repeat A.3 over the next 16-16-16-24-24 tr and inc 4 tr, A.4, repeat A.3 over the next 40-44-48-56-60 tr and inc 0-4-4-4-8 tr, A.4, repeat A.3 over the next 16-16-16-24-24 tr and inc 4 tr, A.4, repeat A.3 over the next 20-24-24-28-28 tr and inc 0-0-2-4-4 tr, finish with A.5 over the last 0-0-2-0-2 tr = 185-201-213-245-257 tr. Work 8th row in A.1 to A.5 as follows (= from WS): Work A.5 over the first 0-0-0-0-2 tr, repeat A.3 over the next 20-24-28-32-32 tr, A.4, repeat A.3 over the next 20-20-20-28-28 tr, A.4, repeat A.3 over the next 40-48-52-60-68 tr, A.4, repeat A.3 over the next 20-20-20-28-28 tr, A.4, repeat A.3 over the next 20-24-28-32-32 tr, A.2 over the next 0-0-0-0-2 tr, finish with A.1 over the last tr = 193-209-221-253-265 tr (incl inc in A.4). Work 9th row in A.1 to A.5 and inc evenly as follows (= from RS): Work A.1 over 1 tr, A.2 over the next 0-0-0-0-2 tr, repeat A.3 over the next 20-24-28-32-32 tr and inc 0-0-0-0-2 tr, A.4, repeat A.3 over the next 20-20-20-28-28 tr and inc 4 tr, A.4, repeat A.3 over the next 40-48-52-60-68 tr and inc 0-0-4-4-4 tr, A.4, repeat A.3 over the next 20-20-20-28-28 tr and inc 4 tr, A.4, repeat A.3 over the next 20-24-28-32-32 tr and inc 0-0-0-0-2 tr, A.5 over the last 0-0-0-0-2 tr = 213-229-245-277-293 tr (incl inc in A.4). ALL SIZES: Piece now measures approx. 11 cm. Work 1st row in A.6 to A.10 as follows (= from WS): Work A.10 (= 4 tr) over the first 0-4-0-4-0-4 tr, repeat A.8 (= 8 tr) over the next 16-16-24-24-32-32 tr, repeat A.9 (= 7 tr) over the next 21 tr, A.8 over the next 16-24-24-24-32-32 tr, repeat A.9 over the next 21 tr, repeat A.8 over the next 32-40-48-56-64-72 tr, repeat A.9 over the next 21 tr, A.8 over the next 16-24-24-24-32-32 tr, repeat A.9 over the next 21 tr, repeat A.8 over the next 16-16-24-24-32-32 tr, A.7 (= 4 tr) over the next 0-4-0-4-0-4 tr, A.6 (= 1 tr) over last tr. Continue pattern like this and inc as shown in A.9. Work 5-5-7-7-9-9 rows of A.6 to A.10. On 6th-6th-8th-8th-10th-10th row – see arrow in diagram in A.6 to A.10 work and inc evenly as follows (= from RS): Work A.6 over 1 tr, A.7 over the next 0-4-0-4-0-4 tr, A.8 over the next 16-16-24-24-32-32 tr and inc 2-2-2-2-2-4 tr, repeat A.9 over the next 30 tr, A.8 over the next 16-24-24-24-32-32 tr and inc 4-0-2-6-0-4 tr, A.9 over the next 30 tr, A.8 over the next 32-40-48-56-64-72 tr and inc 4-4-4-4-4-8 tr, repeat A.9 over the next 30 tr, A.8 over the next 16-24-24-24-32-32 tr and inc 4-0-2-6-0-4 tr, repeat A.9 over the next 30 tr, repeat A.8 over the next 16-16-24-24-32-32 tr and inc 2-2-2-2-2-4 tr, A.10 over the last 0-4-0-4-0-4 tr = 233-257-277-301-321-353 tr. Work 1-2-1-2-1-2 rows more AT THE SAME TIME on first row inc 0-4-16-16-16-12 tr evenly on first row (i.e. 7-8-9-10-11-12 rows of A.6 to A.10 have been worked in total) = 233-261-293-317-337-365 tr. Piece measures approx. 19-20-21-22-23-24 cm. Then work as follows in each size: SIZE M-XL-XXXL: Work next row as follows - from WS: Work A.8 over the first 37-45-55 tr (= right front piece), work 8-8-10 ch, insert 1 marker between these sts, skip the next 56-68-72 tr (= right sleeve), A.8 over the next 74-90-110 tr (= back piece), work 8-8-10 ch, insert 1 marker between these sts, skip the next 56-68-72 tr (= left sleeve), A.8 over the last 38-46-56 tr (= left front piece) = 165-197-241 tr. SIZE S-L-XXL: Work next row as follows from RS: Work A.8 over the first 34-42-50 tr (= left front piece), skip the next 50-64-70 tr (= left sleeve), work 8-8-10 ch, insert 1 marker between these sts, A.8 over the next 66-82-98 tr (= back piece), skip the next 50-64-70 tr (= right sleeve), work 8-8-10 ch, insert 1 marker between these sts, A.8 over the next 33-41-49 tr (= right front piece) = 149-181-217 tr. ALL SIZES: = 149-165-181-197-217-241 tr. Insert 1 marker in the piece. NOW MEASURE THE PIECE FROM HERE. Work next row as follows: Repeat A.11 until 1 st remain, work last st as first st in A.11 (this is done so that the piece is the same in both sides). Continue piece in medium grey. When piece measures 4 cm from marker, dec 2 tr at each marker - READ DECREASE TIP. Dec like this every 9-5-5-10-6-6 cm 2-3-3-2-3-3 times in total = 141-153-169-189-205-229 tr. When piece measures 15-17-17-19-19-21 cm, inc 2 tr at each marker – see INCREASE TIP-2. Inc like this every 3 cm a total of 4 times = 157-169-185-205-221-245 tr. When piece measures 31-33-33-35-35-37 cm, inc 0-0-2-0-2-2 tr evenly = 157-169-187-205-223-247 tr. Adjust so that next row is from RS. Work A.12 (= 6 sts) until 1 st remains, work first st in A.12 (this is done so that the pattern is the same in both sides). When A.12 has been worked 1 time vertically, piece measures approx. 54-56-58-60-62-64 cm from neck edge. Fasten off. SLEEVE: = 50-56-64-68-70-72 tr. Sleeve is worked in the round, top down. Beg by working mid under sleeve as follows: Work 8th-9th-10th-11th-12th-13th round in diagram A.8 over all sts like this (i.e. work stripes, diagram will not fit no of sts). Work 1 dc in 5th ch of the 8-8-8-8-10-10 ch work in armhole on body, 3 ch (= 1 tr), work 1 tr in each of the next 3-3-3-3-5-5 ch, work 1 tr in every tr over sleeve, work 1 tr in each of the remaining 4 ch under sleeve = 58-64-72-76-80-82 tr. Insert 1 marker thread mid under sleeve. Insert 1 marker in piece, NOW MEASURE PIECE FROM HERE. Leave marker in piece, move marker thread when working. Work like this on next round: Work 1-0-0-0-0-1 tr, repeat A.11 over the next 56-64-72-76-80-80 tr (= 14-16-18-19-20-20 times in width), finish with 1-0-0-0-0-1 tr. When A.11 has been worked 1 time vertically, continue with medium grey. When piece measures 5 cm, dec 1 tr on each side of marker thread (= 2 tr dec). Dec like this every 3- 2½-2-1½-1½-1½ cm 9-12-14-16-16-17 times in total = 40-40-44-44-48-48 tr. When piece measures 40-40-39-39-38-38 cm (shorter measurements in the larger sizes because of longer yoke), work A.13 (= 2 tr) on round. Fasten off when A.13 has been worked 1 time vertically. Piece measures approx. 70-71-72-73-74-75 cm from neck edge. Work the other sleeve the same way. BAND: Beg at top of neck edge. Worked back and forth. Work with medium grey as follows: Work 1 sl st around first tr, 1 dc around same tr, * 2 ch, 1 dc around next tr *, repeat from *-* down the entire edge on jacket, finish with 1 dc in last tr. Then work 95 to 115 tr around ch-spaces evenly (make sure to avoid tightening or widening piece). Continue with 1 tr in every tr until band measures 4 cm. Fasten off. Work the other band the same way. NECK EDGE: Worked back and forth from mid front. Work ch where tr were worked (i.e. do not work over the ch skipped = 93-97-101-105-109-113 tr and over band). Work with denim blue: ROW 1 (from RS): Work 7 dc evenly around band tr, 1 dc in each of the first 8-9-10-11-12-13 sts, * 1 htr in each of the next 3 sts, 1 tr in each of the next 3 sts, 1 dtr in each of the next 18 ch, 1 tr in each of the next 3 sts, 1 htr in each of the next 3 sts *, 1 dc in each of the next 16-18-20-22-24-26 sts, repeat from *-* 1 time, 1 dc in each of the last 9-10-11-12-13-14 sts, work 7 dc evenly on band tr = 107-111-115-119-123-127 sts. ROW 2 (= from WS): Work 1 dc in each of the first 20-21-22-23-24-25 sts, ** 1 htr in each of the next 3 sts, 1 tr in each of the next 3 sts, * work the next 2 dtr tog as dtr*, repeat from *-* 4 more times, 1 tr in each of the next 3 sts, 1 htr in each of the next 3 sts **, 1 dc in each of the next 24-26-28-30-32-34 sts, repeat from **-** 1 more time, finish with 1 dc in each of the last 19-20-21-22-23-24 sts = 97-101-105-109-113-117 sts. Work 1 row with 1 dc in every st. Fasten off. ASSEMBLY: Sew on buttons on left band. Fasten 1st button approx. 2 cm from neck edge, then fasten them approx. 8 cm apart. Button between 2 tr on right band. |
|||||||||||||||||||||||||||||||||||||
Diagram explanations |
|||||||||||||||||||||||||||||||||||||
|
|||||||||||||||||||||||||||||||||||||

|
|||||||||||||||||||||||||||||||||||||
|
|||||||||||||||||||||||||||||||||||||
|
Have you made this or any other of our designs? Tag your pictures in social media with #dropsdesign so we can see them! Do you need help with this pattern?You'll find tutorial videos, a Comments/Questions area and more by visiting the pattern on garnstudio.com. © 1982-2024 DROPS Design A/S. We reserve all rights. This document, including all its sub-sections, has copyrights. Read more about what you can do with our patterns at the bottom of each pattern on our site. |
|||||||||||||||||||||||||||||||||||||


With over 40 years in knitting and crochet design, DROPS Design offers one of the most extensive collections of free patterns on the internet - translated to 17 languages. As of today we count 304 catalogues and 11422 patterns - 11422 of which are translated into English (UK/cm).
We work hard to bring you the best knitting and crochet have to offer, inspiration and advice as well as great quality yarns at incredible prices! Would you like to use our patterns for other than personal use? You can read what you are allowed to do in the Copyright text at the bottom of all our patterns. Happy crafting!
Comments / Questions (129)
Hallo nochmal. Muss ich dir Luftmaschenkette in der ersten Runde vom Rumpf umhäkeln? Und wenn ja mit wie vielen Maschen? Werde aus der Anleitung nicht schlau, weil bei den Ärmeln von Luftmaschen die Rede ist. Sorry
20.09.2018 - 11:49DROPS Design answered:
Liebe Frau Kelch, Ärmel beginnen so (Rd 8-9-10-11-12-13 von A.8 gleichzeitg häkeln): 1 feste M (fM) in die 5. Lm der 8-10 Lm (siehe Grösse), die am Armausschnitt des Rumpfteils gehäkelt wurden, 3 Lm (= 1 Stb = Anfang der Reihe), dann je 1 Stb in die nächsten 3- 5 Lm (der 8-10 Lm), 1 Stb in jedes Stb des Ärmels (= die übergesprungenen Maschen) und je 1 Stb in die restlichen 4 Lm unter dem Arm häkeln (= die 8-10 Lm unter dem Arm sind jetzt gehäkelt und Rd beginng unter dem Arm mit den 3 Lm). Viel Spaß beim häkeln!
20.09.2018 - 13:22Muss ich beim Abnehmen der Ärmel die Luftmaschen anhäkeln?
19.09.2018 - 18:45DROPS Design answered:
Liebe Frau Kelch, Jeder Reihe mit Stb beginnt mit 3 Luftmaschen und diese Luftmaschen ersetzen das 1. Stb. Sie können wie beim ABNAHMETIPP abnehmen, dh am Anfang der Reihe nach den 3 Lm und am Ende der Reihe wenn 3 Stb übrig sind (= 1 Stb + die 3 Lm zwischen den Abnahmen). Viel Spaß beim häkeln!
20.09.2018 - 09:14Het patroon gaat van toer 2 opeens naar toer 5? Ik kom van de tweede toer (L, 137st) niet opeens uit op 181... Zit er nog iets tussen?
09.09.2018 - 20:27DROPS Design answered:
Dag Maris, Deze andere toeren (toer 3 en 5) haakje gewoon volgens telpatroon. De toeren waar meerderingen in zitten zijn in het telpatroon aangegeven met een pijl en beschreven in het patroon.
12.09.2018 - 14:27Provar igen då. Funderar på vart den jeansblå i A6-A10 tagit vägen i mönstret. Har gjort tot 8 varv och nu gått över till där jag virkar 8 lm, hoppar över för ärm mm. När den är klar går mönstret över till A11 men vart tog varvet med jeansblått vägen? Ser ut att vara ett varv med stolpar för att sen gå över till grått och petrol. Är det något jag missat?
11.08.2018 - 22:45DROPS Design answered:
Hei Magdalena. I de minste størrelsene får du ikke heklet alle omgangene i diagram A.6-A.10 før du skal legge opp luftmasker under ermene og begynne på bolen. Som oppskriften sier så har du heklet til og med omgang 7-8-9-10-11-12 av diagrammene før omgangen med ermhull. Diagrammene er tegnet for passe alle 6 størrelser, så da er de desseverre lenger enn du trenger for de minste størrelsene. Det er ikke noe i veien for at du likevel velger å hekle en omgang med jeansblå på bolen før du begynner å hekle A.11 om du gjerne vil ha med den omgangen med jeansblå. God fornøyelse
15.08.2018 - 14:27Jeg er gået i stå ved række 7. I str. M. Fra række 6 er der 177 masker, men der skal bruges i alt 189 masker i opskriften for at lave række 7. Derfor mangler jeg 14 masker for at kunn følge opskriften i række 7??? Hvad gør jeg galt?
10.08.2018 - 12:47DROPS Design answered:
Hei Louise. I A.4 økes det 2 staver på hver omgang (som anvist i diagrammet), som vil si at når du hekler A.4 totalt 4 ganger på omgangen har du økt med 12 masker. I tillegg skal du øke 4 staver over A.3 totalt 3 ganger = ytterligere 12 masker økt. Med toatlt 24 masker økt på omgangen ender du med 201 staver etter omgang 7, som angitt i oppskriften. God fornøyelse
14.08.2018 - 13:45Hej! Hur ska jag tänka på V2-5 av A.6 till A10. När jag ökar på A9 så blir det 8 st, varken 21 eller 22 är delbart med 8, hur ska jag göra? Hur tänker jag på resterande varven, V3 - V5? Snälla, jag är ett varv ifrån så tacksam för snabbt svar.
31.07.2018 - 16:39DROPS Design answered:
Hei Magdalena. A.9 hekles over 21 masker av gangen på første omgang = 3 rapporter. Fordi du øker i hver rapport av A.9 vil du på 2 omgang hekle A.9 over 24 masker hver gang (= 8 staver i hver rapport x 3 rapporter). På 5 omgang hekles A.9 over 30 masker (10 staver i hver rapport). God fornøyelse
15.08.2018 - 14:28Första gången jag virkar efter mönster och väljer denna. Mycket verkar vara underförstått. Jag ska precis göra första ökningen i V7 och funderar kring hur jag ska göra eftersom det är varannan färg. Hur ska jag öka, två av samma färg eller en av vardera färgen i stolpen?
29.07.2018 - 18:00DROPS Design answered:
Hei Magdalena. Det kan virke som du er kommet forbi dette stadiet nå, men om du fortsatt lurer så skal du hekle økingene i annenhver farge slik at mønsteret blir opprettholdt. God fornøyelse
15.08.2018 - 14:30I Virkinfon inledningsvis säger ni liksom mot er själva... jag förstår inte i alla fall. Första står det att stolpen inte ersätts för att i nästa mening stå att den ersätts med tre lm...
20.07.2018 - 16:29DROPS Design answered:
Hej, när det virkas fram och tillbaka ersätter de 3 luftmaskorna inte första stolpen, men när det virkas runt ersätter man den första stolpen med 3 luftmaskor.
23.07.2018 - 14:23Jetzt habe ich die Idee, mit meinen Zuschauern zusammen als "CAL" eine Jacke zu häkeln und möchte Sie auf diesem Wege fragen, ob da etwas von Ihrer Seite dagegen sprechen würde...\rFalls Sie Interesse an dem Thema haben und vielleicht auch Ihre Wolle passend zum Projekt zeigen wollen, wäre ich sehr an einer Kooperation interessiert.Über Ihr Interesse und eine Rückmeldung würde ich mich sehr freuen. Liebe Grüße,Alexandra Korfmann (Wolleule)
15.06.2018 - 09:50DROPS Design answered:
Liebe Frau Korfman, Danke für Ihre Anfrage. Schreiben Sie uns bitte media @garnstudio.com (ohne Leerstelle)
15.06.2018 - 11:23Hallo liebes Drops-Team, ich heiße Alexandra und habe einen Youtube-Channel rund ums Häkeln (Wolleule)Ein paar Ihrer Häkeljacken-Modelle habe ich in meinem letzten Podcast vorgestellt, weil ich mir gern einen Cardigan häkeln würde und mir die Modelle Helsinki, Sweet Mint und der Pulli Nordic Fling besonders gefallen... s. 2. Frage
15.06.2018 - 09:49