DROPS Alpaca
DROPS Alpaca
100% Alpaca
from 3.40 £ /50g
Get the yarn to make this pattern from 27.20£.

The yarn cost is calculated from the pattern’s smallest size and the yarn’s cheapest product type. Looking for an even better price? You might find it on the DROPS Deals!

DROPS SS24

From my Angle

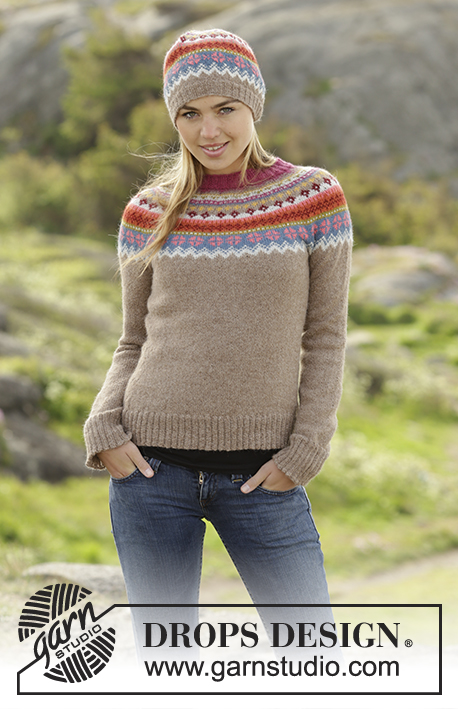
Knitted DROPS jumper with multi-coloured pattern, worked in an angle top down in ”Alpaca”. Size: S - XXXL.

DROPS 172-24
DROPS design: Pattern no z-749
Yarn group A
----------------------------------------------------------
Size: S - M - L - XL - XXL - XXXL
Materials:
DROPS ALPACA from Garnstudio
250-250-300-300-350-350 g colour no 3800, old pink
150-200-200-200-250-250 g colour no 9020, light pearl grey

DROPS DOUBLE POINTED NEEDLES AND CIRCULAR NEEDLE (40 and 80 cm) SIZE 3 mm - or size needed to get 24 sts x 32 rows in stocking st = 10 x 10 cm.
DROPS DOUBLE POINTED NEEDLES AND CIRCULAR NEEDLE (40 and 80 cm) SIZE 2.5 mm for garter st - or size needed to get 26 sts x 34 rows in stocking st = 10 x 10 cm.

-------------------------------------------------------

Alternative Yarn – See how to change yarns here
Yarn Groups A to F – Use the same pattern and change the yarn here
Yarn usage using an alternative yarn – Use our yarn converter here

-------------------------------------------------------

DROPS Alpaca
DROPS Alpaca
100% Alpaca
from 3.40 £ /50g
Get the yarn to make this pattern from 27.20£.

The yarn cost is calculated from the pattern’s smallest size and the yarn’s cheapest product type. Looking for an even better price? You might find it on the DROPS Deals!

Pattern instructions

NOTE: This pattern is written in British English. All measurements in charts are in cm. For conversion from cm to inches - click here. There are different terms for crocheting in British and American English. If this pattern includes crochet, click for "crochet terms" here. For this pattern in American English, please click here.
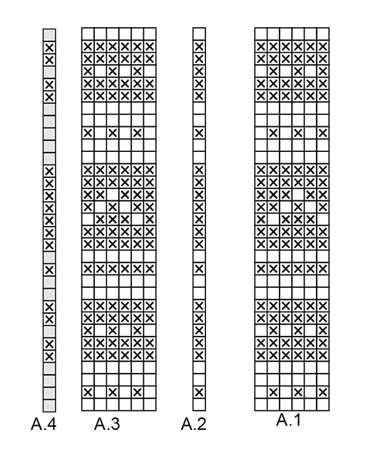
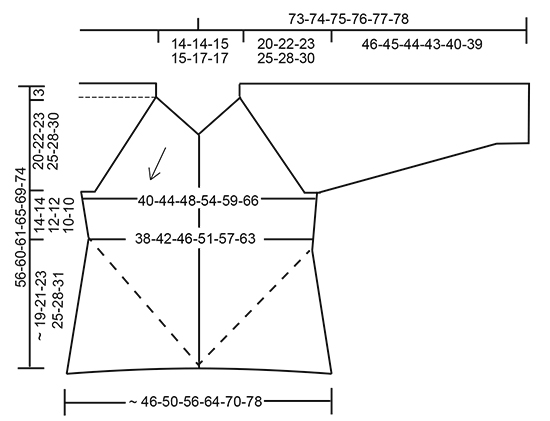
GARTER ST (worked in the round):
1 ridge = 2 rounds. * K 1 round and P 1 round *, repeat from *-*.

PATTERN:
See diagrams A.1 to A.4. Pattern is worked in stocking st.
The diagrams show all rows in pattern seen from RS. NOTE: When diagram is worked back and forth, work as follows: If the strand to be worked with is in the wrong side of piece, move sts back and work 2 rows from the same side or cut the yarn if needed.

RAGLAN:
Inc differently on sleeves and body. Inc by making YO. K YO TWISTED in pattern, they should NOT make holes – READ KNITTING TIP!
BODY:
Inc with 1 YO on each side of 1st and 4th marker (which is in st) as follows: Inc every round 6-12-10-22-18-32 times in total and inc on every other round a total of 28-28-30-28-34-30 times (= 34-40-40-50-52-62 times in total).
SLEEVE:
Inc with 1 YO after 2nd and 5th marker and before 3rd and 6th marker (that are between sts) as follows:
Inc every round 0-4-6-4-0-0 times in total and inc on every other round a total of 31-32-32-37-43-46 times (= 31-36-38-41-43-46 times in total).

DECREASE TIP:
Dec 1 st on each side of each marker as follows: Work until 3 sts remain before marker, K 2 tog, K 2 (marker is in the middle of these sts), slip 1 st as if to K, K 1, psso (= 2 sts dec = 4 sts dec in total).

Dec 2 st on each side of each marker as follows: Work until 5 sts remain before marker, * K 2 tog * repeat from *-* 2 times in total (= 2 sts dec), K 2 (marker is in the middle of these sts), * slip 1 st as if to K, K 1, psso *, repeat from *-* 2 times in total (= 4 sts dec = 8 sts dec in total).

KNITTING TIP:
Work YO with same colour as last/first st before/after YO.

CAST-OFF TIP:
To avoid a tight cast-off edge you may use a needle ½ size larger.
----------------------------------------------------------

JUMPER:
Worked top down in the round on circular needle. Cast on 124-124-132-132-148-148 sts on circular needle size 2.5 mm with old pink. Work 3 ridges in GARTER ST – see explanation above, AT THE SAME TIME on 3rd and 5th round (round with K) inc 12-12-20-20-24-24 sts evenly on each of the rounds (= 24-24-40-40-48-48 sts inc in total) = 148-148-172-172-196-196 sts. Switch to circular needle size 3 mm.

Work next round as follows: On this round insert 4 markers between sts in piece and 2 marker in st (= 6 markers in total).
Back piece:
Work A.1 over the first 30-30-36-36-42-42 sts (= 5-5-6-6-7-7 times in width), insert 1st marker in next st and work st as A.2 (= mid back), work A.3 over the next 30-30-36-36-42-42 sts (= 5-5-6-6-7-7 times in width), insert 2nd marker.
Right sleeve:
Work A.3 over the next 12 sts (= 2 times in width), A.4 over next st (this is done so that the pattern is the same in both sides of sleeve), insert 3rd marker.
Front piece:
Work A.1 over the first 30-30-36-36-42-42 sts (= 5-5-6-6-7-7 times in width), insert 4th marker in next st and work st as A.2 (= mid front), work A.3 over the next 30-30-36-36-42-42 sts (= 5-5-6-6-7-7 times in width), insert 5th marker.
Left sleeve:
Work A.3 over the next 12 sts (= 2 times in width), A.4 over next st (this is done so that the pattern is the same in both sides of sleeve), insert 6th marker.

Inc for RAGLAN – see explanation above! Repeat A.1 to A.4 vertically until finished measurements.

REMEMBER THE KNITTING TENSION When inc for raglan is finished, piece measures approx. 20-22-23-25-28-30 cm on the shortest part of piece. There are 64-70-76-86-94-104 sts on each side of 1st and 4th marker on body (= 129-141-153-173-189-209 sts in total on each front piece and back piece) and 75-85-89-95-99-105 sts on each of the sleeves = 408-452-484-536-576-628 sts in total.

On next round, work as follows:
K the first 2 sts tog (= 1 st dec), work pattern as before until 1st marker, 1 YO, work sts with marker as before (= mid back), 1 YO (= 2 sts inc), work pattern as before until 2 sts remain before 2nd marker, K 2 tog (= 1 st dec), slip the next 75-85-89-95-99-105 sts (sts between 2nd and 3rd marker) on a stitch holder for sleeve, cast on 8-8-12-12-12-16 sts under sleeve with the same colour as last st was worked with, (insert 1 marker between in the middle of the new sts), K 2 tog (= 1 st dec), work until st with 4th marker, 1 YO, work st with marker as before (= mid front), 1 YO (= 2 sts inc), work pattern as before until 2 sts remain before 5th marker, K 2 tog (= 1 st dec), slip the next 75-85-89-95-99-105 sts (sts between 5th and 6th marker) on a stitch holder for sleeve, cast on 8-8-12-12-12-16 sts under sleeve with the same colour as last st was worked with, (insert 1 marker in the middle between the new sts) = 274-298-330-370-402-450 sts.

BODY:
Displace round so that it beg mid under sleeve (i.e. move the next sts over on left needle without working them, until marker under right sleeve.).

Insert 1 marker thread in piece. NOW MEASURE PIECE FROM HERE! Leave marker thread in piece. Move the markers upwards when working. Continue pattern as before. K YOs twisted in pattern, they should NOT make holes.

Work the new sts under sleeve in pattern, adjust so that pattern is mirrored under sleeve (i.e. on each side of marker). On every other round inc 1 st on each side of sts mid front and mid back (i.e. st with 1st and 4th marker) and dec 1 st on each side of marker under each sleeve – READ DECREASE TIP (= 4 sts dec and 4 sts inc every other round). The same no of sts will remain on needle, inc mid front and mid back and dec in the sides.

When piece measures 3 cm from marker thread under sleeve, adjust so that next round is 1 inc/dec round. Work pattern and inc as before but now dec 2 sts on each side of each marker under sleeve (instead of 1 st) on next round. I.e. dec 8 sts in total and inc 4 sts in total (= 2 sts dec at each marker = 4 sts dec in total on round). Dec like this every 2½-7-6-1½-2-2 cm 4-2-2-6-4-4 times in total = 258-290-322-346-386-434 sts. Work the remaining rounds as before, i.e. dec and inc 4 sts on every other round.

Continue like this until piece measures 46-50-50-54-58-63 cm measured along mid st (i.e. st at 1st or 4th marker). Piece measures approx. 56-60-61-65-69-74 cm measured from the shoulder on the longest.

Adjust so that next round is 1 inc/dec round. Cut the yarn. Slip the first 65-73-81-87-97-109 sts (= half back piece, incl st with 1st marker) on a stitch holder, and slip the last 64-72-80-86-96-108 sts on a stitch holder (= half front piece). Now work over the remaining 129-145-161-173-193-217 sts on needle (i.e. from st after 1st marker towards and incl st with 4th marker = right side of jumper, from mid back to mid front).

Now work back and forth as follows:
Continue with pattern as before until finished measurements.
Row 1 (= RS): Cast off the first 2 sts, work pattern as before until 3 sts remain before marker under sleeve, dec 1 st on each side of marker as before (= 2 sts dec), work pattern the rest of row as before = 2 sts cast off at beg of row towards mid back and 2 sts dec in the side on garment (= 4 sts cast off/dec in total).
Row 2 (= WS): Cast off the first 2 sts, work pattern the rest of row as before = 2 sts cast off at beg of row towards mid front.
Row 3 (= RS): Cast off the first 2 sts, work pattern the rest of row as before = 2 sts cast off at beg of row towards mid back.
Row 4 (= WS): Work as 2nd row = 2 sts cast off at beg of row towards mid front.
Row 5 (= RS): Work as 3rd row = 2 sts cast off at beg of row towards mid back.
Row 6 (= WS): Work as 2nd row = 2 sts cast off at beg of row towards mid front.
Row 7 (= RS): Work as 1st row = 2 sts cast off at beg of row towards mid back and 2 sts dec in the side on garment (= 4 sts cast off/dec in total).
Row 8 (= WS): Work as 2nd row = 2 sts cast off at beg of row towards mid front.
Row 9 (= RS): Work as 3rd row = 2 sts cast off at beg of row towards mid back.
Row 10 (= WS): Work as 2nd row = 2 sts cast off at beg of row towards mid front.

Repeat 1st to 10th row until 5 sts remain on needle. Cast off. Slip sts from stitch holder back on needle and work the same way (= left side of jumper, from mid front towards mid back).

SLEEVE:
Worked in the round on double pointed needles. Distribute sts from stitch holder in one side of piece on double pointed needles size 3 mm = 75-85-89-95-99-105 sts. Pick up 8-8-12-12-12-16 sts in the sts cast on under sleeve on body = 83-93-101-107-111-121 sts. Insert 1 marker in the middle of the new sts. Continue with pattern as before, i.e. mirror the pattern at marker. Insert 1 marker thread in piece, NOW MEASURE PIECE FROM HERE. Leave marker thread in piece. Move the markers upwards when working. When piece measures 3 cm, dec 1 st on each side of marker (= 2 sts dec). Dec like this every 1 cm 8-8-8-8-12-25 times in total = 67-77-85-91-87-71 sts. Then every 3½-2-1½-1½-1½-1½ cm 8-12-15-17-13-4 times in total = 51-53-55-57-61-63 sts. When piece measures 45-44-43-42-39-38 cm, switch to double pointed needles size 2.5 mm. Work 3 ridge in GARTER ST - see explanation above, with old pink. Cast off. Piece measures approx. 46-45-44-43-40-39 cm. Work the other sleeve the same way.

EDGE AT THE BOTTOM:
Knit up sts for an edge inside 1 st along the entire bottom edge of jumper. Knit up approx. 240-260-290-332-364-406 sts evenly distributed with old pink from RS on circular needle size 2.5 mm. Make sure that the edge is not too tight on body. If it does pick up more sts. Work 3 ridges in the round. Cast off with circular needle size 3 mm – READ CAST-OFF TIP.

Diagram

symbols = light pearl grey
symbols = old pink
diagram
diagram

Each of our patterns has specific tutorial videos to help you.

Do you have a question? See a list of frequently asked questions (FAQ)

Knitting tension is what determines the final measurements of your work, and is usually measured per 10 x 10 cm. It is provided like so: number of stitches in width x number of rows in height - eg: 19 stitches x 26 rows = 10 x 10 cm.

The knitting tension is very individual; some people knit/crochet loosely while others work tightly. You adjust the knitting tension with the needle size, which is why the suggested needle size is only meant as a guide! You need to adjust this (up or down) to ensure that YOUR knitting tension matches the knitting tension provided in the pattern. If you work with a different knitting tension than provided you will have a different yarn consumption, and your work will have different measurements than what the pattern suggests.

The knitting tension also determines which yarns can replace each other. As long as you achieve the same knitting tension you can replace one yarn with another.

See DROPS lesson: How to measure your tension/gauge

See DROPS video: How to make a gauge tension swatch

The required amount of yarn is provided in grams, eg: 450 g. To calculate how many balls you’ll need you first need to know how many grams are in 1 ball (25g, 50g or 100g). This information is available if you click on the individual yarn quality on our pages. Divide the amount required with the amount of each ball. For example, if each ball is 50g (the most common amount), the calculation will be as follows: 450 / 50 = 9 balls.

The important thing when changing from one yarn to another is that the knitting/crochet tension remains the same. This is so that the measurements of the finished piece will be the same as on the sketch provided. It is easier to achieve the same knitting tension using yarns from the same yarn group. It is also possible to work with multiple strands of a thinner yarn to achieve the knitting tension of a thicker one. Please try our yarn converter. We recommend you to always work a test swatch.

Please NOTE: when changing yarn the garment might have a different look and feel to the garment in the photo, due to individual properties and qualities of each yarn.

See DROPS lesson: Can I use a different yarn than the one mentioned in the pattern?

All our yarns are categorised into yarn groups (from A to F) according to thickness and knitting tension – group A contains the thinnest yarns and group F the thickest. This makes it easier for you to find alternative yarns to our patterns, should you wish to switch yarn. All yarns within the same group have a similar knitting tension and can easily replace each other. However, different yarn qualities have different structures and properties which will give the finished work a unique look and feel.

Click here for an overview of the yarns in each yarn group

At the top of all our patterns you’ll find a link to our yarn calculator, which is a helpful tool should you wish to use a different yarn than suggested. By filling in the yarn quality you wish to replace, the amount (in your size) and number of strands, the calculator will present good alternative yarns with the same knitting tension. Additionally it will tell you how much you’ll require in the new qualities and whether you’ll need to work with multiple strands. Most skeins are 50g (some are 25g or 100g).

If the pattern is worked with multiple colours, every colour will have to be calculated separately. Similarly, if the pattern is worked with several strands of different yarns (for example 1 strand Alpaca and 1 strand Kid-Silk) you will have to find alternatives for each, individually.

Click here to see our yarn calculator

Since different yarns have different qualities and textures we have chosen to keep the original yarn in our patterns. However, you can easily find options among our available qualities by using our yarn calculator, or simply pick a yarn from the same yarn group.

It is possible that some retailers still have discontinued yarns in stock, or that someone has a few skeins at home that they would like to find patterns for.

The yarn calculator will provide both alternative yarn as well as required amount in the new quality.

If you think it's hard to decide what size to make, it can be a good idea to measure a garment you own already and like the size of. Then you can pick the size by comparing those measures with the ones available in the pattern's size chart.

You'll find the size chart at the bottom of the pattern.

See DROPS lesson: How to read size chart

The needle size provided in the pattern serves only as a guide, the important thing is to follow the knitting tension. And since knitting tension is very individual, you will have to adjust the needle size to ensure that YOUR tension is the same as in the pattern – maybe you’ll have to adjust 1, or even 2 needle sizes, up or down to achieve the correct tension. For this, we recommend that you work test swatches.

Should you work with a different knitting tension than the one provided, the measurements of the finished garment might deviate from the measurement sketch.

See DROPS lesson: How to measure your tension/gauge

See DROPS video: How to make a tension/gauge swatch

Working a garment top-down provides more flexibility and room for personal adjustment. For example it is easier to try the garment on while working, as well as making adjustments to length of yoke and shoulder caps.

The instructions are carefully explaining every step, in the correct order. Diagrams are adjusted to the knitting direction and are worked as usual.

The diagram depicts all rows/rounds, and every stitch seen from the right side. It is read from bottom to top, from right to left. 1 square = 1 stitch.

When working back and forth, every other row is worked from the right side and every other row is worked from the wrong side. When working from the wrong side, the diagram will have to be worked reversed: from left to right, knit stitches are purled, purl stitches are knit etc.

When working in the round every round is worked from the right side and the diagram are worked from right to left on all rounds.

See DROPS lesson: How to read knitting diagrams

The diagram depicts all rows/rounds, and every stitch seen from the right side. It is worked from bottom to top, from right to left.

When working back and forth every other row is worked from the right side: from right to left and every other row is worked from the wrong side: from left to right.

When working in the round, every row in the diagram are worked from the right side, from right to left.

When working a circular diagram you start in the middle and work your way outwards, counter clockwise, row by row.

The rows usually start with a given number of chain stitches (equivalent to the height of the following stitch), this will either be depicted in the diagram or explained in the pattern.

See DROPS lesson: How to read crochet diagrams

Instructions for working several diagrams after each other on the same row/round, will often be written like so: “work A.1, A.2, A.3 a total of 0-0-2-3-4 times". This means you work A.1 once, then A.2 is worked once, and A.3 is repeated (in width) the number of times provided for your size – in this case like so: S = 0 times, M = 0 times, L=2 times, XL= 3 times and XXL = 4 times.

The diagrams are worked as usual: begin with the first row in A.1, then work the first row in A.2 etc.

See DROPS lesson: How to read knitting diagrams

See DROPS lesson: How to read crochet diagrams

The total width of the garment (from wrist-to-wrist) will be larger in the larger sizes, despite the actual sleeves being shorter. The larger sizes have longer sleeve caps and wider shoulders, so there will be a good fit in all sizes.

The measurement sketch/schematic drawing provides information regarding the full length of the garment. If it’s a jumper or a jacket the length is measured from the highest point on the shoulder closest to the neckline, and straight down to the bottom of the garment. It is NOT measured from the tip of shoulder. Similarly, the length of yoke is measured from the highest point on the shoulder and down to where yoke is split into body and sleeves.

On a jacket measures are never taken along bands, unless specifically stated. Always measure inside band stitches when measuring the length.

See DROPS lesson: How to read a schematic drawing

Diagrams are often repeated on the round or in height. 1 repeat is the diagram the way it appears in the pattern. If it says to work 5 repeats of A.1 in the round, then you work A.1 a total of 5 times after/next to each other in the round. If it says to work 2 repeats of A.1 vertically/in height you work the entire diagram once, then begin again at the start and work the entire diagram one more time.

Chain stitches are slightly narrower than other stitches and to avoid working the cast-on edge too tight, we simply chain more stitches to begin with. The stitch count will be adjusted on the following row to fit the pattern and measurement sketch.

The rib edge is more elastic and will contract slightly compared to, for example, stocking stitch. By increasing before the rib edge, you avoid a visible difference in width between the rib edge and the rest of the body.

It’s very easy to cast off too tightly, and by making yarn overs while casting off (and simultaneously casting these off) you avoid a too tight cast off edge.

See DROPS video: How to bind off with yarn overs (yo)

To achieve an even increase (or decrease) you can increase on, for example: every 3rd and 4th row alternately, like so: work 2 rows and increase on the 3rd row, work 3 rows and increase on the 4th. Repeat this until the increase is complete.

See DROPS lesson: Increase or decrease 1 st on every 3rd and 4th row alternately

Should you prefer to work in the round instead of back and forth, you may of course adjust the pattern. You’ll need to add steeks mid-front (usually 5 stitches), and follow the instructions. When you would normally turn and work from the wrong side, simply work across the steek and continue in the round. At the end you’ll cut the piece open, pick up stitches to work bands, and cover the cut edges.

See DROPS video: How to knit steeks and cut open

Should you prefer to work back and forth instead of in the round, you may of course adjust the pattern so you work the pieces separately and then assemble them at the end. Divide the stitches for the body in 2, add 1 edge stitch in each side (for sewing) and work the front and back pieces separately.

See DROPS lesson: Can I adapt a pattern for circular needles into straight needles?

Pattern repeats can vary slightly in the different sizes, in order to get the correct proportions. If you’re not working the exact same size as the garment in the photo, yours might deviate slightly. This has been carefully developed and adjusted so that the complete impression of the garment is the same in all sizes.

Make sure to follow instructions and diagrams for your size!

If you have found a pattern you like which is available in women’s size it’s not very difficult to convert it to men’s size. The biggest difference will be the length of sleeves and body. Start working on the women size that you think would fit across the chest. The additional length will be worked right before you cast off for the armhole/sleeve cap. If the pattern is worked top-down you can add the length right after the armhole or before the first decrease on sleeve.

Regarding additional yarn amount, this will depend on how much length you add, but it is better with a skein too many than too few.

All yarns will have excess fibres (from production) that might come off as lint or shedding. Brushed yarns (ie hairier yarns) have more of these loose, excess fibres, causing more shedding.

Shedding also depends on what is worn under or over the garment, and whether this pulls at the yarn fibres. It’s therefore not possible to guarantee that there will be no shedding

Below are some tips on how to get the best result when working with hairier yarns:

1. When the garment is finished (before you wash it) shake it vigorously so the looser hairs come off. NOTE: do NOT use a lint roller, brush or any method that pulls at the yarn.

2. Place the garment in a plastic bag and put it in your freezer - the temperature will cause the fibres to become less attached to each other, and excess fibres will come off easier.

3. Leave in the freezer for a few hours before taking it out and shaking it again.

4. Wash the garment according to the instructions on the yarn label.

Pilling is a natural process that happens to even the most exclusive of fibers. It's a natural sign of wear and tear that is hard to avoid, and that is most visible in high friction areas of your garment like a sweater's arms and cuffs.

You can make your garment look as new by removing the pilling, using a fabric comb or a pill/lint remover.

Still can't find the answer you need? Then scroll down and leave your question so one of our experts can try to help you. This will be done normally within 5 to 10 working days.
In the meantime, you can read the questions and answers that others have left to this pattern or join the DROPS Workshop on Facebook to get help from fellow knitters/crocheters!

You might also like...

Post a comment to pattern DROPS 172-24

We would love to hear what you have to say about this pattern!

If you want to leave a question, please make sure you select the correct category in the form below, to speed up the answering process. Required fields are marked *.

Comments / Questions (23)

country flag Mieke Baras wrote:

Bij het heen en weer breien wordt ook niet duidelijk gezegd dat je de minderingen en meerderingen (via omslagen) moet verder zetten. Breien in patroon zoals voorheen, is wel erg bondig gezegd! Maar goed, ik ben er achter gekomen dat ik de 10nld in totaal 7x moet breien. Ik heb de Engelse, Duitse en Franse vertaling moeten lezen vooraleer ik het doorhad

05.10.2016 - 20:10

country flag Mieke Baras wrote:

Hallo, ik ben gelukkig een ervaren breister, maar ik wil toch echt mijn beklag doen over de erg gebrekkige uitleg! Je moet het werk meten vanaf de extra steken voor de mouw, maar dat is enkel voor de minderingen! Daarna spreekt men over 50cm, maar dat geldt dan weer voor de TOTALE lengte van het werk!

05.10.2016 - 20:06

country flag Mieke Baras wrote:

Bij het heen en weer breien moet je op de nlden aan de goede kant in totaal 3st minderen ( = 2st afkanten, 1st aan elke kant vd markeerder, 1st meerderen voor 4de markeerder). Klopt dat ? Ik zou dan de 10nld in totaal 5x moeten breien en een 6de keer tot en met nld 6 om 5st over te houden. Klopt dat?

03.10.2016 - 11:32

DROPS Design answered:

Hoi Mieke. Waar ben je nu in het patroon? Bvd.

04.10.2016 - 15:04

country flag Mieke Baras wrote:

Ik ben het lijf aan het breien, maar weet niet goed vanaf waar in het breiwerk ik de 50 cm moet meten, dus de plaats waar de 2 helften apart gebreid moeten worden. Ik veronderstel dat het is vanaf de steken die bijgezet werden voor de mouwen ? Klopt dat ?

03.10.2016 - 11:32

DROPS Design answered:

Hoi Mieke. Er staat aan het begin van LIJF: Plaats 1 markeerdraad in het werk. MEET NU HET WERK VANAF HIER! (na het verplaatsen van het begin van de nld. Dwz, je plaatst je markeerder waar het nieuwe begin van de nld is en meet vanaf hier.

04.10.2016 - 15:02

country flag Kerry wrote:

On the sleeve increase the instructions says to insert marker in between stitches so surely yarn on needle before or after marker amounts to the same thing?

18.09.2016 - 22:39

DROPS Design answered:

Dear Kerry, add a marker between the new sts picked up, and work pattern as before, diagram will not fit in the round due to the number of sts so adjust next rounds so that diagram will be lined up over sts on needle. Happy knitting!

19.09.2016 - 10:09

country flag Cornelia Hütt-Fischer wrote:

In dieser sehr schönen Anleitung wird die Farbe altrosa 3800 verwendet. Leider existiert diese nicht bei den bisherigen Farben. Ist das ein Fehler oder eine neue Farbe? LG Conny

12.08.2016 - 12:51

DROPS Design answered:

Liebe Cornelia, diese Farbe ist im Sortiment und Sie finden sie auf der Farbkarte.

17.08.2016 - 14:14

country flag Carola Eriksson wrote:

What a great pattern! has to be published and knitted!

29.06.2016 - 21:01

country flag Totoche wrote:

Magnifique, j'adore

26.06.2016 - 13:31

country flag Rita wrote:

Vakker, søt og elegant!

07.06.2016 - 22:56

country flag Eva wrote:

Mich interessiert die Schnittführung für diesen Pulli sehr, vor allem bei den Ärmeln. Habe aus Garnresten schon einige ähnliche Puliis gestrickt,(selbst ausgedacht), war aber mit den Lösungen für die Ärmel nie so ganz glücklich. Nun warte ich gespannt auf Eure Ideen.

07.06.2016 - 12:27