
Popular categories
Looking for a yarn?


|
|||||||||||||||||||||||||||||||||||||||||||
Vadelma |
|||||||||||||||||||||||||||||||||||||||||||
 |
 |
||||||||||||||||||||||||||||||||||||||||||
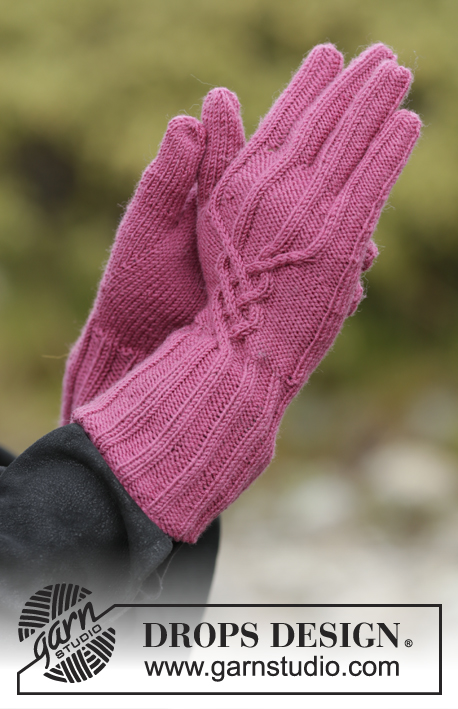
Set consists of: Knitted DROPS hat, neck warmer and gloves with cables in "BabyMerino".
DROPS 172-44 |
|||||||||||||||||||||||||||||||||||||||||||
|
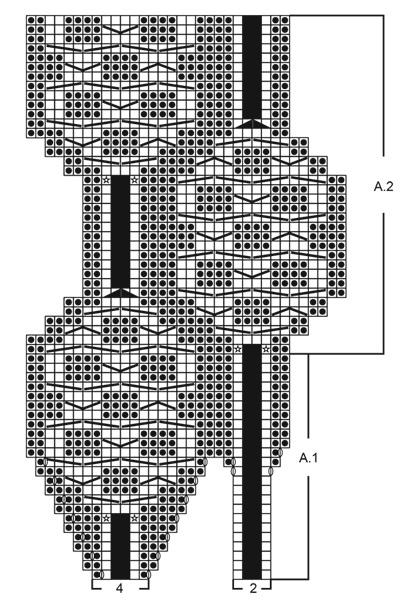
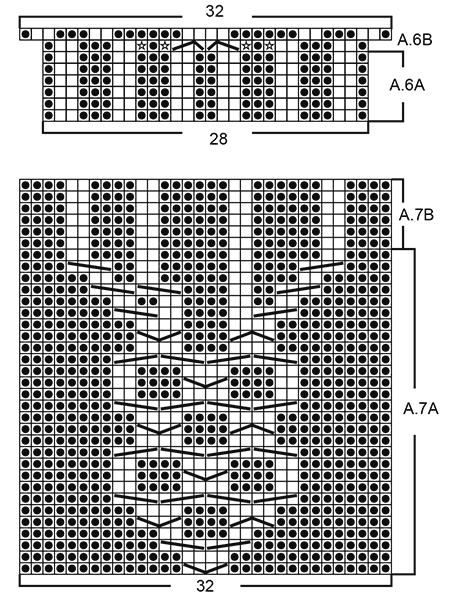
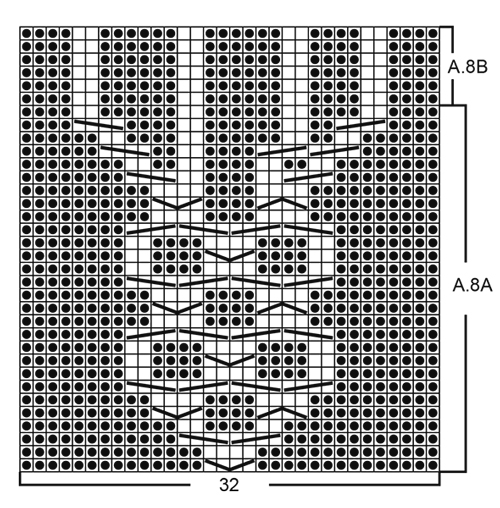
HAT: PATTERN: See diagrams A.1 and A.2. ---------------------------------------------------------- HAT: Worked in the round on double pointed needles, work top down and switch to circular needle when needed. Cast on 14-16 sts on double pointed needles size 3 mm with plum and work as follows: ROUND 1: K and inc 14-16 sts by making 1 YO after every st = 28-32 sts. ROUND 2: K all sts (always work YOs twisted to avoid holes). ROUND 3: K and inc 14-17 sts evenly (inc with YOs) = 42-49 sts. ROUND 4: * K 2, P 1, K 2, P 1-2 *, repeat from *-* 7 times in total (work YOs twisted to avoid holes). Then work pattern in the round as follows: * A.1 (= 6 sts), P 0-1 *, repeat from *-* the entire round (= 7 repetitions with A.1 and P 0-1 between every repetition). When A.1 has been worked, there are 182-189 sts on needle. Continue in the round according to diagram A.2 the same way with P 0-1 between every repetition. REMEMBER THE KNITTING TENSION When A.2 has been worked 1 time vertically, hat measures approx. 20 cm from the top. Now dec 1 st in every P section (dec 1 st by working the last two sts in every P section P tog), work in addition the 4 K sts in the middle cable in every repetition twisted tog 2 by 2 = 140-147 sts remain on needle. Switch to circular needle size 2.5 mm and rib in the round with K over K and P over P until hat measures approx. 23-24 cm from the top. Then loosely cast off with K over K and P over P. ASSEMBLY: Baste a strand up and down through sts at the top of hat, tighten tog and fasten. ---------------------------------------------------------- NECK WARMER: PATTERN: See diagrams A.3 to A.5. INCREASE TIP: Inc 1 st by making 1 YO, on next round P YO twisted to avoid holes - NOTE: To make the inc less visible inc at the end of every P section. ---------------------------------------------------------- NECK WARMER: Worked in the round on circular needle, top down. Cast on 170-204 sts on circular needle size 2.5 mm with heather. K 1 round. Then work according to diagram A.3 (= 5-6 repetitions of 34 sts). When A.3 has been worked, switch to circular needle size 3 mm. Then continue pattern in the round according to diagram A.4. REMEMBER THE KNITTING TENSION When A.4 has been worked, switch back to circular needle size 2.5 mm. Insert 1 marker, NOW MEASURE PIECE FROM HERE! Work in the round according to diagram A.5, when A.5 has been worked 1 time in height continue with K over K and P over P. When piece measures 2 cm from marker, inc 1 st in every P-section - READ INCREASE TIP = 210-252 sts. Inc like this every 4th round a total of 4 times = 330-396 sts. When rib measures 6-7 cm from marker, loosely cast off with K over K and P over P. Neck warmer measures approx. 16-17 cm from top and down. ---------------------------------------------------------- GLOVES: PATTERN: See diagrams A.6 to A.8. INCREASE TIP (applies to thumb gusset): Inc 1 st by making 1 YO. On next round K YO twisted to avoid holes. ---------------------------------------------------------- LEFT GLOVE: Worked in the round on double pointed needles. Cast on 56 sts on double pointed needles size 2.5 mm with plum. K 1 round. Work next round as follows: Work A.6A 2 times in total (= 2 repetitions of 28 sts). Continue rib like this. When piece measures 10 cm, work A.6B over the first 28 sts and A.6A over the last 28 sts. When A.6B has been worked 1 time vertically, there are 60 sts on needle. NOW MEASURE PIECE FROM HERE! Work next round as follows: Work A.7A over the first 32 sts (= on top of hand), P 1, 26 sts in stocking st and P 1 (= 28 sts inside hand). REMEMBER THE KNITTING TENSION Insert 1 marker in the next to last st in stocking st inside hand (i.e. in third last st on round) = thumb st. When piece measures 1.5 cm from rib beg inc for thumb gusset and inc as follows: Inc 1 st in each side of st with marker - READ INCREASE TIP. Inc like this every 3rd round 7 times in total = 15 sts thumb gusset (there will be 2 sts more between YO on every inc). When piece measures 7 cm, slip the 15 thumb sts on 1 stitch holder. On next round, cast on 1 new st behind thumb sts = 60 sts on needle. Continue with pattern and stocking st as before until A.7A has been worked - piece measures approx. 8 cm. Then work A.7B over the 32 sts on top of hand, continue the remaining 28 sts inside hand as before. When piece measures 9 cm, slip the first 25 sts on 1 stitch holder (= on top of hand), keep the next 15 sts on needle and slip the remaining 20 sts on 1 stitch holder (= inside the hand). PINKIE: = 15 sts, in addition cast on 1 new st towards the hand = 16 sts. Work in the round as follows: Work P over P and K over K over the first 8 sts, work in stocking st over the next 6 sts and P the last 2 sts. When finger measures 6 cm, K all sts tog 2 by 2 = 8 sts. Cut the yarn and pull it through the remaining sts, tighten tog and fasten. HAND: Slip sts from stitch holders back on the needles, pick in addition up 2 sts towards the little finger = 47 sts. Work K over K and P over P for 2 rounds - NOTE: P the one new st which is closest to top of hand and K the second new st which is closest inside of hand. Keep the 2 sts that were picked up towards the little finger + 9 sts on top of hand and 5 sts inside the hand on the needle. Slip the remaining 31 sts back on the stitch holders. RING FINGER: = 16 sts, in addition cast on 2 new sts towards stitch holders = 18 sts. Work in the round with P over P and K over K over the 9 sts on top of hand, P 1 towards pinkie on top of hand and work the remaining 8 sts in stocking st. When finger measures 7.5 cm, K all sts tog 2 by 2 = 9 sts. Cut the yarn and pull it through the remaining sts, tighten tog and fasten. MIDDLE FINGER: Slip 8 sts from stitch holder on top of hand and 7 sts inside the hand back on needles, pick in addition up 3 sts towards the ring finger and cast on 2 new st towards sts on stitch holder = 20 sts. Work in the round with P over P and K over K over the 8 sts mid on top of finger, P 1 towards ring finger on top of hand and work the remaining 11 sts in stocking st. When finger measures 8 cm, K all sts tog 2 by 2 = 10 sts. Cut the yarn and pull it through the remaining sts, tighten tog and fasten. INDEX FINGER: Slip the remaining 16 sts from stitch holders back on the needles, pick in addition up 4 sts towards the middle finger = 20 sts. Work in the round with P over P and K over K over the 8 sts mid on top of finger, P 2 towards middle finger on top of hand and work the remaining 10 sts in stocking st. When finger measures 7 cm, K all sts tog 2 by 2 = 10 sts. Cut the yarn and pull it through the remaining sts, tighten tog and fasten. THUMB: Slip the sts over thumb gusset back on the needles and knit in addition up 3 sts along the edge behind the thumb sts = 18 sts. Work in stocking st in the round. When thumb measures 6 cm, K all sts tog 2 by 2 = 9 sts. Cut the yarn and pull it through the remaining sts, tighten tog and fasten. RIGHT GLOVE: Work as left glove but reversed – i.e. work pattern according to diagram A.8A/A.8B (instead of A.7A/A.7B) and inc for thumb gusset on each side of third st at beg (instead of in third to last st on round). |
|||||||||||||||||||||||||||||||||||||||||||
Diagram explanations |
|||||||||||||||||||||||||||||||||||||||||||
|
|||||||||||||||||||||||||||||||||||||||||||
|
|||||||||||||||||||||||||||||||||||||||||||

|
|||||||||||||||||||||||||||||||||||||||||||
|
|||||||||||||||||||||||||||||||||||||||||||
|
|||||||||||||||||||||||||||||||||||||||||||
|
Have you made this or any other of our designs? Tag your pictures in social media with #dropsdesign so we can see them! Do you need help with this pattern?You'll find tutorial videos, a Comments/Questions area and more by visiting the pattern on garnstudio.com. © 1982-2024 DROPS Design A/S. We reserve all rights. This document, including all its sub-sections, has copyrights. Read more about what you can do with our patterns at the bottom of each pattern on our site. |
|||||||||||||||||||||||||||||||||||||||||||


With over 40 years in knitting and crochet design, DROPS Design offers one of the most extensive collections of free patterns on the internet - translated to 17 languages. As of today we count 304 catalogues and 11422 patterns - 11422 of which are translated into English (UK/cm).
We work hard to bring you the best knitting and crochet have to offer, inspiration and advice as well as great quality yarns at incredible prices! Would you like to use our patterns for other than personal use? You can read what you are allowed to do in the Copyright text at the bottom of all our patterns. Happy crafting!
Comments / Questions (17)
Hallo, kann es sein, dass sich im Muster A2 ein Fehler eingeschlichen hat? Ich nehme im Muster A2 in der Reihe 1 zweimal mit kfb zu (aus 26 Maschen werden 28). Aber: in der 2. Reihe wird nicht abgenommen. Es sind aber nur noch 26 Maschen eingezeichnet. Mir bleiben hier beim Rapport zwei linke Maschen auf der Nadel übrig. Erst in Reihe 3 sind dann wieder 28 Maschen da, ohne Zunahme in Reihe 2. Lese ich hier etwas falsch oder ist das ein Fehler im Muster? Vera Vogl
30.01.2017 - 20:38Dans le modèle bonnet drops 172 il y a des erreurs dans les explications que vous donnez pour le diagramme. Vous avez annoncé qu'il y avait des corrections mais nous ne pouvons pas y accéder. Merci de nous permettre de les suivre et de pouvoir réaliser ce superbe bonnet. Je suis très fidèle à vos modèles gratuits. J'achète la laine que vous proposez car j'ai la chance d'avoir un magasin qui la vend! Bravo et merci de ces modèles ravissants et si agréables à fabriquer! Danne
10.12.2016 - 19:58DROPS Design answered:
Bonjour Mme Aumeyras, si vous avez le catalogue papier ou si vous avez imprimé ce modèle avant le 24/10 (date de la correction), il est recommandé d'imprimer à nouveau le diagramme A.1, en revanche, si vous l'avez imprimé après cette date, le diagramme en ligne est correct. Si vous pensez avoir repéré une autre erreur merci de bien vouloir donner plus de précisions pour vérification complémentaire. Merci, bon tricot!
12.12.2016 - 11:06En el patrón 172-44 el gráfico A.7 tanto A como B no se imprime
16.11.2016 - 19:09DROPS Design wrote:
Diagram A.1 has been updated. Le diagramme A.1 a été modifié. Das Diagram A.1 wurde Korrigiert.
24.10.2016 - 14:29Ist das richtig, das in Reihe 13 zwei Umschläge direkt nacheinander kommen ? Oder müsste eins kfb sein ?
20.10.2016 - 09:26DROPS Design answered:
Liebe Frau Heumann, danke für den Nachricht, unser Designteam wird das Diagram mal schauen.
20.10.2016 - 12:38Laura wrote:
Love the glove design - haven't seen a glove pattern as nice as this!
11.06.2016 - 07:27Myriam wrote:
Nice gloves.
08.06.2016 - 23:11