
Popular categories
Looking for a yarn?


|
||||||||||||||||
Tauriel Cardigan |
||||||||||||||||
 |
 |
|||||||||||||||
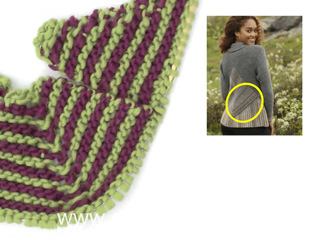
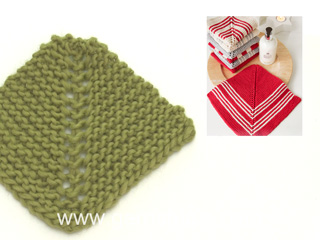
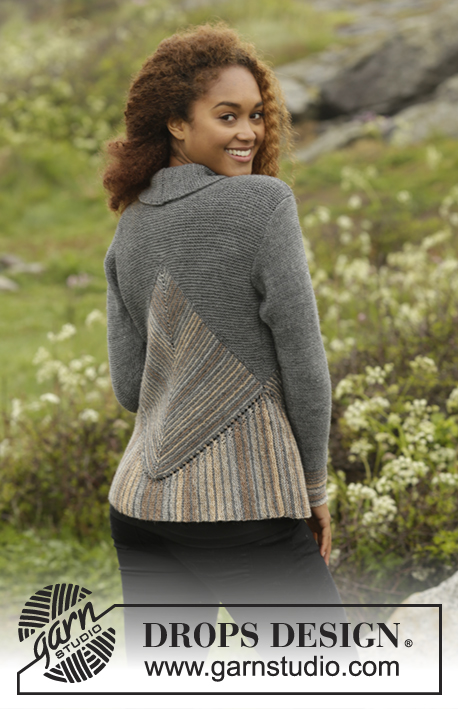
Knitted DROPS jacket in garter st with domino squares, stripes and shawl collar in ”Fabel”. Size: S - XXXL.
DROPS 173-15 |
||||||||||||||||
|
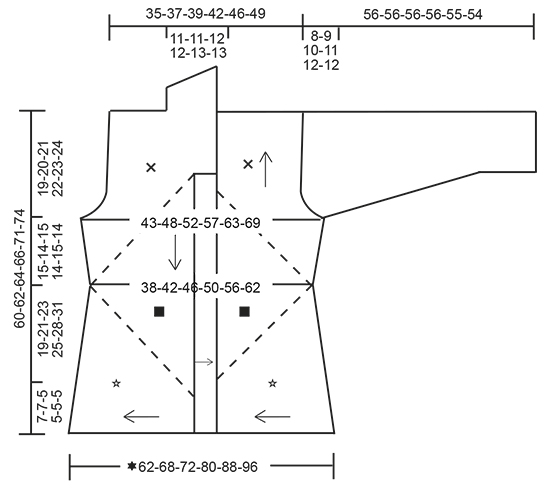
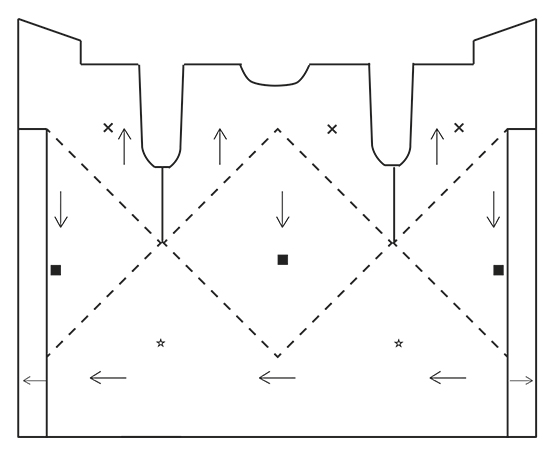
GARTER ST (back and forth): K all rows. 1 ridge = 2 rows K. STRIPES: * Work 1 ridge in GARTER ST - see explanation above, with sand. Work 1 ridge with grey. *, repeat from *-* until finished measurements. First row with new colour is always from RS. DOMINO SQUARE: Insert 1 marker in the middle st. ROW 1 (= RS): K until st with marker, 1 YO, K 1 (st with marker), 1 YO, K the rest of row (= 2 sts inc). ROW 2 (= WS): K all sts. Repeat 1st and 2nd row, i.e. inc 2 sts in the middle of the square on every row from RS. HALF A DOMINO SQUARE LEFT: Insert 1 marker in the first st. ROW 1 (= RS): K 1 (st with marker), 1 YO, K the rest of row. ROW 2 (= WS): K all sts. Repeat 1st and 2nd row, i.e. inc 1 st inside 1 st of square at beg of every row from RS. HALF A DOMINO SQUARE RIGHT: Insert 1 marker in the last st. ROW 1 (= RS): K until st with marker, 1 YO, K 1 (st with marker). ROW 2 (= WS): K all sts. Repeat 1st and 2nd row, i.e. inc 1 st inside 1 st of square at end of every row from RS. INCREASE TIP (applies to sleeve): Work until 2 sts remain before marker, 1 YO (= 1 st inc), K 4 (marker is in the middle of these sts), 1 YO (= 1 sts inc). Work YO twisted on next round. PATTERN (applies to sleeve): Work * 3 ridges with sand, work 1 ridge with grey *, repeat from *-* 4 times in total, then work stripes as follows: Work * 1 ridge with sand, work 1 ridge with grey *, repeat from *-* 4 times in total. Now work piece in grey until finished measurements. Turn piece inside out to that WS is outwards and continue in stocking st. BUTTONHOLES: Dec for buttonholes on right band. 1 buttonhole = K 2 tog and make 1 YO. ---------------------------------------------------------- JACKET: Work first 3 domino squares – see square on chart, then work 1 edge to sts on domino squares (i.e. bottom edge of jacket) with short rows - see star on chart. Edge is worked from mid front to mid back and mid front again. Finally work a yoke on jacket over domino square - se cross on chart. BACK PIECE: DOMINO SQUARE: Cast on 5 sts on circular needle size 3.5 mm with grey. K 1 row from WS. Switch colour to sand and work DOMINO SQUARE - see explanation above, back and forth and STRIPES – see explanation above. REMEMBER THE KNITTING TENSION Work Domino square and stripes until piece measures 38-42-46-50-56-62 cm at the widest = approx. 62-68-74-82-90-100 ridges, adjust so that last ridge is with sand, and approx. 64-70-76-84-92-102 sts on each side of st with marker (= approx. 129-141-153-169-185-205 sts in total on needle). Work 1 ridge with grey and inc as before (i.e. 1 st on each side of st with marker) and inc 4 sts evenly on each side of mid st on row from RS (= 10 sts inc in total on row from RS) = approx. 69-75-81-89-97-107 sts on each side of st with marker (= approx. 139-151-163-179-195-215 sts in total on needle). Slip sts on a stitch holder and work left front piece domino square. LEFT FRONT PIECE: DOMINO SQUARE: Cast on 3 sts on circular needle size 3.5 mm with grey. K 1 row from WS. Switch colour to sand and work HALF DOMINO SQUARE LEFT – see explanation above, back and forth and stripes, until piece measures 19-21-23-25-28-31 cm on the widest = approx. 62-68-74-82-90-100 ridges, adjust with back piece (= approx. 65-71-77-85-93-103 sts). Work 1 ridge with grey and inc as before (i.e. 1 st after st with marker) and inc 4 sts evenly on row from RS (= 5 sts inc in total on row from RS) = approx. 70-76-82-90-98-108 sts. Slip sts on a stitch holder and work right front piece domino square. RIGHT FRONT PIECE: DOMINO SQUARE: Cast on 3 sts on circular needle size 3.5 mm with grey. K 1 row from WS. Switch colour to sand and work HALF DOMINO SQUARE RIGHT – see explanation above, back and forth in stripes, until piece measures 19-21-23-25-28-31 cm on the widest = approx. 62-68-74-82-90-100 ridges, adjust with back piece (= approx. 65-71-77-85-93-103 sts). Work 1 ridge with grey and inc as before (i.e. 1 st before st with marker) and inc 4 sts evenly on row from RS (= 5 sts inc in total on row from RS) = approx. 70-76-82-90-98-108 sts. Slip all sts from domino back on needle in sequence without working them as follows: Sts from right front piece domino square are on needle, insert 1 marker, slip sts from back piece domino square back on needle, insert 1 marker, slip sts from left front piece domino square back on needle = approx. 279-303-327-359-391-431 sts in total. Then work bottom edge from right front piece, over back piece, to left front piece as follows: BOTTOM EDGE: Work piece tog with sts from mid front (i.e. tip of domino on right front piece) and to the side, down to tip mid back, up to the side and down to mid front (i.e. tip of domino on left front piece). Cast on 16-16-12-12-12-12 sts on circular needle size 3.5 mm with grey. Work short rows and stripes as follows: RIGHT FRONT PIECE BOTTOM EDGE: Work tog with sts from tip mid front and out to marker in the side as follows: ROW 1 (= RS): K 1, 1 YO and K rest of row (= 1 st inc). ROW 2 (= WS): K until 1 st remains on row, work next st tog with the first 2 sts from domino (= K 3 tog = 2 sts dec from domino) Switch to sand. ROW 3 (= RS): As 1st row. ROW 4 (= WS): K until 5 sts remain on row, turn piece. ROW 5 (= RS): K all sts. ROW 6 (= WS): K until 3 sts remain on row, turn piece. ROW 7 (= RS): K all sts. ROW 8 (= WS): K until 1 st remains on row, work next st tog with the first 2 sts from domino (= K 3 tog = 2 sts dec from domino). Switch colour to grey. Repeat 1st to 8th row until all sts from tip of domino out to the side until marker (i.e. right front piece domino square = approx. 70-76-82-90-98-108 sts) has been worked tog with the edge. RIGHT BACK PIECE BOTTOM EDGE: Worked tog with sts from the side and down to tip of domino square on back piece as follows: ROW 1 (= RS): K 1, 1 YO, K 2 twisted tog, K 2 twisted tog, K the rest of row (= 1 st dec). ROW 2 (= WS): K until 1 st remains on row, work next st tog with the first 2 sts from domino (= K 3 tog = 2 sts dec from domino). Switch to sand. ROW 3 (= RS): As 1st row. ROW 4 (= WS): K until 5 sts remain on row, turn piece. ROW 5 (= RS): K all sts. ROW 6 (= WS): K until 3 sts remain on row, turn piece. ROW 7 (= RS): K all sts. ROW 8 (= WS): K until 1 st remains on row, work next st tog with the first 2 sts from domino (= K 3 tog = 2 sts dec from domino) Switch colour to grey. Repeat 1st to 8th row down to tip mid back (= approx. 69-75-81-89-97-107 sts). NOTE: On last repetition of 8th or 2nd row slip the first 3 sts from domino back on needle. ( = K 4 sts tog = 3 sts dec). LEFT BACK PIECE BOTTOM EDGE: Work tog with sts from tip of domino square on back piece and out to marker in the side as right front piece bottom edge. LEFT FRONT PIECE BOTTOM EDGE: Worked tog with sts from the side and down to tip of domino square on front piece as right back piece bottom edge. BACK PIECE: Now work yoke on back piece with grey as follows: RIGHT BACK PIECE: Pick up 64-70-76-84-92-102 sts with grey from RS on needle size 3.5 mm on one side of domino, pick up 2 sts on tip of domino, pick up 64-70-76-84-92-102 sts down the other side of domino = 130-142-154-170-186-206 sts. K 1 row from WS and inc 15-13-13-11-13-9 sts evenly on each side of tip (= 30-26-26-22-26-18 sts inc in total) = 80-84-90-96-106-112 sts on each side (= 160-168-180-192-212-224 sts in total). Then work over the first 80-84-90-96-106-112 sts (i.e. in right side of piece seen from RS) as follows: READ ALL OF THE FOLLOWING SECTION BEFORE CONTINUING! WORK SHORT ROWS, SHORT RIDGES AND INC IN THE SIDE AT THE SAME TIME AS FOLLOWS: SHORT ROWS: Row 1 (= RS): K the first 2 sts tog, turn piece (= 1 st). Row 2 (= WS): K back. Row 3 (= RS): K 1, insert 1 marker, K the next 2 sts from domino tog, turn piece (= 2 sts). Move the marker upwards when working. Row 4 (= WS): K back. Row 5 (= RS): K 2, K the next 2 sts tog, turn piece (= 3 sts). Row 6 (= WS): K back. Row 7 (= RS): K 3, K the next 2 sts tog, turn piece (= 4 sts). Row 8 (= WS): K back. Continue the short rows like this, i.e. work over 2 sts more on every row from RS but work them 2 K tog, i.e. 2 sts become 1 st. Continue like this until all sts up to tip of domino have been worked. SHORT RIDGES: Applies only to size L-XL-XXL-XXXL: When piece measures 0-0-2-2-2-2 cm, work 0-0-1-1-1-1 short ridge (i.e. work from RS until where the last turn was, turn piece and work back = 2 rows = 1 short ridge) over the sts already worked, work short ridge every 0-0-5-4-3-2 cm 0-0-4-6-8-11 times in total. INC IN THE SIDE: When yoke measures 1 cm, inc 1 st inside 1 edge st at beg of next row from RS. Inc like this every 1½-1-1- ½-½-½ cm 9-12-14-17-19-22 times in total = 10-13-15-18-20-23 sts before marker. When yoke measures 15-14-15-14-15-14 cm (measured along the side), cast off for armhole at beg of every row from RS as follows: Cast off 3 sts a total of 1-1-2-2-2-3 times, 2 sts a total of 1-2-2-3-4-4 times and 1 st a total of 4-5-4-5-5-5 times (i.e. 1 st remains before marker). Piece measures approx. 19-21-23-25-28-31 cm measured in the side from domino and up. When the short rows have been worked, there are 40-42-45-48-53-56 sts in total on needle. Slip sts on 1 stitch holder and work left back piece. LEFT BACK PIECE: = 80-84-90-96-106-112 sts. READ ALL OF THE FOLLOWING SECTION BEFORE CONTINUING! WORK SHORT ROWS, SHORT RIDGES AND INC IN THE SIDE AT THE SAME TIME AS FOLLOWS: SHORT ROWS: Row 1 (= WS): Work the first 2 sts from domino, turn piece. Row 2 (= RS): Work the 2 sts K tog (= 1 st). Row 3 (= WS): K 1, insert 1 marker, work the next 2 sts from domino, turn piece (= 3 sts). Move the marker upwards when working. Row 4 (= RS): K 2 tog, K 1 (= 2 sts). Row 5 (= WS): K 2, work the next 2 sts from domino, turn piece (= 4 sts). Row 6 (= RS): K 2 tog, K the rest of row. Row 7 (= WS): K, work the next 2 sts from domino, turn piece (= 4 sts). Row 8 (= RS): K 2 tog, K the rest of row. Continue the short rows like this, i.e. work over 2 sts more from domino on every row from WS and dec 1 st at beg of the every row from RS, i.e. 2 sts become 1 st. Continue like this until all sts up to tip of domino have been worked. SHORT RIDGES: Applies only to size L-XL-XXL-XXXL: When piece measures 0-0-2-2-2-2 cm, work 0-0-1-1-1-1 short ridge (i.e. work from WS until where the last turn was, turn piece and work back = 2 rows = 1 short ridge) over the sts already worked, work short ridge every 0-0-5-4-3-2 cm 0-0-4-6-8-11 times in total. INC IN THE SIDE: When yoke measures 1 cm, inc 1 st inside 1 edge st at end of next row from RS. Inc like this every 1½-1-1- ½-½-½ cm 9-12-14-17-19-22 times in total = 10-13-15-18-20-23 sts before marker. When yoke measures 15-14-15-14-15-14 cm (measured along the side), cast off for armhole at beg of every row from WS as follows: Cast off 3 sts a total of 1-1-2-2-2-3 times, 2 sts a total of 1-2-2-3-4-4 times and 1 st a total of 4-5-4-5-5-5 times (i.e. 1 st remains after marker). Piece measures approx. 19-21-23-25-28-31 cm measured in the side from domino and up. When the short rows have been worked, there are 40-42-45-48-53-56 sts in total on needle. BACK PIECE: Slip sts from right and left back piece on to same needle = 80-84-90-96-106-112 sts. Work in garter st. When piece measures 13-11-11-9-8-5 cm from tip of domino (approx. 2 cm remain), cast off the middle 24-24-26-26-28-28 sts for neck and finish each shoulder separately = 28-30-32-35-39-42 sts remain on shoulder. On next row from the neck dec 1 st = 27-29-31-34-38-41 sts. Work in garter st until piece measures 15-13-13-11-10-7 cm from tip of domino. Cast off. The whole piece measures approx. 60-62-64-66-71-74 cm. Work the other shoulder the same way. RIGHT FRONT PIECE: Pick up 66-72-78-86-94-104 sts with grey from RS on circular needle size 3.5 mm on the side of domino. K 1 row from WS and inc 14-12-12-10-12-8 sts evenly = 80-84-90-96-106-112 sts. Cut the yarn. Then work short rows and inc as on left back piece (beg from WS): When all sts from domino have been worked, cast on 8 sts at the end of next row from WS for band = 48-50-53-56-61-64 sts (incl 8 band sts). Continue in garter st. When piece measures 60-62-64-66-71-74 cm in total (adjust with back piece), cast off the first 27-29-31-34-38-41 sts for shoulder on next row from WS = 21-21-22-22-23-23 sts remain on needle, work the rest of row. Then work shawl collar in garter st, beg from RS as follows: * Work 2 rows back and forth over the first 15-15-16-16-17-17 sts, work 2 rows back and forth over all sts *, repeat from *-* until shawl collar measures 8-8-9-9-10-10 cm at the shortest. Cast off. RIGHT BAND: Pick up approx. 104-113-117-127-140-154 sts with grey in edge sts from RS from bottom edge of jacket up along domino mid front up to where the 8 band sts were cast on (adjust no of sts to avoid a wavy band or a tight band). Work band in garter st tog with the 8 band sts as follows: Pick up 1 st in each of the 8 band sts from RS on double pointed needle size 3.5 mm, leave sts on double pointed needle and work the tog with ridges as follows: On every row from RS work last st from band tog with 1 st from the 8 band sts. When 5 ridges have been worked, dec for 5-5-5-6-6-6 BUTTONHOLES – see explanation above, evenly on next row from RS (top button hole is in the transition between band and front piece). Cast off when the 8 band sts have been worked tog with band. LEFT FRONT PIECE: Pick up 66-72-78-86-94-104 sts with grey from RS on circular needle size 3.5 mm on the side of domino. K 1 row from WS and inc 14-12-12-10-12-8 sts evenly = 80-84-90-96-106-112 sts. Then work short rows and inc as on right back piece. When all sts from domino have been worked, cast on 8 sts at the end of next row from RS for band = 48-50-53-56-61-64 sts (incl 8 band sts). Work in garter st. When piece measures 60-62-64-66-71-74 cm in total (adjust with back piece), cast off the first 27-29-31-34-38-41 sts for shoulder on next row from RS = 21-21-22-22-23-23 sts remain on needle, work the rest of row. Then work shawl collar in garter st, beg from WS as follows: * Work 2 rows back and forth over the first 15-15-16-16-17-17 sts, work 2 rows back and forth over all sts *, repeat from *-* until shawl collar measures 8-8-9-9-10-10 cm at the shortest. Cast off. LEFT BAND: Pick up approx. 104-113-117-127-140-154 sts with grey in edge sts from RS from where the 8 band sts were cast on, over domino and down along the entire jacket (adjust no of sts to avoid a wavy band or a tight band). Work band in garter st tog with the 8 band sts as follows: Pick up 1 st in each of the 8 band sts from RS on double pointed needle size 3.5 mm, leave sts on double pointed needle and work the tog with ridges as follows: On every row from WS work last st from band tog with 1 st from the 8 band sts. Cast off when the 8 band sts have been worked tog with band. SLEEVE: Worked in the round on double pointed needles. Cast on 46-48-50-54-56-58 sts on double pointed needles size 3.5 mm with sand. Work PATTERN - see explanation above. When piece measures 14-12-10-8-3 cm, insert 1 marker at beg of round, inc 1 st on each side of marker – see INCREASE TIP. Inc like this every 1½ cm 21-22-23-24-25-26 times in total = 88-92-96-102-106-110 sts. When piece measures 48-47-46-45-43-42 cm (shorter measurements in the larger sizes because of longer sleeve cap and wider shoulders). Continue to work back and forth and cast off for sleeve cap at beg of every row in each side of piece as follows: Cast off 4 sts 2 times, 2 sts 3 times and 1 st 2 times, then cast off 2 sts in each side until piece measures 56-56-56-56-55-54 cm, then cast off 3 sts 1 time in each side of piece. Cast off the remaining sts. Knit another sleeve the same way. ASSEMBLY: Assemble with grey. Sew the shoulder seams. Sew the collar tog mid back and sew it to the neckline. Sew in sleeves with WS outwards, i.e. stocking st is turned inwards. Sew side seams down to bottom edge in outer loop of edge sts. Sew on buttons. |
||||||||||||||||
Diagram explanations |
||||||||||||||||
|
||||||||||||||||
|
||||||||||||||||
|
||||||||||||||||
|
Have you made this or any other of our designs? Tag your pictures in social media with #dropsdesign so we can see them! Do you need help with this pattern?You'll find tutorial videos, a Comments/Questions area and more by visiting the pattern on garnstudio.com. © 1982-2024 DROPS Design A/S. We reserve all rights. This document, including all its sub-sections, has copyrights. Read more about what you can do with our patterns at the bottom of each pattern on our site. |
||||||||||||||||


With over 40 years in knitting and crochet design, DROPS Design offers one of the most extensive collections of free patterns on the internet - translated to 17 languages. As of today we count 304 catalogues and 11415 patterns - 11415 of which are translated into English (UK/cm).
We work hard to bring you the best knitting and crochet have to offer, inspiration and advice as well as great quality yarns at incredible prices! Would you like to use our patterns for other than personal use? You can read what you are allowed to do in the Copyright text at the bottom of all our patterns. Happy crafting!
Comments / Questions (70)
Er der nogen der kan forklare mig hvordan jeg strikker den sidste pind ned til spidsen på højre rygstykkes nedre kant? Jeg forstår ikke hvordan jeg på 2. eller 8. pind skal sætte de 3 første m fra dominoen tilbage på p (= 4 m ret sammen = 3 m taget ind fra dominoen)
11.08.2016 - 20:31DROPS Design answered:
Hej Dorte. Kan du bruge mit svar til Lotte herover?
15.09.2016 - 13:19Er der mulighed for at købe de flotte kreationer?
07.08.2016 - 08:37DROPS Design answered:
Hej Pia. Vi har kun opskriften - ikke den faerdige model. Men maaske kan du finde en som kan lave den til dig (kontakt evt din lokale strikkebutik - nogen gange kan de hjaelpe).
26.08.2016 - 14:26Super flot model, den bliver spændende og alligevel rimelig nem at strikke.
30.07.2016 - 09:52Super passt ja toll zum Pullover 350,würde auch von mir gestrickt,freue mich wenn die Anleitung zu haben ist.
21.07.2016 - 12:31Das wird mein nächstes Projekt! Ich freue mich schon auf die Anleitung; vielen Dank!!
03.07.2016 - 10:35Gewoonweg prachtig, ik zou er zo aan willen beginnen te breien.
28.06.2016 - 21:58Piękny sweterek, z radością zrobiłabym go!
23.06.2016 - 10:11Schönes ausgefallenes Design
21.06.2016 - 17:27Estela wrote:
Muy original el diseño.
20.06.2016 - 16:52Love the design. Wish it was hooded. Stunning model.
20.06.2016 - 06:48