
Popular categories
Looking for a yarn?


|
|||||||||||||||||||||||||||||||||||||||||||||||||
Stony Ridge |
|||||||||||||||||||||||||||||||||||||||||||||||||
 |
 |
||||||||||||||||||||||||||||||||||||||||||||||||
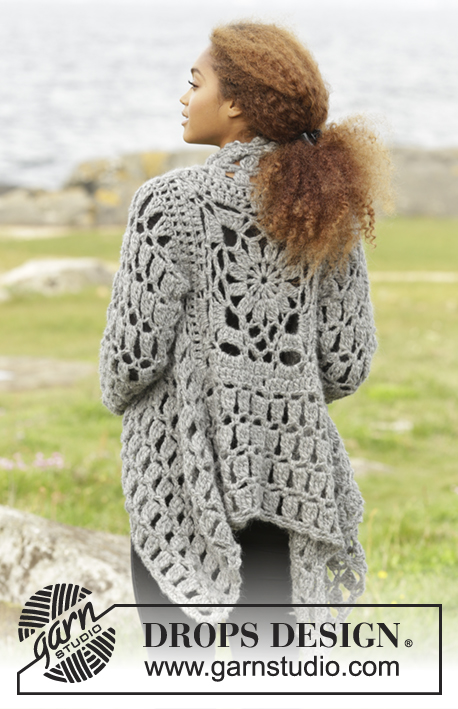
Crochet DROPS jacket worked in a square in 1 thread Cloud or 2 threads Air. Size S-XXXL.
DROPS 173-31 |
|||||||||||||||||||||||||||||||||||||||||||||||||
|
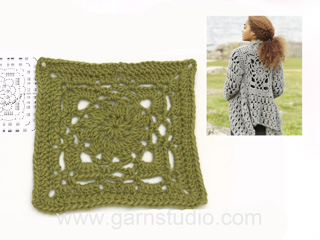
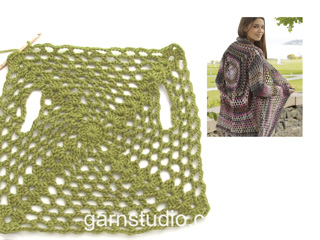
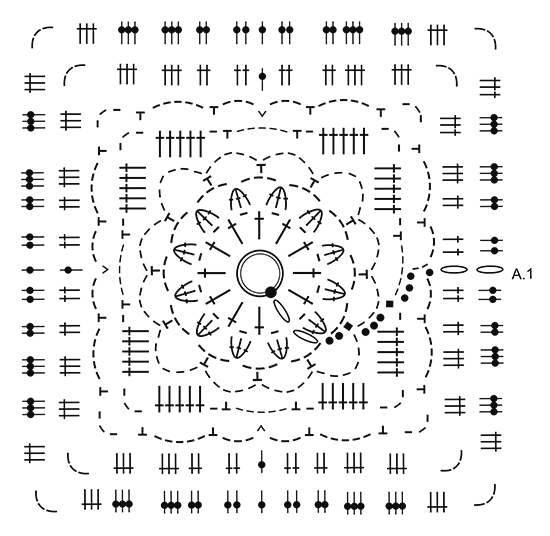
INC DC-GROUP: Work (3 dc, ch 3, 3 dc) around ch-space in the corner. PATTERN: See diagrams A.1 to A.5. ---------------------------------------------------------- JACKET: Work piece from mid back and outwards as a square. Beg with 1 thread Cloud or 2 threads Air on hook size 7 mm and work pattern according to diagram A.1. REMEMBER THE CROCHET GAUGE! When entire diagram A.1 has been worked, piece measures 36 x 36 cm / 14¼" x 14¼". Size S/M is now finished. Continue the remaining sizes in the round as follows: Size L/XL, XXL and XXXL: Continue with 1-2-2 rounds in total with 1 dc in every dc and work 1 INC dc-GROUP – see explanation above, in each corner. NOTE: Beg round with ch 3, and finish round with 1 sl st in 3rd ch at beg of round Now continue in all sizes as follows (work 2nd round in diagram A.2): Work 1 ch and 1 sl st in first dc on round, work A.2 over the next 12-15-18-18 dc (= 4-5-6-6 repetitions), work (1 sc, ch 3, 1 sc) around ch-space in the corner, work ch 3, skip 3 dc, A.2 over the next 6-9-12-12 dc (= 2-3-4-4 repetitions), 1 sc in space between the next 2 dc, insert a marker in piece and work 18-21-24-24 loose ch for armhole, skip 18-21-24-24 dc, work (1 sc, ch 3, 1 sc) around ch-space in next corner, work ch 3, skip 3 dc, work A.2 over the next 27-33-39-39 dc (= 9-11-13-13 repetitions), work (1 sc, ch 3, 1 sc) around ch-space in the corner, work 18-21-24-24 loose ch for armhole, skip 18-21-24-24 dc, insert a new marker in piece and work A.2 over the next 9-12-15-15 dc (= 3-4-5-5 repetitions), work (1 sc, 3 ch 1 sc) around ch-space in the corner, work ch 3, skip 3 dc, work A.2 over the next 12-15-18-18 dc (= 4-5-6-6 repetitions), and finish with 1 sl st in first sc on round. Now work pattern in the round as follows (work from 2nd round in diagram A.3a-A.3c): Work A.3a (show how round beg and end), work A.3b around every ch-space until first corner, work A.3c (= 3 tr, ch 3, 3 tr) around ch-space in the corner, continue with A.3b around every ch-space until ch for armhole, work A.3b 6-7-8-8 times around the 18-21-24-24 ch, work A.3c around ch-space in the corner, work A.3b around every ch-space until next corner, work A.3c around ch-space in the corner, work A.3b 6-7-8-8 times around the 18-21-24-24 ch for armhole, work A.3b around every ch-space until next corner, work A.3c around ch-space in the corner, work A.3b around the remaining ch-spaces on round. When A.3a-A.3c have been worked vertically, repeat the last 2 round in diagram until piece measures approx. 70-76-80-82 cm / 27½"-30"-31½"-32¼"" in total (= 35-38-40-41 cm / 13¾"-15"-15¾"-16⅛" from the middle of A.1 and out in one side) - adjust so that last round worked is a round with ch-spaces and sc. Cut the yarn. FRONT PIECE: Work front pieces back and forth without inc. Insert a marker on last round worked. NOW MEASURE THE PIECE FROM HERE. Beg at star in one corner – see chart, and work from 2nd row in diagram as follows: A.4a, then work A.4b until 1 ch-space remain before the ch-space in the corner, work A.4c. Continue like this back and forth. When A.4a, A.4b and A.4c have been worked vertically, repeat the last 2 rows until front piece measures approx. 23-25-26-27 cm / 9"-9¾"-10¼"-10½" from marker – adjust so that last row is worked as next to last row in A.4a-A.4c. Fasten off. Repeat in opposite side of piece – see star on chart. SLEEVES: Work sleeve back and forth. Beg at marker mid under sleeve and work from WS 18-21-24-24 dc evenly up to shoulder, then work 18-21-24-24 dc around ch-row = 36-42-48-48 dc. Insert a marker here. NOW MEASURE THE PIECE FROM HERE. Then work pattern back and forth from 2nd row (= RS) in diagram A.4 as follows: NOTE: On first row work every tr in tr-groups into one dc on previous row. Work A.4a, then work A.4b over the next 30-36-42-42 dc, work A.4c = 12-14-16-16 tr-groups. When entire diagram A.4a-A.4c has been worked vertically, repeat the last 2 rows in pattern, AT THE SAME TIME dec 1 tr-group in each side of sleeve by working as shown on the last 4 rows in diagram A.5a at beg of row and A.5b at the end of row = 10-12-14-14 tr-group. Repeat this dec in each side 0-1-1-1 more time = 10-10-12-12 tr-groups. When piece measures approx. 50 cm / 19¾" in all sizes, the sleeve is done - adjust to finish after a row that is last row in A.4a-A.4c. Fasten off. Work the other sleeve the same way. ASSEMBLY: Sew underarm seams in outer loops of edge sts. Work an edge around the entire jacket as follows: Beg in one corner on one of the front pieces and work * (1 sc, ch 3, 1 sc, ch 3, 1 sc, 3 ch) around ch-space in the corner, work (3 ch, skip approx. 1 cm / ⅜", 1 sc) until next corner, work ch 3, *, repeat from *-* around the entire jacket. Finish with 1 sl st in first sc on round. Fasten off. |
|||||||||||||||||||||||||||||||||||||||||||||||||
Diagram explanations |
|||||||||||||||||||||||||||||||||||||||||||||||||
|
|||||||||||||||||||||||||||||||||||||||||||||||||
|
|||||||||||||||||||||||||||||||||||||||||||||||||

|
|||||||||||||||||||||||||||||||||||||||||||||||||

|
|||||||||||||||||||||||||||||||||||||||||||||||||

|
|||||||||||||||||||||||||||||||||||||||||||||||||
|
Have you made this or any other of our designs? Tag your pictures in social media with #dropsdesign so we can see them! Do you need help with this pattern?You'll find tutorial videos, a Comments/Questions area and more by visiting the pattern on garnstudio.com. © 1982-2024 DROPS Design A/S. We reserve all rights. This document, including all its sub-sections, has copyrights. Read more about what you can do with our patterns at the bottom of each pattern on our site. |
|||||||||||||||||||||||||||||||||||||||||||||||||


With over 40 years in knitting and crochet design, DROPS Design offers one of the most extensive collections of free patterns on the internet - translated to 17 languages. As of today we count 304 catalogs and 11422 patterns - 11417 of which are translated into English (US/in).
We work hard to bring you the best knitting and crochet have to offer, inspiration and advice as well as great quality yarns at incredible prices! Would you like to use our patterns for other than personal use? You can read what you are allowed to do in the Copyright text at the bottom of all our patterns. Happy crafting!
Comments / Questions (47)
Ik heb proeflapjes gemaakt van 10 stokjes en dan 6 rijen. het is dan wat groter dan 10 bij 10cm. Maar als ik het binnenste vierkant haak dan is het kleiner dan 36cm bij 36cm. Hoe zou dit kunnen? en komen er video's van de rest van het patroon?? zou erg leuk zijn. Dank je wel
08.09.2017 - 21:02DROPS Design answered:
Hallo Peggy, Zou het kunnen dat je toch wat strakker hebt gehaakt bij het maken van het binnenste vierkant? Als het echt een stuk kleiner wordt, kun je beter een grotere haaknaald nemen. Voor de meeste steken staan er (inmiddels) video's bij. Ik denk dat er niet meer video's bij komen.
13.09.2017 - 13:38Sized as S-XXXL is not helpful. Measurements please!
07.06.2017 - 15:39DROPS Design answered:
Dear Mrs Moss, you will find at the bottom of the pattern a measurement chart with all measurements for each size, taken flat, in cm. Compare these to a similar garment you have and like the shape to find out the matching size. Read more about sizing here. Happy crocheting!
07.06.2017 - 15:55Cher drops, Malgré un échantillon parfait,la laine cloud,je n'arrive pas à 36 x 36 cm à la fin du diagramme A1 et cela en suivant et faisant juste le diagramme A1, ma question et la suivante : pourquoi? En attente de votre réponse,recevez mes salutations amicales
04.05.2017 - 16:41DROPS Design answered:
Chere Uyan! Selon les dimensions obtenues je vous recommande d'utiliser un autre numero de crochet (6 ou 8). Au debut realisez un échantillon de 10 B x 6 rangs et verrez si les dimensions sont correctes (10 x 10 cm). Bon tricot!
04.05.2017 - 17:36Haekelt man die Arme einzeln oder in Runden das sieht man nicht auf den Fotos.
29.03.2017 - 20:10DROPS Design answered:
Liebe Frau Stahl, die Ärmel werden in Hin- und Rück-R gehäkelt, mit einer Naht mitte unter die Ärmel. Viel Spaß beim häkeln!
28.06.2017 - 08:37Hallo, ich komme irgendwie mit den Ärmel nicht klar......Dann ab der 2. R (= Hin-R) von A.4 wie folgt hin- und zurückhäkeln(mir kommt es so vor als häkel ich in Runden und nicht hin und her.Arm ist an der Jacke rund. Dann erklären sie mir bitte die Abnahme der D-Stäbchengruppen am Anfang und am Ende
29.03.2017 - 15:40DROPS Design answered:
Liebe Frau Stahl, hier wird mit Fotos (und Text auf französisch und english) gezeigt, wie man die Ärmel häkelt. Viel Spaß beim häkeln!
29.03.2017 - 16:17Bitte erklären sie mir wie dieser Satz gemeint ist ?: Nun für alle Größen wie folgt weiterhäkeln (die 2. Rd von A.2 häkeln),Ich komme ab A 1 leider nicht weiter
22.03.2017 - 08:46DROPS Design answered:
Liebe Frau Stahl, jetzt die 2. Reihe in A.2 stricken (= 1 fM, 3 Stb springen) von (bis) wiederholen, und um jeder Ecke (1 fM, 3 Lm, 1 fM). Hier sehen Sie einige Fotos, wie man A.2 häkelt. Viel Spaß beim häkeln!
22.03.2017 - 09:32Gibt es mittlerweile eine Antwort vom Design-Team wegen der Maschenprobe und der Größe des Quadrats? Mir geht es nämlich wie Birte: Ich habe mit Nadelstärke 8 eine perfekte Maschenprobe, aber nach dem Muster A1 ist mein Quadrat nur ca. 25cm auf 25cm groß. Woran kann das liegen? Ich bin mir sicher, dass ich immer die richtigen Stäbchen bzw. Doppelstäbchen gehäkelt habe.
25.12.2016 - 15:13DROPS Design answered:
Liebe Julia, gerne können Sie mit unserem Video zu A.1 schauen. Viel Spaß beim häkeln!
29.12.2016 - 14:00Fiz a amostra com o tamanho correcto, mas ao terminar o diagrama A1 só tenho 29cm, e isso esticando já o quadrado. Devo bloquear até alcançar os 36cm? Nao sei bem como prosseguir, devo juntar mais uma fila para alcançar o tamanho correcto ou confiar que a peça vai alargar?
29.10.2016 - 01:53DROPS Design answered:
Preferencialmente, deve esticar o quadrado até alcançar os 36 cm para que a forma do casaco se mantenha como no modelo original. Opcionalmente, pode juntar mais uma fila. Se não está a usar o fio DROPS, não podemos garantir qual o resultado final. Bons crochés!
31.10.2016 - 16:14Fiz a amostra com o tamanho correcto, mas ao terminar o diagrama A1 só tenho 29cm, e isso esticando já o quadrado. Devo bloquear até alcançar os 36cm? Nao sei bem como prosseguir, devo juntar mais uma fila para alcançar o tamanho correcto ou confiar que a peça vai alargar?
29.10.2016 - 01:13DROPS Design answered:
Preferencialmente, deve esticar o quadrado até alcançar os 36 cm para que a forma do casaco se mantenha como no modelo original. Opcionalmente, pode juntar mais uma fila. Se não está a usar o fio DROPS, não podemos garantir qual o resultado final. Bons crochés!
31.10.2016 - 16:14Vielen Dank für die schnelle Antwort. Doppelstäbchen sind doch nur in der zweiten Runde von A.1 vorhanden, oder habe ich etwas übersehen ?
28.10.2016 - 18:21DROPS Design answered:
Liebe Frau Morten, stimmt. Passen Sie mal auf, die Maschenprobe bei dem Quadrat auch zu beachten. A.1 müsste ca 36x36cm sein.
31.10.2016 - 08:41