DROPS Big Delight
DROPS Big Delight
100% Wool
Discontinued
find alternatives
DROPS SS24

Fall Festival

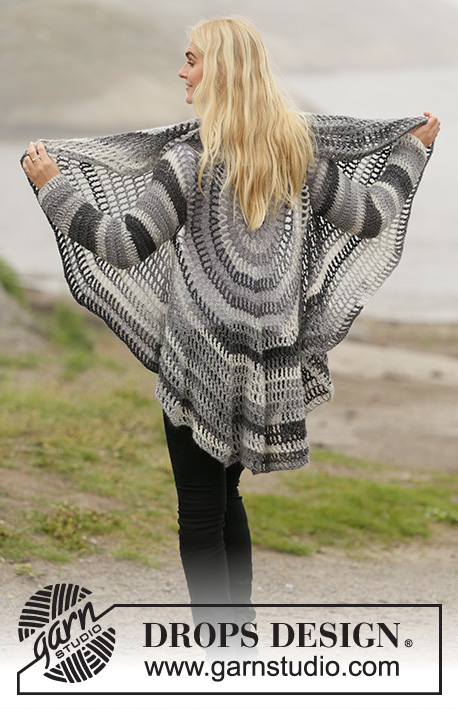
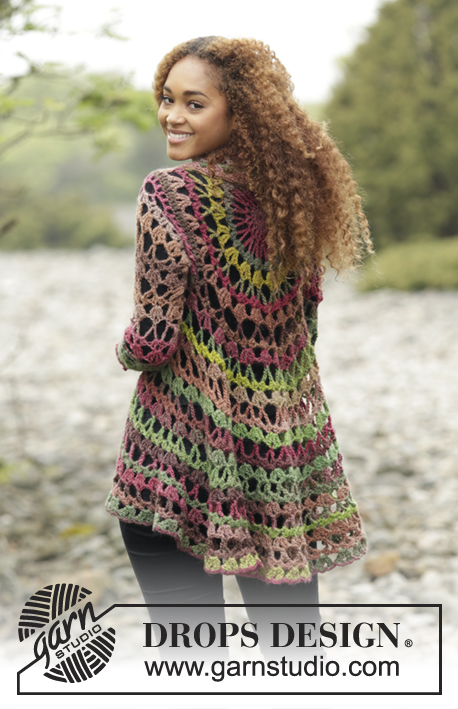
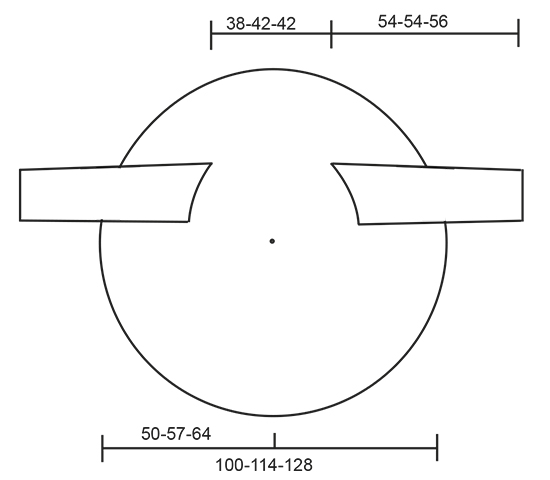
Crochet jacket worked in a circle in 1 strand DROPS Big Delight or 1 strand DROPS Fabel together with 1 strand DROPS Flora. Size: S - XXXL.

DROPS 171-21
DROPS design: Pattern no db-065
Yarn group C or A + A
----------------------------------------------------------
Size: S/M - L/XL - XXL/ XXXL
Materials:
DROPS BIG DELIGHT from Garnstudio
500-600-700 g colour no 06, autumn forest

or use
DROPS FABEL from Garnstudio (yarn group A)
250-300-350 g colour no 542, green
together with
DROPS FLORA from Garnstudio (yarn group A)
250-300-350 g colour no 15, green

DROPS CROCHET HOOK SIZE 5.5 mm – or size needed to get 13 tr x 8 rows = 10 x 10 cm with one strand of DROPS Fabel and DROPS Flora

-------------------------------------------------------

Alternative Yarn – See how to change yarns here
Yarn Groups A to F – Use the same pattern and change the yarn here
Yarn usage using an alternative yarn – Use our yarn converter here

-------------------------------------------------------

DROPS Big Delight
DROPS Big Delight
100% Wool
Discontinued
find alternatives

Pattern instructions

NOTE: This pattern is written in British English. All measurements in charts are in cm. For conversion from cm to inches - click here. There are different terms for crocheting in British and American English. If this pattern includes crochet, click for "crochet terms" here. For this pattern in American English, please click here.
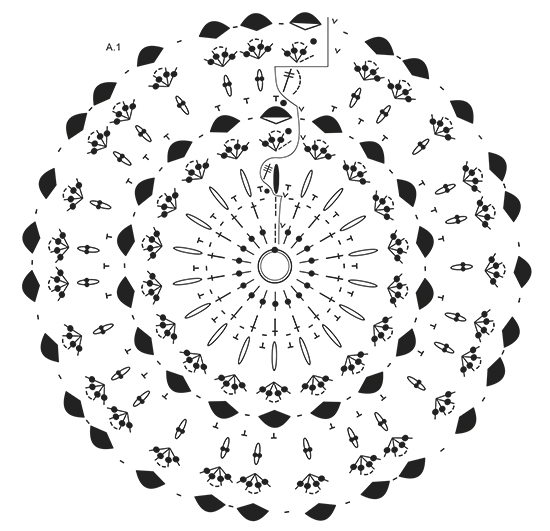
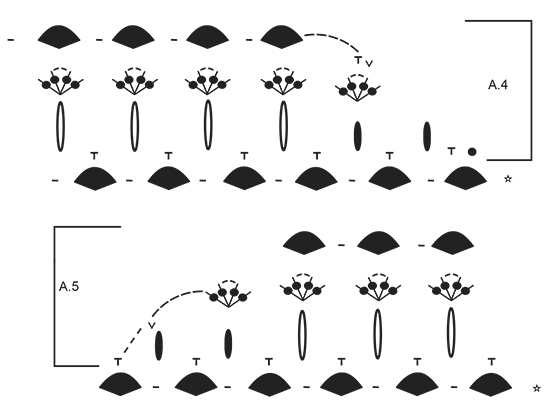
PATTERN:
See diagrams A.1 to A.5.

CROCHET INFO:
Replace first dc at beg of round with 1 ch, finish round with 1 sl st in 1st ch at beg of round.
Replace first tr at beg of round with 3 ch, finish round with 1 sl st in 3rd ch from beg of round.
Replace first dtr at beg of round with 4 ch, finish round with 1 sl st in 4th ch from beg of round.
----------------------------------------------------------

JACKET WORKED IN A CIRCLE:
Crochet 4 ch on hook size 5.5 mm with Big Delight (or DROPS Fabel and DROPS Flora) and form a ring with 1 sl st in first ch. Then work according to A.1. READ CROCHET INFO! REMEMBER THE CROCHET TENSION!
When A.1 has been worked, circle measures approx. 33 cm in diameter and there are 27 dtr-groups on round.

Size L/XL-XXL/XXXL: Work according to A.2, on first round in A.2 inc 9 ch-spaces evenly (inc the same way as on 6th round in A.1, inc 1 ch-space as follows: Work 1 dc around ch-space in the middle of dtr-group, 9 ch, 1 dc around ch between dtr-groups, 9 ch, 1 dc around ch-space in the middle of next dtr-group) = 36-36 ch-spaces. Work A.2 1 time vertically.

ALL SIZES: = 27-36-36 dtr-groups. Work next round as round 1 in A.3, AT THE SAME TIME work armholes as follows:
1 dc around ch-space in the middle of dtr-group, work 30-33-36 loose ch, skip 5-6-7 dtr-groups, 1 dc around ch-space in the middle of next dtr-group (armhole has been worked), * 12 ch, 1 dc around ch-space in the middle of next dtr-group *, repeat from *-* 8-14-12 times in total, work 30-33-36 loose ch, skip 5-6-7 dtr-groups, 1 dc around ch-space in the middle of next dtr-group (another armhole has been worked), * 12 ch, 1 dc around ch-space in the middle of next dtr-group *, repeat from *-* the entire round and finish with 1 sl st in first dc at beg of round (instead of 1 dc around next ch-space).

Work next round as round 2 in A.3 as follows: Work the same way as before with 2 tr + 2 ch + 2 tr around every ch-space, around every ch-space for armhole work 6-7-8 tr-groups, AT THE SAME TIME inc 9 tr-groups evenly on round, inc 1 tr-group by working 2 tr + 2 ch + 2 tr + 2 tr + 2 ch + 2 tr around 1 ch-space = 36-45-45 tr-groups.
ROUND 3: Work 2 dtr + 2 ch + 2 dtr around ch-space in the middle of every tr-group and 1 ch between every dtr-group = 36-45-45 dtr-groups with 1 ch between each.

Continue to work according to A.3, AT THE SAME TIME inc 9 ch-spaces evenly every time 1st round is worked, as follows:
ROUND 1: Work sl sts until middle of first ch-space (in the middle of a dtr-group), 1 dc, * 12 ch, 1 dc around next ch-space in the middle of a dtr-group *, repeat from *-* the entire round AT THE SAME TIME inc 9 ch-spaces evenly on round = 45-54-54 ch-spaces (finish round with 6 ch and 1 triple tr in first dc at beg of round).
ROUND 2: Work 2 tr + 2 ch + 2 tr around every ch-space the entire round = 45-54-54 tr-groups.
ROUND 3: Work 2 dtr + 2 ch + 2 dtr around every ch-space in tr-group and 1 ch between every dtr-group the entire round = 45-54-54 dtr-group with 1 ch between each.

Repeat 1st-3rd round 3-3-4 more times, AT THE SAME TIME inc 9 ch-spaces every time 1st round is worked = 72-81-90 dtr-group.

To get an oval shape on jacket work back and forth only over the bottom 47-54-61 dtr-groups, do not work over the middle 25-27-29 dtr-groups at the top of neck.

Beg from RS and repeat 1st-3rd row in A.3 as before 2 times in total (i.e. back is 6 rows longer vertically), to get a nice transition on every turn work as shown in A.4 and A.5, AT THE SAME TIME inc 7 ch-spaces every time 1st row is worked (= 86-95-104 dtr-groups in total on round incl dtr-groups towards the neck).
Finish with 1 round ch-spaces around the entire jacket (from RS) as follows: * 4 ch, 1 dc around ch-space in the middle of a dtr-group, 4 ch, 1 dc before next dtr-group *, repeat from *-* the entire round, fasten off.

SLEEVE:
Work 60-66-72 tr around armhole (approx. 5 tr in every dtr-group and approx. 30-33-36 tr around ch-space – beg mid under sleeve).

Work next round as follows:
* 1 tr in first/next tr, 1 ch, skip 1 tr *, repeat from *-* the entire round = 30-33-36 tr + 30-33-36 ch.
Continue to work as follows:
ROUND 1: * 6 ch, skip 5 sts, 1 dc in next st *, repeat from *-* the entire round = 10-11-12 ch-spaces.
ROUND 2: Work 2 tr + 2 ch + 2 tr around every ch-space the entire round = 10-11-12 tr-groups.
ROUND 3: Work 2 dtr + 2 ch + 2 dtr around every ch-space in tr-group and 1 ch between every dtr-group the entire round = 10-11-12 dtr-group with 1 ch between each.
ROUND 4: * 12 ch, 1 dc around ch-space in the middle of dtr-group *, repeat from *-* the entire round = 10-11-12 ch-spaces but at the same time dec 1 ch-space on round mid under sleeve as follows: 1 dc around ch-space in the middle of next to last dtr-group on round, 6 ch, 1 tr around ch-space in the middle of dtr-group to be skipped, 6 ch, 1 dc around ch-space in the middle of next dtr-group). On new round work tr-group mid under sleeve in tr between the 2 ch-spaces with 6 ch = 9-10-11 tr-groups.
Repeat 2nd-4th round and dec at the same time 1 ch-space every 3rd round so that there is 1 dtr-group/ch-space less on round. When there are 5-6-7 dtr-groups/ch-spaces on round, work without dec until piece measures 54-54-56 cm, or desired measurements, try the jacket while working. Fasten off and repeat on the other sleeve.

Diagram

symbols = 4 ch, (chain stitches) 1 sl st (slip stitch) in first ch (chain stitch) (see black point on circle), round begins and ends here
symbols = 1 ch (chain stitch)
symbols = 1 sl st (slip stitch)
symbols = work 1 sl sts (slip stitch) around the beginning of first ch-space (chain space), 1 ch (chain stitch)
symbols = 1 dc around ch-space (double crochet around chain stitch/chain space)
symbols = 1 tr around ch-space (treble crochet around chain stitch ring/chain space)
symbols = 1 tr in st (treble crochet in stitch)
symbols = 1 dtr in st (double treble crochet in stitch)
symbols = 1 triple tr in st (triple treble crochet in stitch)
symbols = 6 ch (chain stitches)
symbols = 12 ch (chain stitches)
symbols = 9 ch (chain stitches)
symbols = 2 dtr + 2 ch + 2 dtr around ch-space in tr-group (2 double treble crochets + 2 chain stitches + 2 double treble crochets around chain space in treble crochet group)
symbols = 4 ch, 1 dtr + 2 ch + 2 dtr around ch-space in tr-group (4 chain stitches, 1 double treble crochet + 2 chain stitches + 2 double treble crochets around chain space in treble crochet group)
symbols = round shows last round on previous diagram, round has already been worked
diagram
diagram
diagram
diagram
Do you have a question? See a list of frequently asked questions (FAQ)

Knitting tension is what determines the final measurements of your work, and is usually measured per 10 x 10 cm. It is provided like so: number of stitches in width x number of rows in height - eg: 19 stitches x 26 rows = 10 x 10 cm.

The knitting tension is very individual; some people knit/crochet loosely while others work tightly. You adjust the knitting tension with the needle size, which is why the suggested needle size is only meant as a guide! You need to adjust this (up or down) to ensure that YOUR knitting tension matches the knitting tension provided in the pattern. If you work with a different knitting tension than provided you will have a different yarn consumption, and your work will have different measurements than what the pattern suggests.

The knitting tension also determines which yarns can replace each other. As long as you achieve the same knitting tension you can replace one yarn with another.

See DROPS lesson: How to measure your tension/gauge

See DROPS video: How to make a gauge tension swatch

The required amount of yarn is provided in grams, eg: 450 g. To calculate how many balls you’ll need you first need to know how many grams are in 1 ball (25g, 50g or 100g). This information is available if you click on the individual yarn quality on our pages. Divide the amount required with the amount of each ball. For example, if each ball is 50g (the most common amount), the calculation will be as follows: 450 / 50 = 9 balls.

The important thing when changing from one yarn to another is that the knitting/crochet tension remains the same. This is so that the measurements of the finished piece will be the same as on the sketch provided. It is easier to achieve the same knitting tension using yarns from the same yarn group. It is also possible to work with multiple strands of a thinner yarn to achieve the knitting tension of a thicker one. Please try our yarn converter. We recommend you to always work a test swatch.

Please NOTE: when changing yarn the garment might have a different look and feel to the garment in the photo, due to individual properties and qualities of each yarn.

See DROPS lesson: Can I use a different yarn than the one mentioned in the pattern?

All our yarns are categorised into yarn groups (from A to F) according to thickness and knitting tension – group A contains the thinnest yarns and group F the thickest. This makes it easier for you to find alternative yarns to our patterns, should you wish to switch yarn. All yarns within the same group have a similar knitting tension and can easily replace each other. However, different yarn qualities have different structures and properties which will give the finished work a unique look and feel.

Click here for an overview of the yarns in each yarn group

At the top of all our patterns you’ll find a link to our yarn calculator, which is a helpful tool should you wish to use a different yarn than suggested. By filling in the yarn quality you wish to replace, the amount (in your size) and number of strands, the calculator will present good alternative yarns with the same knitting tension. Additionally it will tell you how much you’ll require in the new qualities and whether you’ll need to work with multiple strands. Most skeins are 50g (some are 25g or 100g).

If the pattern is worked with multiple colours, every colour will have to be calculated separately. Similarly, if the pattern is worked with several strands of different yarns (for example 1 strand Alpaca and 1 strand Kid-Silk) you will have to find alternatives for each, individually.

Click here to see our yarn calculator

Since different yarns have different qualities and textures we have chosen to keep the original yarn in our patterns. However, you can easily find options among our available qualities by using our yarn calculator, or simply pick a yarn from the same yarn group.

It is possible that some retailers still have discontinued yarns in stock, or that someone has a few skeins at home that they would like to find patterns for.

The yarn calculator will provide both alternative yarn as well as required amount in the new quality.

If you think it's hard to decide what size to make, it can be a good idea to measure a garment you own already and like the size of. Then you can pick the size by comparing those measures with the ones available in the pattern's size chart.

You'll find the size chart at the bottom of the pattern.

See DROPS lesson: How to read size chart

The needle size provided in the pattern serves only as a guide, the important thing is to follow the knitting tension. And since knitting tension is very individual, you will have to adjust the needle size to ensure that YOUR tension is the same as in the pattern – maybe you’ll have to adjust 1, or even 2 needle sizes, up or down to achieve the correct tension. For this, we recommend that you work test swatches.

Should you work with a different knitting tension than the one provided, the measurements of the finished garment might deviate from the measurement sketch.

See DROPS lesson: How to measure your tension/gauge

See DROPS video: How to make a tension/gauge swatch

Working a garment top-down provides more flexibility and room for personal adjustment. For example it is easier to try the garment on while working, as well as making adjustments to length of yoke and shoulder caps.

The instructions are carefully explaining every step, in the correct order. Diagrams are adjusted to the knitting direction and are worked as usual.

The diagram depicts all rows/rounds, and every stitch seen from the right side. It is read from bottom to top, from right to left. 1 square = 1 stitch.

When working back and forth, every other row is worked from the right side and every other row is worked from the wrong side. When working from the wrong side, the diagram will have to be worked reversed: from left to right, knit stitches are purled, purl stitches are knit etc.

When working in the round every round is worked from the right side and the diagram are worked from right to left on all rounds.

See DROPS lesson: How to read knitting diagrams

The diagram depicts all rows/rounds, and every stitch seen from the right side. It is worked from bottom to top, from right to left.

When working back and forth every other row is worked from the right side: from right to left and every other row is worked from the wrong side: from left to right.

When working in the round, every row in the diagram are worked from the right side, from right to left.

When working a circular diagram you start in the middle and work your way outwards, counter clockwise, row by row.

The rows usually start with a given number of chain stitches (equivalent to the height of the following stitch), this will either be depicted in the diagram or explained in the pattern.

See DROPS lesson: How to read crochet diagrams

Instructions for working several diagrams after each other on the same row/round, will often be written like so: “work A.1, A.2, A.3 a total of 0-0-2-3-4 times". This means you work A.1 once, then A.2 is worked once, and A.3 is repeated (in width) the number of times provided for your size – in this case like so: S = 0 times, M = 0 times, L=2 times, XL= 3 times and XXL = 4 times.

The diagrams are worked as usual: begin with the first row in A.1, then work the first row in A.2 etc.

See DROPS lesson: How to read knitting diagrams

See DROPS lesson: How to read crochet diagrams

The total width of the garment (from wrist-to-wrist) will be larger in the larger sizes, despite the actual sleeves being shorter. The larger sizes have longer sleeve caps and wider shoulders, so there will be a good fit in all sizes.

The measurement sketch/schematic drawing provides information regarding the full length of the garment. If it’s a jumper or a jacket the length is measured from the highest point on the shoulder closest to the neckline, and straight down to the bottom of the garment. It is NOT measured from the tip of shoulder. Similarly, the length of yoke is measured from the highest point on the shoulder and down to where yoke is split into body and sleeves.

On a jacket measures are never taken along bands, unless specifically stated. Always measure inside band stitches when measuring the length.

See DROPS lesson: How to read a schematic drawing

Diagrams are often repeated on the round or in height. 1 repeat is the diagram the way it appears in the pattern. If it says to work 5 repeats of A.1 in the round, then you work A.1 a total of 5 times after/next to each other in the round. If it says to work 2 repeats of A.1 vertically/in height you work the entire diagram once, then begin again at the start and work the entire diagram one more time.

Chain stitches are slightly narrower than other stitches and to avoid working the cast-on edge too tight, we simply chain more stitches to begin with. The stitch count will be adjusted on the following row to fit the pattern and measurement sketch.

The rib edge is more elastic and will contract slightly compared to, for example, stocking stitch. By increasing before the rib edge, you avoid a visible difference in width between the rib edge and the rest of the body.

It’s very easy to cast off too tightly, and by making yarn overs while casting off (and simultaneously casting these off) you avoid a too tight cast off edge.

See DROPS video: How to bind off with yarn overs (yo)

To achieve an even increase (or decrease) you can increase on, for example: every 3rd and 4th row alternately, like so: work 2 rows and increase on the 3rd row, work 3 rows and increase on the 4th. Repeat this until the increase is complete.

See DROPS lesson: Increase or decrease 1 st on every 3rd and 4th row alternately

Should you prefer to work in the round instead of back and forth, you may of course adjust the pattern. You’ll need to add steeks mid-front (usually 5 stitches), and follow the instructions. When you would normally turn and work from the wrong side, simply work across the steek and continue in the round. At the end you’ll cut the piece open, pick up stitches to work bands, and cover the cut edges.

See DROPS video: How to knit steeks and cut open

Should you prefer to work back and forth instead of in the round, you may of course adjust the pattern so you work the pieces separately and then assemble them at the end. Divide the stitches for the body in 2, add 1 edge stitch in each side (for sewing) and work the front and back pieces separately.

See DROPS lesson: Can I adapt a pattern for circular needles into straight needles?

Pattern repeats can vary slightly in the different sizes, in order to get the correct proportions. If you’re not working the exact same size as the garment in the photo, yours might deviate slightly. This has been carefully developed and adjusted so that the complete impression of the garment is the same in all sizes.

Make sure to follow instructions and diagrams for your size!

If you have found a pattern you like which is available in women’s size it’s not very difficult to convert it to men’s size. The biggest difference will be the length of sleeves and body. Start working on the women size that you think would fit across the chest. The additional length will be worked right before you cast off for the armhole/sleeve cap. If the pattern is worked top-down you can add the length right after the armhole or before the first decrease on sleeve.

Regarding additional yarn amount, this will depend on how much length you add, but it is better with a skein too many than too few.

All yarns will have excess fibres (from production) that might come off as lint or shedding. Brushed yarns (ie hairier yarns) have more of these loose, excess fibres, causing more shedding.

Shedding also depends on what is worn under or over the garment, and whether this pulls at the yarn fibres. It’s therefore not possible to guarantee that there will be no shedding

Below are some tips on how to get the best result when working with hairier yarns:

1. When the garment is finished (before you wash it) shake it vigorously so the looser hairs come off. NOTE: do NOT use a lint roller, brush or any method that pulls at the yarn.

2. Place the garment in a plastic bag and put it in your freezer - the temperature will cause the fibres to become less attached to each other, and excess fibres will come off easier.

3. Leave in the freezer for a few hours before taking it out and shaking it again.

4. Wash the garment according to the instructions on the yarn label.

Pilling is a natural process that happens to even the most exclusive of fibers. It's a natural sign of wear and tear that is hard to avoid, and that is most visible in high friction areas of your garment like a sweater's arms and cuffs.

You can make your garment look as new by removing the pilling, using a fabric comb or a pill/lint remover.

Still can't find the answer you need? Then scroll down and leave your question so one of our experts can try to help you. This will be done normally within 5 to 10 working days.
In the meantime, you can read the questions and answers that others have left to this pattern or join the DROPS Workshop on Facebook to get help from fellow knitters/crocheters!

You might also like...

Fall Festival

Silvia Fernández-Longo, Spain

171-21 Fall Festival

Roser, Spain

Post a comment to pattern DROPS 171-21

We would love to hear what you have to say about this pattern!

If you want to leave a question, please make sure you select the correct category in the form below, to speed up the answering process. Required fields are marked *.

Comments / Questions (292)

country flag Eva wrote:

Hej. Undrar om jag förstått mönstret rätt. Har gjort cirkeln och börjat med A3. När ärmhålen är gjorda finns det 8 resp 7 stolpgrupper emellan ärmhålen, stämmer det? Sedan står det att runt varje ärmhål (30 lm) ska det vara 6 stolpgrupper men att man ska öka 9 grupper jämnt över varvet. Ska det ökas över de 30 lm också eller enbart emellan?

02.09.2016 - 08:52

DROPS Design answered:

Hej Eva. Ja, du öker jaevnt over hele varvet - saa jeg vil sige ogsaa over ärmhål

13.09.2016 - 14:40

country flag Annie Kuijpers wrote:

DANK JE WEL IK HEB HET BEGREPEN GROETJES Annie

01.09.2016 - 13:11

country flag Leny wrote:

Gelukkig kon ik dat 'zelf' bedenken, hartelijk dank zover en ik hoop als het nodig is weer met mijn vragen terecht te kunnen bij u! De service is top.

31.08.2016 - 13:57

country flag Leny wrote:

Ik begrijp het nu gelukkig. Maar toch nog een nieuwe vraag: in Tour zes moeten er toch steeds 9 lossen tussen die vasten? Dat is toch een en dezelfde Tour? Heel hartelijk dank.

30.08.2016 - 22:41

DROPS Design answered:

Hoi Leny. Mooi. Ja, dat klopt - had ik gemist (9 l tussen de vasten op toer 6)

31.08.2016 - 11:57

country flag Annie Kuijpers wrote:

Hallo Hoe haak je het ovaal van vest herfstbos model nr. db 065. Het moet afwisselen met a4 en a5 maar ik weet niet hoe ik snap het niet benwel zover met het vest maar heb nog nooit geen patroon gelezen dus nu zit ik vast Annie

30.08.2016 - 16:29

DROPS Design answered:

Hoi Annie. Je haakt toer 1-3 van A.3 totaal 2 keer langs de onderste 47-54-61 dstk-groepen en tegelijkertijd haak je volgens A.4 of A.5 bij het keren voor een mooie overgang. Vergeet niet om ook 7 l-lussen te meerderen elke keer dat je toer 1 van A.3 haakt (dwz, 2 keer 7 l-lussen meerderen).

01.09.2016 - 12:37

country flag Leny wrote:

Dank voor het antwoord, maar het is me nog niet duidelijk, het valt ook niet mee om duidelijk te omschrijven wat ik bedoel, mijn 'probleem' is dat ik om de 2 lossen van de stk.groep dus mijn 4 lossen heb gehaakt, moet dat dstk. daar dan in gehaakt worden? zo ja, dan daarna de 2 lossen en dan vouwt het geheel weer dubbel door het volgende dstk. wat ik wil haken. Ik voel me heel dom, maar ik kom er niet uit en ik wil zo graag dit vest maken. Help svp nog eens

29.08.2016 - 14:57

DROPS Design answered:

Hoi Leny. Ik vind het moeilijk te volgen wat je bedoelt. Maar je begint met 4 l en dan haak je om de 2 l van de vorige toer: 1 dstk en 2 l en 2 dstk. Je haakt dan verder als volgt: 1 l, om de volgende 2 l van de vorige toer (kijk op telpatroon): 2 dstk en 2 l en 2 dstk om l-lus in stk-groep enzovoort. Je eindigt met 1 l en 1 hv in de 4e l van het begin van de toer. Kijk ook eventueel hier. Deze instructie is van mijn Franse collega. Misschien kan je wat mee.

30.08.2016 - 12:12

country flag Leny wrote:

Hoe moet ik tour vijf beginnen nadat ik de vier lossen heb gehaakt, ik moet dan een dubbel stokje maken en waar steek ik dat in? Dezelfde vraag is dan voor de volgende tour waar ik moet beginnen met twee dubbele stokjes. Alvast bedankt!

27.08.2016 - 16:31

DROPS Design answered:

Hoi Leny. Je haakt de eerste "4 l, 1 dstk en 2 l en 2 dstk om l-lus in stk-groep" in de eerste 2 l tussen de stk-groep van vorige toer (zie telpatroon), daarna in toer 6 begin je met: haak hv tot midden van eerste l-lus, 1 l = dus hv over de 4 l tot het midden (ongeveer 2 hv verwacht ik), daarna ga je door met 1 v (de kleine T) in het midden van de l-lus, 1 v om de l tussen de dstk-groepen, 1 v om l-lus in dstk-groep enzovoort.

29.08.2016 - 11:46

country flag Melinda wrote:

Another question because it said my first one was too long. Is there any way of getting a picture of this cardigan spread out flat? Are the edges of the oval blended into the circle?

26.08.2016 - 08:42

DROPS Design answered:

Dear Belinda, there is no picture of the jacket flat, the oval shape is worked in rows, ie work on the stated number of sts for your size leaving the remaining sts unworked, the transition between circle (unworked sts) and A.4/A.5 will then be smooth and make a nice oval. Happy crocheting!

26.08.2016 - 11:04

country flag Melinda wrote:

So I've made it to the oval portion of this pattern. I have read both the directions and looked at the diagrams. If I am reading the pattern correctly, it says to repeat A3 twice then do a group of A4 and finally a group of A5. But further down it says do an A4, then an A3, then an A5. I understand both ways, but which one do we do and how do we add the ch 12s at the beginning of the row?

26.08.2016 - 08:38

DROPS Design answered:

Dear Melinda, when working A.4, A.3 and A.5, row 1 will start with first 2 6-ch-spaces (beg of A.4), then crochet 12-ch-spaces, then finish with 2 6-ch-spaces (end of A.5). Happy crocheting!

26.08.2016 - 11:02

country flag Janice Smith wrote:

I am at the part where it says work A3 whick i did and increased 9 loops to end up with 45.round 2 and round 3.. then it says repeat 1-3 for 3 more times to end up with 72.. DO I just do 1 and 3 or do you mean 1,2,and 3?

25.08.2016 - 02:10

DROPS Design answered:

Dear Mrs Smith, work the 3 rounds in A.3, ie round 1 inc 9 loops evenly, then round 2 and round 3, ie work A.3 that way a total of 4 times in height = there are 72 sts groups. Happy crocheting!

25.08.2016 - 10:09