
Popular categories
Looking for a yarn?


|
||||||||||||||||||||||
Misty Mountain |
||||||||||||||||||||||
|
|
||||||||||||||||||||||
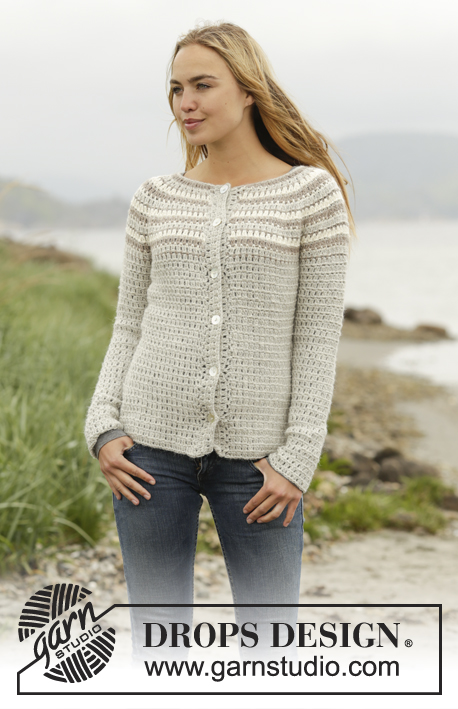
Crochet DROPS jumper and hat with stripes, worked top down in “Puna”. Size: S - XXXL.
DROPS 173-37 |
||||||||||||||||||||||
|
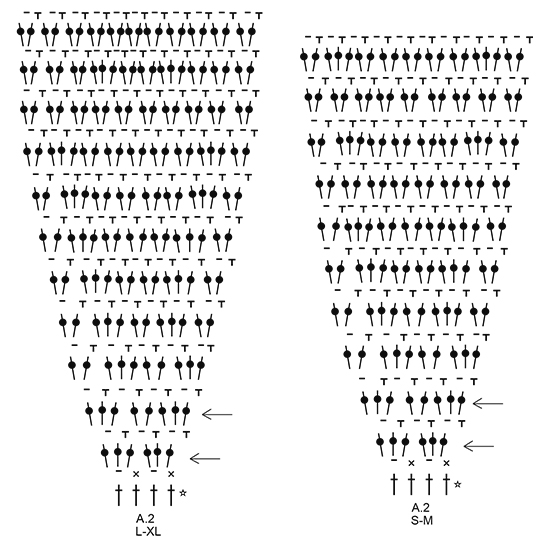
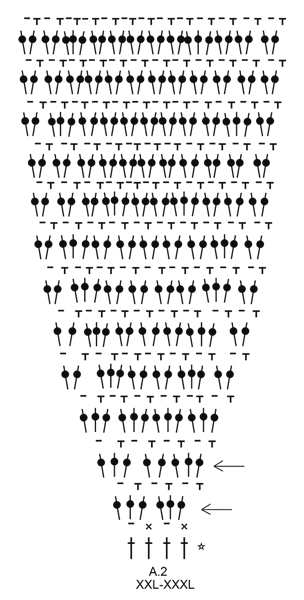
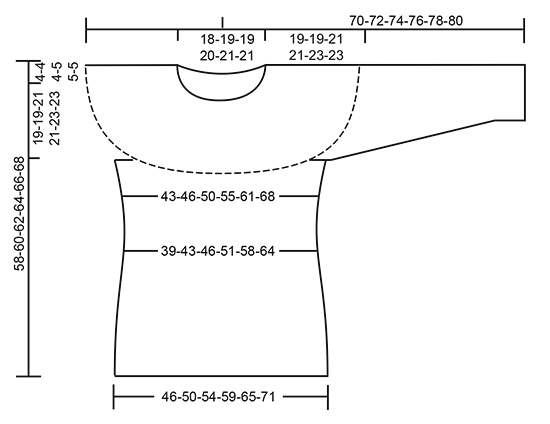
PATTERN: See diagrams A.1 to A.3. See diagram for correct size. CROCHET INFO: Beg every dc round with 1 ch (this replaces first dc) and finish with 1 sl st in first ch from beg of round. Beg every round with tr with 3 ch (= first tr) and finish with 1 sl st in 3rd ch at beg of round. At the end of every round with tr/dc work as follows: Before last pull through of last tr/dc switch colour as follows: Get next colour, i.e. 2 round down (1 tr round and 1 dc round), with the new colour work 1 sl st around round it was worked on (i.e. around last tr/dc), 4 ch, pull then through last loop on hook. This is done to avoid a tight strand in the piece. STRIPES: STRIPE 1: 1 round off white. STRIPE 2: 1 round light grey. STRIPE 3: 1 round taupe. DECREASE TIP (applies to body): Adjust so that next round is 1 round with tr. Work as before until 1 ch remains before marker, * work 1 tr around next ch, but wait with last pull through, work 1 tr more around same ch, but on last pull through, pull yarn through all sts on hook (= 1 tr dec) *, repeat from *-* around next ch (i.e. on the other side of marker) = 2 tr dec at each marker (= 4 tr in total). Every time you dec, repeat A.1 2 times less in total in width. INCREASE TIP: Adjust so that next round is 1 round with tr. Work as before until 1 ch remains before marker, * work 3 tr around next ch *, repeat from *-* 2 times in total = 2 tr inc at marker, repeat at both markers (= 4 tr inc in total). Every time you inc, repeat A.1 2 more times in total in width. DECREASE TIP-1 (applies to sleeve): Adjust so that next round is 1 round with tr. * Work 1 tr around first/next ch on round but wait with last pull through, work 1 tr more around the same ch but on last pull through, pull yarn through all sts on hook (= 1 tr dec) *, repeat from *-* around next ch = 2 tr dec. Every time you dec, repeat A.1 1 time less in total in width. Dec alternately at beg and end of round (i.e. when dec at the end work as before until 2 ch remain on round). ---------------------------------------------------------- JUMPER: The piece is worked top down. Rounds start mid back. YOKE: Work 96-101-101-110-115-120 ch on hook size 4.5 mm with taupe and form a ring with 1 sl st in first ch. Work 3 ch (= 1 tr) - READ CROCHET INFO, 1 tr in each of the next 5-3-3-5-3-1 ch, * skip 1 ch, 1 tr in each of the next 6 ch *, repeat from *-* the entire row = 84-88-88-96-100-104 tr. Work 2nd round (= round with dc/ch) in pattern as follows in STRIPES – see explanation above. Work A.1 over the first 10-12-12-12-14-14 tr (= 5-6-6-6-7-7 times in width), A.2 over the next 8 tr (= 2 times in width), A.1 over the next 6-6-6-8-8-8 tr (= 3-3-3-4-4-4 times in width), A.2 over the next 8 tr (= 2 times in width), A.1 over the next 20-22-22-24-26-28 tr (= 10-11-11-12-13-14 times in width), A.2 over the next 8 tr (= 2 times in width), A.1 over the next 6-6-6-8-8-8 tr (= 3-3-3-4-4-4 times in width), A.2 over the next 8 tr (= 2 times in width), A.1 over the last 10-10-10-12-12-14 tr (= 5-5-5-6-6-7 times in width). Repeat A.1 vertically and inc as shown in A.2 AT THE SAME TIME inc evenly as follows: Work 3rd round in pattern AT THE SAME TIME inc evenly as follows: Work A.1 over the first 10-12-12-12-14-14 sts and inc 0-2-2-4-4-4 tr evenly, A.2 as before (= 2 times in width), A.1 over the next 6-6-6-8-8-8 sts and inc 0-4-4-4-4-4 tr evenly, A.2 as before, A.1 over the next 20-22-22-24-26-28 sts and inc 0-4-4-6-6-8 tr evenly, A.2 as before, A.1 over the next 6-6-6-8-8-8 sts and inc 0-4-4-4-4-4 tr evenly, A.2 as before, A.1 over the last 10-10-10-12-12-14 sts and inc 0-2-2-2-4-4 tr evenly = 100-120-120-132-138-144 tr (incl inc in A.2). REMEMBER THE CROCHET TENSION! Work 4th round in pattern as follows: Work A.1 over the first 10-14-14-16-18-18 tr, A.2 as before, A.1 over the next 6-10-10-12-12-12 tr, A.2 as before, A.1 over the next 20-26-26-30-32-36 tr, A.2 as before, A.1 over the next 6-10-10-12-12-12 tr, A.2 as before, A.1 over the last 10-12-12-14-16-18 tr. Work 5th round in pattern AT THE SAME TIME inc evenly as follows: Work A.1 over the first 10-14-14-16-18-18 sts and inc 0-0-0-2-0-4 tr evenly, A.2 as before (= 2 times in width), A.1 over the next 6-10-10-12-12-12 sts and inc 0-2-4-4-0-0 tr evenly, A.2 as before, A.1 over the next 20-26-26-30-32-36 sts and inc 0-0-2-4-4-8 tr evenly, A.2 as before, A.1 over the next 6-10-10-12-12-12 sts and inc 0-2-4-4-0-0 tr evenly, A.2 as before, A.1 over the last 10-12-12-14-16-18 sts and inc 0-0-2-2-2-4 tr evenly = 116-140-148-164-160-176 tr (incl inc in A.2). Continue pattern and inc in A.2. When last round remains in A.2, piece measures approx. 18-18-19-19-21-21 cm from neck edge (= 212-236-260-276-304-320 tr). Work last round of A.2 as follows: Work A.1 over the first 10-14-14-18-18-22 tr, A.2 over the next 20-20-22-22-26-26 tr (= 1 time in width), 8-8-8-10-10-12 ch, skip the next 46-52-58-60-64-64 tr (i.e. 20-20-22-22-26-26 tr A.2, 6-12-14-16-12-12 tr A.1 and 20-20-22-22-26-26 tr A.2 for sleeve), A.2 over the next 20-20-22-22-26-26 tr (= 1 time in width), A.1 over the next 20-26-28-34-36-44 tr, A.2 over the next 20-20-22-22-26-26 tr (= 1 time in width), 8-8-8-10-10-12 ch, skip the next 46-52-58-60-64-64 tr (i.e. 20-20-22-22-26-26 tr A.2, 6-12-14-16-12-12 tr A.1 and 20-20-22-22-26-26 tr A.2 for sleeve), A.2 over the next 20-20-22-22-26-26 tr (= 1 time in width), A.1 over the last 10-12-14-16-18-22 tr = 136-148-160-176-196-216 sts. Continue piece with light grey. Work next round as follows: Work A.1 over the first 30-34-36-40-44-48 sts, 1 tr in each of the 8-8-8-10-10-12 ch under sleeve, insert 1 marker between these sts, A.1 over the next 60-66-72-78-88-96 sts, 1 tr in each of the 8-8-8-10-10-12 ch under sleeve, insert 1 marker between these, A.1 over the last 30-32-36-38-44-48 sts. Insert 1 marker in piece, NOW MEASURE PIECE FROM HERE. Then repeat A.1 over all sts. When piece measures 4 cm from marker, dec 2 tr at each marker - READ DECREASE TIP. Dec like this every 4-4½-4½-5½-5½-6 cm 3 times in total = 124-136-148-164-184-204 sts. When piece measures 14-16-16-17-17-19 cm from marker, inc 2 tr at each marker – see INCREASE TIP. Inc like this every 2½ cm a total of 6 times = 148-160-172-188-208-228 tr. Continue pattern until piece measures 35-37-37-38-38-40 cm from marker (= 54-56-58-59-61-63 cm from neck edge), adjust to finish with 1 round tr. Fasten off. SLEEVE: = 46-52-58-60-64-64 tr. Work first round on sleeve with same colour as last stripe in dc on body. Sleeve is worked in the round, top down. Beg by working mid under sleeve as follows: Work 1 dc in the 5th-5th-5th-5th-5th-6th ch of the 8-8-8-10-10-12 ch worked in armhole on body, work 1 ch (= 1 dc), work 1 dc in each of the next 3-3-3-5-5-6 ch, A.1 (i.e. 1 round with dc and ch) over the 46-52-58-60-64-64 tr over sleeve, finish with 1 dc in each of the remaining 4-4-4-4-4-5 ch under sleeve = 54-60-66-70-74-76 sts. Continue piece with light grey. Insert 1 marker in piece, NOW MEASURE PIECE FROM HERE. Work A.1 in the round. When piece measures 3 cm from marker, dec 2 tr under sleeve - READ DECREASE TIP-1. Dec like this every 3-2½-2-2-2-2 cm 11-13-15-17-18-18 times in total = 32-34-36-36-38-40 sts. When piece measures 42-44-43-45-45-47 cm from marker, adjust to finish with 1 round tr. Fasten off. Work the other sleeve the same way. NECK EDGE: Work with light grey from RS as follows: Work 1 dc in every ch where tr was worked in first round (= 84-88-88-96-100-104 dc). Fasten off. ---------------------------------------------------------- HAT: Work piece top down, in STRIPES - see explanation above. Work 4 ch on hook size 3.5 mm with taupe and form a ring with 1 sl st in first ch. Work A.3 – see CROCHET INFO! After the 3 first rounds of A.3 (= 36 tr) repeat A.3 4 times in total on the round. REMEMBER THE CROCHET TENSION! When working last round of A.3, inc 0-2-4 tr evenly = 96-98-100 tr. Piece measures approx. 17 cm in diameter. Then work A.1 over all sts (= 48-49-50 times on round). When piece measures 23-24-25 cm in total from the top, adjust so that last round is a round with tr, work 1 dc in every tr (continue with stripes). Work 3 rounds in total with 1 dc in every st. Piece measures 24-25-26 cm in total from the top. Fasten off. |
||||||||||||||||||||||
Diagram explanations |
||||||||||||||||||||||
|
||||||||||||||||||||||

|
||||||||||||||||||||||
|
||||||||||||||||||||||
|
||||||||||||||||||||||
|
||||||||||||||||||||||
|
Have you made this or any other of our designs? Tag your pictures in social media with #dropsdesign so we can see them! Do you need help with this pattern?You'll find tutorial videos, a Comments/Questions area and more by visiting the pattern on garnstudio.com. © 1982-2024 DROPS Design A/S. We reserve all rights. This document, including all its sub-sections, has copyrights. Read more about what you can do with our patterns at the bottom of each pattern on our site. |
||||||||||||||||||||||


With over 40 years in knitting and crochet design, DROPS Design offers one of the most extensive collections of free patterns on the internet - translated to 17 languages. As of today we count 304 catalogues and 11422 patterns - 11422 of which are translated into English (UK/cm).
We work hard to bring you the best knitting and crochet have to offer, inspiration and advice as well as great quality yarns at incredible prices! Would you like to use our patterns for other than personal use? You can read what you are allowed to do in the Copyright text at the bottom of all our patterns. Happy crafting!
Comments / Questions (107)
Beste ik haak deze trui 173-37 in maat m ik kom niet uit op de steken dat jullie vermelden toer 1 heb ik 88 stk in toer 3 kom ik op 130 st uit en bij jullie staat er 120 ik heb alles na geteld en per rij de totale aantal st op geschreven ronde 1= 88 ronde 2= 104 ronde 3= 130 ronde 4= 152 ronde 5=172 nu weet ik niet doe ik iets verkeerd of hebben jullie de verkeerde aantal steken geschreven want als ik de trui in xl doe dan kloppen de steken verhouding wel met jullie aantal
03.04.2017 - 17:51DROPS Design answered:
Hoi Els, Als je met toer 2 begint, haak je in patroon volgens de telpatronen en begin je op de eerste toer van het telpatroon en dan kom je in toer 3 op 120 uit; Misschien was je begonnen met de toer waar de pijl naast staat in telpatroon A2 en dan meerder je gelijk al in elke herhaling van A2, waardoor je op 130 uitkomt.
04.04.2017 - 09:00Hai, Ik ben na tig dekens en pannenlappen nu aan een echte trui begonnen. Maar volgens mij doe ik het niet goed/snap ik het niet. Het meerderen is dat nou in A1 of in A2? En er staat: A.2 als hiervoor (= 2 keer in de breedte) Wat wordt hiermee bedoeld? En na toer 5 bestaan de toeren dan enkel nog uit A2 of ook nog A1? En hoeveel steken zijn A1 dan elke toer? hopelijk kunnen jullie deze beginneling op weg helpen.
27.02.2017 - 22:11DROPS Design answered:
Hoi Angela. Je meerdert automatisch in A.2 (zie het telpatroon hieronder). En TEGELIJKERTIJD wordt er ook gemeerderd gelijkmatig verdeeld in A.1 (alleen niet in de kleinste maat). Door het meerderen wordt A.2 breder - A.1 blijft het genoemde aantal st hebben
28.02.2017 - 15:58HI, after struggling a lot to undertsand the explanation, i m stuck in 4th row, i have 132 thread as planned after the 3rd ,but how is it possible to make row 4 as if i count it says : a1 16 + a2 (2 times in withd, on top of 16thread) + a1 12 + a2 16 + a1 30 +a2 16+ a1 12+a2 16 + a1 14 = 148.. am i right? well i hope to get some help, thanks in advance.
17.02.2017 - 20:16DROPS Design answered:
Dear Mrs Chauffriat, you have to work A.1 and A.2 as shown in diagram, so work A.1 over the number of sts in A.1, then work A.2 over each A.2 (= 2 times in width). Happy crocheting!
20.02.2017 - 09:15Hei! Jeg har kommet til 11. runde på størrelse L, og det står at jeg skal ha 260 masker når jeg er ferdig med A2. Jeg har allerede 259 masker, men har fulgt oppskriften. Og det er jo flere runder igjen med økninger, så da kommer jeg til å sitte igjen med altfor mange masker. Man skal gjøre det samme på A2 på både L og XL? Har jeg gjort noe feil? Går det an å få en oversikt over hvor mange masker man skal ha for hver runde? På forhånd takk!
29.01.2017 - 11:59DROPS Design answered:
Hej Silje. Jeg kan desvaerre ikke skrive det helt ud. Men du maa tage ud for meget et sted. Du öker i A.2 hele vejen (se diagram for A.2), men samtidig skal du tage ud jaevnt fordelt i A.1. Men laeg maerke til at det gör du kun til og med 5 omg. Herefter tager du kun ud i A.2. Kan det vaere grunden til du har for mange m?
01.02.2017 - 14:39Telt de hv op het einde van de toer ook mee als vervanging van een stk? Eindig ik de eerste toer op 5 stokjes + hv of 6 stokjes en dan een hv?
20.01.2017 - 12:34DROPS Design answered:
Hoi Anja. De hv aan het eind van de toer telt niet mee.
23.01.2017 - 14:48Witam, utknęłam na okrążeniu 3. Nie umiem poradzić sobie z dodawaniem oczek w schemacie A1. Albo mi zostanie oczek do końca robótki, albo mi tych oczek zabraknie. Czy mogłabym prosić o pomoc?
16.01.2017 - 13:21DROPS Design answered:
Witaj Stefanio. KLIKNIJ TUTAJ a znajdziesz jak odczytywać schematy. Dodawane oczka są ujęte w schemacie A.2, musisz tylko przerabiać dokładnie schemat, a oczka zostaną dodane. Podczas wykonywania 3-ciego okrążenia należy równomiernie dodawać oczka ponad oczkami przerabianymi wg schematu A.1 (KLIKNIJ TUTAJ a zobaczysz jak równomiernie dodawać oczka), POWODZENIA!
16.01.2017 - 22:15Liebes Garnstudio-Team, wieder mal eine schöne Anleitung. Eine Frage hätte ich dazu. Werden die Zunahmen ab der Runde 7 auch jeweils 2x in der Breite gearbeitet? oder nur jeweils 1x? Vielen Dank
23.11.2016 - 20:42DROPS Design answered:
Liebe Frau Geppert, die Zunahmen in A.2 stehen im Diagram, dh wenn Sie 2 x A.2 in der Breite häkeln, wiederholen Sie diese Reihe 2 Mal in der Breite. Viel Spaß beim häkeln!
24.11.2016 - 09:34Entschuldigung, aber ich verstehe es immer noch nicht. 1. Reihe hab ich 88 Stäbchen gehäkelt 2. Reihe ist die fm/lm Reihe = 88 Maschen 3. Reihe wäre dann der Teil nach......dann die 2. Rd (= Rd mit fM/Lm) des Musters wie folgt in STREIFEN häkeln ..... Das wären dann Zunahmen von 16 Maschen. Ergibt eine Maschenanzahl von 104 in der 3. Reihe 4. Reihe wäre wieder fm/lm Reihe ergibt wieder 104 Maschen 5. Reihe wäre dann die in der Beschreibung 3. Rd.
21.11.2016 - 14:33DROPS Design answered:
Liebe Frau Sauer, die 2. Runde wird mit fM/Lm im A.1 sowie im A.2 gehäkelt - dann bei der 3. Runde häkeln Sie der 1. R mit Pfeil = Zunahme im A.2 und in A.1, die Zunahmen in A.2 sind im Diagram gezeichnet, die Zunahmen im A.1 müssen Sie wie arbeiten, wie in der Anleitung erklärt. 4. Reihe = mit fM/Lm. Bei der 5. Reihe müssen Sie im A.1 wie erklärt zunhemen und der 5. Reihe in A.2 (mit Zunahmen) arbeiten. Viel Spaß beim häkeln!
21.11.2016 - 15:01Schade das ich keine Antwort auf meine Fragen bekomme. Hätte den Pullover gern weiter gehäkelt.
20.11.2016 - 19:07DROPS Design answered:
Liebe Frau Sauer, siehe Anwort unten. Viel Spaß beim häkeln!
21.11.2016 - 09:56Ich scheitere schon in der 2. Runde. Maschenanzahl nach gehäkelter 2. Runde sind 104 oder 88? Dann heisst es A1 in der Höhe wdh und wie in A2 gezeigt zunehmen. Welche Zunahmen (Pfeil 1 oder 2) muss ich in welcher Runde machen. Dann nach der 5. Runde heisst es im Muster und mit den Zunahmen in A2 weiterarbeiten. Bedeutet das, dass dann in jeder Stäbchenrunde im Muster zugenommen wird oder auch nur in jeder 2. Runde?
19.11.2016 - 11:06DROPS Design answered:
Liebe Frau Sauer, bei der 2. Runden nehmen Sie in jedem A.2 zu, so haben Sie die gleiche Maschenanzahl (Runde 2 = mit fM/Lm) = keine Zunahme. Bei der 3. + 5. R (= Pfeile) müssen Sie dann auch in A.1 zunehmen - wie in der Anleitung erklärt. Dann weiter wie in A.1 und A.2 weiterarbeiten. Viel Spaß beim häkeln!
21.11.2016 - 09:16